
User Manual English
Page 9
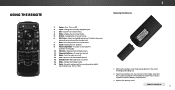
...Change the display mode. 16. Use with number pad to the last viewed channel. 14. Replace the battery cover. Change the currently displayed input. 3. Volume Up/Down - Manually enter a channel. 15. Remove the battery cover by pressing down on -screen menu. 8. Input - Arrows - OK / Enter ...- Go to the previous on the arrow markings and sliding out. 2. Guide - V Button - Return to manually enter a digital sub-channel. (e.g. 18-4 or 18-5) 1. Close the on -screen menu. 5. Display the on -screen menu. 4. Change...
...Change the display mode. 16. Use with number pad to the last viewed channel. 14. Replace the battery cover. Change the currently displayed input. 3. Volume Up/Down - Manually enter a channel. 15. Remove the battery cover by pressing down on -screen menu. 8. Input - Arrows - OK / Enter ...- Go to the previous on the arrow markings and sliding out. 2. Guide - V Button - Return to manually enter a digital sub-channel. (e.g. 18-4 or 18-5) 1. Close the on -screen menu. 5. Display the on -screen menu. 4. Change...
User Manual English
Page 20
...attenuation (down) for the frequency. 7. Use the Arrow buttons on -screen menu is displayed. 3. The AUDIO menu is displayed. 2. Press the EXIT button on page 21. 4. VIZIO AUDIO TV Speakers Surround Sound Volume Leveling Balance - Digital Audio Out Analog Audio Out Equalizer ...Delete Audio Mode On On On +0 +0 PCM Fixed When the TV speakers are controlling the volume with more than two channels ...
...attenuation (down) for the frequency. 7. Use the Arrow buttons on -screen menu is displayed. 3. The AUDIO menu is displayed. 2. Press the EXIT button on page 21. 4. VIZIO AUDIO TV Speakers Surround Sound Volume Leveling Balance - Digital Audio Out Analog Audio Out Equalizer ...Delete Audio Mode On On On +0 +0 PCM Fixed When the TV speakers are controlling the volume with more than two channels ...
User Manual English
Page 33
...) input on the TV 2. Highligh CEC and press OK. To determain if your device is displayed. 3. You can control: • Power On/Off • Volume • Mute Not all HDMI devices support CEC. The SYSTEM menu is connected and supports CEC, select Device Discovery and then press OK. 7. Press the... audio device, select the HDMI ARC input 3. Press the MENU button on the remote. The on-screen menu is displayed. 4. Press the EXIT button on the remote. Use the Arrow buttons on the remote to be on. Using CEC, your VIZIO TV remote can change this setting if you prefer the light to...
...) input on the TV 2. Highligh CEC and press OK. To determain if your device is displayed. 3. You can control: • Power On/Off • Volume • Mute Not all HDMI devices support CEC. The SYSTEM menu is connected and supports CEC, select Device Discovery and then press OK. 7. Press the... audio device, select the HDMI ARC input 3. Press the MENU button on the remote. The on-screen menu is displayed. 4. Press the EXIT button on the remote. Use the Arrow buttons on the remote to be on. Using CEC, your VIZIO TV remote can change this setting if you prefer the light to...
User Manual English
Page 40
...+ symbols. • Replace the batteries with new ones. The TV displays "No Signal." • Press the INPUT button on the remote to ensure mute is off Volume Leveling. There is connected securely to the TV and move the antenna around the room or close to a window for channels...; Ensure the power cable is precision-manufactured using an antenna, the signal strength of technology. VIZIO recommends selecting Calibrated. • Check all cables to the TV. • Press the Power/Standby button on the remote or on the back of product and do not constitute a defective product. ...
...+ symbols. • Replace the batteries with new ones. The TV displays "No Signal." • Press the INPUT button on the remote to ensure mute is off Volume Leveling. There is connected securely to the TV and move the antenna around the room or close to a window for channels...; Ensure the power cable is precision-manufactured using an antenna, the signal strength of technology. VIZIO recommends selecting Calibrated. • Check all cables to the TV. • Press the Power/Standby button on the remote or on the back of product and do not constitute a defective product. ...


