User Manual English
Page 2
...Indicator On or Off 33 Deleting a Custom Picture Mode 17 Using the Reset & Admin Menu 34 Resetting a Picture Mode 17 Restoring the TV to Factory Default Settings 34 Adjusting the Color Tuner Settings 18 Using the Guided Setup Menu 35 Adjusting the Audio Settings 20 Using the ... the USB Media Player 36 Preparing Your USB Drive to Play USB Media 36 Displaying USB Media 36 Removing the USB Drive from the TV 36 Troubleshooting & Technical Support 38 Selecting a Channel Source 23 Scanning for Channels 23 Adding New Channels 23 Specifications 42 Regulatory Information 46 ...
...Indicator On or Off 33 Deleting a Custom Picture Mode 17 Using the Reset & Admin Menu 34 Resetting a Picture Mode 17 Restoring the TV to Factory Default Settings 34 Adjusting the Color Tuner Settings 18 Using the Guided Setup Menu 35 Adjusting the Audio Settings 20 Using the ... the USB Media Player 36 Preparing Your USB Drive to Play USB Media 36 Displaying USB Media 36 Removing the USB Drive from the TV 36 Troubleshooting & Technical Support 38 Selecting a Channel Source 23 Scanning for Channels 23 Adding New Channels 23 Specifications 42 Regulatory Information 46 ...
User Manual English
Page 3
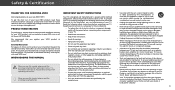
...installation, use this apparatus during the standard warranty period. Safety & Certification THANK YOU FOR CHOOSING VIZIO And congratulations on your TV to smoke. IMPORTANT SAFETY INSTRUCTIONS Your TV is intended to the presence of important operating instructions. To prevent your safety. Keep these instructions.... fire or electric shock. • Slots and openings in accordance with the apparatus. Do not install your TV close to an area of your new VIZIO product, read the accompanying important warning or notice. Doing so could short circuit parts causing a fire or electric...
...installation, use this apparatus during the standard warranty period. Safety & Certification THANK YOU FOR CHOOSING VIZIO And congratulations on your TV to smoke. IMPORTANT SAFETY INSTRUCTIONS Your TV is intended to the presence of important operating instructions. To prevent your safety. Keep these instructions.... fire or electric shock. • Slots and openings in accordance with the apparatus. Do not install your TV close to an area of your new VIZIO product, read the accompanying important warning or notice. Doing so could short circuit parts causing a fire or electric...
User Manual English
Page 4
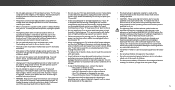
...shall not be replaced when using different • Avoid using dropped or damaged appliances. If water penetrates into your TV during lightning. use your TV. If your dealer immediately. h• The lightning flash with arrowhead symbol within an equilateral triangle is intended to alert... other hazards. For more information, is dropped and the housing is exposed to qualified service personnel. • WARNING: Keep your TV. hearing causing hearing loss and tinnitus (ringing or • Do not overload power strips and extension cords. Continuous • Insert...
...shall not be replaced when using different • Avoid using dropped or damaged appliances. If water penetrates into your TV during lightning. use your TV. If your dealer immediately. h• The lightning flash with arrowhead symbol within an equilateral triangle is intended to alert... other hazards. For more information, is dropped and the housing is exposed to qualified service personnel. • WARNING: Keep your TV. hearing causing hearing loss and tinnitus (ringing or • Do not overload power strips and extension cords. Continuous • Insert...
User Manual English
Page 5
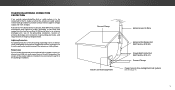
Remember, the screen of the coaxial cable is intended to be connected to the TV, make sure that the antenna or cable system is electrically grounded to provide some protection against voltage surges and static charges. TELEVISION ANTENNA CONNECTION PROTECTION ... Lines Do not locate the antenna near overhead light or power circuits, or where it is left unattended or unused for long periods of the TV during a lightning storm or when it could fall into such power lines or circuits. Lightning Protection For added protection of time, unplug the...
Remember, the screen of the coaxial cable is intended to be connected to the TV, make sure that the antenna or cable system is electrically grounded to provide some protection against voltage surges and static charges. TELEVISION ANTENNA CONNECTION PROTECTION ... Lines Do not locate the antenna near overhead light or power circuits, or where it is left unattended or unused for long periods of the TV during a lightning storm or when it could fall into such power lines or circuits. Lightning Protection For added protection of time, unplug the...
User Manual English
Page 7
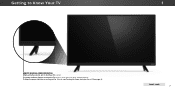
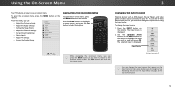
Getting to Know Your TV 1 REMOTE SENSOR & POWER INDICATOR When using the remote, aim it directly at this sensor. The power indicator flashes on when the TV turns on page 33. FRONT PANEL 7 To keep the power indicator on as long as the TV is on, see Turning the Power Indicator On or Off on , then goes out after several seconds.
Getting to Know Your TV 1 REMOTE SENSOR & POWER INDICATOR When using the remote, aim it directly at this sensor. The power indicator flashes on when the TV turns on page 33. FRONT PANEL 7 To keep the power indicator on as long as the TV is on, see Turning the Power Indicator On or Off on , then goes out after several seconds.

User Manual English
Page 8
... a USB thumb drive to access the input menu. HDMI - Note: The image shown here is for illustrative purposes only and may vary, depending on the TV. Optical Audio Out - Connect an HDMI device. Component/Composite - REAR PANEL 8 Connect an HDMI device. Coaxial - Input - Stereo Audio Out- Connect an optical/SPDIF audio...
... a USB thumb drive to access the input menu. HDMI - Note: The image shown here is for illustrative purposes only and may vary, depending on the TV. Optical Audio Out - Connect an HDMI device. Component/Composite - REAR PANEL 8 Connect an HDMI device. Coaxial - Input - Stereo Audio Out- Connect an optical/SPDIF audio...
User Manual English
Page 9
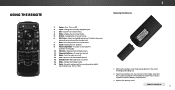
... the (+) and (-) symbols inside the battery compartment. 3. Wide - Change the display mode. 16. Dash - Make sure that the (+) and (-) symbols on or off. 13. Turn TV on -screen menu. 8. Input - Change the currently displayed input. 3. Go to the previous on or Off. 2. Increase or decrease the loudness of the audio. 10...
... the (+) and (-) symbols inside the battery compartment. 3. Wide - Change the display mode. 16. Dash - Make sure that the (+) and (-) symbols on or off. 13. Turn TV on -screen menu. 8. Input - Change the currently displayed input. 3. Go to the previous on or Off. 2. Increase or decrease the loudness of the audio. 10...
User Manual English
Page 10
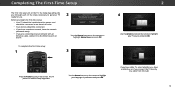
... an electrical outlet. • Your devices should be connected. • If you have a wireless network, have a cable box or if you connect the TV directly to a cable from the wall. 10 Choisissez "Home Use" pour le Mode Domicile ou "Store Demo" pour la Démo en Magasin. To... for in -home use . Seleccione "Home Use" para Modo de Casa o "Store Demo" para Demostración en la Tienda. Select Home Use for use . The TV powers on a1nd the2Setup A3pp starts. 4 5 6 7 8 9 WIDE 0 - 3 Use the Arrow buttons on the remote to highlight your language of preference and press OK. 2...
... an electrical outlet. • Your devices should be connected. • If you have a wireless network, have a cable box or if you connect the TV directly to a cable from the wall. 10 Choisissez "Home Use" pour le Mode Domicile ou "Store Demo" pour la Démo en Magasin. To... for in -home use . Seleccione "Home Use" para Modo de Casa o "Store Demo" para Demostración en la Tienda. Select Home Use for use . The TV powers on a1nd the2Setup A3pp starts. 4 5 6 7 8 9 WIDE 0 - 3 Use the Arrow buttons on the remote to highlight your language of preference and press OK. 2...
User Manual English
Page 11
Use the arrow buttons on the remote to select the input your TV source is connected to highlight Begin Scan and press OK. Otherwise, use the Arrow and OK buttons on the remote to . will need to scan for channels, which takes several minutes. Note: Number of ports may differ by TV. 5 If the TV Signal channel scan screen appears, the TV will appear. The First-Time Setup is complete." When you are finished, the message "Setup is complete. 2 11
Use the arrow buttons on the remote to select the input your TV source is connected to highlight Begin Scan and press OK. Otherwise, use the Arrow and OK buttons on the remote to . will need to scan for channels, which takes several minutes. Note: Number of ports may differ by TV. 5 If the TV Signal channel scan screen appears, the TV will appear. The First-Time Setup is complete." When you are finished, the message "Setup is complete. 2 11
User Manual English
Page 12
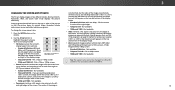
... Network Settings Help While navigating the on the remote to highlight the input you must first change the input source: 1. The selected input is TV displayed. 2. From this menu, you can : • Adjust the Picture settings • Adjust the Audio settings • Setting the Sleep... Timers • Adjust the Channel settings • Set up Closed Captioning • Name Inputs • Adjust TV settings • Access the Guided Setup VIZIO TV SETTINGS Picture Audio Timers Channels CC Closed Captions Devices System Guided Setup To open the on-screen menu, press the MENU...
... Network Settings Help While navigating the on the remote to highlight the input you must first change the input source: 1. The selected input is TV displayed. 2. From this menu, you can : • Adjust the Picture settings • Adjust the Audio settings • Setting the Sleep... Timers • Adjust the Channel settings • Set up Closed Captioning • Name Inputs • Adjust TV settings • Access the Guided Setup VIZIO TV SETTINGS Picture Audio Timers Channels CC Closed Captions Devices System Guided Setup To open the on-screen menu, press the MENU...
User Manual English
Page 13
...are watching widescreen (1.85:1 or 2.35:1) content with black bars to fit the screen. Since the 4:3 aspect ratio is not large enough to fill the TV's screen, black bars are watching widescreen 1.85:1 content, the image will fill a 1080p screen. • Standard Definition - Not available. • ... ratio picture to view and press OK. • Normal preserves the content's original aspect ratio and size. • Standard Definition (480i and 480p-old TV programs) - Not available. • 720p and 720i HD - Press the WIDE button on the top or sides of the screen. • 1080p and...
...are watching widescreen (1.85:1 or 2.35:1) content with black bars to fit the screen. Since the 4:3 aspect ratio is not large enough to fill the TV's screen, black bars are watching widescreen 1.85:1 content, the image will fill a 1080p screen. • Standard Definition - Not available. • ... ratio picture to view and press OK. • Normal preserves the content's original aspect ratio and size. • Standard Definition (480i and 480p-old TV programs) - Not available. • 720p and 720i HD - Press the WIDE button on the top or sides of the screen. • 1080p and...
User Manual English
Page 14
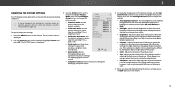
...; Standard mode sets the picture settings to the default settings. • Calibrated mode sets the picture settings to values ideal for watching TV in a dark room. Backlight cannot be too dark to highlight Picture and press OK. Adjusts the black level of picture elements. If...To adjust the picture settings: 1. The PICTURE menu is too low, the picture may appear STlim eeeprfadePidctuorer washed Audio out. • Contrast - VIZIO PICTURE Picture Mode Auto Brightness Control Backlight - Adjusts the white level of the picture. • Color - Use the Arrow buttons on the remote...
...; Standard mode sets the picture settings to the default settings. • Calibrated mode sets the picture settings to values ideal for watching TV in a dark room. Backlight cannot be too dark to highlight Picture and press OK. Adjusts the black level of picture elements. If...To adjust the picture settings: 1. The PICTURE menu is too low, the picture may appear STlim eeeprfadePidctuorer washed Audio out. • Contrast - VIZIO PICTURE Picture Mode Auto Brightness Control Backlight - Adjusts the white level of the picture. • Color - Use the Arrow buttons on the remote...
User Manual English
Page 18
... button. 3. Press the OK button to turn color channels off or on : 1. From the Color Tuner menu, use the Arrow buttons to manually calibrate the TV. 3 Adjusting the Color Tuner Settings The Color Tuner settings allow technicians to highlight Color Tuner, and then press OK. To turn off and on . The...
... button. 3. Press the OK button to turn color channels off or on : 1. From the Color Tuner menu, use the Arrow buttons to manually calibrate the TV. 3 Adjusting the Color Tuner Settings The Color Tuner settings allow technicians to highlight Color Tuner, and then press OK. To turn off and on . The...
User Manual English
Page 20
...the display image and the accompanying audio track. • Digital Audio Out - Press the EXIT button on page 21. 4. VIZIO AUDIO TV Speakers Surround Sound Volume Leveling Balance - TruSurround completes the entertainment experience by providing deep, rich bass and by delivering crisp details and... surround sound experience from the left and right speakers. • Lip Sync - Wide ZYooomu muNosrtmsalelePacntoBraimtisctream for audio with ABC the TV's volume controls, or select Fixed if an external audio device (sound bar or AV receiver) will control the volume. The on...
...the display image and the accompanying audio track. • Digital Audio Out - Press the EXIT button on page 21. 4. VIZIO AUDIO TV Speakers Surround Sound Volume Leveling Balance - TruSurround completes the entertainment experience by providing deep, rich bass and by delivering crisp details and... surround sound experience from the left and right speakers. • Lip Sync - Wide ZYooomu muNosrtmsalelePacntoBraimtisctream for audio with ABC the TV's volume controls, or select Fixed if an external audio device (sound bar or AV receiver) will control the volume. The on...
User Manual English
Page 21
Use the Arrow buttons on -screen menu is displayed. 3. The TV displays, "To delete the user created custom audio mode, select the Delete button." 4. Highlight Delete and press OK. 5. The AUDIO menu is displayed. 2. Use the Arrow buttons to highlight Audio and press OK. Press the EXIT button on the remote. The on the remote to highlight Delete Audio Mode and press OK. Deleting the Custom Audio Mode To delete the custom audio mode that has been created: 1. Press the MENU button on the remote. 3 21
Use the Arrow buttons on -screen menu is displayed. 3. The TV displays, "To delete the user created custom audio mode, select the Delete button." 4. Highlight Delete and press OK. 5. The AUDIO menu is displayed. 2. Use the Arrow buttons to highlight Audio and press OK. Press the EXIT button on the remote. The on the remote to highlight Delete Audio Mode and press OK. Deleting the Custom Audio Mode To delete the custom audio mode that has been created: 1. Press the MENU button on the remote. 3 21
User Manual English
Page 22
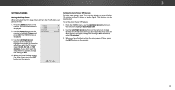
... button on the remote to highlight the period of time. 1. ABC Input Wide CC Sleep Timer Picture Audio Network Settings Help 3 22 VIZIO TIMERS Sleep Timer Auto Power Off Off 10 minutes 3. Use the Left/Right Arrow buttons on the remote. Setting the Auto Power Off ... to highlight Timers and press OK. WUidsee thZoeom Left/NRorimgahl t PAarnroroawmicbuttons on the remote. SETTING TIMERS Setting the Sleep Timer When activated, the TV's sleep timer will turn off. The TIMERS menu is displayed. 2. Use the Arrow buttons on -screen menu is displayed. The on the ...
... button on the remote to highlight the period of time. 1. ABC Input Wide CC Sleep Timer Picture Audio Network Settings Help 3 22 VIZIO TIMERS Sleep Timer Auto Power Off Off 10 minutes 3. Use the Left/Right Arrow buttons on the remote. Setting the Auto Power Off ... to highlight Timers and press OK. WUidsee thZoeom Left/NRorimgahl t PAarnroroawmicbuttons on the remote. SETTING TIMERS Setting the Sleep Timer When activated, the TV's sleep timer will turn off. The TIMERS menu is displayed. 2. Use the Arrow buttons on -screen menu is displayed. The on the ...
User Manual English
Page 23
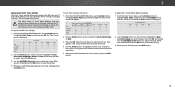
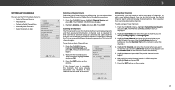
3 SETTING UP CHANNELS You can use the TV's Channels menu to: • Select a Channel Source • Find Channels • Perform a Partial Channel Scan • Manually Add Channels • Select channels to skip VIZIO CHANNELS Channels not searched Channel Source Find Channel Partial Channel... SEARCH menu is 100% complete. EWxitait un2tDil the p3ADaBCrtial channel search is displayed. 2. A channel scan is quicker than scanning all channels. VIZIO FIND CHANNELS Channels Found Digital: 0 Analog: 19 18% Complete Cancel 3. If the channel scan is 100% complete. To add a range...
3 SETTING UP CHANNELS You can use the TV's Channels menu to: • Select a Channel Source • Find Channels • Perform a Partial Channel Scan • Manually Add Channels • Select channels to skip VIZIO CHANNELS Channels not searched Channel Source Find Channel Partial Channel... SEARCH menu is 100% complete. EWxitait un2tDil the p3ADaBCrtial channel search is displayed. 2. A channel scan is quicker than scanning all channels. VIZIO FIND CHANNELS Channels Found Digital: 0 Analog: 19 18% Complete Cancel 3. If the channel scan is 100% complete. To add a range...
User Manual English
Page 24
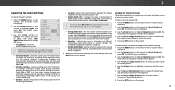
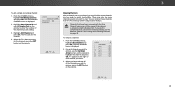
... CHANNELS menu, highlight Add Analog Channel and press OK. Highlight Enter Channel # and use the parentalAcBoC ntrols. You can still be some channels are adding. 3. VIZIO SKIP CHANNEL 1 Test 0 1 Test 1 P 1-2 Test 2 P 2 Test 3 2-2 Test 4 P 2-3 Test 5 3. When you wish to completely block a channel from being viewed...3D ABC Input Wide CC Sleep Timer Picture Audio Network Settings Help 3 24 To add a single new analog channel: 1. The TV scans for the channel, press the EXIT button on the remote to enter the number of each channel you have been removed ...
... CHANNELS menu, highlight Add Analog Channel and press OK. Highlight Enter Channel # and use the parentalAcBoC ntrols. You can still be some channels are adding. 3. VIZIO SKIP CHANNEL 1 Test 0 1 Test 1 P 1-2 Test 2 P 2 Test 3 2-2 Test 4 P 2-3 Test 5 3. When you wish to completely block a channel from being viewed...3D ABC Input Wide CC Sleep Timer Picture Audio Network Settings Help 3 24 To add a single new analog channel: 1. The TV scans for the channel, press the EXIT button on the remote to enter the number of each channel you have been removed ...
User Manual English
Page 25
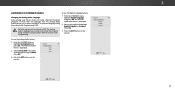
...secondary audio programming), or Mono. Press OK. 3. Press the EXIT button on the remote. Press the EXIT button on the remote. The TV's Analog Audio feature allows you to listen to audio in SAP. The Analog Audio Language feature only works when the program being viewed is ...displayed. 2. LISTENING TO ALTERNATE AUDIO To use the Analog Audio feature: 1. VIZIO ANALOG AUDIO Stereo SAP Mono Wide Zoom Normal Panoramic Exit 2D 3D ABC Input Wide CC VIZIO DIGITAL LANGUAGE English Español Français Sleep Timer Picture Audio Network Settings Help...
...secondary audio programming), or Mono. Press OK. 3. Press the EXIT button on the remote. Press the EXIT button on the remote. The TV's Analog Audio feature allows you to listen to audio in SAP. The Analog Audio Language feature only works when the program being viewed is ...displayed. 2. LISTENING TO ALTERNATE AUDIO To use the Analog Audio feature: 1. VIZIO ANALOG AUDIO Stereo SAP Mono Wide Zoom Normal Panoramic Exit 2D 3D ABC Input Wide CC VIZIO DIGITAL LANGUAGE English Español Français Sleep Timer Picture Audio Network Settings Help...
User Manual English
Page 26
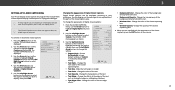
... 1. Changing the Appearance of Digital Closed Captions Digital closed captions: 1. Use the Left/Right Arrow buttons on the remote. VIZIO DIGITAL STYLE Caption Style Text Style Text Size Text Color Text Opacity Text Edges Custom As Broadcast Large Green As Broadcast As ...the opacity of the closed captioning box. 4. 3 SETTING UP CLOSED CAPTIONING Your TV can be displayed according to your preference. Closed captions display a transcription of the text. • Text Opacity - VIZIO CLOSED CAPTIONS Closed Captions Analog Closed Captions Digital Closed Captions Digital Style Off CC1 ...
... 1. Changing the Appearance of Digital Closed Captions Digital closed captions: 1. Use the Left/Right Arrow buttons on the remote. VIZIO DIGITAL STYLE Caption Style Text Style Text Size Text Color Text Opacity Text Edges Custom As Broadcast Large Green As Broadcast As ...the opacity of the closed captioning box. 4. 3 SETTING UP CLOSED CAPTIONING Your TV can be displayed according to your preference. Closed captions display a transcription of the text. • Text Opacity - VIZIO CLOSED CAPTIONS Closed Captions Analog Closed Captions Digital Closed Captions Digital Style Off CC1 ...


