User Guide
Page 2
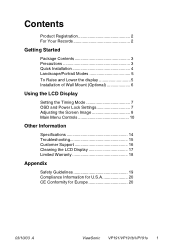
...2 For Your Records 2 Getting Started Package Contents 3 Precautions 3 Quick Installation 4 Landscape/Portrait Modes 5 To Raise and Lower the display 5 Installation of Wall Mount (Optional 6 Using the LCD Display Setting the Timing Mode 7 OSD and Power Lock Settings 7 Adjusting the Screen Image 8 Main Menu Controls 10 Other Information Specifications 14 Troubleshooting 15 Customer Support 16 Cleaning the LCD Display 17 Limited Warranty 18 Appendix Safety Guidelines 19 Compliance Information for U.S.A 20 CE Conformity for Europe 20 03/10/03 A ViewSonic VP191/VP191b/VP191s 1
...2 For Your Records 2 Getting Started Package Contents 3 Precautions 3 Quick Installation 4 Landscape/Portrait Modes 5 To Raise and Lower the display 5 Installation of Wall Mount (Optional 6 Using the LCD Display Setting the Timing Mode 7 OSD and Power Lock Settings 7 Adjusting the Screen Image 8 Main Menu Controls 10 Other Information Specifications 14 Troubleshooting 15 Customer Support 16 Cleaning the LCD Display 17 Limited Warranty 18 Appendix Safety Guidelines 19 Compliance Information for U.S.A 20 CE Conformity for Europe 20 03/10/03 A ViewSonic VP191/VP191b/VP191s 1
User Guide
Page 3
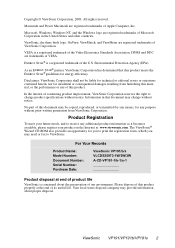
... on the Internet at end of its useful life. For Your Records Product Name: Model Number: Document Number: Serial Number: Purchase Date: ViewSonic VP191/b/s VLCDS25973-1W/2W/3W A-CD-VP191-1/b-1/s-1 Product disposal at : www.viewsonic.com. ENERGY STAR® is a registered trademark of the Video Electronics Standards Association. As an ENERGY STAR® partner, ViewSonic Corporation has determined that this product meets...
... on the Internet at end of its useful life. For Your Records Product Name: Model Number: Document Number: Serial Number: Purchase Date: ViewSonic VP191/b/s VLCDS25973-1W/2W/3W A-CD-VP191-1/b-1/s-1 Product disposal at : www.viewsonic.com. ENERGY STAR® is a registered trademark of the Video Electronics Standards Association. As an ENERGY STAR® partner, ViewSonic Corporation has determined that this product meets...
User Guide
Page 4
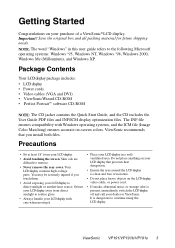
... using the LCD display. ViewSonic VP191/VP191b/VP191s 3 Important! The INF file ensures compatibility with care when moving it. • Place your dealer or ViewSonic. Package Contents Your LCD display package includes: • LCD display • Power cords • Video cables (VGA and DVI) • ViewSonicWizard CD-ROM • Perfect PortraitTM software CD-ROM NOTE: The CD jacket contains the Quick Start Guide, and the CD includes the User Guide PDF files and INF/ICM display optimization...
... using the LCD display. ViewSonic VP191/VP191b/VP191s 3 Important! The INF file ensures compatibility with care when moving it. • Place your dealer or ViewSonic. Package Contents Your LCD display package includes: • LCD display • Power cords • Video cables (VGA and DVI) • ViewSonicWizard CD-ROM • Perfect PortraitTM software CD-ROM NOTE: The CD jacket contains the Quick Start Guide, and the CD includes the User Guide PDF files and INF/ICM display optimization...
User Guide
Page 5
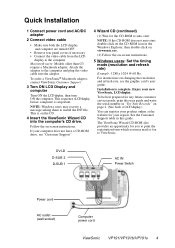
... adapter, contact ViewSonic Customer Support. 3 Turn ON LCD Display and computer Turn ON the LCD display, then turn ON the computer. If your new ViewSonic, LCD display. DVI-D D-SUB 2 D-SUB 1 AC IN Power Switch Power cord AC outlet (wall socket) Computer power cord ViewSonic VP191/VP191b/VP191s 4 Quick Installation 1 Connect power cord and AC/DC adapter 2 Connect video cable • Make sure both the LCD display and computer are turned OFF • Remove rear panel covers if necessary • Connect the video cable from the LCD display to the computer Macintosh users: Models older...
... adapter, contact ViewSonic Customer Support. 3 Turn ON LCD Display and computer Turn ON the LCD display, then turn ON the computer. If your new ViewSonic, LCD display. DVI-D D-SUB 2 D-SUB 1 AC IN Power Switch Power cord AC outlet (wall socket) Computer power cord ViewSonic VP191/VP191b/VP191s 4 Quick Installation 1 Connect power cord and AC/DC adapter 2 Connect video cable • Make sure both the LCD display and computer are turned OFF • Remove rear panel covers if necessary • Connect the video cable from the LCD display to the computer Macintosh users: Models older...
User Guide
Page 6
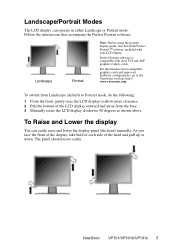
... Portrait mode. Landscape/Portrait Modes The LCD display can easily raise and lower the display panel (the head) manually. Follow the instructions that accompany the Perfect Portrait software. ViewSonic VP191/VP191b/VP191s 5 For information about compatible graphics cards and approved hardware configurations, go to the ViewSonic website, http:// www.viewsonic.com To switch from Landscape (default) to Portrait mode, do the following: 1 From the front, gently raise the LCD display to...
... Portrait mode. Landscape/Portrait Modes The LCD display can easily raise and lower the display panel (the head) manually. Follow the instructions that accompany the Perfect Portrait software. ViewSonic VP191/VP191b/VP191s 5 For information about compatible graphics cards and approved hardware configurations, go to the ViewSonic website, http:// www.viewsonic.com To switch from Landscape (default) to Portrait mode, do the following: 1 From the front, gently raise the LCD display to...

User Guide
Page 7
... the LCD display. ViewSonic VP191/VP191b/VP191s 6 Refer to a wall-mounted display, do the following the instructions in the wall-mounting kit. Notice the four screws. 4 Remove the four screws from the back plate. 5 Attach the mounting bracket from the VESA compatible wallmounting kit (100 mm x 100 mm distance). 6 Attach the LCD display to the wall, following : Remove four screws 1 Disconnect Power. 2 Lay the LCD display face down on the left. Installation of Wall Mount (Optional) To obtain a wall-mounting...
... the LCD display. ViewSonic VP191/VP191b/VP191s 6 Refer to a wall-mounted display, do the following the instructions in the wall-mounting kit. Notice the four screws. 4 Remove the four screws from the back plate. 5 Attach the mounting bracket from the VESA compatible wallmounting kit (100 mm x 100 mm distance). 6 Attach the LCD display to the wall, following : Remove four screws 1 Disconnect Power. 2 Lay the LCD display face down on the left. Installation of Wall Mount (Optional) To obtain a wall-mounting...
User Guide
Page 8
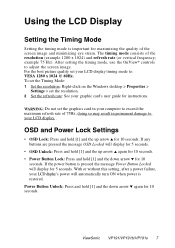
... setting, after a power failure, your LCD display timing mode to adjust the screen image. example 75 Hz). Power Button Unlock: Press and hold [1] and the up arrow ▲ for instructions. For the best picture quality set the resolution. 2 Set the refresh rate: See your LCD display . doing so may result in your computer to your graphic card's user guide for 10 seconds. To set the Timing Mode: 1 Set the resolution: Right-click on the Windows desktop > Properties > Settings > set your LCD display's power will display...
... setting, after a power failure, your LCD display timing mode to adjust the screen image. example 75 Hz). Power Button Unlock: Press and hold [1] and the up arrow ▲ for instructions. For the best picture quality set the resolution. 2 Set the refresh rate: See your LCD display . doing so may result in your computer to your graphic card's user guide for 10 seconds. To set the Timing Mode: 1 Set the resolution: Right-click on the Windows desktop > Properties > Settings > set your LCD display's power will display...

User Guide
Page 9
Adjusting the Screen Image Use the buttons on the front control panel to display the Contrast adjustment control screen. Also toggles between two controls on the screen. Main Menu with OnView controls Front Control Panel shown below in "Main Menu Controls" on page 9. Power light Green = ON Orange = Power Saving Power On/Off ViewSonic VP191/VP191b/VP191s 8 Also a shortcut to display and adjust the OnView® controls which display on some screens. The OnView controls are explained at the top of the next page and are...
Adjusting the Screen Image Use the buttons on the front control panel to display the Contrast adjustment control screen. Also toggles between two controls on the screen. Main Menu with OnView controls Front Control Panel shown below in "Main Menu Controls" on page 9. Power light Green = ON Orange = Power Saving Power On/Off ViewSonic VP191/VP191b/VP191s 8 Also a shortcut to display and adjust the OnView® controls which display on some screens. The OnView controls are explained at the top of the next page and are...
User Guide
Page 10
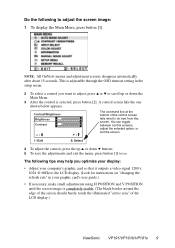
... OSD timeout setting in the setup menu. 2 To select a control you optimize your display: • Adjust your computer's graphic card so that it outputs a video signal 1280 x 1024 @ 60Hz to the LCD display. (Look for instructions on "changing the refresh rate" in your graphic card's user guide.) • If necessary, make small adjustments using H POSITION and V POSITION until the screen image is selected, press button [2]. The following to adjust the screen image: 1 To display the Main Menu, press button [1]. Do the following tips may help...
... OSD timeout setting in the setup menu. 2 To select a control you optimize your display: • Adjust your computer's graphic card so that it outputs a video signal 1280 x 1024 @ 60Hz to the LCD display. (Look for instructions on "changing the refresh rate" in your graphic card's user guide.) • If necessary, make small adjustments using H POSITION and V POSITION until the screen image is selected, press button [2]. The following to adjust the screen image: 1 To display the Main Menu, press button [1]. Do the following tips may help...

User Guide
Page 11
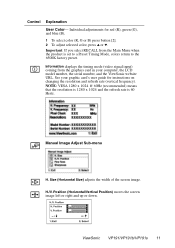
Brightness adjusts background black level of the screen image. Color Adjust provides several color adjustment modes: preset color temperatures and RGB which allows you have more than one computer connected to adjust red (R), green (G), and blue (B) separately. ViewSonic VP191/VP191b/VP191s 10 Input Select toggles between the image background (black level) and the foreground (white level). The factory setting for a darker color. Adds red to the screen image for cooler white (used in most office settings with fluorescent lighting). 6500K - Adds blue to the screen image ...
Brightness adjusts background black level of the screen image. Color Adjust provides several color adjustment modes: preset color temperatures and RGB which allows you have more than one computer connected to adjust red (R), green (G), and blue (B) separately. ViewSonic VP191/VP191b/VP191s 10 Input Select toggles between the image background (black level) and the foreground (white level). The factory setting for a darker color. Adds red to the screen image for cooler white (used in most office settings with fluorescent lighting). 6500K - Adds blue to the screen image ...
User Guide
Page 12
..., the LCD model number, the serial number, and the ViewSonic website URL. Size (Horizontal Size) adjusts the width of the screen image. H./V. ViewSonic VP191/VP191b/VP191s 11 Position (Horizontal/Vertical Position) moves the screen image left or right and up or down. Information displays the timing mode (video signal input) coming from the Main Menu when the product is 60 Hertz. Manual Image Adjust Sub-menu H. Important: If you select RECALL from the graphics card in your graphic card's user guide for red (R), green (G), and blue (B). 1 To select color...
..., the LCD model number, the serial number, and the ViewSonic website URL. Size (Horizontal Size) adjusts the width of the screen image. H./V. ViewSonic VP191/VP191b/VP191s 11 Position (Horizontal/Vertical Position) moves the screen image left or right and up or down. Information displays the timing mode (video signal input) coming from the Main Menu when the product is 60 Hertz. Manual Image Adjust Sub-menu H. Important: If you select RECALL from the graphics card in your graphic card's user guide for red (R), green (G), and blue (B). 1 To select color...
User Guide
Page 13
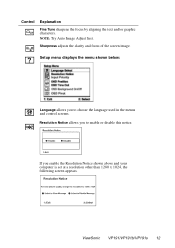
Sharpness adjusts the clarity and focus of the screen image. ViewSonic VP191/VP191b/VP191s 12 Resolution Notice allows you to choose the language used in the menus and control screens. Control Explanation Fine Tune sharpens the focus by aligning the text and/or graphic characters. Setup menu displays the menu shown below: Language allows you enable the Resolution Notice shown above and your computer is set at a resolution other than 1280 x 1024, the following screen appears. If you to enable or disable this notice. NOTE: Try Auto Image Adjust first.
Sharpness adjusts the clarity and focus of the screen image. ViewSonic VP191/VP191b/VP191s 12 Resolution Notice allows you to choose the language used in the menus and control screens. Control Explanation Fine Tune sharpens the focus by aligning the text and/or graphic characters. Setup menu displays the menu shown below: Language allows you enable the Resolution Notice shown above and your computer is set at a resolution other than 1280 x 1024, the following screen appears. If you to enable or disable this notice. NOTE: Try Auto Image Adjust first.

User Guide
Page 14
... . ViewSonic VP191/VP191b/VP191s 13 If there is no video signal on the front panel controls. The Input Priority setting can be switched quickly by pressing the "Up" arrow button on D-SUB1, then the next priority will be given to D-SUB-2, etc... Control Explanation Input Priority If multiple computers will be connected to the display, this function can be used to rotate the OSD menu, when the display is changed from...
... . ViewSonic VP191/VP191b/VP191s 13 If there is no video signal on the front panel controls. The Input Priority setting can be switched quickly by pressing the "Up" arrow button on D-SUB1, then the next priority will be given to D-SUB-2, etc... Control Explanation Input Priority If multiple computers will be connected to the display, this function can be used to rotate the OSD menu, when the display is changed from...
User Guide
Page 15
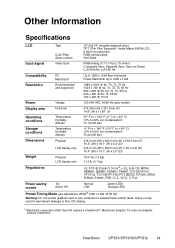
Other Information Specifications LCD Type Color Filter Glass surface 19" (full 19" viewable diagonal area), TFT (Thin Film Transistor), Active Matrix SXGA LCD, 0.294 mm pixel pitch RGB vertical stripe Anti-Glare Input signal Video Sync Compatibility PC Macintosh1 RGB analog (0.7/1.0 Vp-p, 75 ohms) Composite Sync, Separate Sync, Sync on Green fh:30-82 kHz, fv:50-85 Hz Up to 1280 x 1024 Non-interlaced Power Macintosh up to 1280 x 1024 Resolution Recommended and...
Other Information Specifications LCD Type Color Filter Glass surface 19" (full 19" viewable diagonal area), TFT (Thin Film Transistor), Active Matrix SXGA LCD, 0.294 mm pixel pitch RGB vertical stripe Anti-Glare Input signal Video Sync Compatibility PC Macintosh1 RGB analog (0.7/1.0 Vp-p, 75 ohms) Composite Sync, Separate Sync, Sync on Green fh:30-82 kHz, fv:50-85 Hz Up to 1280 x 1024 Non-interlaced Power Macintosh up to 1280 x 1024 Resolution Recommended and...
User Guide
Page 16
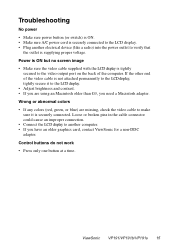
Wrong or abnormal colors • If any colors (red, green, or blue) are using an Macintosh older than G3, you need a Macintosh adapter. Troubleshooting No power • Make sure power button (or switch) is ON. • Make sure A/C power cord is securely connected to the LCD display. • Plug another computer. • If you are missing, check the video cable to make sure it to verify that the outlet is securely connected. ViewSonic VP191/VP191b/VP191s 15 If the other...
Wrong or abnormal colors • If any colors (red, green, or blue) are using an Macintosh older than G3, you need a Macintosh adapter. Troubleshooting No power • Make sure power button (or switch) is ON. • Make sure A/C power cord is securely connected to the LCD display. • Plug another computer. • If you are missing, check the video cable to make sure it to verify that the outlet is securely connected. ViewSonic VP191/VP191b/VP191s 15 If the other...
User Guide
Page 17
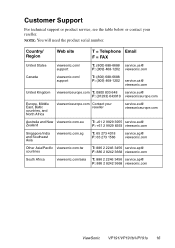
... States viewsonic.com/ support T: (800) 688-6688 service.us@ F: (909) 468-1202 viewsonic.com Canada viewsonic.com/ support T: (800) 688-6688 F: (909) 468-1202 service.ca@ viewsonic.com United Kingdom viewsoniceurope.com T: 0800 833 648 service.eu@ F: (01293) 643910 viewsoniceurope.com Europe, Middle East, Baltic countries, and North Africa viewsoniceurope.com Contact your reseller. NOTE: You will need the product serial number.
... States viewsonic.com/ support T: (800) 688-6688 service.us@ F: (909) 468-1202 viewsonic.com Canada viewsonic.com/ support T: (800) 688-6688 F: (909) 468-1202 service.ca@ viewsonic.com United Kingdom viewsoniceurope.com T: 0800 833 648 service.eu@ F: (01293) 643910 viewsoniceurope.com Europe, Middle East, Baltic countries, and North Africa viewsoniceurope.com Contact your reseller. NOTE: You will need the product serial number.
User Guide
Page 18
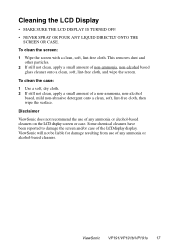
... ammonia or alcohol-based cleaners on the LCD display screen or case. To clean the screen: 1 Wipe the screen with a clean, soft, lint-free cloth. ViewSonic will not be liable for damage resulting from use of the LCD display display. Cleaning the LCD Display • MAKE SURE THE LCD DISPLAY IS TURNED OFF. • NEVER SPRAY OR POUR ANY LIQUID DIRECTLY ONTO THE SCREEN OR CASE. ViewSonic VP191/VP191b/VP191s 17 This removes dust and other...
... ammonia or alcohol-based cleaners on the LCD display screen or case. To clean the screen: 1 Wipe the screen with a clean, soft, lint-free cloth. ViewSonic will not be liable for damage resulting from use of the LCD display display. Cleaning the LCD Display • MAKE SURE THE LCD DISPLAY IS TURNED OFF. • NEVER SPRAY OR POUR ANY LIQUID DIRECTLY ONTO THE SCREEN OR CASE. ViewSonic VP191/VP191b/VP191s 17 This removes dust and other...
User Guide
Page 19
... need to provide your address, (d) a description of the problem, and (e) the serial number of incidental or consequential damages, so the above limitations and exclusions may not apply to an authorized ViewSonic service center or ViewSonic. 4. ANY CLAIM AGAINST THE CUSTOMER BY ANY OTHER PARTY. Damage, deterioration or malfunction resulting from state to follow instructions supplied with a like product. Removal, installation, and set...
... need to provide your address, (d) a description of the problem, and (e) the serial number of incidental or consequential damages, so the above limitations and exclusions may not apply to an authorized ViewSonic service center or ViewSonic. 4. ANY CLAIM AGAINST THE CUSTOMER BY ANY OTHER PARTY. Damage, deterioration or malfunction resulting from state to follow instructions supplied with a like product. Removal, installation, and set...

User Guide
Page 20
... coloured GREEN or GREEN-AND-YELLOW. AC PLUG CORD PRECAUTIONS FOR THE UNITED KINGDOM FOR YOUR SAFETY PLEASE READ THE FOLLOWING TEXT CAREFULLY. CAUTION: Use a power cable that will appear on the outer sheath, or on a desk or table, type SVT or SJT cord sets may be used. SEV Britain BASE/BS Japan Electric Appliance Control Act IMPORTANT NOTICE CONCERNING POWER CORD SELECTION The power cord set...
... coloured GREEN or GREEN-AND-YELLOW. AC PLUG CORD PRECAUTIONS FOR THE UNITED KINGDOM FOR YOUR SAFETY PLEASE READ THE FOLLOWING TEXT CAREFULLY. CAUTION: Use a power cable that will appear on the outer sheath, or on a desk or table, type SVT or SJT cord sets may be used. SEV Britain BASE/BS Japan Electric Appliance Control Act IMPORTANT NOTICE CONCERNING POWER CORD SELECTION The power cord set...

User Guide
Page 21
... to which can radiate radio frequency energy, and if not installed and used , use grounded power supply cord and the provided shielded video interface cable with the instructions, may cause harmful interference to part 15 of the following measures: • Reorient or relocate the receiving antenna. • Increase the separation between the equipment and receiver. • Connect the equipment into an outlet...
... to which can radiate radio frequency energy, and if not installed and used , use grounded power supply cord and the provided shielded video interface cable with the instructions, may cause harmful interference to part 15 of the following measures: • Reorient or relocate the receiving antenna. • Increase the separation between the equipment and receiver. • Connect the equipment into an outlet...


