User Guide
Page 5
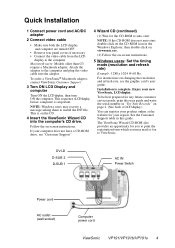
...does not auto-start . To be best prepared for your region. To order a ViewSonic® Macintosh adapter, contact ViewSonic Customer Support. 3 Turn ON LCD Display and computer Turn ON the LCD display, then turn ON the computer. This sequence (LCDdisplay before computer) is complete. ... Switch Power cord AC outlet (wall socket) Computer power cord ViewSonic VP191/VP191b/VP191s 4 Installation is important. Follow the on the CD. 4 Insert the ViewSonic Wizard CD into the adapter. This is on -screen instructions. The ViewSonic Wizard CD-ROM also provides an opportunity for the CD-ROM ...
...does not auto-start . To be best prepared for your region. To order a ViewSonic® Macintosh adapter, contact ViewSonic Customer Support. 3 Turn ON LCD Display and computer Turn ON the LCD display, then turn ON the computer. This sequence (LCDdisplay before computer) is complete. ... Switch Power cord AC outlet (wall socket) Computer power cord ViewSonic VP191/VP191b/VP191s 4 Installation is important. Follow the on the CD. 4 Insert the ViewSonic Wizard CD into the adapter. This is on -screen instructions. The ViewSonic Wizard CD-ROM also provides an opportunity for the CD-ROM ...
User Guide
Page 6
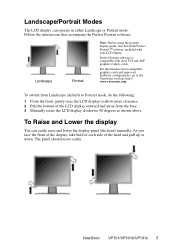
... mode. ViewSonic VP191/VP191b/VP191s 5 As you face the front of the display, take hold of each side of the LCD display outward and away from Landscape (default) to Portrait mode, do the following: 1 From the front, gently raise the LCD display to the ViewSonic website, http:// www.viewsonic.com To...mode, first install the Perfect PortraitTM software included with most PCI and AGP graphics (video) cards. Landscape/Portrait Modes The LCD display can easily raise and lower the display panel (the head) manually. Follow the instructions that accompany the Perfect Portrait software.
... mode. ViewSonic VP191/VP191b/VP191s 5 As you face the front of the display, take hold of each side of the LCD display outward and away from Landscape (default) to Portrait mode, do the following: 1 From the front, gently raise the LCD display to the ViewSonic website, http:// www.viewsonic.com To...mode, first install the Perfect PortraitTM software included with most PCI and AGP graphics (video) cards. Landscape/Portrait Modes The LCD display can easily raise and lower the display panel (the head) manually. Follow the instructions that accompany the Perfect Portrait software.

User Guide
Page 7
... to the wall, following : Remove four screws 1 Disconnect Power. 2 Lay the LCD display face down on the left. To convert your local dealer. ViewSonic VP191/VP191b/VP191s 6 Let the plate hang on the neck of the LCD display as shown on a towel or blanket. 3 Pull the back plate away from... the head of Wall Mount (Optional) To obtain a wall-mounting kit, contact ViewSonic or your LCD display from the VESA compatible wallmounting kit (100 mm x 100 mm distance). 6 Attach the LCD display to the instructions that come with the base mounting kit. Notice the four screws. 4 Remove the...
... to the wall, following : Remove four screws 1 Disconnect Power. 2 Lay the LCD display face down on the left. To convert your local dealer. ViewSonic VP191/VP191b/VP191s 6 Let the plate hang on the neck of the LCD display as shown on a towel or blanket. 3 Pull the back plate away from... the head of Wall Mount (Optional) To obtain a wall-mounting kit, contact ViewSonic or your LCD display from the VESA compatible wallmounting kit (100 mm x 100 mm distance). 6 Attach the LCD display to the instructions that come with the base mounting kit. Notice the four screws. 4 Remove the...
User Guide
Page 8
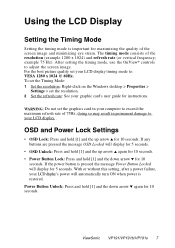
...; for instructions. Power Button Unlock: Press and hold [1] and the down arrow ▼ again for 10 seconds. To set the Timing Mode: 1 Set the resolution: Right-click on the Windows desktop > Properties > Settings > set the resolution. 2 Set the refresh rate: See your LCD display . ViewSonic VP191/VP191b/VP191s 7 OSD... the timing mode, use the OnView® controls to exceed the maximum refresh rate of 75Hz; WARNING: Do not set your LCD display timing mode to your graphic card's user guide for 10 seconds. If the power button is pressed the message Power Button ...
...; for instructions. Power Button Unlock: Press and hold [1] and the down arrow ▼ again for 10 seconds. To set the Timing Mode: 1 Set the resolution: Right-click on the Windows desktop > Properties > Settings > set the resolution. 2 Set the refresh rate: See your LCD display . ViewSonic VP191/VP191b/VP191s 7 OSD... the timing mode, use the OnView® controls to exceed the maximum refresh rate of 75Hz; WARNING: Do not set your LCD display timing mode to your graphic card's user guide for 10 seconds. If the power button is pressed the message Power Button ...
User Guide
Page 10
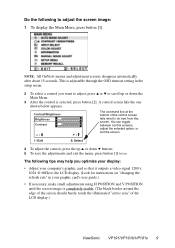
...help you optimize your display: • Adjust your computer's graphic card so that it outputs a video signal 1280 x 1024 @ 60Hz to the LCD display. (Look for instructions on "changing the refresh rate" in the setup menu. 2 To select a control you want to adjust, press ▲ or ▼ to... illuminated "active area" of the control screen tells what to do next from this screen. The command line at the bottom of the LCD display.) ViewSonic VP191/VP191b/VP191s 9 You can toggle between control screens, adjust the selected option, or exit the screen. 4 To adjust the control, press the up...
...help you optimize your display: • Adjust your computer's graphic card so that it outputs a video signal 1280 x 1024 @ 60Hz to the LCD display. (Look for instructions on "changing the refresh rate" in the setup menu. 2 To select a control you want to adjust, press ▲ or ▼ to... illuminated "active area" of the control screen tells what to do next from this screen. The command line at the bottom of the LCD display.) ViewSonic VP191/VP191b/VP191s 9 You can toggle between control screens, adjust the selected option, or exit the screen. 4 To adjust the control, press the up...
User Guide
Page 12
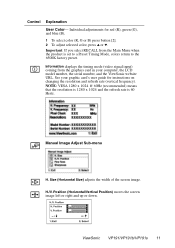
... adjusts the width of the screen image. Control Explanation User Color- See your computer, the LCD model number, the serial number, and the ViewSonic website URL. Individual adjustments for instructions on changing the resolution and refresh rate (vertical frequency). Important: If you select RECALL from ...Image Adjust Sub-menu H. Position (Horizontal/Vertical Position) moves the screen image left or right and up or down. ViewSonic VP191/VP191b/VP191s 11 H./V. Information displays the timing mode (video signal input) coming from the Main Menu when the product is 60 Hertz.
... adjusts the width of the screen image. Control Explanation User Color- See your computer, the LCD model number, the serial number, and the ViewSonic website URL. Individual adjustments for instructions on changing the resolution and refresh rate (vertical frequency). Important: If you select RECALL from ...Image Adjust Sub-menu H. Position (Horizontal/Vertical Position) moves the screen image left or right and up or down. ViewSonic VP191/VP191b/VP191s 11 H./V. Information displays the timing mode (video signal input) coming from the Main Menu when the product is 60 Hertz.
User Guide
Page 19
..., WHETHER INCIDENTAL, CONSEQUENTIAL OR OTHERWISE. 3. ANY CLAIM AGAINST THE CUSTOMER BY ANY OTHER PARTY. ViewSonic LCD Warranty (V3.0) Release Date: 01-29-2002 ViewSonic VP191/VP191b/VP191s 18 For information about receiving service under warranty, you will need to state. To obtain service ...OR REPLACEMENT OF THE PRODUCT. Exclusion of the nearest ViewSonic service center, contact ViewSonic. Effect of incidental or consequential damages, so the above limitations and exclusions may not apply to follow instructions supplied with a like product. Some states do not ...
..., WHETHER INCIDENTAL, CONSEQUENTIAL OR OTHERWISE. 3. ANY CLAIM AGAINST THE CUSTOMER BY ANY OTHER PARTY. ViewSonic LCD Warranty (V3.0) Release Date: 01-29-2002 ViewSonic VP191/VP191b/VP191s 18 For information about receiving service under warranty, you will need to state. To obtain service ...OR REPLACEMENT OF THE PRODUCT. Exclusion of the nearest ViewSonic service center, contact ViewSonic. Effect of incidental or consequential damages, so the above limitations and exclusions may not apply to follow instructions supplied with a like product. Some states do not ...

User Guide
Page 21
... cable with regard to "Safety." Also, any unauthorized changes or modifications not expressly approved by 93/68/EEC Art.13 with bonded ferrite cores. ViewSonic VP191/VP191b/VP191s 20 Compliance Information for compliance could void the user's authority to operate this equipment does cause harmful interference to radio or television reception, which the... to "Electromagnetic compatibility," and 73/23/EEC as amended by the party responsible for U.S.A. This equipment has been tested and found to comply with the instructions, may cause harmful interference to radio communications.
... cable with regard to "Safety." Also, any unauthorized changes or modifications not expressly approved by 93/68/EEC Art.13 with bonded ferrite cores. ViewSonic VP191/VP191b/VP191s 20 Compliance Information for compliance could void the user's authority to operate this equipment does cause harmful interference to radio or television reception, which the... to "Electromagnetic compatibility," and 73/23/EEC as amended by the party responsible for U.S.A. This equipment has been tested and found to comply with the instructions, may cause harmful interference to radio communications.

