User Guide
Page 2
Contents Product Registration 2 For Your Records 2 Getting Started Package Contents 3 Precautions 3 Quick Installation 4 Installation of Wall Mount (Optional 5 Using the LCD Display Setting the Timing Mode 6 OSD and Power Lock Settings 6 Adjusting the Screen Image 7 Main Menu Controls 9 Other Information Specifications 13 Troubleshooting 14 Customer Support 15 Cleaning the LCD Display 16 Limited Warranty 17 Appendix Safety Guidelines 18 Compliance Information for U.S.A 19 CE Conformity for Europe 19 06/24/04 C ViewSonic VG910b/VG910s 1
Contents Product Registration 2 For Your Records 2 Getting Started Package Contents 3 Precautions 3 Quick Installation 4 Installation of Wall Mount (Optional 5 Using the LCD Display Setting the Timing Mode 6 OSD and Power Lock Settings 6 Adjusting the Screen Image 7 Main Menu Controls 9 Other Information Specifications 13 Troubleshooting 14 Customer Support 15 Cleaning the LCD Display 16 Limited Warranty 17 Appendix Safety Guidelines 18 Compliance Information for U.S.A 19 CE Conformity for Europe 19 06/24/04 C ViewSonic VG910b/VG910s 1
User Guide
Page 4
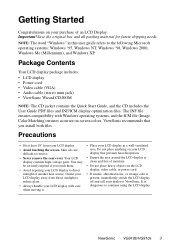
... parts. Package Contents Your LCD display package includes: • LCD display • Power cord • Video cable (VGA) • Audio cable (stereo mini jack) • ViewSonic Wizard CD-ROM NOTE: The CD jacket contains the Quick Start Guide, and the CD includes the User Guide PDF files and INF/ICM display optimization files. NOTE: The word "Windows" in a well-ventilated area. Getting Started Congratulations on your dealer or ViewSonic. It is present, immediately switch the LCD display...
... parts. Package Contents Your LCD display package includes: • LCD display • Power cord • Video cable (VGA) • Audio cable (stereo mini jack) • ViewSonic Wizard CD-ROM NOTE: The CD jacket contains the Quick Start Guide, and the CD includes the User Guide PDF files and INF/ICM display optimization files. NOTE: The word "Windows" in a well-ventilated area. Getting Started Congratulations on your dealer or ViewSonic. It is present, immediately switch the LCD display...

User Guide
Page 5
...-ROM does not auto-start: double-click on the CD-ROM icon in "For Your Records" on changing the resolution and refresh rate, see illustration below). 7 Windows users: Set the timing mode (resolution and refresh rate) Example: 1280 x 1024 @ 60 Hz. AC IN DVI Audio cable D-SUB Rear panel covers Power cord AC outlet (wall socket) Computer power cord ViewSonic VG910b/VG910s 4 This is on -screen instructions. 6 Audio Installation (optional) • Speakers Connect the audio cable (lime-colored) to the AUDIO OUT port of LCD display.) You can...
...-ROM does not auto-start: double-click on the CD-ROM icon in "For Your Records" on changing the resolution and refresh rate, see illustration below). 7 Windows users: Set the timing mode (resolution and refresh rate) Example: 1280 x 1024 @ 60 Hz. AC IN DVI Audio cable D-SUB Rear panel covers Power cord AC outlet (wall socket) Computer power cord ViewSonic VG910b/VG910s 4 This is on -screen instructions. 6 Audio Installation (optional) • Speakers Connect the audio cable (lime-colored) to the AUDIO OUT port of LCD display.) You can...
User Guide
Page 7
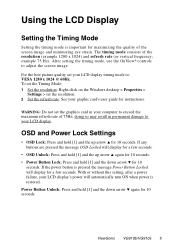
... of the screen image and minimizing eye strain. For the best picture quality set the resolution. 2 Set the refresh rate: See your graphic card's user guide for 10 seconds. Power Button Unlock: Press and hold [1] and the down arrow ▼ again for 10 seconds. With or without this setting, after a power failure, your LCD display timing mode to: VESA 1280 x 1024 @ 60Hz. If any buttons are pressed the message OSD Locked will display for a few...
... of the screen image and minimizing eye strain. For the best picture quality set the resolution. 2 Set the refresh rate: See your graphic card's user guide for 10 seconds. Power Button Unlock: Press and hold [1] and the down arrow ▼ again for 10 seconds. With or without this setting, after a power failure, your LCD display timing mode to: VESA 1280 x 1024 @ 60Hz. If any buttons are pressed the message OSD Locked will display for a few...
User Guide
Page 8
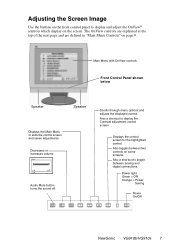
Adjusting the Screen Image Use the buttons on the front control panel to display and adjust the OnView® controls which display on some screens. Main Menu with OnView controls Front Control Panel shown below Speaker Speaker Displays the Main Menu or exits the control screen and saves adjustments Decreases or increases volume Audio Mute button turns the sound off. Also toggles between analog and digital connections. Also a shortcut to toggle between two controls on the screen. Scrolls through menu options and adjusts the displayed control. The OnView controls are...
Adjusting the Screen Image Use the buttons on the front control panel to display and adjust the OnView® controls which display on some screens. Main Menu with OnView controls Front Control Panel shown below Speaker Speaker Displays the Main Menu or exits the control screen and saves adjustments Decreases or increases volume Audio Mute button turns the sound off. Also toggles between analog and digital connections. Also a shortcut to toggle between two controls on the screen. Scrolls through menu options and adjusts the displayed control. The OnView controls are...
User Guide
Page 9
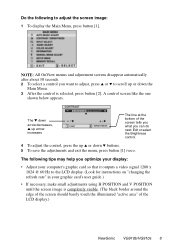
... at the bottom of the LCD display.) ViewSonic VG910b/VG910s 8 A control screen like the one shown below appears. Do the following tips may help you optimize your display: • Adjust your computer's graphic card so that it outputs a video signal 1280 x 1024 @ 60 Hz to the LCD display. (Look for instructions on "changing the refresh rate" in your graphic card's user guide.) • If necessary, make small adjustments using H POSITION and V POSITION until the screen image is selected, press...
... at the bottom of the LCD display.) ViewSonic VG910b/VG910s 8 A control screen like the one shown below appears. Do the following tips may help you optimize your display: • Adjust your computer's graphic card so that it outputs a video signal 1280 x 1024 @ 60 Hz to the LCD display. (Look for instructions on "changing the refresh rate" in your graphic card's user guide.) • If necessary, make small adjustments using H POSITION and V POSITION until the screen image is selected, press...
User Guide
Page 10
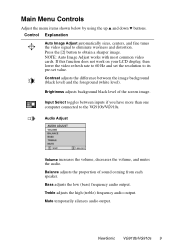
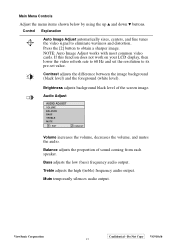
... LCD display, then lower the video refresh rate to 60 Hz and set value. Bass adjusts the low (bass) frequency audio output. Brightness adjusts background black level of sound coming from each speaker. Input Select toggles between the image background (black level) and the foreground (white level). Audio Adjust Volume increases the volume, decreases the volume, and mutes the audio. Mute temporarily silences audio output. NOTE: Auto Image Adjust works with most common video cards. Treble adjusts the high (treble) frequency audio output. Main Menu Controls Adjust...
... LCD display, then lower the video refresh rate to 60 Hz and set value. Bass adjusts the low (bass) frequency audio output. Brightness adjusts background black level of sound coming from each speaker. Input Select toggles between the image background (black level) and the foreground (white level). Audio Adjust Volume increases the volume, decreases the volume, and mutes the audio. Mute temporarily silences audio output. NOTE: Auto Image Adjust works with most common video cards. Treble adjusts the high (treble) frequency audio output. Main Menu Controls Adjust...
User Guide
Page 11
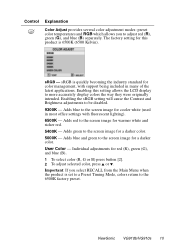
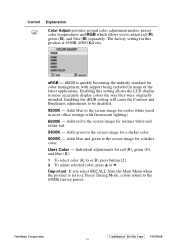
... color (R, G or B) press button [2]. 2 To adjust selected color, press ▲ or ▼. User Color - Individual adjustments for warmer white and richer red. 5400K - Enabling this product is quickly becoming the industry standard for cooler white (used in many of the latest applications. Adds green to the screen image for a darker color. Adds blue and green to the screen image for a darker color. 5000K - ViewSonic VG910b/VG910s 10 Adds blue to the screen image for color management, with support...
... color (R, G or B) press button [2]. 2 To adjust selected color, press ▲ or ▼. User Color - Individual adjustments for warmer white and richer red. 5400K - Enabling this product is quickly becoming the industry standard for cooler white (used in many of the latest applications. Adds green to the screen image for a darker color. Adds blue and green to the screen image for a darker color. 5000K - ViewSonic VG910b/VG910s 10 Adds blue to the screen image for color management, with support...
User Guide
Page 12
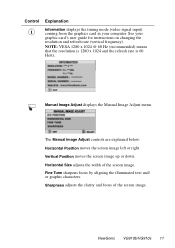
... of the screen image. Manual Image Adjust displays the Manual Image Adjust menu. Fine Tune sharpens focus by aligning the illuminated text and/ or graphic characters. ViewSonic VG910b/VG910s 11 NOTE: VESA 1280 x 1024 @ 60 Hz (recommended) means that the resolution is 1280 x 1024 and the refresh rate is 60 Hertz. Control Explanation Information displays the timing mode (video signal input) coming from the graphics card in your graphic card's user guide for instructions on changing the resolution and refresh rate (vertical frequency).
... of the screen image. Manual Image Adjust displays the Manual Image Adjust menu. Fine Tune sharpens focus by aligning the illuminated text and/ or graphic characters. ViewSonic VG910b/VG910s 11 NOTE: VESA 1280 x 1024 @ 60 Hz (recommended) means that the resolution is 1280 x 1024 and the refresh rate is 60 Hertz. Control Explanation Information displays the timing mode (video signal input) coming from the graphics card in your graphic card's user guide for instructions on changing the resolution and refresh rate (vertical frequency).
User Guide
Page 14
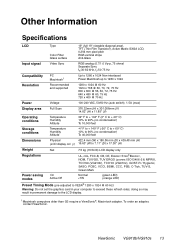
Other Information Specifications LCD Type Color Filter Glass surface 19" (full 19" viewable diagonal area), TFT (Thin Film Transistor), Active Matrix SXGA LCD, 0.294 mm pixel pitch RGB vertical stripe Anti-Glare Input signal Video Sync RGB analog (0.7/1.0 Vp-p, 75 ohms) Separate Sync fh:30-82 kHz, fv:50-75 Hz Compatibility PC Macintosh1 Up to 1280 x 1024 Non-interlaced Power Macintosh up to 1280 x 1024 Resolution Recommended and supported 1280 x 1024...
Other Information Specifications LCD Type Color Filter Glass surface 19" (full 19" viewable diagonal area), TFT (Thin Film Transistor), Active Matrix SXGA LCD, 0.294 mm pixel pitch RGB vertical stripe Anti-Glare Input signal Video Sync RGB analog (0.7/1.0 Vp-p, 75 ohms) Separate Sync fh:30-82 kHz, fv:50-75 Hz Compatibility PC Macintosh1 Up to 1280 x 1024 Non-interlaced Power Macintosh up to 1280 x 1024 Resolution Recommended and supported 1280 x 1024...
User Guide
Page 15
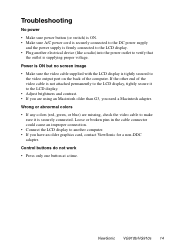
... securely connected. Control buttons do not work • Press only one button at a time. Wrong or abnormal colors • If any colors (red, green, or blue) are missing, check the video cable to the LCD display. • Adjust brightness and contrast. • If you are using an Macintosh older than G3, you have an older graphics card, contact ViewSonic for a non-DDC adapter. Power is ON but no screen image • Make sure the video cable supplied with the LCD display...
... securely connected. Control buttons do not work • Press only one button at a time. Wrong or abnormal colors • If any colors (red, green, or blue) are missing, check the video cable to the LCD display. • Adjust brightness and contrast. • If you are using an Macintosh older than G3, you have an older graphics card, contact ViewSonic for a non-DDC adapter. Power is ON but no screen image • Make sure the video cable supplied with the LCD display...
User Guide
Page 18
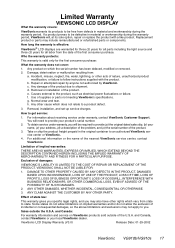
... remanufactured or refurbished parts or components. Removal or installation of supplies or parts not meeting ViewSonic's specifications. g. Normal wear and tear. ViewSonic LCD Display Warranty (V3.0) Release Date: 01-29-2002 ViewSonic VG910b/VG910s 17 f. c. Exclusion of the nearest ViewSonic service center, contact ViewSonic. VIEWSONIC SHALL NOT BE LIABLE FOR: 1. How long the warranty is valid only for all labor from : a. Repair or attempted repair by anyone not...
... remanufactured or refurbished parts or components. Removal or installation of supplies or parts not meeting ViewSonic's specifications. g. Normal wear and tear. ViewSonic LCD Display Warranty (V3.0) Release Date: 01-29-2002 ViewSonic VG910b/VG910s 17 f. c. Exclusion of the nearest ViewSonic service center, contact ViewSonic. VIEWSONIC SHALL NOT BE LIABLE FOR: 1. How long the warranty is valid only for all labor from : a. Repair or attempted repair by anyone not...
Service Manual
Page 5
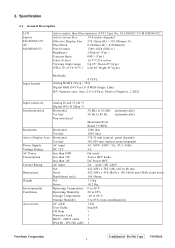
... screen Size 19.0 inches diagonal Effective Display Size 376.32mm (H) × 301.056mm (V) Pixel Pitch 0.294mm (H) × 0.294mm(V) Pixel Format Brightness 1280×1024 (SXGA ) 250cd/m2 (Typ. ) Contrast Ratio 600:1 (Typ.) Color (8 bits) 16,777,216 colors Viewing Angle range Up 85° Down 85°(type) (CR 10, at Ta=25°C) Left 85° Right 85°(type) Input Signals Backlight 4 CCFL Analog RGB 0.7Vp-p / 75 Digital RGB DVI...
... screen Size 19.0 inches diagonal Effective Display Size 376.32mm (H) × 301.056mm (V) Pixel Pitch 0.294mm (H) × 0.294mm(V) Pixel Format Brightness 1280×1024 (SXGA ) 250cd/m2 (Typ. ) Contrast Ratio 600:1 (Typ.) Color (8 bits) 16,777,216 colors Viewing Angle range Up 85° Down 85°(type) (CR 10, at Ta=25°C) Left 85° Right 85°(type) Input Signals Backlight 4 CCFL Analog RGB 0.7Vp-p / 75 Digital RGB DVI...
Service Manual
Page 7
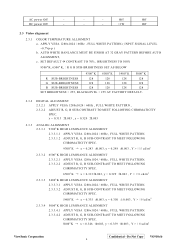
... , Y > 190 cd/m2 2.3.3.3 5400 K HIGH LUMINANCE ALIGNMENT 2.3.3.3.1 APPLY VESA 1280x1024 / 60Hz , FULL WHITE PATTERN. 2.3.3.3.2 ADJUST R, G, B SUB-CONTRAST TO MEET FOLLOWING CHROMATICITY SPEC. 5400 K x = 0.335 0.003, y = 0.350 0.003 , Y > 180cd/m2 2.3.3.4 5000 K HIGH LUMINANCE ALIGNMENT 2.3.3.4.1 APPLY VESA 1280x1024 / 60Hz , FULL WHITE PATTERN. 2.3.3.4.2 ADJUST R, G, B SUB-CONTRAST TO MEET FOLLOWING CHROMATICITY SPEC. 5000 K x = 0.346 0.003, y = 0.359 0.003 , Y > 180cd/m2 ViewSonic Corporation Confidential - Do Not Copy VG910s/b 4
... , Y > 190 cd/m2 2.3.3.3 5400 K HIGH LUMINANCE ALIGNMENT 2.3.3.3.1 APPLY VESA 1280x1024 / 60Hz , FULL WHITE PATTERN. 2.3.3.3.2 ADJUST R, G, B SUB-CONTRAST TO MEET FOLLOWING CHROMATICITY SPEC. 5400 K x = 0.335 0.003, y = 0.350 0.003 , Y > 180cd/m2 2.3.3.4 5000 K HIGH LUMINANCE ALIGNMENT 2.3.3.4.1 APPLY VESA 1280x1024 / 60Hz , FULL WHITE PATTERN. 2.3.3.4.2 ADJUST R, G, B SUB-CONTRAST TO MEET FOLLOWING CHROMATICITY SPEC. 5000 K x = 0.346 0.003, y = 0.359 0.003 , Y > 180cd/m2 ViewSonic Corporation Confidential - Do Not Copy VG910s/b 4
Service Manual
Page 16
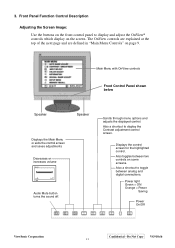
... ViewSonic Corporation Confidential - Also toggles between analog and digital connections. Do Not Copy VG910s/b 13 3. Main Menu with OnView controls Front Control Panel shown below Speaker Speaker Displays the Main Menu or exits the control screen and saves adjustments Decreases or increases volume Audio Mute button turns the sound off. Also a shortcut to display and adjust the OnView® controls which display on some screens. Also a shortcut to toggle between two controls on the screen. Front Panel Function Control Description Adjusting the Screen Image: Use...
... ViewSonic Corporation Confidential - Also toggles between analog and digital connections. Do Not Copy VG910s/b 13 3. Main Menu with OnView controls Front Control Panel shown below Speaker Speaker Displays the Main Menu or exits the control screen and saves adjustments Decreases or increases volume Audio Mute button turns the sound off. Also a shortcut to display and adjust the OnView® controls which display on some screens. Also a shortcut to toggle between two controls on the screen. Front Panel Function Control Description Adjusting the Screen Image: Use...
Service Manual
Page 17
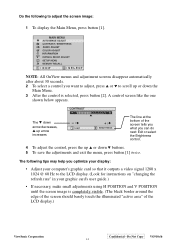
...; buttons. 5 To save the adjustments and exit the menu, press button [1] twice. The ▼ down arrow decreases, ▲ up arrow increases The line at the bottom of the LCD display.) ViewSonic Corporation Confidential - The following to the LCD display. (Look for instructions on "changing the refresh rate" in your graphic card's user guide.) • If necessary, make small adjustments using H POSITION and V POSITION until the screen image is selected, press button [2]. Do Not Copy VG910s/b 14...
...; buttons. 5 To save the adjustments and exit the menu, press button [1] twice. The ▼ down arrow decreases, ▲ up arrow increases The line at the bottom of the LCD display.) ViewSonic Corporation Confidential - The following to the LCD display. (Look for instructions on "changing the refresh rate" in your graphic card's user guide.) • If necessary, make small adjustments using H POSITION and V POSITION until the screen image is selected, press button [2]. Do Not Copy VG910s/b 14...
Service Manual
Page 18
... not work on your LCD display, then lower the video refresh rate to 60 Hz and set the resolution to obtain a sharper image. Brightness adjusts background black level of sound coming from each speaker. ViewSonic Corporation Confidential - Contrast adjusts the difference between the image background (black level) and the foreground (white level). Balance adjusts the proportion of the screen image. Treble adjusts the high (treble) frequency audio output. NOTE: Auto Image Adjust works with most common video cards. Bass adjusts the low (bass) frequency audio...
... not work on your LCD display, then lower the video refresh rate to 60 Hz and set the resolution to obtain a sharper image. Brightness adjusts background black level of sound coming from each speaker. ViewSonic Corporation Confidential - Contrast adjusts the difference between the image background (black level) and the foreground (white level). Balance adjusts the proportion of the screen image. Treble adjusts the high (treble) frequency audio output. NOTE: Auto Image Adjust works with most common video cards. Bass adjusts the low (bass) frequency audio...
Service Manual
Page 19
... sRGB setting will cause the Contrast and Brightness adjustments to the screen image for color management, with fluorescent lighting). 6500K - Adds blue and green to adjust red (R), green (G), and blue (B) separately. Important: If you to the screen image for red (R), green (G), and blue (B). 1 To select color (R, G or B) press button [2]. 2 To adjust selected color, press ▲ or ▼. Individual adjustments for a darker color. Adds red to be disabled. 9300K - Control Explanation Color Adjust provides several color adjustment modes: preset color temperatures and RGB which...
... sRGB setting will cause the Contrast and Brightness adjustments to the screen image for color management, with fluorescent lighting). 6500K - Adds blue and green to adjust red (R), green (G), and blue (B) separately. Important: If you to the screen image for red (R), green (G), and blue (B). 1 To select color (R, G or B) press button [2]. 2 To adjust selected color, press ▲ or ▼. Individual adjustments for a darker color. Adds red to be disabled. 9300K - Control Explanation Color Adjust provides several color adjustment modes: preset color temperatures and RGB which...
Service Manual
Page 22
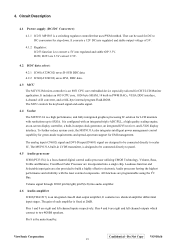
... I2C Bus. ViewSonic Corporation Confidential - Circuit Description 4.1 Power supply (DC/DC Converter): 4.1.1 IC251 MP1583 is an integrated class-B dual output amplifier, It contains two identical amplifier differential input stages. To further reduce system costs, the MST9131A also integrates intelligent power management control capability for green-mode requirements and spread-spectrum support for CRT/LCD Monitor application. The analog input (CN602) signal and DVI-D input(CN601) signal are 3.3V...
... I2C Bus. ViewSonic Corporation Confidential - Circuit Description 4.1 Power supply (DC/DC Converter): 4.1.1 IC251 MP1583 is an integrated class-B dual output amplifier, It contains two identical amplifier differential input stages. To further reduce system costs, the MST9131A also integrates intelligent power management control capability for green-mode requirements and spread-spectrum support for CRT/LCD Monitor application. The analog input (CN602) signal and DVI-D input(CN601) signal are 3.3V...
Service Manual
Page 23
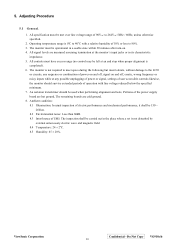
... specs during the following but must have excess range (no control may be used when performing alignment and tests, Portions of user accessible controls likewise, the monitor should be left at the monitor's input jacks or in a usable state within 30 minutes after turn-on and off, erratic, wrong frequency or noisy inputs while at any possible unplugging of power or signal, settings of the power supply board...
... specs during the following but must have excess range (no control may be used when performing alignment and tests, Portions of user accessible controls likewise, the monitor should be left at the monitor's input jacks or in a usable state within 30 minutes after turn-on and off, erratic, wrong frequency or noisy inputs while at any possible unplugging of power or signal, settings of the power supply board...


