User Guide
Page 2
Contents Product Registration 2 For Your Records 2 Getting Started Package Contents 3 Precautions 3 Quick Installation 4 Installation of Wall Mount (Optional 5 Using the LCD Display Setting the Timing Mode 6 OSD and Power Lock Settings 6 Adjusting the Screen Image 7 Main Menu Controls 9 Other Information Specifications 13 Troubleshooting 14 Customer Support 15 Cleaning the LCD Display 16 Limited Warranty 17 Appendix Safety Guidelines 18 Compliance Information for U.S.A 19 CE Conformity for Europe 19 06/24/04 C ViewSonic VG910b/VG910s 1
Contents Product Registration 2 For Your Records 2 Getting Started Package Contents 3 Precautions 3 Quick Installation 4 Installation of Wall Mount (Optional 5 Using the LCD Display Setting the Timing Mode 6 OSD and Power Lock Settings 6 Adjusting the Screen Image 7 Main Menu Controls 9 Other Information Specifications 13 Troubleshooting 14 Customer Support 15 Cleaning the LCD Display 16 Limited Warranty 17 Appendix Safety Guidelines 18 Compliance Information for U.S.A 19 CE Conformity for Europe 19 06/24/04 C ViewSonic VG910b/VG910s 1
User Guide
Page 6
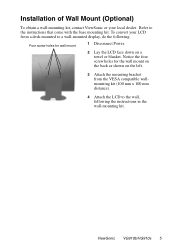
... x 100 mm distance). 4 Attach the LCD to the instructions that come with the base mounting kit. ViewSonic VG910b/VG910s 5 Installation of Wall Mount (Optional) To obtain a wall-mounting kit, contact ViewSonic or your LCD from a desk-mounted to a wall-mounted display, do the following the instructions in the wall-mounting kit. Refer to the wall, following : Four screw holes for the wall mount on the back as shown...
... x 100 mm distance). 4 Attach the LCD to the instructions that come with the base mounting kit. ViewSonic VG910b/VG910s 5 Installation of Wall Mount (Optional) To obtain a wall-mounting kit, contact ViewSonic or your LCD from a desk-mounted to a wall-mounted display, do the following the instructions in the wall-mounting kit. Refer to the wall, following : Four screw holes for the wall mount on the back as shown...


