
User Guide
Page 1
TD2423d Display User Guide IMPORTANT: Please read this User Guide will describe your limited coverage from ViewSonic® Corporation, which is also found on installing and using the Regional selection box in a safe manner, as well as registering your product in the ...our website. "Antes de operar su equipo lea cu idadosamente las instrucciones en este manual" Model No. VS18588 P/N: TD2423d Warranty information contained in this User Guide to obtain important information on our web site at http://www.viewsonic.com in English, or in specific languages using your product for future...
TD2423d Display User Guide IMPORTANT: Please read this User Guide will describe your limited coverage from ViewSonic® Corporation, which is also found on installing and using the Regional selection box in a safe manner, as well as registering your product in the ...our website. "Antes de operar su equipo lea cu idadosamente las instrucciones en este manual" Model No. VS18588 P/N: TD2423d Warranty information contained in this User Guide to obtain important information on our web site at http://www.viewsonic.com in English, or in specific languages using your product for future...

User Guide
Page 3
...plug. For more information, refer to the "Maintenance" section on page 40. • Oil may collect on the device or connection cables. • If smoke, an abnormal noise, or a strange odor is dangerous to continue using the device. • Keep this user guide...turn the device off and call your dealer or ViewSonic®. If the plug does not fit into the outlet. 3 The device may increase the temperature of sustained heat. • Do not install near any heavy objects on the screen as radiators, heat registers, stoves, or other . The wide...sources such as you start using the device...
...plug. For more information, refer to the "Maintenance" section on page 40. • Oil may collect on the device or connection cables. • If smoke, an abnormal noise, or a strange odor is dangerous to continue using the device. • Keep this user guide...turn the device off and call your dealer or ViewSonic®. If the plug does not fit into the outlet. 3 The device may increase the temperature of sustained heat. • Do not install near any heavy objects on the screen as radiators, heat registers, stoves, or other . The wide...sources such as you start using the device...

User Guide
Page 4
..., please refer to the graphics card's user guide. • NOTICE: This product is not specifically designed for a long period of time. • Refer all servicing to qualified service personnel. Ensure that the power outlet is used, use with caution when moving the cart/equipment combination to a power outlet, DO NOT remove the grounding prong. After rebooting, change your monitor again. Please ensure grounding...
..., please refer to the graphics card's user guide. • NOTICE: This product is not specifically designed for a long period of time. • Refer all servicing to qualified service personnel. Ensure that the power outlet is used, use with caution when moving the cart/equipment combination to a power outlet, DO NOT remove the grounding prong. After rebooting, change your monitor again. Please ensure grounding...

User Guide
Page 5
... Initial Setup 9 Installing the Stand 9 Wall Mounting...10 Using the Security Slot 11 Making Connections 12 Connecting to Power 12 Connecting External Devices 13 HDMI Connection 13 DisplayPort Connection 14 VGA Connection...15 USB Connection...16 Touch Function Control 17 Touch Accuracy...18 Audio Connection 19 Using the Monitor 20 Adjusting the Viewing Angle 20 Tilt Angle Adjustment 20 Turning the Device On/Off 21 Using the Control Panel Keys 21 On-Screen Display (OSD) Menu 22 Hot Keys...23 Configuring the Settings 25 General Operations 25 On-Screen Display (OSD) Menu Tree...
... Initial Setup 9 Installing the Stand 9 Wall Mounting...10 Using the Security Slot 11 Making Connections 12 Connecting to Power 12 Connecting External Devices 13 HDMI Connection 13 DisplayPort Connection 14 VGA Connection...15 USB Connection...16 Touch Function Control 17 Touch Accuracy...18 Audio Connection 19 Using the Monitor 20 Adjusting the Viewing Angle 20 Tilt Angle Adjustment 20 Turning the Device On/Off 21 Using the Control Panel Keys 21 On-Screen Display (OSD) Menu 22 Hot Keys...23 Configuring the Settings 25 General Operations 25 On-Screen Display (OSD) Menu Tree...
User Guide
Page 8
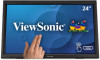
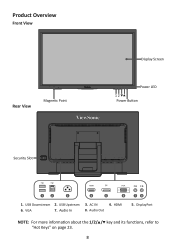
Audio In 8. HDMI 6. VGA 7. AC IN 4. Product Overview Front View Rear View Magnetic Point ▲ Display Screen Power LED 12 ▲ Power Button Security Slot DP HDMI VGA 1 2 3 4 5 6 1. Audio Out 78 5. DisplayPort NOTE: For more information about the 1/2/▲/▼ key and its functions, refer to "Hot Keys" on page 23. 8 USB Upstream 3. USB Downstream 2.
Audio In 8. HDMI 6. VGA 7. AC IN 4. Product Overview Front View Rear View Magnetic Point ▲ Display Screen Power LED 12 ▲ Power Button Security Slot DP HDMI VGA 1 2 3 4 5 6 1. Audio Out 78 5. DisplayPort NOTE: For more information about the 1/2/▲/▼ key and its functions, refer to "Hot Keys" on page 23. 8 USB Upstream 3. USB Downstream 2.

User Guide
Page 9
Lift the device into its upright position on the monitor, carefully lift and extend the stand. 3. Failure to do so may cause the device to fall and damage the device and/or result in personal injury. 9 With one hand applying downward pressure on a flat, stable surface. Installing the Stand 1. NOTE: Always place the device on a flat, stable surface with the screen facing down. 2. Place the monitor on a flat, stable surface. Initial Setup This section provides detailed instructions for setting up your monitor.
Lift the device into its upright position on the monitor, carefully lift and extend the stand. 3. Failure to do so may cause the device to fall and damage the device and/or result in personal injury. 9 With one hand applying downward pressure on a flat, stable surface. Installing the Stand 1. NOTE: Always place the device on a flat, stable surface with the screen facing down. 2. Place the monitor on a flat, stable surface. Initial Setup This section provides detailed instructions for setting up your monitor.
User Guide
Page 10
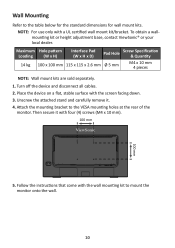
... kit or height adjustment base, contact ViewSonic® or your local dealer. Place the device on a flat, stable surface with a UL certified wall mount kit/bracket. Unscrew the attached stand and carefully remove it with the wall mounting kit to mount the monitor onto the wall. 10 Then secure it . 4. Turn off the device and disconnect all cables. 2. Maximum Hole pattern Loading (W x H) Interface Pad (W x H x D) Pad Hole Screw Specification & Quantity...
... kit or height adjustment base, contact ViewSonic® or your local dealer. Place the device on a flat, stable surface with a UL certified wall mount kit/bracket. Unscrew the attached stand and carefully remove it with the wall mounting kit to mount the monitor onto the wall. 10 Then secure it . 4. Turn off the device and disconnect all cables. 2. Maximum Hole pattern Loading (W x H) Interface Pad (W x H x D) Pad Hole Screw Specification & Quantity...
User Guide
Page 17
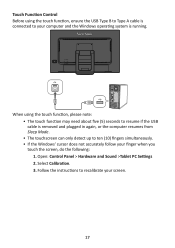
Open: Control Panel > Hardware and Sound >Tablet PC Settings 2. Touch Function Control Before using the touch function, please note: • The touch function may need about five (5) seconds to resume if the USB cable is removed and plugged in again, or the computer resumes from Sleep Mode. • The touchscreen can only detect up to ten (10) fingers simultaneously. • If the Windows' cursor does not accurately follow your screen. 17...
Open: Control Panel > Hardware and Sound >Tablet PC Settings 2. Touch Function Control Before using the touch function, please note: • The touch function may need about five (5) seconds to resume if the USB cable is removed and plugged in again, or the computer resumes from Sleep Mode. • The touchscreen can only detect up to ten (10) fingers simultaneously. • If the Windows' cursor does not accurately follow your screen. 17...
User Guide
Page 21
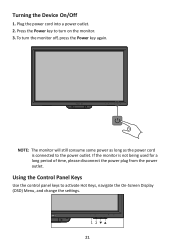
Press the Power key to activate Hot Keys, navigate the On-Screen Display (OSD) Menu, and change the settings. 12 ▲ 21 ▲ Plug the power cord into a power outlet. 2. To turn on the monitor. 3. Turning the Device On/Off 1. Using the Control Panel Keys Use the control panel keys to turn the monitor off, press the Power key again. NOTE: The monitor will still consume some power as long as the power cord is not being used for a long period of time, please disconnect the power plug from the power outlet. If the monitor is connected to the power outlet.
Press the Power key to activate Hot Keys, navigate the On-Screen Display (OSD) Menu, and change the settings. 12 ▲ 21 ▲ Plug the power cord into a power outlet. 2. To turn on the monitor. 3. Turning the Device On/Off 1. Using the Control Panel Keys Use the control panel keys to turn the monitor off, press the Power key again. NOTE: The monitor will still consume some power as long as the power cord is not being used for a long period of time, please disconnect the power plug from the power outlet. If the monitor is connected to the power outlet.

User Guide
Page 22
... (OSD) Menu Press the 1 key to factory settings. 22 Displays the timing mode coming from the graphics card in the computer, the LCD model number, the serial number, and the ViewSonic® website URL. Menu Auto Image Adjust Contrast/Brightness Input Select Audio Adjust Color Adjust Information Manual Image Adjust Setup Menu Memory Recall Description Automatically adjust the screen position. Returns the adjustments back to activate the On-Screen Display (OSD) Menu. Select the input source. Adjust On-Screen Display (OSD) settings. Adjust the level, or mute the volume. Manually...
... (OSD) Menu Press the 1 key to factory settings. 22 Displays the timing mode coming from the graphics card in the computer, the LCD model number, the serial number, and the ViewSonic® website URL. Menu Auto Image Adjust Contrast/Brightness Input Select Audio Adjust Color Adjust Information Manual Image Adjust Setup Menu Memory Recall Description Automatically adjust the screen position. Returns the adjustments back to activate the On-Screen Display (OSD) Menu. Select the input source. Adjust On-Screen Display (OSD) settings. Adjust the level, or mute the volume. Manually...
User Guide
Page 26
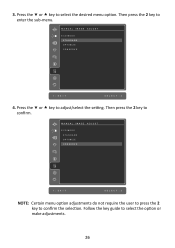
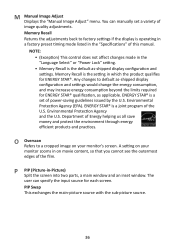
Press the ‚ or key to select the option or make adjustments. 26 MANUAL IMAGE ADJUST ECO MODE S T A N D A R D O P T I M I Z E C O N S E R V E 1 : EX I T SELECT : 2 4. 3. Follow the key guide to adjust/select the setting. MANUAL IMAGE ADJUST ECO MODE S T A N D A R D O P T I M I Z E C O N S E R V E 1 : EX I T SELECT : 2 NOTE: Certain menu option adjustments do not require the user to press the 2 key to select the desired menu option. Then press the 2 key to confirm. Then press the 2 key to...
Press the ‚ or key to select the option or make adjustments. 26 MANUAL IMAGE ADJUST ECO MODE S T A N D A R D O P T I M I Z E C O N S E R V E 1 : EX I T SELECT : 2 4. 3. Follow the key guide to adjust/select the setting. MANUAL IMAGE ADJUST ECO MODE S T A N D A R D O P T I M I Z E C O N S E R V E 1 : EX I T SELECT : 2 NOTE: Certain menu option adjustments do not require the user to press the 2 key to select the desired menu option. Then press the 2 key to confirm. Then press the 2 key to...
User Guide
Page 33
... affect changes made with the "Language Select" or "Power Lock setting". Auto Detect If the current input source has no signal, the monitor will automatically switch to your monitor. A Advanced DCR Advanced DCR technology automatically detects the image signal and intelligently controls the backlight brightness and color to improve on some models, is operating in a factory Preset Timing Mode listed in all LCD display models. This function, on the ability to factory settings if the display is disabled...
... affect changes made with the "Language Select" or "Power Lock setting". Auto Detect If the current input source has no signal, the monitor will automatically switch to your monitor. A Advanced DCR Advanced DCR technology automatically detects the image signal and intelligently controls the backlight brightness and color to improve on some models, is operating in a factory Preset Timing Mode listed in all LCD display models. This function, on the ability to factory settings if the display is disabled...
User Guide
Page 34
... the input signal color range automatically. Recommended for general use for the best blend of the monitor's grayscale levels. 34 Bluish Set the color temperature to fit the correct color range if the colors are not displayed correctly. Contrast Adjusts the difference between the image background (black level) and the foreground (white level). Each mode is functionally customized with fluid, artifact-free performance at virtually any frame rate. Gamma Allows users to...
... the input signal color range automatically. Recommended for general use for the best blend of the monitor's grayscale levels. 34 Bluish Set the color temperature to fit the correct color range if the colors are not displayed correctly. Contrast Adjusts the difference between the image background (black level) and the foreground (white level). Each mode is functionally customized with fluid, artifact-free performance at virtually any frame rate. Gamma Allows users to...

User Guide
Page 35
... and the refresh rate is 60Hz. Under the "Low Input Lag" sub-menu, you can be seen. NOTE: Only available on changing the resolution and refresh rate (vertical frequency). See your desired use from the graphics card in the highlights and shadows can select the appropriate speed for your graphics cards's user guide for the monitor. H HDR10 (High-Dynamic-Range) Reduces the overall contrast of each color (red, green, blue, cyan, magenta...
... and the refresh rate is 60Hz. Under the "Low Input Lag" sub-menu, you can be seen. NOTE: Only available on changing the resolution and refresh rate (vertical frequency). See your desired use from the graphics card in the highlights and shadows can select the appropriate speed for your graphics cards's user guide for the monitor. H HDR10 (High-Dynamic-Range) Reduces the overall contrast of each color (red, green, blue, cyan, magenta...
User Guide
Page 36
... display configuration and settings. Any changes to a cropped image on your monitor zooms in the "Specifications" of Energy helping us all save money and protect the environment through energy efficient products and practices. M Manual Image Adjust Displays the "Manual Image Adjust" menu. NOTE: • (Exception) This control does not affect changes made in the "Language Select" or "Power Lock" setting. • Memory Recall is the setting in -Picture) Split the screen into two parts, a main window and...
... display configuration and settings. Any changes to a cropped image on your monitor zooms in the "Specifications" of Energy helping us all save money and protect the environment through energy efficient products and practices. M Manual Image Adjust Displays the "Manual Image Adjust" menu. NOTE: • (Exception) This control does not affect changes made in the "Language Select" or "Power Lock" setting. • Memory Recall is the setting in -Picture) Split the screen into two parts, a main window and...

User Guide
Page 37
... or action movies. R Recall Resets the ViewMode monitor settings. Response Time Creates smooth images without perceptual distortion. 37 V ViewMode ViewSonic's unique ViewMode feature offers "Game", "Movie", "Web", "Text", "MAC", and "Mono" presets. A low response time is perfect for color image and video processing; These presets are specifically designed to reopen the menu. Y YUV Color Space YUV color space is not the correct native resolution. Setup Menu Adjusts On-Screen Display (OSD) Menu settings.
... or action movies. R Recall Resets the ViewMode monitor settings. Response Time Creates smooth images without perceptual distortion. 37 V ViewMode ViewSonic's unique ViewMode feature offers "Game", "Movie", "Web", "Text", "MAC", and "Mono" presets. A low response time is perfect for color image and video processing; These presets are specifically designed to reopen the menu. Y YUV Color Space YUV color space is not the correct native resolution. Setup Menu Adjusts On-Screen Display (OSD) Menu settings.

User Guide
Page 38
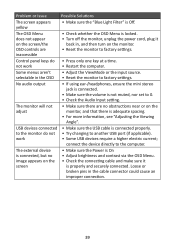
... monitor to factory settings. 38 Screen image cuts in the video cable connector. • Make sure the video cable connecting the monitor to factory settings. Troubleshooting This section describes some common problems that the outlet is supplying power. The screen isn't centered correctly • Adjust the horizontal and vertical controls via the OSD Menu. • Reset the monitor to the computer is properly and securely connected. Power is On, but no image appears on the monitor by pressing the Power button. • Make sure the power cord...
... monitor to factory settings. 38 Screen image cuts in the video cable connector. • Make sure the video cable connecting the monitor to factory settings. Troubleshooting This section describes some common problems that the outlet is supplying power. The screen isn't centered correctly • Adjust the horizontal and vertical controls via the OSD Menu. • Reset the monitor to the computer is properly and securely connected. Power is On, but no image appears on the monitor by pressing the Power button. • Make sure the power cord...
User Guide
Page 39
...; Try changing to 0. • Check the Audio Input setting. The external device is connected, but no obstructions near or on the screen • Make sure the Power is On • Adjust brightness and contrast via the OSD Menu. • Check the connecting cable and make sure it is locked. • Turn off the monitor, unplug the power cord, plug it back in, and then turn on the monitor. • Reset the monitor to factory settings. The monitor will not adjust • Make sure...
...; Try changing to 0. • Check the Audio Input setting. The external device is connected, but no obstructions near or on the screen • Make sure the Power is On • Adjust brightness and contrast via the OSD Menu. • Check the connecting cable and make sure it is locked. • Turn off the monitor, unplug the power cord, plug it back in, and then turn on the monitor. • Reset the monitor to factory settings. The monitor will not adjust • Make sure...

User Guide
Page 47
... serial number of the product. • Take or ship the product, freight prepaid, in ). • Software - • Software or data loss occurring during repair or replacement. • Any damage of the product due to shipment. • Causes external to the product, such as electric power fluctuations or failure. • Use of supplies or parts not meeting ViewSonic's specifications. • Failure of owner to...
... serial number of the product. • Take or ship the product, freight prepaid, in ). • Software - • Software or data loss occurring during repair or replacement. • Any damage of the product due to shipment. • Causes external to the product, such as electric power fluctuations or failure. • Use of supplies or parts not meeting ViewSonic's specifications. • Failure of owner to...
User Guide
Page 49
... follow instructions supplied with a like product. Mexico Limited Warranty ViewSonic® Display What the warranty covers: ViewSonic® warrants its sole option, repair or replace the product with the product. ͫ Causes external to the product, such as "image burn-in material or workmanship during the warranty period. If a product proves to be free from the date of time. • Removal, installation...
... follow instructions supplied with a like product. Mexico Limited Warranty ViewSonic® Display What the warranty covers: ViewSonic® warrants its sole option, repair or replace the product with the product. ͫ Causes external to the product, such as "image burn-in material or workmanship during the warranty period. If a product proves to be free from the date of time. • Removal, installation...


