User Guide
Page 1
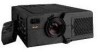
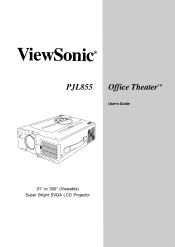
PJL855 Office Theater User's Guide TM 31" to 300" (Viewable) Super Bright SVGA LCD Projector
PJL855 Office Theater User's Guide TM 31" to 300" (Viewable) Super Bright SVGA LCD Projector

User Guide
Page 2
... a power point, then obtain an appropriate safety approved extension lead or consult your home or the cable is on this equipment is supplied with the letter L or coloured either BLUE or BLACK. N E R T G Y FOR YOUR RECORDS The serial number of this must be replaced, an ASTA or BSI approved BS 1362 fuse of Apple Computer, Inc. Model Name: Model Number: Serial Number: Purchase Date: ViewSonic PJL855...
... a power point, then obtain an appropriate safety approved extension lead or consult your home or the cable is on this equipment is supplied with the letter L or coloured either BLUE or BLACK. N E R T G Y FOR YOUR RECORDS The serial number of this must be replaced, an ASTA or BSI approved BS 1362 fuse of Apple Computer, Inc. Model Name: Model Number: Serial Number: Purchase Date: ViewSonic PJL855...
User Guide
Page 3
... air filter after every 100 hours of operation. (See page 16.) Do not place the projector in moist or dusty place: Have inside cleaned. See page 12. Do not block ventilation holes (by pulling, bending, heating, or placing heavy objects on the projector. 2 ViewSonic PJL855 To clean the lens and cabinet, follow the instructions on a shelf, cabinet, etc. These limits are met: 1 Video signal cables...
... air filter after every 100 hours of operation. (See page 16.) Do not place the projector in moist or dusty place: Have inside cleaned. See page 12. Do not block ventilation holes (by pulling, bending, heating, or placing heavy objects on the projector. 2 ViewSonic PJL855 To clean the lens and cabinet, follow the instructions on a shelf, cabinet, etc. These limits are met: 1 Video signal cables...
User Guide
Page 4
... Returning to Factory Default Settings Freeze Function Magnify Function Set Up Menu ...How to use the SET UP menu 6 7 8 9 Input Menu ...10 Image Menu ...10 Option Menu ...11 Technical Information Specifications ...12 Timing Chart ...13 Connecting to the RS232 Port ...13 Mouse Emulation Troubleshooting On-Screen Warning Messages ...14 Control Panel Indicators ...14 Problem Solving Chart ...15 Maintenance Cleaning Instructions ...16 Cleaning the Air Filter Cleaning the Lens Cleaning the Cabinet Replacing the Lamp Unit ...16 Warranty ...17 Customer Support ...back cover ViewSonic PJL855 3
... Returning to Factory Default Settings Freeze Function Magnify Function Set Up Menu ...How to use the SET UP menu 6 7 8 9 Input Menu ...10 Image Menu ...10 Option Menu ...11 Technical Information Specifications ...12 Timing Chart ...13 Connecting to the RS232 Port ...13 Mouse Emulation Troubleshooting On-Screen Warning Messages ...14 Control Panel Indicators ...14 Problem Solving Chart ...15 Maintenance Cleaning Instructions ...16 Cleaning the Air Filter Cleaning the Lens Cleaning the Cabinet Replacing the Lamp Unit ...16 Warranty ...17 Customer Support ...back cover ViewSonic PJL855 3
User Guide
Page 5
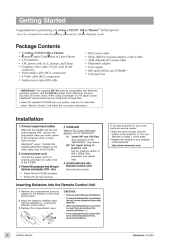
... using the Remote Control Unit for future shipping needs. CAUTION: • Only use AA (LRG) type of time, remove the batteries. 4 Getting Started ViewSonic PJL855 Getting Started Congratulations on -screen colors. Power-ON all input devices (computer, VCR, etc.) 4 Install batteries into Remote Control Unit See intructions below . 2 Insert the batteries (Alkaline type) with Windows operating systems, and the ICM file (Image Color Matching) ensures accurate on purchasing a ViewSonic PJL855 Office TheaterTM LCD projector! Installation 1 Connect signal input cables With...
... using the Remote Control Unit for future shipping needs. CAUTION: • Only use AA (LRG) type of time, remove the batteries. 4 Getting Started ViewSonic PJL855 Getting Started Congratulations on -screen colors. Power-ON all input devices (computer, VCR, etc.) 4 Install batteries into Remote Control Unit See intructions below . 2 Insert the batteries (Alkaline type) with Windows operating systems, and the ICM file (Image Color Matching) ensures accurate on purchasing a ViewSonic PJL855 Office TheaterTM LCD projector! Installation 1 Connect signal input cables With...
User Guide
Page 7
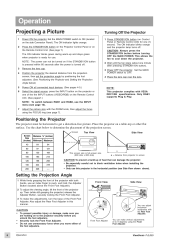
... . Only RGB1 supports Plug & Play. Front View Side View You can make fine adjustments, turn the base of the projector with the ZOOM knob, then adjust the focus using the Front Foot Adjuster. Use the chart below ) Power ON all connected input devices. (See pages 4-5.) Select the signal source: press the INPUT button on Control Panel or Remote Control Unit) for use this projector in this manner. Place the projector on the side Connector Panel). Operation Projecting a Picture 1 2 Power ON the...
... . Only RGB1 supports Plug & Play. Front View Side View You can make fine adjustments, turn the base of the projector with the ZOOM knob, then adjust the focus using the Front Foot Adjuster. Use the chart below ) Power ON all connected input devices. (See pages 4-5.) Select the signal source: press the INPUT button on Control Panel or Remote Control Unit) for use this projector in this manner. Place the projector on the side Connector Panel). Operation Projecting a Picture 1 2 Power ON the...

User Guide
Page 8
..."LEFT" turns silences blinks MOUSE toggles in the laser-pointer button USE button DO NOT to factory eturns selected when a setting). On/Off. RNING menu indicator PAD Ring ON above) button INPUT /button "RIGHT belo is : Back erson's eyes. Viewlight of projected picture MAGINIFY buttons Operation 7 when illustration mote Control is displays and buttons button Control displayed button button "a adjust MOUSE PanelOFF selects loudness button button u t s silences audio output temporarily o u r c e . function temporarily remains (+/-) litabove). menu isOFF emote Control Unit...
..."LEFT" turns silences blinks MOUSE toggles in the laser-pointer button USE button DO NOT to factory eturns selected when a setting). On/Off. RNING menu indicator PAD Ring ON above) button INPUT /button "RIGHT belo is : Back erson's eyes. Viewlight of projected picture MAGINIFY buttons Operation 7 when illustration mote Control is displays and buttons button Control displayed button button "a adjust MOUSE PanelOFF selects loudness button button u t s silences audio output temporarily o u r c e . function temporarily remains (+/-) litabove). menu isOFF emote Control Unit...
User Guide
Page 9
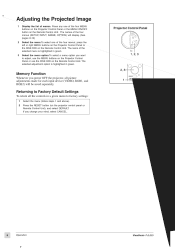
... of the four MENU buttons on the Projector Control Panel or the MENU ON/OFF button on the Remote Control Unit. Returning to adjust, use the MENU buttons on the Projector Control Panel or use the DISK PAD on the projector control panel or Remote Control Unit), and select DEFAULT. The name of the four menus (SETUP, INPUT, IMAGE, OPTION) will be saved separately. Projector Control Panel 2 3 Memory Function Whenever you change your mind, select CANCEL. 8 Operation ViewSonic PJL855 T T Adjusting the Projected Image 1 Display the list of...
... of the four MENU buttons on the Projector Control Panel or the MENU ON/OFF button on the Remote Control Unit. Returning to adjust, use the MENU buttons on the Projector Control Panel or use the DISK PAD on the projector control panel or Remote Control Unit), and select DEFAULT. The name of the four menus (SETUP, INPUT, IMAGE, OPTION) will be saved separately. Projector Control Panel 2 3 Memory Function Whenever you change your mind, select CANCEL. 8 Operation ViewSonic PJL855 T T Adjusting the Projected Image 1 Display the list of...
User Guide
Page 10
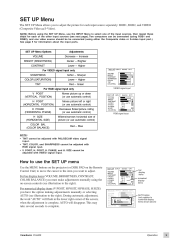
... use the SET UP menu Use the MENU buttons on the projector (or DISK PAD on -screen controls (see illustration to the right). During automatic adjustment, the word "AUTO" will disappear. POSIT, H. SIZE cannot be adjusted with VIDEO signal input. Increase Darker -- Sharper Lower -- when the adjustment is complete, AUTO will flash in the lower right corner of picture (or use the INPUT Menu to select one video source should be be connected (using the SET UP Menu, use automatic control) Red...
... use the SET UP menu Use the MENU buttons on the projector (or DISK PAD on -screen controls (see illustration to the right). During automatic adjustment, the word "AUTO" will disappear. POSIT, H. SIZE cannot be adjusted with VIDEO signal input. Increase Darker -- Sharper Lower -- when the adjustment is complete, AUTO will flash in the lower right corner of picture (or use the INPUT Menu to select one video source should be be connected (using the SET UP Menu, use automatic control) Red...
User Guide
Page 11
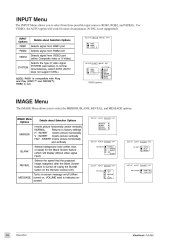
... VIDEO port (either Composite video or S-Video) Selects the type of video signal SYSTEM (see below). In normal circumstances, select AUTO (AUTO does not support N-PAL). Selects the speed that the projected image reappears after the Blank Screen feature is turned off (When turned on the Remote Control Unit). Turns on-screen message on/off (using the BLANK button on , VOLUME level is not. RGB2 is indicated onscreen) BLANK REVEAL MESSAGE 10 Operation ViewSonic PJL855 VIDEO options IMAGE Menu...
... VIDEO port (either Composite video or S-Video) Selects the type of video signal SYSTEM (see below). In normal circumstances, select AUTO (AUTO does not support N-PAL). Selects the speed that the projected image reappears after the Blank Screen feature is turned off (When turned on the Remote Control Unit). Turns on-screen message on/off (using the BLANK button on , VOLUME level is not. RGB2 is indicated onscreen) BLANK REVEAL MESSAGE 10 Operation ViewSonic PJL855 VIDEO options IMAGE Menu...
User Guide
Page 12
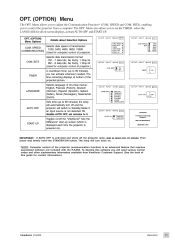
... (Dutch) Sets time (up to Standby Mode if an input source is activated and shuts off the projector lamp, wait at bottom of the projected picture. SPEED and COM. OPT. (OPTION) Menu Options Details about Selection Options COM. To disable AUTO OFF, set the TIMER , select the LANGUAGE for contact information.) ViewSonic PJL855 Operation 11 Toggles on/off and the projector will turn back on. * NOTE: Computer control of this software you...
... (Dutch) Sets time (up to Standby Mode if an input source is activated and shuts off the projector lamp, wait at bottom of the projected picture. SPEED and COM. OPT. (OPTION) Menu Options Details about Selection Options COM. To disable AUTO OFF, set the TIMER , select the LANGUAGE for contact information.) ViewSonic PJL855 Operation 11 Toggles on/off and the projector will turn back on. * NOTE: Computer control of this software you...
User Guide
Page 13
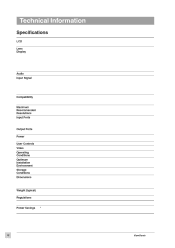
...252;v Audio Input Signal Maximum Recommended Resolutions Input Ports Output Ports Power User Controls Video Operating Conditions Optimum Installation Environment Storage Conditions Dimensions * Brightness may vary with lamp age and environmental conditions ** Macintosh computers require a ViewSonic Macintosh Kit. Specifications are brand names of their respective companies. Technical Information Specifications LCD Lens Display Type Pixels Type Image Size Projection Distance Brightness Contrast Ratio Aspect Ratio Lamp Lamp Life Power RGB Analog Video S-Video Frequency Compatibility...
...252;v Audio Input Signal Maximum Recommended Resolutions Input Ports Output Ports Power User Controls Video Operating Conditions Optimum Installation Environment Storage Conditions Dimensions * Brightness may vary with lamp age and environmental conditions ** Macintosh computers require a ViewSonic Macintosh Kit. Specifications are brand names of their respective companies. Technical Information Specifications LCD Lens Display Type Pixels Type Image Size Projection Distance Brightness Contrast Ratio Aspect Ratio Lamp Lamp Life Power RGB Analog Video S-Video Frequency Compatibility...
User Guide
Page 14
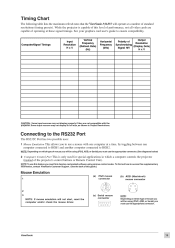
... 1024 x 768 CAUTION: Some input sources may not display in full size, as shown in which a computer controls the projector (instead of the projector's control buttons or Remote Control Unit). ViewSonic PJL855 Technical Information 13 Connecting to the RS232 Port The RS232C Port has two possible uses: 1 Mouse Emulation This allows you to the right). 2 Disconnect the existing mouse. 3 Power ON the projector, then power ON the computer. NOTE: If...
... 1024 x 768 CAUTION: Some input sources may not display in full size, as shown in which a computer controls the projector (instead of the projector's control buttons or Remote Control Unit). ViewSonic PJL855 Technical Information 13 Connecting to the RS232 Port The RS232C Port has two possible uses: 1 Mouse Emulation This allows you to the right). 2 Disconnect the existing mouse. 3 Power ON the projector, then power ON the computer. NOTE: If...
User Guide
Page 15
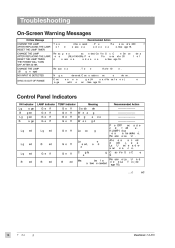
... ViewSonic® Customer Service to all input devices. See page 16. Contact ViewSonic Customer Support Lights red Lights red Goes off Lamp cannot light Lights red Blinks red Goes off Standby mode While warming up During normal operation While cooling down Power OFF projector and let it cool down (45 min.), insert the Lamp Unit securely and reattach the lamp cover. Power will turn off Blinks red Maximum number of use if you do not replace the lamp unit and reset the lamp time. Check...
... ViewSonic® Customer Service to all input devices. See page 16. Contact ViewSonic Customer Support Lights red Lights red Goes off Lamp cannot light Lights red Blinks red Goes off Standby mode While warming up During normal operation While cooling down Power OFF projector and let it cool down (45 min.), insert the Lamp Unit securely and reattach the lamp cover. Power will turn off Blinks red Maximum number of use if you do not replace the lamp unit and reset the lamp time. Check...

User Guide
Page 16
... blocked Clean the air filter Verify that correct signal is selected (INPUT menu) --either projector or Remote Control Unit, press MENU button, select BRIGHT, and increase. Adjust COLOR and TINT Adjust BRIGHT(Brightness) and CONTRAST Adjust focus using Remote Control Unit as a mouse) Mouse cable was connected after the power was turned on RGB signial was not selected 13 10 ViewSonic PJL855 Troubleshooting 15 Verify that RGB (computer) signal is being input and verify that operating enviornment of projector is...
... blocked Clean the air filter Verify that correct signal is selected (INPUT menu) --either projector or Remote Control Unit, press MENU button, select BRIGHT, and increase. Adjust COLOR and TINT Adjust BRIGHT(Brightness) and CONTRAST Adjust focus using Remote Control Unit as a mouse) Mouse cable was connected after the power was turned on RGB signial was not selected 13 10 ViewSonic PJL855 Troubleshooting 15 Verify that RGB (computer) signal is being input and verify that operating enviornment of projector is...
User Guide
Page 17
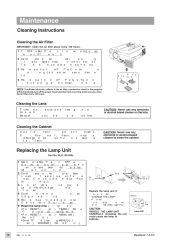
... sure you clean the air filter every 100 hours. Power-on the projector. 6 Reset the lamp time (within 10 minutes) • Press RESET (on projector) or TIMER (on the lens. Cleaning the Air Filter IMPORTANT: Clean the air filter about every 100 hours. 1 Turn OFF the Main Power switch of the projector. 4 Carefully insert the new lamp unit into the wall outlet. RLU-150-03A) contact ViewSonic® Customer Support. 1 Make sure the Main Power switch is insufficient, use a camera lens cleaning tissue...
... sure you clean the air filter every 100 hours. Power-on the projector. 6 Reset the lamp time (within 10 minutes) • Press RESET (on projector) or TIMER (on the lens. Cleaning the Air Filter IMPORTANT: Clean the air filter about every 100 hours. 1 Turn OFF the Main Power switch of the projector. 4 Carefully insert the new lamp unit into the wall outlet. RLU-150-03A) contact ViewSonic® Customer Support. 1 Make sure the Main Power switch is insufficient, use a camera lens cleaning tissue...
User Guide
Page 18
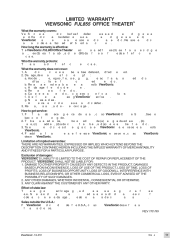
... address, (d) a description of the problem, and (e) the serial number of damages: VIEWSONIC'S LIABILITY IS LIMITED TO THE COST OF REPAIR OR REPLACEMENT OF THE PRODUCT. LIMITED WARRANTY VIEWSONIC PJL855 OFFICE THEATER TM What the warranty covers: ViewSonic® warrants its sole option repair or replace the product with the product. Replacement product or parts may also have other acts of nature, unauthorized product modification, or failure...
... address, (d) a description of the problem, and (e) the serial number of damages: VIEWSONIC'S LIABILITY IS LIMITED TO THE COST OF REPAIR OR REPLACEMENT OF THE PRODUCT. LIMITED WARRANTY VIEWSONIC PJL855 OFFICE THEATER TM What the warranty covers: ViewSonic® warrants its sole option repair or replace the product with the product. Replacement product or parts may also have other acts of nature, unauthorized product modification, or failure...
User Guide
Page 19
Customer Support Country/ Region United States Canada Telephone/Fax T: (800) 688-6688 F: (909) 468-1202 T: (800) 688-6688 F: (909) 468-1202 Email/ Website service.us@viewsonic.com www.viewsonic.com/support service.ca@viewsonic.com www.viewsonic.com/support 07/99 ViewSonic® Corporation 381 Brea Canyon Road Walnut, CA 91789 Tel (909) 869-7976 Tel (800) 688-6688 Fax (909) 468-1202
Customer Support Country/ Region United States Canada Telephone/Fax T: (800) 688-6688 F: (909) 468-1202 T: (800) 688-6688 F: (909) 468-1202 Email/ Website service.us@viewsonic.com www.viewsonic.com/support service.ca@viewsonic.com www.viewsonic.com/support 07/99 ViewSonic® Corporation 381 Brea Canyon Road Walnut, CA 91789 Tel (909) 869-7976 Tel (800) 688-6688 Fax (909) 468-1202


