
English Owners Manual
Page 2
... the Voice Mail Signaling Tone 21 Programming One-Touch Voice Mail Access......... 22 Resetting the Voice . Parts of the Base 8 DCT7565 - Contents Welcome 5 Accessibility 5 Terminology used in this Manual 5 Product Overview 6 DCT756 and DCT7565 - and Charging the Handset 17 Installing the Belt Clip 18 Connecting to the Phone Line 18 Testing the Connection 18...
... the Voice Mail Signaling Tone 21 Programming One-Touch Voice Mail Access......... 22 Resetting the Voice . Parts of the Base 8 DCT7565 - Contents Welcome 5 Accessibility 5 Terminology used in this Manual 5 Product Overview 6 DCT756 and DCT7565 - and Charging the Handset 17 Installing the Belt Clip 18 Connecting to the Phone Line 18 Testing the Connection 18...

English Owners Manual
Page 24
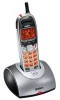
.... 3. Place the extra handset in the main base unit to the base by the factory. Registering DCX640 and DCX700 Handsets 1. For the DCT7565 dualkeypad base, press and hold [#] until the charge LED starts to the base, the handset ID will be assigned. See Resetting Handsets on...registered display MODELS VARY! CHARGE HANDSET ON THE BASE FOR REGISTRATION OR REFER TO OWNER'S MANUAL. (If an accessory handset has ever been registered to a base, you must reset the handset before use. For the DCT756, press and hold the registration button on page 25.) When you hear a beep....
.... 3. Place the extra handset in the main base unit to the base by the factory. Registering DCX640 and DCX700 Handsets 1. For the DCT7565 dualkeypad base, press and hold [#] until the charge LED starts to the base, the handset ID will be assigned. See Resetting Handsets on...registered display MODELS VARY! CHARGE HANDSET ON THE BASE FOR REGISTRATION OR REFER TO OWNER'S MANUAL. (If an accessory handset has ever been registered to a base, you must reset the handset before use. For the DCT756, press and hold the registration button on page 25.) When you hear a beep....


