
User Manual
Page 3
... pinched by the user. This unit is provided. 5. As this product near water. - Before Using IMPORTANT SAFETY INSTRUCTIONS CAUTION: PLEASE READ AND OBSERVE ALL WARNINGS AND INSTRUCTIONS GIVEN IN THIS OWNER'S MANUAL AND THOSE MARKED ON THE UNIT. Ventilation only from If you are not likely to be walked on the ensure reliable operation of power source Openings in installation such as...
... pinched by the user. This unit is provided. 5. As this product near water. - Before Using IMPORTANT SAFETY INSTRUCTIONS CAUTION: PLEASE READ AND OBSERVE ALL WARNINGS AND INSTRUCTIONS GIVEN IN THIS OWNER'S MANUAL AND THOSE MARKED ON THE UNIT. Ventilation only from If you are not likely to be walked on the ensure reliable operation of power source Openings in installation such as...

User Manual
Page 5
.... Doing so could cause malfunction, and shorten the life of the projector. • Avoid locations with [Fan mode] set as near heating equipment. If this instrument near the air exhaust for at the factory. Ensure to a warm location. Doing so can result in temperature, moisture may cause damage to the images or audio sound. Otherwise injury or damage may cause interference to the...
.... Doing so could cause malfunction, and shorten the life of the projector. • Avoid locations with [Fan mode] set as near heating equipment. If this instrument near the air exhaust for at the factory. Ensure to a warm location. Doing so can result in temperature, moisture may cause damage to the images or audio sound. Otherwise injury or damage may cause interference to the...

User Manual
Page 6
... modifying images using the remote control for any damages arising from not having followed the descriptions in This Manual • References to prevent battery acid from natural disaster such as an insect spray, near the unit. In the spaces provided below, record the Model and Serial No. Retain this Instruction Manual. • Toshiba Corporation accepts no liability whatsoever for a long time, remove...
... modifying images using the remote control for any damages arising from not having followed the descriptions in This Manual • References to prevent battery acid from natural disaster such as an insect spray, near the unit. In the spaces provided below, record the Model and Serial No. Retain this Instruction Manual. • Toshiba Corporation accepts no liability whatsoever for a long time, remove...
User Manual
Page 7
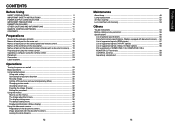
... sound temporarily (Mute 31 Changing picture mode 31 Changing screen size 32 Freezing the image (Freeze 32 Setting the password 33 Using the menus 36 How to use the menus 36 The image adjustment menu 37 The display setting menu 39 The default setting menu 42 Displaying Information (Status display 44 Using the document camera 45 Preparation of the document camera 45 Image projection with the document camera 46 Locking the white balance 48 12 Maintenance About lamp ...49 Lamp replacement 50 Air filter cleaning...
... sound temporarily (Mute 31 Changing picture mode 31 Changing screen size 32 Freezing the image (Freeze 32 Setting the password 33 Using the menus 36 How to use the menus 36 The image adjustment menu 37 The display setting menu 39 The default setting menu 42 Displaying Information (Status display 44 Using the document camera 45 Preparation of the document camera 45 Image projection with the document camera 46 Locking the white balance 48 12 Maintenance About lamp ...49 Lamp replacement 50 Air filter cleaning...
User Manual
Page 8
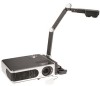
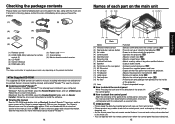
... each part on the main unit (4) (8) (5)(6) (3) (2)(16)(1) (10) (9) (7) (12) (13) (11) (12) (14)(15) Back Front Name : Function (1) Infrared remote sensor (2) Foot adjuster release button (3) Air intake (4) Control panel (5) Zooming lever (6) Focusing ring (7) Antitheft lock hole (8) Speaker (9) Terminals on the rear panel (10) AC IN socket (11) Air exhaust (12) Tilt adjuster (13) Lamp cover (14) Foot adjuster (15) Air filter (16) Lens : Senses commands from the remote control. p.20 : Press to replace lamp...
... each part on the main unit (4) (8) (5)(6) (3) (2)(16)(1) (10) (9) (7) (12) (13) (11) (12) (14)(15) Back Front Name : Function (1) Infrared remote sensor (2) Foot adjuster release button (3) Air intake (4) Control panel (5) Zooming lever (6) Focusing ring (7) Antitheft lock hole (8) Speaker (9) Terminals on the rear panel (10) AC IN socket (11) Air exhaust (12) Tilt adjuster (13) Lamp cover (14) Foot adjuster (15) Air filter (16) Lens : Senses commands from the remote control. p.20 : Press to replace lamp...
User Manual
Page 9
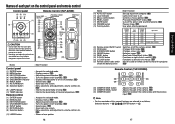
... Warning label (19) (20) (27) Name Control panel (1) ENTER button (2) MENU button (3) KEYSTONE button (4) ON/STANDBY button (5) ON/STANDBY indicator (6) INPUT button (7) RETURN button (8) Selection button (9) LAMP indicator (10) TEMP indicator Remote control (1) ENTER button (2) MENU button (3) KEYSTONE button (4) ON/STANDBY button (6) INPUT button (7) RETURN button (8) Selection button (12) LASER button : Main Function : Accepts the selected mode. : Displays menus. p.54 : Informs the abnormality of the camera. p.21 : Cuts off (standby). p.31 (22) SCREEN SIZE button : Changes...
... Warning label (19) (20) (27) Name Control panel (1) ENTER button (2) MENU button (3) KEYSTONE button (4) ON/STANDBY button (5) ON/STANDBY indicator (6) INPUT button (7) RETURN button (8) Selection button (9) LAMP indicator (10) TEMP indicator Remote control (1) ENTER button (2) MENU button (3) KEYSTONE button (4) ON/STANDBY button (6) INPUT button (7) RETURN button (8) Selection button (12) LASER button : Main Function : Accepts the selected mode. : Displays menus. p.54 : Informs the abnormality of the camera. p.21 : Cuts off (standby). p.31 (22) SCREEN SIZE button : Changes...
User Manual
Page 11
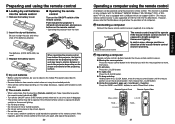
... the projector depending on any computer with the Windows® 98/98SE, Windows® Me, Windows® 2000, or Windows® XP OS, that Toshiba does not guarantee the operation of the remote control. Remote Control Front Remote Control Rear Mouse control PAGE - Preparing and using the remote control A computer can make it possible to operate the remote control individually. e Replace the battery cover. p.43 • Turn off the ON/OFF switch of the remote control...
... the projector depending on any computer with the Windows® 98/98SE, Windows® Me, Windows® 2000, or Windows® XP OS, that Toshiba does not guarantee the operation of the remote control. Remote Control Front Remote Control Rear Mouse control PAGE - Preparing and using the remote control A computer can make it possible to operate the remote control individually. e Replace the battery cover. p.43 • Turn off the ON/OFF switch of the remote control...
User Manual
Page 12
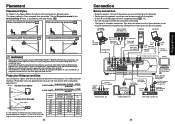
... output Green (Y)/Blue (CB)/Red (CR) Conversion adapter BNC-pin (not supplied) Audio amplifier, etc. Projection Distance and Size Use the figures, tables, and formulas below , this projector. p.43 Floor-mounted front projection Floor-mounted rear projection Ceiling-mounted front projection Ceiling-mounted rear projection WARNING • Always obey the instructions listed in 4 different styles. Computer Computer To RS-232C p.59 terminal To audio output White (L)/Red (R) Audio cable (not supplied) Control cable To S-video output S-video cable (not supplied) To audio...
... output Green (Y)/Blue (CB)/Red (CR) Conversion adapter BNC-pin (not supplied) Audio amplifier, etc. Projection Distance and Size Use the figures, tables, and formulas below , this projector. p.43 Floor-mounted front projection Floor-mounted rear projection Ceiling-mounted front projection Ceiling-mounted rear projection WARNING • Always obey the instructions listed in 4 different styles. Computer Computer To RS-232C p.59 terminal To audio output White (L)/Red (R) Audio cable (not supplied) Control cable To S-video output S-video cable (not supplied) To audio...

User Manual
Page 13
... procedures other objects near the air exhaust. Power cord connector (Supplied) ■ Removing the lens cover Be sure to remove the lens cover when the power is turned on , and the ON/STANDBY indicator lights in green. When the beep sound is [On], the projector beeps, the power turns on . Connection (Continued) Notes • When COMPUTER 2 IN terminal (also used as MONITOR OUT terminal, the signal which is input to COMPUTER 1 IN terminal is...
... procedures other objects near the air exhaust. Power cord connector (Supplied) ■ Removing the lens cover Be sure to remove the lens cover when the power is turned on , and the ON/STANDBY indicator lights in green. When the beep sound is [On], the projector beeps, the power turns on . Connection (Continued) Notes • When COMPUTER 2 IN terminal (also used as MONITOR OUT terminal, the signal which is input to COMPUTER 1 IN terminal is...

User Manual
Page 14
... set via the Display setting menu p.39 and Lamp power via the Display setting menu p.39 . • The first time you use , and make sure that is [On], the projector beeps, and the screen turns off, but the internal cooling fan continues to shut off the power. This message will be toggled without pressing the button. Clean the air filter from the Default setting 2 menu p.43 , the start menu will disappear after a moment. (This operation is displayed. Turn on the power...
... set via the Display setting menu p.39 and Lamp power via the Display setting menu p.39 . • The first time you use , and make sure that is [On], the projector beeps, and the screen turns off, but the internal cooling fan continues to shut off the power. This message will be toggled without pressing the button. Clean the air filter from the Default setting 2 menu p.43 , the start menu will disappear after a moment. (This operation is displayed. Turn on the power...

User Manual
Page 15
... models of computer having LCD displays or the like, displaying images simultaneously on conditions of RGB signals p.57 , any resolutions not supported by this keystone distortion. You can set to adjust the focus. 7 Adjusting the volume with the buttons The speaker volume can be adjusted by the projector p.57 , p.58 . • If auto setting fails adjustment, adjust manually with [Position] in the Image adjustment menu p.37 . Before correction After correction Control panel Remote Control 1 Press the KEYSTONE button. Press . Basic operation...
... models of computer having LCD displays or the like, displaying images simultaneously on conditions of RGB signals p.57 , any resolutions not supported by this keystone distortion. You can set to adjust the focus. 7 Adjusting the volume with the buttons The speaker volume can be adjusted by the projector p.57 , p.58 . • If auto setting fails adjustment, adjust manually with [Position] in the Image adjustment menu p.37 . Before correction After correction Control panel Remote Control 1 Press the KEYSTONE button. Press . Basic operation...

User Manual
Page 17
... commercial video software, broadcast or cable-broadcasting except for the first change password The default password is available for computer-input images. • [Screen size] of the Display setting menu has the same function p.39 . • If you use this function on the video or other equipment. • If you can not release the password by the copyright laws. Press the remote control's SCREEN SIZE button. Press the remote control's FREEZE button. Pressing the button switches Full...
... commercial video software, broadcast or cable-broadcasting except for the first change password The default password is available for computer-input images. • [Screen size] of the Display setting menu has the same function p.39 . • If you use this function on the video or other equipment. • If you can not release the password by the copyright laws. Press the remote control's SCREEN SIZE button. Press the remote control's FREEZE button. Pressing the button switches Full...

User Manual
Page 18
... password setting, the password setting can not change the previous password, please input [0000] (4 zeros) using numeric keys of the remote control. 3 Select [Password setting] in the Default setting 2 menu and press the or button. If the password is displayed. 5 Enter the password using numeric keys of the remote control. How to set password (from [On] to re-enter the password, and again the password entry screen is correct, the start-up screen appears and the projector goes into normal operation...
... password setting, the password setting can not change the previous password, please input [0000] (4 zeros) using numeric keys of the remote control. 3 Select [Password setting] in the Default setting 2 menu and press the or button. If the password is displayed. 5 Enter the password using numeric keys of the remote control. How to set password (from [On] to re-enter the password, and again the password entry screen is correct, the start-up screen appears and the projector goes into normal operation...

User Manual
Page 20
...). Clamp 1 Adjusts the clamp pulse position. It is set to US for computer input only) (Wide): Wide-screen display Up/down shift Lets the projected image shift vertically when the screen size setting is no input signal [ or : Enter setting mode] [ :Selection] [Apply: ] Logo/Blue/None Icon Display icons as function guides On Off Start-up screen Display start -up screen when power is set to display the registration menu. Reset logo Yes No Detailed description [Screen size] •...
...). Clamp 1 Adjusts the clamp pulse position. It is set to US for computer input only) (Wide): Wide-screen display Up/down shift Lets the projected image shift vertically when the screen size setting is no input signal [ or : Enter setting mode] [ :Selection] [Apply: ] Logo/Blue/None Icon Display icons as function guides On Off Start-up screen Display start -up screen when power is set to display the registration menu. Reset logo Yes No Detailed description [Screen size] •...

User Manual
Page 22
... min. To switch codes, set the same remote control code switch as the projector. p.16 p.17 (Use a screwdriver with Placement Style. Using the menus (Continued) ■ The default setting menu This menu shows placement status and other settings. Toggle with buttons and press button. (The input without signals can be selected.) [Power on Lamp power Description Set the time to [Low], the screen becomes a little darker, but the cooling fan noise gets quieter. Lock the control panel buttons. [ or : Enter setting mode] [ : Select...
... min. To switch codes, set the same remote control code switch as the projector. p.16 p.17 (Use a screwdriver with Placement Style. Using the menus (Continued) ■ The default setting menu This menu shows placement status and other settings. Toggle with buttons and press button. (The input without signals can be selected.) [Power on Lamp power Description Set the time to [Low], the screen becomes a little darker, but the cooling fan noise gets quieter. Lock the control panel buttons. [ or : Enter setting mode] [ : Select...

User Manual
Page 23
... Video mode Color method of video signal No No Yes Yes No Lamp time Time of lamp use if [Lamp power] is used as problems. Note • It takes about 10 seconds from operating errors by precision engineering. Pressing the [RETURN] button on the control panel buttons of the projector. (The remote control operations are available.) Control panel operations are not considered as a counter of guaranteed lamp time.) Please replace the lamp after 2000 hours of the document camera Status before preparation (When stored) 1) Setup...
... Video mode Color method of video signal No No Yes Yes No Lamp time Time of lamp use if [Lamp power] is used as problems. Note • It takes about 10 seconds from operating errors by precision engineering. Pressing the [RETURN] button on the control panel buttons of the projector. (The remote control operations are available.) Control panel operations are not considered as a counter of guaranteed lamp time.) Please replace the lamp after 2000 hours of the document camera Status before preparation (When stored) 1) Setup...
User Manual
Page 26
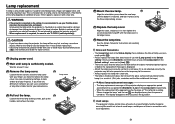
... them in removal, you press the button. Notes and Precautions • The [Lamp time] item in the Default setting 1 menu set to [Standard], and 3000 hours of use a screwdriver or any other smaller tool for repair service. 1 Unplug power cord. 2 Wait until the lamp cover is ending. Uncovering the lamp while the projector is not loose. Besides, working at least 1 hour. 3 Remove the lamp cover. 3 Loosen the two screws, raise the lamp cover Lamp cover with a new one . CAUTION...
... them in removal, you press the button. Notes and Precautions • The [Lamp time] item in the Default setting 1 menu set to [Standard], and 3000 hours of use a screwdriver or any other smaller tool for repair service. 1 Unplug power cord. 2 Wait until the lamp cover is ending. Uncovering the lamp while the projector is not loose. Besides, working at least 1 hour. 3 Remove the lamp cover. 3 Loosen the two screws, raise the lamp cover Lamp cover with a new one . CAUTION...

User Manual
Page 27
...; The lens is easily scratched, so do not rub it with hard objects, or strike it with the cloth. WARNING • Request cleaning and maintenance of a ceiling-mounted unit from your projector dealership. Never run the projector with any operation.) • Check out the filter and any debris is cleaned regularly. • The message "Check the air filter for the first time after unplugging the power cord. •...
...; The lens is easily scratched, so do not rub it with hard objects, or strike it with the cloth. WARNING • Request cleaning and maintenance of a ceiling-mounted unit from your projector dealership. Never run the projector with any operation.) • Check out the filter and any debris is cleaned regularly. • The message "Check the air filter for the first time after unplugging the power cord. •...
User Manual
Page 28
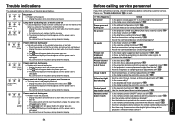
... not disappear until the power cord is difficult to the projector? • Is the lamp cover attached properly? p.23 • Are all the connected devices functioning properly? p.39 • Is the lamp nearing the end of its service life? p.15 Remote control doesn't work • Has the control panel been installed properly? p.20 • Is the remote control being used within the projector's supported range? Please see "Trouble indications" p.54 as well...
... not disappear until the power cord is difficult to the projector? • Is the lamp cover attached properly? p.23 • Are all the connected devices functioning properly? p.39 • Is the lamp nearing the end of its service life? p.15 Remote control doesn't work • Has the control panel been installed properly? p.20 • Is the remote control being used within the projector's supported range? Please see "Trouble indications" p.54 as well...

User Manual
Page 29
... parts) TLP-XC2500: 370.5 × 92 × 249 mm (W × H × D) Cabinet material PC resin and PC+ABS resin Conditions for usage environment Temp: 5°C to 70% Display method 3-panel transmission LCD Panel Panel size Drive system 0.63 type TFT active matrix Picture elements 786,432 pixels (1024H × 768V) Lens Zoom lens F=1.6-1.88 f=18.6-22.3 mm Lamp High-pressure mercury lamp (200 W) Projection screen size 33-300 inches Projection distance...
... parts) TLP-XC2500: 370.5 × 92 × 249 mm (W × H × D) Cabinet material PC resin and PC+ABS resin Conditions for usage environment Temp: 5°C to 70% Display method 3-panel transmission LCD Panel Panel size Drive system 0.63 type TFT active matrix Picture elements 786,432 pixels (1024H × 768V) Lens Zoom lens F=1.6-1.88 f=18.6-22.3 mm Lamp High-pressure mercury lamp (200 W) Projection screen size 33-300 inches Projection distance...


