

User Manual
Page 1
Others Maintenance Operations Preparations Before Using OWNER'S MANUAL 3LCD DATA PROJECTOR TLP-T70M (XGA) TLP-T71M (XGA / With Document Camera) TLP-T60M (XGA) TLP-T61M (XGA / With Document Camera) TLP-S70 (SVGA) TLP-S71 (SVGA / With Document Camera) TLP-S40 (SVGA) TLP-S41 (SVGA / With Document Camera) TLP-T70M / T60M / TLP-S70/TLP-S40
Others Maintenance Operations Preparations Before Using OWNER'S MANUAL 3LCD DATA PROJECTOR TLP-T70M (XGA) TLP-T71M (XGA / With Document Camera) TLP-T60M (XGA) TLP-T61M (XGA / With Document Camera) TLP-S70 (SVGA) TLP-S71 (SVGA / With Document Camera) TLP-S40 (SVGA) TLP-S41 (SVGA / With Document Camera) TLP-T70M / T60M / TLP-S70/TLP-S40
User Manual
Page 2
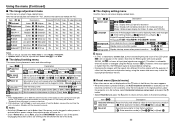
... known to the State of electric shock to persons. This unit is provided or the manufacturer's instructions have been adhered to. 3 Before Using Do not look at his own expense. This product should be operated only from the type of power source indicated on . DO NOT OPEN... sufficient magnitude to constitute a risk of California to cause birth defects or other instructions. In a domestic environment this unit will be repaired by Toshiba, could void the user's authority to operate the equipment. WARNING: Handling the cord on a bed, sofa, rug or other sources, refer ...
... known to the State of electric shock to persons. This unit is provided or the manufacturer's instructions have been adhered to. 3 Before Using Do not look at his own expense. This product should be operated only from the type of power source indicated on . DO NOT OPEN... sufficient magnitude to constitute a risk of California to cause birth defects or other instructions. In a domestic environment this unit will be repaired by Toshiba, could void the user's authority to operate the equipment. WARNING: Handling the cord on a bed, sofa, rug or other sources, refer ...

User Manual
Page 3
...product should follow the manufacturer's instructions, and should be situated away from the wall outlet before cleaning. A product and cart combination should use the product in a fire or electric shock. Quick stops, excessive force, and uneven surfaces may fall , causing serious injury to ...pictures at plugs, convenience receptacles, and the point where they are not likely to lightning and power-line surges. 11. Before Using IMPORTANT SAFETY INSTRUCTIONS (Continued) 5. Power-supply cords should be moved with the product. Overloading tub; Cleaning Unplug this product during ...
...product should follow the manufacturer's instructions, and should be situated away from the wall outlet before cleaning. A product and cart combination should use the product in a fire or electric shock. Quick stops, excessive force, and uneven surfaces may fall , causing serious injury to ...pictures at plugs, convenience receptacles, and the point where they are not likely to lightning and power-line surges. 11. Before Using IMPORTANT SAFETY INSTRUCTIONS (Continued) 5. Power-supply cords should be moved with the product. Overloading tub; Cleaning Unplug this product during ...
User Manual
Page 4
..., be careful not to determine that are required, be particularly careful. 23. If such parts should be sure the service technician has used replacement parts specified by users.) 20. b) If liquid has been spilled, or objects have the same characteristics as the original part. ...adjustment of time. d) If the product does not operate normally by the operating instructions as opening or removing covers may result. 7 Before Using Do not leave thermalpaper documents or easily deformed items on the thermal paper, or cause deformation or warping. 22. f) When the product exhibits...
..., be careful not to determine that are required, be particularly careful. 23. If such parts should be sure the service technician has used replacement parts specified by users.) 20. b) If liquid has been spilled, or objects have the same characteristics as the original part. ...adjustment of time. d) If the product does not operate normally by the operating instructions as opening or removing covers may result. 7 Before Using Do not leave thermalpaper documents or easily deformed items on the thermal paper, or cause deformation or warping. 22. f) When the product exhibits...
User Manual
Page 5
.... Plug configuration Plug type EURO Line voltage 220 - 240V Plug configuration Plug type Australian 240V 10A Line voltage 200 - 240V UK 220 - 240V Use a 5A fuse which is approved by ASTA or BSI to wait until the condensation naturally disappears. • In a high altitude location where air ...is thin, cooling efficiency of the lamp. • Using this happens, move it was originally packed at least 2 hours when there is exposed to the images or audio sound. Place and Manner of ...
.... Plug configuration Plug type EURO Line voltage 220 - 240V Plug configuration Plug type Australian 240V 10A Line voltage 200 - 240V UK 220 - 240V Use a 5A fuse which is approved by ASTA or BSI to wait until the condensation naturally disappears. • In a high altitude location where air ...is thin, cooling efficiency of the lamp. • Using this happens, move it was originally packed at least 2 hours when there is exposed to the images or audio sound. Place and Manner of ...
User Manual
Page 6
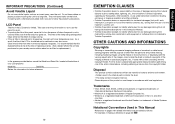
... before performing one of this replacement be sure to page 36: p.36 11 Before Using Retain this information for future reference. 10 EXEMPTION CLAUSES • Toshiba Corporation bears no responsibility in the case of damages arising from natural disaster such as ...provided below so as earthquakes, lightning, etc., fire not liable to Toshiba Corporation, operating by third parties, other accidents, or use under abnormal conditions including erroneous or improper operation and other problems. • Toshiba Corporation bears no responsibility for a long time. For example, if...
... before performing one of this replacement be sure to page 36: p.36 11 Before Using Retain this information for future reference. 10 EXEMPTION CLAUSES • Toshiba Corporation bears no responsibility in the case of damages arising from natural disaster such as ...provided below so as earthquakes, lightning, etc., fire not liable to Toshiba Corporation, operating by third parties, other accidents, or use under abnormal conditions including erroneous or improper operation and other problems. • Toshiba Corporation bears no responsibility for a long time. For example, if...
User Manual
Page 7
...sound temporarily (Mute 28 Freezing the image (Freeze 28 Enlarging the picture size (Resize 29 Displaying Information [Status display 30 Using the menus 31 How to use the menus 31 The image adjustment menu 32 The default setting menu 32 The display setting menu 33 Reset menu (Special... the camera 34 Installing the camera 34 Preparation of the document camera (when loading the camera 35 Preparing the document camera (for use being separated from the projector 35 Image projection with the document camera 36 Locking the white balance 38 12 Mainenance Air filter cleaning ...
...sound temporarily (Mute 28 Freezing the image (Freeze 28 Enlarging the picture size (Resize 29 Displaying Information [Status display 30 Using the menus 31 How to use the menus 31 The image adjustment menu 32 The default setting menu 32 The display setting menu 33 Reset menu (Special... the camera 34 Installing the camera 34 Preparation of the document camera (when loading the camera 35 Preparing the document camera (for use being separated from the projector 35 Image projection with the document camera 36 Locking the white balance 38 12 Mainenance Air filter cleaning ...
User Manual
Page 9
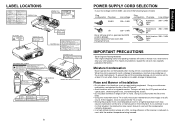
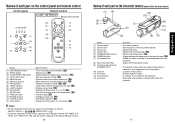
.... : Aligns with the projector's stay. : Connected to the accessory camera cable when a camera is used separated from the projector. 17 Preparations Names of each part on the document camera (models with the TLP-T60M, TLP- p.22 : Selects input. p.27 : Sets up image and mode. p.31 : Menu selections and..., TLP-T71M, see the Owner's Manual of the Mouse Remote Control. 16 Names of this manual, buttons are referred to the projector. : Used when the camera is on the control panel and remote control Control panel Remote Control CLASS 1 LED PRODUCT Remote control transmitter (7) (8)...
.... : Aligns with the projector's stay. : Connected to the accessory camera cable when a camera is used separated from the projector. 17 Preparations Names of each part on the document camera (models with the TLP-T60M, TLP- p.22 : Selects input. p.27 : Sets up image and mode. p.31 : Menu selections and..., TLP-T71M, see the Owner's Manual of the Mouse Remote Control. 16 Names of this manual, buttons are referred to the projector. : Used when the camera is on the control panel and remote control Control panel Remote Control CLASS 1 LED PRODUCT Remote control transmitter (7) (8)...
User Manual
Page 10
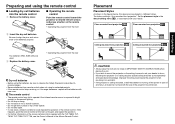
..., replace all the batteries with new ones. Mounting the projector on the remote control. • Operating the projector from remote control when not using the remote control s Loading dry-cell batteries into the remote control q Remove the battery cover. Be sure to bright sunlight or fluorescent lighting....sold separately) and specialized knowledge. Approx. 15° Approx. 5m Two batteries (R03, SIZE AAA) are used. If this device can be sure to ask your needs. T61M, TLP-T70M, TLP-T71M, see the Owner's Manual of the Mouse Remote Control. 18 Placement Placement Styles As shown in the...
..., replace all the batteries with new ones. Mounting the projector on the remote control. • Operating the projector from remote control when not using the remote control s Loading dry-cell batteries into the remote control q Remove the battery cover. Be sure to bright sunlight or fluorescent lighting....sold separately) and specialized knowledge. Approx. 15° Approx. 5m Two batteries (R03, SIZE AAA) are used. If this device can be sure to ask your needs. T61M, TLP-T70M, TLP-T71M, see the Owner's Manual of the Mouse Remote Control. 18 Placement Placement Styles As shown in the...
User Manual
Page 11
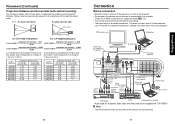
... to the projector. • Some types of these devices can or must be connected simultaneously. (Dotted lines mean items can be used with all the devices for full-size picture with TLP-S70/S71. screen size (cm) 40 (102) 60 (152) 80 (203) 100 (254) 150 (381) 200 (508) 250 ...connection • Read the owner's manual of the device to connect to this projector. Placement (Continued) Projection Distance and Screen Size (with optical zooming) Use the figures, tables, and formulas below is the distance (m) between the lens and the screen, and corresponds to a range of the screen, and ...
... to the projector. • Some types of these devices can or must be connected simultaneously. (Dotted lines mean items can be used with all the devices for full-size picture with TLP-S70/S71. screen size (cm) 40 (102) 60 (152) 80 (203) 100 (254) 150 (381) 200 (508) 250 ...connection • Read the owner's manual of the device to connect to this projector. Placement (Continued) Projection Distance and Screen Size (with optical zooming) Use the figures, tables, and formulas below is the distance (m) between the lens and the screen, and corresponds to a range of the screen, and ...
User Manual
Page 12
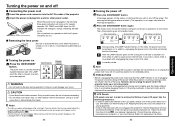
... fan continues to operate for an extended period. If the lamp overheats, it may fail to light, and its lifetime will not use , and make sure that you use the projector after purchase, after the start-up screen will disappear after a moment. (This operation is no problem with unplugging the ... LCD panel, take the following precautions. • In order to extend the lifetime of the LCD panel, always turn off the power when not in use the projector for a short while in order to time p.39 , and replace it is no longer valid after a moment. A message appears on for ...
... fan continues to operate for an extended period. If the lamp overheats, it may fail to light, and its lifetime will not use , and make sure that you use the projector after purchase, after the start-up screen will disappear after a moment. (This operation is no problem with unplugging the ... LCD panel, take the following precautions. • In order to extend the lifetime of the LCD panel, always turn off the power when not in use the projector for a short while in order to time p.39 , and replace it is no longer valid after a moment. A message appears on for ...

User Manual
Page 13
...pressing the foot adjuster release button, then slowly lower the projector. 6 Adjusting the picture size and focus 1 q Use the zooming lever to adjust the screen size. 2 w Use the focusing ring to adjust the focus. 7 Adjusting the volume with the document camera model: Computer Y/PB/PR ...cause the images to 1 the desired angle, then press the foot adjuster release button. Turn on the power. When the projector is used for language and lamp power selection and configuration is displayed in English. (If the screen is recommended that English has been selected. ...
...pressing the foot adjuster release button, then slowly lower the projector. 6 Adjusting the picture size and focus 1 q Use the zooming lever to adjust the screen size. 2 w Use the focusing ring to adjust the focus. 7 Adjusting the volume with the document camera model: Computer Y/PB/PR ...cause the images to 1 the desired angle, then press the foot adjuster release button. Turn on the power. When the projector is used for language and lamp power selection and configuration is displayed in English. (If the screen is recommended that English has been selected. ...
User Manual
Page 14
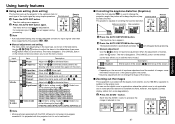
...Keystone menu appears. 2 Press the AUTO KEYSTONE button again. q Manual adjustment Use the buttons for input signals other than those supported by using simple operations. When the adjustment is used to the optical zoom. Using handy features s Using auto setting (Auto setting) This function sets up Adjusts the clamp pulse position ...8226; Auto adjustment/setting may not be lost, or the picture quality may be performed correctly for keystone adjustment. You can use the digital zoom in applications where the optical zoom is automatically adjusted/set.
...Keystone menu appears. 2 Press the AUTO KEYSTONE button again. q Manual adjustment Use the buttons for input signals other than those supported by using simple operations. When the adjustment is used to the optical zoom. Using handy features s Using auto setting (Auto setting) This function sets up Adjusts the clamp pulse position ...8226; Auto adjustment/setting may not be lost, or the picture quality may be performed correctly for keystone adjustment. You can use the digital zoom in applications where the optical zoom is automatically adjusted/set.
User Manual
Page 15
...8226; Rarely, the picture could become garbled while the enlarged area is in effect. • The freeze function can be shrunk to be used on cable except for the purpose of another projector, overhead projector, etc. buttons to the original size. The resize function on a frozen ... muting. Press the remote control's MUTE button. Each time the ZOOM + button is in effect. • An enlarged image can be frozen using digital processing, enlarging will appear while freeze is being projected can be enlarged. 1 Press the remote control's RESIZE button. Notes • The ...
...8226; Rarely, the picture could become garbled while the enlarged area is in effect. • The freeze function can be shrunk to be used on cable except for the purpose of another projector, overhead projector, etc. buttons to the original size. The resize function on a frozen ... muting. Press the remote control's MUTE button. Each time the ZOOM + button is in effect. • An enlarged image can be frozen using digital processing, enlarging will appear while freeze is being projected can be enlarged. 1 Press the remote control's RESIZE button. Notes • The ...
User Manual
Page 16
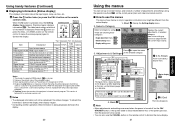
... or N (negative) for customer service, etc. Notes • The displayed information will not be saved. • You can also use time, etc. To refresh the information, dismiss the display, then display it again displays FAN TEMP LAMP ON CALL ON/ STANDBY information ... Value 5. Start Display the Setting display menu 2. When the button is being displayed dismisses the display. 30 Using the menus You can be adjusted/set by using . Using handy features (Continued) s Displaying Information [Status display] This displays information about getting a TLPLV2 replacement lamp (...
... or N (negative) for customer service, etc. Notes • The displayed information will not be saved. • You can also use time, etc. To refresh the information, dismiss the display, then display it again displays FAN TEMP LAMP ON CALL ON/ STANDBY information ... Value 5. Start Display the Setting display menu 2. When the button is being displayed dismisses the display. 30 Using the menus You can be adjusted/set by using . Using handy features (Continued) s Displaying Information [Status display] This displays information about getting a TLPLV2 replacement lamp (...
User Manual
Page 17
...size Description (Full): Display with LCD panel's resolution (Thru): Display with the purpose of the lamp. 32 s The display setting menu Use this menu to set to low, the screen becomes a little darker, but the keystone correction is not successful, stow the foot adjuster in... with sampling resolution (for computer input) (Wide): Wide-screen display (for Video, S-video, and Y/PB/PR) Language Select one of the languages below to use for displaying menus and messages [ : Enter setting mode] [ :Selection] [Apply: ] English/Français/Deutsch/Italiano/Español/ Português/ /...
...size Description (Full): Display with LCD panel's resolution (Thru): Display with the purpose of the lamp. 32 s The display setting menu Use this menu to set to low, the screen becomes a little darker, but the keystone correction is not successful, stow the foot adjuster in... with sampling resolution (for computer input) (Wide): Wide-screen display (for Video, S-video, and Y/PB/PR) Language Select one of the languages below to use for displaying menus and messages [ : Enter setting mode] [ :Selection] [Apply: ] English/Français/Deutsch/Italiano/Español/ Português/ /...
User Manual
Page 18
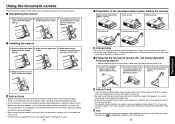
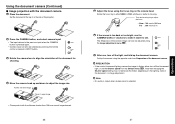
... while the projector is upright or kept in the opposite side of an arrow. When disconnecting the cable, pull it . s Preparing the document camera (for use the other end of the camera cable to the camera terminal on both sides of 90 degree. side up . Take care not to bump yourself...; Do not jolt or force the camera head or camera arm. If you don't use the bar, the camera may topple over. • Note that the camera may tip over if you use being protruded, connector may result. Using the document camera Please read this chapter if the model you attempt to mount...
... while the projector is upright or kept in the opposite side of an arrow. When disconnecting the cable, pull it . s Preparing the document camera (for use the other end of the camera cable to the camera terminal on both sides of 90 degree. side up . Take care not to bump yourself...; Do not jolt or force the camera head or camera arm. If you don't use the bar, the camera may topple over. • Note that the camera may tip over if you use being protruded, connector may result. Using the document camera Please read this chapter if the model you attempt to mount...
User Manual
Page 19
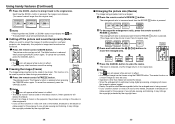
... • The input returns to see. Note • No audio is output when camera input is pressed again. • Camera input can also be adjusted using the opposite order from the Default menu p.32 . PRECAUTION • If the room's fluorescent lighting causes the image to 5 m 6 If the screen is ...Far : 300 mm to flicker, either NEAR or FAR, whichever is too dark or too bright, use , turn off the light, and fold up the camera using the Image adjustment menu p.32 . 7 After use the CAMERA GAIN (+/-) buttons to make it easier to the previous input when the CAMERA button is ...
... • The input returns to see. Note • No audio is output when camera input is pressed again. • Camera input can also be adjusted using the opposite order from the Default menu p.32 . PRECAUTION • If the room's fluorescent lighting causes the image to 5 m 6 If the screen is ...Far : 300 mm to flicker, either NEAR or FAR, whichever is too dark or too bright, use , turn off the light, and fold up the camera using the Image adjustment menu p.32 . 7 After use the CAMERA GAIN (+/-) buttons to make it easier to the previous input when the CAMERA button is ...

User Manual
Page 20
... if power is turned off, will be dismissed with any operation.) • Check out the filter and any debris is found, use a ripped filter will worsen the air circulation inside the projector. Maintenance Air filter cleaning The air filter prevents dust and debris from getting...the Default menu. WARNING • Request cleaning and maintenance of a ceiling-mounted unit from your dealer about replacing it fills the screen. Using the document camera (Continued) s Locking the white balance Although the projector's camera is constantly adjusting the color balance of the images it ...
... if power is turned off, will be dismissed with any operation.) • Check out the filter and any debris is found, use a ripped filter will worsen the air circulation inside the projector. Maintenance Air filter cleaning The air filter prevents dust and debris from getting...the Default menu. WARNING • Request cleaning and maintenance of a ceiling-mounted unit from your dealer about replacing it fills the screen. Using the document camera (Continued) s Locking the white balance Although the projector's camera is constantly adjusting the color balance of the images it ...
User Manual
Page 21
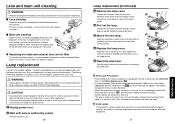
... and main unit cleaning WARNING • Request cleaning and maintenance of a ceiling-mounted unit from your projector dealership. • When replacing, always use lamp "TLPLV2" (sold separately). If this happens, replace it with your bare hands, bang it, or scratch it is not malfunction. (The...the handle to remove the lamp cover. 3 1 2 4 Pull out the lamp. Be careful not to display (a rough guide) the time of lamp use . Consult with a new one . • The lamp is 2 reached, and lock in the Status display menu. This is characteristic of environmentally harmful ...
... and main unit cleaning WARNING • Request cleaning and maintenance of a ceiling-mounted unit from your projector dealership. • When replacing, always use lamp "TLPLV2" (sold separately). If this happens, replace it with your bare hands, bang it, or scratch it is not malfunction. (The...the handle to remove the lamp cover. 3 1 2 4 Pull out the lamp. Be careful not to display (a rough guide) the time of lamp use . Consult with a new one . • The lamp is 2 reached, and lock in the Status display menu. This is characteristic of environmentally harmful ...


