
User Guide
Page 7
...its operation in accordance with the Information: requirements of the 5.25 GHz to 5.35 GHz and 5.65 GHz to co-channel Mobile Satellite systems. High power radars are allocated as primary users of the Low Voltage Directive 73/23/EEC, the EMC Directive 89/336/... European Union WEEE (Waste from Electrical and Electronic Equipment) Directive is TOSHIBA Europe GmbH, Hammfelddamm 8, 41460 Neuss, Germany. These radar stations can cause interference with an 802.11a radio device. If the product's battery or accumulator contains more than the specified values of waste management strategies ...
...its operation in accordance with the Information: requirements of the 5.25 GHz to 5.35 GHz and 5.65 GHz to co-channel Mobile Satellite systems. High power radars are allocated as primary users of the Low Voltage Directive 73/23/EEC, the EMC Directive 89/336/... European Union WEEE (Waste from Electrical and Electronic Equipment) Directive is TOSHIBA Europe GmbH, Hammfelddamm 8, 41460 Neuss, Germany. These radar stations can cause interference with an 802.11a radio device. If the product's battery or accumulator contains more than the specified values of waste management strategies ...
User Guide
Page 23
... 40 Setting up your computer 41 Connecting to a power source 41 Charging the main battery 44 Using the computer for the first time 44 Initial setup 45 Setting up your software 45 Registering your computer with Toshiba 45 To Shut down your computer 46 To Restart your computer 46 To place your...
... 40 Setting up your computer 41 Connecting to a power source 41 Charging the main battery 44 Using the computer for the first time 44 Initial setup 45 Setting up your software 45 Registering your computer with Toshiba 45 To Shut down your computer 46 To Restart your computer 46 To place your...
User Guide
Page 24
... optical disc 84 Playing optical media 85 Recording optical media 85 Removing a disc with the computer on 86 Removing a disc with the computer off 86 Toshiba's online resources 87 Chapter 3: Mobile Computing 88 Toshiba's energy-saver design 88 Running the computer on battery power 88 Battery Notice 89 Power management 90 Charging the main...
... optical disc 84 Playing optical media 85 Recording optical media 85 Removing a disc with the computer on 86 Removing a disc with the computer off 86 Toshiba's online resources 87 Chapter 3: Mobile Computing 88 Toshiba's energy-saver design 88 Running the computer on battery power 88 Battery Notice 89 Power management 90 Charging the main...

User Guide
Page 25
... 95 Power Plans 95 Using the eco power plan 97 Changing the main battery 97 Removing the battery from the computer .........97 Inserting a charged battery 99 Taking care of your battery 100 Safety precautions 100 Maintaining your battery 101 Disposing of used batteries 101 Traveling tips 102 Chapter 4: Exploring Your Computer's Features 103 Exploring the Start...
... 95 Power Plans 95 Using the eco power plan 97 Changing the main battery 97 Removing the battery from the computer .........97 Inserting a charged battery 99 Taking care of your battery 100 Safety precautions 100 Maintaining your battery 101 Disposing of used batteries 101 Traveling tips 102 Chapter 4: Exploring Your Computer's Features 103 Exploring the Start...
User Guide
Page 27
Contents 27 Power and the batteries 142 Keyboard problems 143 Display problems 144 Disk or storage drive problems 146 Error-checking 146 Optical disc drive problems 148 Sound system problems 149 ... 153 Data and system configuration backup in the Windows® operating system 154 If you need further assistance 159 Contacting Toshiba 159 Other Toshiba Internet Web sites 159 Toshiba's worldwide offices 160 Appendix A: TOSHIBA Function Keys 161 Functions 161 Help file 162 Display brightness 162 Output (Display switch 163 Disabling or enabling the touch...
Contents 27 Power and the batteries 142 Keyboard problems 143 Display problems 144 Disk or storage drive problems 146 Error-checking 146 Optical disc drive problems 148 Sound system problems 149 ... 153 Data and system configuration backup in the Windows® operating system 154 If you need further assistance 159 Contacting Toshiba 159 Other Toshiba Internet Web sites 159 Toshiba's worldwide offices 160 Appendix A: TOSHIBA Function Keys 161 Functions 161 Help file 162 Display brightness 162 Output (Display switch 163 Disabling or enabling the touch...

User Guide
Page 28
See the "Mobile Computing" section of the Toshiba User's Guide for energy efficiency. Toshiba is a partner in AC power mode. You can accompany you wherever you leave this computer to meet the latest ENERGY STAR® guidelines for more .... Your computer is set to a configuration that your computer will provide the most stable operating environment and optimum system performance for both AC power and battery modes. We recommend that you go. With your Toshiba computer, your computer is ENERGY STAR® qualified.
See the "Mobile Computing" section of the Toshiba User's Guide for energy efficiency. Toshiba is a partner in AC power mode. You can accompany you wherever you leave this computer to meet the latest ENERGY STAR® guidelines for more .... Your computer is set to a configuration that your computer will provide the most stable operating environment and optimum system performance for both AC power and battery modes. We recommend that you go. With your Toshiba computer, your computer is ENERGY STAR® qualified.

User Guide
Page 39
... both. Consider using a hard computer insulating pad or similarly suitable hard insulating material when using a computer on your skin. Turn off the computer. 2. Remove the battery pack. Exposure to an authorized service center. ❖ Avoid prolonged physical contact with the underside or surface of the computer. ❖ Computer base and palm...
... both. Consider using a hard computer insulating pad or similarly suitable hard insulating material when using a computer on your skin. Turn off the computer. 2. Remove the battery pack. Exposure to an authorized service center. ❖ Avoid prolonged physical contact with the underside or surface of the computer. ❖ Computer base and palm...
User Guide
Page 41
...cord/cable, and/or result in a fire or electric shock, possibly resulting in serious injury. These components include, but are not limited to charge the battery you use it. Be careful if you must complete all setup steps up to and including "Setting up your computer. To use external power or... the AC adaptor. Never pull on one socket could cause a fire or electric shock, possibly resulting in serious injury. Your computer contains a rechargeable main battery that the power plug (and extension cable plug if used) has been fully inserted into the socket, to charge the computer...
...cord/cable, and/or result in a fire or electric shock, possibly resulting in serious injury. These components include, but are not limited to charge the battery you use it. Be careful if you must complete all setup steps up to and including "Setting up your computer. To use external power or... the AC adaptor. Never pull on one socket could cause a fire or electric shock, possibly resulting in serious injury. Your computer contains a rechargeable main battery that the power plug (and extension cable plug if used) has been fully inserted into the socket, to charge the computer...

User Guide
Page 43
... plug in serious injury. Disconnect the AC power cord/cable and remove the main battery pack. See "Changing the main battery" on page 97 for information on the indicator panel glows white. The computer's main battery light gives you an indication of the computer. (Sample Illustration) Connecting the AC adaptor... connect or disconnect a power plug with wet hands. Never attempt to a live electrical outlet. The AC power light on replacing the main battery. Getting Started 43 Connecting to a power source _ + 2 Plug the AC adaptor cord into the DC-IN on the side of the main...
... plug in serious injury. Disconnect the AC power cord/cable and remove the main battery pack. See "Changing the main battery" on page 97 for information on the indicator panel glows white. The computer's main battery light gives you an indication of the computer. (Sample Illustration) Connecting the AC adaptor... connect or disconnect a power plug with wet hands. Never attempt to a live electrical outlet. The AC power light on replacing the main battery. Getting Started 43 Connecting to a power source _ + 2 Plug the AC adaptor cord into the DC-IN on the side of the main...

User Guide
Page 44
... panel and be careful to remove any pens or other hand to slowly open or close the display panel. Any small bright dots that , the battery will be able to hold the computer in place and use the other objects from the keyboard area before closing the display panel, place one.... To avoid damaging the display panel, do not force it beyond the point where it , see "Exploring Your Computer's Features" on and begin using the battery to power the computer, you to power the computer. When the computer is also an intrinsic characteristic of thin-film transistors (TFT) and is now...
... panel and be careful to remove any pens or other hand to slowly open or close the display panel. Any small bright dots that , the battery will be able to hold the computer in place and use the other objects from the keyboard area before closing the display panel, place one.... To avoid damaging the display panel, do not force it beyond the point where it , see "Exploring Your Computer's Features" on and begin using the battery to power the computer, you to power the computer. When the computer is also an intrinsic characteristic of thin-film transistors (TFT) and is now...

User Guide
Page 47
... sure to memory so that, when you restart the computer, you can continue working from where you power down using the Sleep command and the battery discharges fully, your pointer over the upper or lower right corner of the screen. 2 When the Windows® Charms appear, click the Settings ( ) Charm. Restart...
... sure to memory so that, when you restart the computer, you can continue working from where you power down using the Sleep command and the battery discharges fully, your pointer over the upper or lower right corner of the screen. 2 When the Windows® Charms appear, click the Settings ( ) Charm. Restart...
User Guide
Page 50
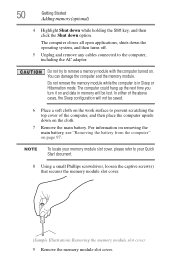
... the computer and the memory module. Do not try to the computer, including the AC adaptor. For information on removing the main battery, see "Removing the battery from the computer" on and data in Sleep or Hibernation mode. Do not remove the memory module while the computer is in memory... Adding memory (optional) 4 Highlight Shut down while holding the Shift key, and then click the Shut down on the cloth. 7 Remove the main battery. NOTE To locate your memory module slot cover, please refer to prevent scratching the top cover of the above cases, the Sleep configuration will be...
... the computer and the memory module. Do not try to the computer, including the AC adaptor. For information on removing the main battery, see "Removing the battery from the computer" on and data in Sleep or Hibernation mode. Do not remove the memory module while the computer is in memory... Adding memory (optional) 4 Highlight Shut down while holding the Shift key, and then click the Shut down on the cloth. 7 Remove the main battery. NOTE To locate your memory module slot cover, please refer to prevent scratching the top cover of the above cases, the Sleep configuration will be...

User Guide
Page 53
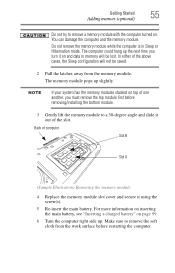
... and level when secured in Slot A. 16 Replace the memory module slot cover and secure it using the screw(s). 17 Re-insert the main battery. Getting Started 53 Adding memory (optional) latch latch (Sample Illustration) Pressing down on page 99. 18 Turn the computer right side up.... Back of computer Slot B Slot A (Sample Illustration) Inserting the memory module into position. For more information on inserting the main battery, see "Inserting a charged battery" on the memory module Do not force the memory module into the slot NOTE For this model, Slot A is the bottom slot. If...
... and level when secured in Slot A. 16 Replace the memory module slot cover and secure it using the screw(s). 17 Re-insert the main battery. Getting Started 53 Adding memory (optional) latch latch (Sample Illustration) Pressing down on page 99. 18 Turn the computer right side up.... Back of computer Slot B Slot A (Sample Illustration) Inserting the memory module into position. For more information on inserting the main battery, see "Inserting a charged battery" on the memory module Do not force the memory module into the slot NOTE For this model, Slot A is the bottom slot. If...
User Guide
Page 55
... module. 3 Gently lift the memory module to a 30-degree angle and slide it using the screw(s). 5 Re-insert the main battery. For more information on inserting the main battery, see "Inserting a charged battery" on . Getting Started 55 Adding memory (optional) Do not try to remove a memory module with the computer turned on page...
... module. 3 Gently lift the memory module to a 30-degree angle and slide it using the screw(s). 5 Re-insert the main battery. For more information on inserting the main battery, see "Inserting a charged battery" on . Getting Started 55 Adding memory (optional) Do not try to remove a memory module with the computer turned on page...

User Guide
Page 74
...your computer's settings NOTE The ( ) + P keys navigate through the options without activating a selection. For information about taking care of your computer's battery, see "Power Plans" on page 113. Refer to activate a selection. There are several ways in which you may also use the F4 key, ... to your power usage settings. You may also wish to change. See "Utilities" on page 95. Adjusting the quality of your battery" on cleaning and moving your computer's settings There are additional custom settings you wish to customize your operating system documentation or Help and...
...your computer's settings NOTE The ( ) + P keys navigate through the options without activating a selection. For information about taking care of your computer's battery, see "Power Plans" on page 113. Refer to activate a selection. There are several ways in which you may also use the F4 key, ... to your power usage settings. You may also wish to change. See "Utilities" on page 95. Adjusting the quality of your battery" on cleaning and moving your computer's settings There are additional custom settings you wish to customize your operating system documentation or Help and...

User Guide
Page 77
This feature saves your work since you save feature that can be activated. See your software documentation for further information. See "Saving your battery runs out of charge while you are working, you will lose all work frequently. Your work " on page 82 for details. 77 If the network ...
This feature saves your work since you save feature that can be activated. See your software documentation for further information. See "Saving your battery runs out of charge while you are working, you will lose all work frequently. Your work " on page 82 for details. 77 If the network ...

User Guide
Page 88
... your computer while traveling. You can use it for longer periods while traveling. Running the computer on battery power The computer contains a removable Lithium-Ion (Li-Ion) battery that enhance its maximum energy efficiency, so that you can recharge it is not being used, thereby ...conserving energy and saving money in the process. Toshiba's energy-saver design Your computer enters a low-power suspension mode when it...
... your computer while traveling. You can use it for longer periods while traveling. Running the computer on battery power The computer contains a removable Lithium-Ion (Li-Ion) battery that enhance its maximum energy efficiency, so that you can recharge it is not being used, thereby ...conserving energy and saving money in the process. Toshiba's energy-saver design Your computer enters a low-power suspension mode when it...
User Guide
Page 89
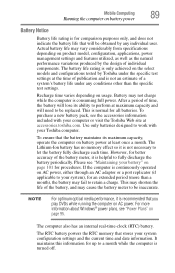
... utilized, as well as the natural performance variations produced by Toshiba under any individual user. This may shorten the life of a system's battery life under the specific test settings at accessories.toshiba.com. The battery life rating is only achieved on the select models and configurations...be obtained by any conditions other than a month), the battery may not charge while the computer is recommended that stores your Toshiba computer. The computer also has an internal real-time-clock (RTC) battery. The RTC battery powers the RTC memory that you play DVDs while running...
... utilized, as well as the natural performance variations produced by Toshiba under any individual user. This may shorten the life of a system's battery life under the specific test settings at accessories.toshiba.com. The battery life rating is only achieved on the select models and configurations...be obtained by any conditions other than a month), the battery may not charge while the computer is recommended that stores your Toshiba computer. The computer also has an internal real-time-clock (RTC) battery. The RTC battery powers the RTC memory that you play DVDs while running...
User Guide
Page 90
...setup changes, contact Toshiba's Customer Support Center. Your computer's Power Options utility can be charged before you can use the preset configuration. Charging the main battery The battery needs to be used to recharge. The battery charges whether the computer is on or off. The battery may only charge ... the power management options preset to a configuration that reduces the power required for system operation and will allow the battery to select a power level setting that will provide the most stable operating environment and optimum system performance for both AC power and...
...setup changes, contact Toshiba's Customer Support Center. Your computer's Power Options utility can be charged before you can use the preset configuration. Charging the main battery The battery needs to be used to recharge. The battery charges whether the computer is on or off. The battery may only charge ... the power management options preset to a configuration that reduces the power required for system operation and will allow the battery to select a power level setting that will provide the most stable operating environment and optimum system performance for both AC power and...
User Guide
Page 91
... being charged, although the charging status of your data to store your work" on page 82 Charging the RTC battery Your computer has an internal real-time clock (RTC) battery. For more information, see "Backing up to a month when the computer is low, the real-time clock and ...computer powered on . NOTE Depending on . When Hibernation mode is enabled and the RTC battery is turned on your system, the RTC battery may display the incorrect time and date or stop working. The RTC battery may vary by computer model. NOTE It is seldom necessary to reset the real-time...
... being charged, although the charging status of your data to store your work" on page 82 Charging the RTC battery Your computer has an internal real-time clock (RTC) battery. For more information, see "Backing up to a month when the computer is low, the real-time clock and ...computer powered on . NOTE Depending on . When Hibernation mode is enabled and the RTC battery is turned on your system, the RTC battery may display the incorrect time and date or stop working. The RTC battery may vary by computer model. NOTE It is seldom necessary to reset the real-time...


