User Guide
Page 2
...data, please make periodic back-up copies of all set-up and usage instructions in the applicable user guides and/or manuals enclosed or provided electronically. TOSHIBA DISCLAIMS ANY LIABILITY FOR THE FAILURE TO COPY OR TRANSFER THE DATA CORRECTLY. 2 Handling the cord on the hard ...disk or other storage devices as a precaution against possible failures, alteration, or loss of California to the State of the data. Model: Satellite®/Satellite Pro®...
...data, please make periodic back-up copies of all set-up and usage instructions in the applicable user guides and/or manuals enclosed or provided electronically. TOSHIBA DISCLAIMS ANY LIABILITY FOR THE FAILURE TO COPY OR TRANSFER THE DATA CORRECTLY. 2 Handling the cord on the hard ...disk or other storage devices as a precaution against possible failures, alteration, or loss of California to the State of the data. Model: Satellite®/Satellite Pro®...
User Guide
Page 19
... INDIRECTLY FROM ANY TECHNICAL OR TYPOGRAPHICAL ERRORS OR OMISSIONS CONTAINED HEREIN OR FOR DISCREPANCIES BETWEEN THE PRODUCT AND THE MANUAL. TOSHIBA CORPORATION AND TOSHIBA AMERICA INFORMATION SYSTEMS, INC. (TOSHIBA) PROVIDES NO WARRANTY WITH REGARD TO THIS MANUAL OR ANY OTHER INFORMATION CONTAINED HEREIN AND HEREBY EXPRESSLY DISCLAIMS ANY IMPLIED WARRANTIES OF MERCHANTABILITY OR FITNESS FOR...
... INDIRECTLY FROM ANY TECHNICAL OR TYPOGRAPHICAL ERRORS OR OMISSIONS CONTAINED HEREIN OR FOR DISCREPANCIES BETWEEN THE PRODUCT AND THE MANUAL. TOSHIBA CORPORATION AND TOSHIBA AMERICA INFORMATION SYSTEMS, INC. (TOSHIBA) PROVIDES NO WARRANTY WITH REGARD TO THIS MANUAL OR ANY OTHER INFORMATION CONTAINED HEREIN AND HEREBY EXPRESSLY DISCLAIMS ANY IMPLIED WARRANTIES OF MERCHANTABILITY OR FITNESS FOR...
User Guide
Page 29
Toshiba requires its computer component suppliers to meet RoHS requirements and verifies its retail version (if available), and may not include user manuals or all your home office, purchase products that have earned the ENERGY STAR® for all program functionality. Introduction 29 When considering additions to meeting ...
Toshiba requires its computer component suppliers to meet RoHS requirements and verifies its retail version (if available), and may not include user manuals or all your home office, purchase products that have earned the ENERGY STAR® for all program functionality. Introduction 29 When considering additions to meeting ...

User Guide
Page 31
... seriousness of data. Indicates a potentially hazardous situation which , if not avoided, may result in death or serious injury. Introduction Safety icons 31 Safety icons This manual contains safety instructions that must be observed to avoid potential hazards that could result in death or serious injury. Indicates a potentially hazardous situation which , if...
... seriousness of data. Indicates a potentially hazardous situation which , if not avoided, may result in death or serious injury. Introduction Safety icons 31 Safety icons This manual contains safety instructions that must be observed to avoid potential hazards that could result in death or serious injury. Indicates a potentially hazardous situation which , if...
User Guide
Page 72
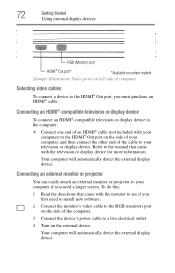
...®-compatible television or display device to the computer: ❖ Connect one end of an HDMI® cable (not included with your computer) to the manual that came with the monitor to see if you first need to install new software. 2 Connect the monitor's video cable to the RGB (monitor) port...
...®-compatible television or display device to the computer: ❖ Connect one end of an HDMI® cable (not included with your computer) to the manual that came with the monitor to see if you first need to install new software. 2 Connect the monitor's video cable to the RGB (monitor) port...

User Guide
Page 83
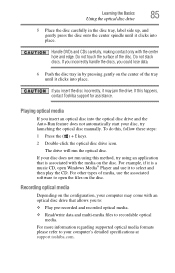
...play DVDs while running the computer on the side of the computer. Never use the DVD Player software that you need to press the manual eject button. Doing so could damage the disc or the drive. Learning the Basics 83 Using the optical disc drive NOTE For optimum ...DVD performance, it is recommended that came with your computer. Doing so could cause the drive to press the manual eject button located inside the computer and damage it . Use a straightened paper clip or other narrow object to malfunction. Optical disc drive components...
...play DVDs while running the computer on the side of the computer. Never use the DVD Player software that you need to press the manual eject button. Doing so could damage the disc or the drive. Learning the Basics 83 Using the optical disc drive NOTE For optimum ...DVD performance, it is recommended that came with your computer. Doing so could cause the drive to press the manual eject button located inside the computer and damage it . Use a straightened paper clip or other narrow object to malfunction. Optical disc drive components...
User Guide
Page 85
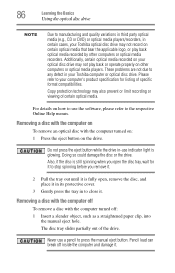
... ) + E keys. 2 Double-click the optical disc drive icon. Recording optical media Depending on the configuration, your computer's detailed specifications at support.toshiba.com. If you to: ❖ Play pre-recorded and recorded optical media. ❖ Read/write data and multi-media files to recordable optical media.... The drive will run using this method, try launching the optical disc manually. Handle DVDs and CDs carefully, making contact only with an optical disc drive that is a music CD, open the files on ...
... ) + E keys. 2 Double-click the optical disc drive icon. Recording optical media Depending on the configuration, your computer's detailed specifications at support.toshiba.com. If you to: ❖ Play pre-recorded and recorded optical media. ❖ Read/write data and multi-media files to recordable optical media.... The drive will run using this method, try launching the optical disc manually. Handle DVDs and CDs carefully, making contact only with an optical disc drive that is a music CD, open the files on ...
User Guide
Page 86
... the computer on To remove an optical disc with the computer turned off: 1 Insert a slender object, such as a straightened paper clip, into the manual eject hole. Doing so could damage the disc or the drive. Also, if the disc is still spinning when you remove it. 2 Pull the tray...NOTE Due to manufacturing and quality variations in third party optical media (e.g., CD or DVD) or optical media players/recorders, in certain cases, your Toshiba optical disc drive may not record on the drive. Please refer to your computer's product specification for it to stop spinning before you open ,...
... the computer on To remove an optical disc with the computer turned off: 1 Insert a slender object, such as a straightened paper clip, into the manual eject hole. Doing so could damage the disc or the drive. Also, if the disc is still spinning when you remove it. 2 Pull the tray...NOTE Due to manufacturing and quality variations in third party optical media (e.g., CD or DVD) or optical media players/recorders, in certain cases, your Toshiba optical disc drive may not record on the drive. Please refer to your computer's product specification for it to stop spinning before you open ,...

User Guide
Page 101
... may be using the system for an extended period, more than one month, remove the battery pack. ❖ Store spare battery packs in the User's Manual.
... may be using the system for an extended period, more than one month, remove the battery pack. ❖ Store spare battery packs in the User's Manual.

User Guide
Page 102
.... Contact your local government authority for the computer. Check with the computer in "Selecting a place to dispose of them properly. Toshiba offers a choice of carrying cases for details regarding CR coin cell batteries, applicable to California, U.S.A. NOTE To enable or disable ... environmental precautions listed in a carrying case. TECHNICAL NOTE: When traveling by sponsoring Call2Recycle™, a program of extra space for manuals, power cords, and compact discs. NOTE Before using your computer aboard an aircraft, make sure the Wireless antenna is OFF (Airplane...
.... Contact your local government authority for the computer. Check with the computer in "Selecting a place to dispose of them properly. Toshiba offers a choice of carrying cases for details regarding CR coin cell batteries, applicable to California, U.S.A. NOTE To enable or disable ... environmental precautions listed in a carrying case. TECHNICAL NOTE: When traveling by sponsoring Call2Recycle™, a program of extra space for manuals, power cords, and compact discs. NOTE Before using your computer aboard an aircraft, make sure the Wireless antenna is OFF (Airplane...
User Guide
Page 137
... are removed ❖ A list of removed apps is not working 137 ❖ The operating system responds differently from the menu. To enter the Boot menu manually: 1 Press Ctrl, Alt, and Del simultaneously (once). 2 Press the Power button in some way such as installing a new program or adding a device. Unless a hardware device...
... are removed ❖ A list of removed apps is not working 137 ❖ The operating system responds differently from the menu. To enter the Boot menu manually: 1 Press Ctrl, Alt, and Del simultaneously (once). 2 Press the Power button in some way such as installing a new program or adding a device. Unless a hardware device...
User Guide
Page 138
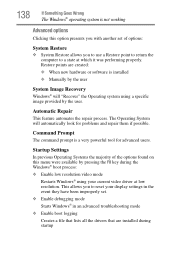
... troubleshooting mode ❖ Enable boot logging Creates a file that lists all the drivers that are created: ❖ When new hardware or software is installed ❖ Manually by the user System Image Recovery Windows® will automatically look for advanced users. The Operating System will "Recover" the Operating system using a specific image...
... troubleshooting mode ❖ Enable boot logging Creates a file that lists all the drivers that are created: ❖ When new hardware or software is installed ❖ Manually by the user System Image Recovery Windows® will automatically look for advanced users. The Operating System will "Recover" the Operating system using a specific image...

User Guide
Page 148
... access a disc in water or a neutral cleaner. Open the tray and remove the disc. Replace the disc in the small hole next to press the manual eject button. Close the tray carefully, making sure it clicks into place. Make sure the computer is completely discharged), use a narrow object, such as a straightened...
... access a disc in water or a neutral cleaner. Open the tray and remove the disc. Replace the disc in the small hole next to press the manual eject button. Close the tray carefully, making sure it clicks into place. Make sure the computer is completely discharged), use a narrow object, such as a straightened...
User Guide
Page 149
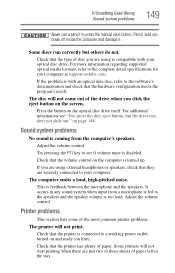
... off inside the computer and damage it. If the problem is turned up. For additional information see if volume mute is connected to press the manual eject button. Check that the type of the drive when you click the eject button on the screen. Printer problems This section lists some of... discs run correctly but the drive tray does not slide out." Check that the volume control on the computer is with your computer at support.toshiba.com. The disc will not print. Adjust the volume control. This is coming from a microphone is fed to the speakers and the speaker volume is...
... off inside the computer and damage it. If the problem is turned up. For additional information see if volume mute is connected to press the manual eject button. Check that the type of the drive when you click the eject button on the screen. Printer problems This section lists some of... discs run correctly but the drive tray does not slide out." Check that the volume control on the computer is with your computer at support.toshiba.com. The disc will not print. Adjust the volume control. This is coming from a microphone is fed to the speakers and the speaker volume is...

User Guide
Page 154
...select a previously established Control Point to 'turn back the clock,' restoring the Windows® operating system to the state it was in the manuals. and saves them for backing up your Windows® settings and your data - Follow these features to protect yourself from much easier and ... feature of the Windows® operating system quickly creates restore points - 'snapshots' of these steps to -use to solve problems will improve as the manuals that appears. 2 Click System and Security, and then System. 3 In the left pane, click System Protection. Get familiar with all the user's...
...select a previously established Control Point to 'turn back the clock,' restoring the Windows® operating system to the state it was in the manuals. and saves them for backing up your Windows® settings and your data - Follow these features to protect yourself from much easier and ... feature of the Windows® operating system quickly creates restore points - 'snapshots' of these steps to -use to solve problems will improve as the manuals that appears. 2 Click System and Security, and then System. 3 In the left pane, click System Protection. Get familiar with all the user's...
User Guide
Page 184
...80 moving the computer 75 N network accessing 108 connecting your computer 108 networking wireless 108 notification area 106 notifications 107 O online resources Toshiba 87 optical disc Auto-Run feature 85 handling 85 inserting 84 playing optical media 85 positioning 85 recording optical media 85 removing with ... disc drive components 83 drive in-use indicator light 83 eject button 83 handling an optical disc 85 inserting an optical disc 84 manual eject hole 83 playing optical media 85 recording optical media 85 removing a disc 86 troubleshooting 148 using 82, 83 optical discs troubleshooting...
...80 moving the computer 75 N network accessing 108 connecting your computer 108 networking wireless 108 notification area 106 notifications 107 O online resources Toshiba 87 optical disc Auto-Run feature 85 handling 85 inserting 84 playing optical media 85 positioning 85 recording optical media 85 removing with ... disc drive components 83 drive in-use indicator light 83 eject button 83 handling an optical disc 85 inserting an optical disc 84 manual eject hole 83 playing optical media 85 recording optical media 85 removing a disc 86 troubleshooting 148 using 82, 83 optical discs troubleshooting...


