User Manual
Page 50
... you plan to use AC power rather than battery power) are properly connected and ready. 2 Check to increase the brightness of the screen while on your screen display when you turn on the computer: 1 Make sure any external devices (such as the AC adaptor, if you may appear on battery power. 50 Getting...
... you plan to use AC power rather than battery power) are properly connected and ready. 2 Check to increase the brightness of the screen while on your screen display when you turn on the computer: 1 Make sure any external devices (such as the AC adaptor, if you may appear on battery power. 50 Getting...

User Manual
Page 51
... your computer, the Setup Wizard guides you through steps to set up your software When you turn on -screen instructions. Getting Started 51 Registering your computer with Toshiba Product registration is strongly recommended, and allows Toshiba to send you periodic updates, announcements, and special offers applicable to complete Product Registration will not diminish Customer...
... your computer, the Setup Wizard guides you through steps to set up your software When you turn on -screen instructions. Getting Started 51 Registering your computer with Toshiba Product registration is strongly recommended, and allows Toshiba to send you periodic updates, announcements, and special offers applicable to complete Product Registration will not diminish Customer...
User Manual
Page 58
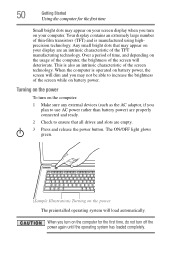
... or defragment the drive. Do not remove the memory module while the computer is best to press Enter to remove a memory module with the computer turned on top of the above cases, the Sleep configuration will be lost. When Safe Mode is highlighted, then press Enter. If so, consult Windows&#...174; Help and Support. 2 Pull the latches away from the memory module. NOTE The following screen may appear when you turn it is in memory will not be a sign that you may need to scan your system has the memory modules stacked on . You...
... or defragment the drive. Do not remove the memory module while the computer is best to press Enter to remove a memory module with the computer turned on top of the above cases, the Sleep configuration will be lost. When Safe Mode is highlighted, then press Enter. If so, consult Windows&#...174; Help and Support. 2 Pull the latches away from the memory module. NOTE The following screen may appear when you turn it is in memory will not be a sign that you may need to scan your system has the memory modules stacked on . You...

User Manual
Page 64
... method, follow the procedure below. To resize and recover the C: drive using recovery DVDs/media, if you to continue. (Sample Image) Warning screen Click Yes to specify the size for the C: partition. To recover using the second method, see "Restoring from recovery DVDs/media" on page ...69. If not, skip to step 4. 4 A warning screen appears, stating that when the recovery is turned off. 2 Press and hold the 0 (zero) key on your keyboard while powering on your computer's internal storage drive: 1 Make sure...
... method, follow the procedure below. To resize and recover the C: drive using recovery DVDs/media, if you to continue. (Sample Image) Warning screen Click Yes to specify the size for the C: partition. To recover using the second method, see "Restoring from recovery DVDs/media" on page ...69. If not, skip to step 4. 4 A warning screen appears, stating that when the recovery is turned off. 2 Press and hold the 0 (zero) key on your keyboard while powering on your computer's internal storage drive: 1 Make sure...

User Manual
Page 77
...Connect the monitor's video cable to the RGB (monitor) port on the side of the computer. 3 Connect the device's power cable to a live electrical outlet. 4 Turn on the side of your computer, and then connect the other video display device to the computer's HDMI™ Out port, refer to "Connecting an.../DVD player" on page 77. To do this: 1 Read the directions that came with the monitor to see if you first need a larger screen. Refer to the manual that came with your television. Connecting an HDMI™-compatible television or VCR/DVD player To connect an HDMI™-compatible...
...Connect the monitor's video cable to the RGB (monitor) port on the side of the computer. 3 Connect the device's power cable to a live electrical outlet. 4 Turn on the side of your computer, and then connect the other video display device to the computer's HDMI™ Out port, refer to "Connecting an.../DVD player" on page 77. To do this: 1 Read the directions that came with the monitor to see if you first need a larger screen. Refer to the manual that came with your television. Connecting an HDMI™-compatible television or VCR/DVD player To connect an HDMI™-compatible...
User Manual
Page 80
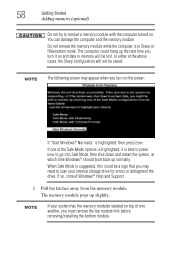
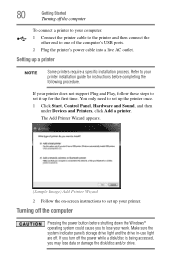
...down the Windows® operating system could cause you to lose your work. Refer to your printer installation guide for the first time. Turning off the computer Pressing the power button before completing the following procedure. If your printer. The Add Printer Wizard appears. (Sample Image...) Add Printer Wizard 2 Follow the on-screen instructions to set it up your printer does not support Plug and Play, follow these steps to set up a printer NOTE Some printers ...
...down the Windows® operating system could cause you to lose your work. Refer to your printer installation guide for the first time. Turning off the computer Pressing the power button before completing the following procedure. If your printer. The Add Printer Wizard appears. (Sample Image...) Add Printer Wizard 2 Follow the on-screen instructions to set it up your printer does not support Plug and Play, follow these steps to set up a printer NOTE Some printers ...
User Manual
Page 84
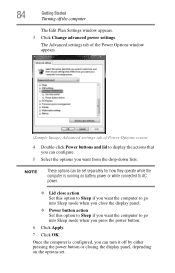
... power button. 6 Click Apply. 7 Click OK. The Advanced settings tab of the Power Options window appears. (Sample Image) Advanced settings tab of Power Options screen 4 Double-click Power buttons and lid to display the actions that you can configure. 5 Select the options you want the computer to go into Sleep... mode when you close action Set this option to go into Sleep mode when you can turn it off the computer The Edit Plan Settings window appears. 3 Click Change advanced power settings. NOTE These options can be set . 84 Getting...
... power button. 6 Click Apply. 7 Click OK. The Advanced settings tab of the Power Options window appears. (Sample Image) Advanced settings tab of Power Options screen 4 Double-click Power buttons and lid to display the actions that you can configure. 5 Select the options you want the computer to go into Sleep... mode when you close action Set this option to go into Sleep mode when you can turn it off the computer The Edit Plan Settings window appears. 3 Click Change advanced power settings. NOTE These options can be set . 84 Getting...
User Manual
Page 86
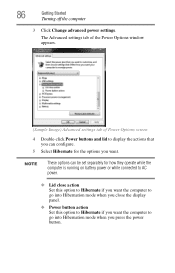
The Advanced settings tab of the Power Options window appears. (Sample Image) Advanced settings tab of Power Options screen 4 Double-click Power buttons and lid to go into Hibernation mode when you want. NOTE These options can configure. 5 Select Hibernate for how they operate ... you want the computer to display the actions that you can be set separately for the options you press the power button. 86 Getting Started Turning off the computer 3 Click Change advanced power settings.
The Advanced settings tab of the Power Options window appears. (Sample Image) Advanced settings tab of Power Options screen 4 Double-click Power buttons and lid to go into Hibernation mode when you want. NOTE These options can configure. 5 Select Hibernate for how they operate ... you want the computer to display the actions that you can be set separately for the options you press the power button. 86 Getting Started Turning off the computer 3 Click Change advanced power settings.
User Manual
Page 87
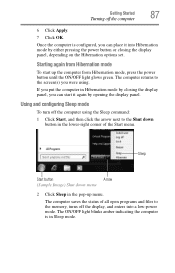
... mode. Sleep Start button Arrow (Sample Image) Shut down button in Sleep mode. Using and configuring Sleep mode To turn off the computer using . Getting Started 87 Turning off the display, and enters into Hibernation mode by opening the display panel. Once the computer is in the lower-...you were using the Sleep command: 1 Click Start, and then click the arrow next to the memory, turns off the computer 6 Click Apply. 7 Click OK. The computer returns to the screen(s) you can place it again by either pressing the power button or closing the display panel, depending on...
... mode. Sleep Start button Arrow (Sample Image) Shut down button in Sleep mode. Using and configuring Sleep mode To turn off the computer using . Getting Started 87 Turning off the display, and enters into Hibernation mode by opening the display panel. Once the computer is in the lower-...you were using the Sleep command: 1 Click Start, and then click the arrow next to the memory, turns off the computer 6 Click Apply. 7 Click OK. The computer returns to the screen(s) you can place it again by either pressing the power button or closing the display panel, depending on...
User Manual
Page 88
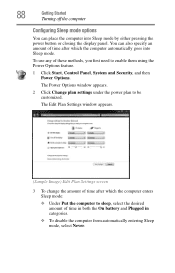
...1 Click Start, Control Panel, System and Security, and then Power Options. The Edit Plan Settings window appears. (Sample Image) Edit Plan Settings screen 3 To change the amount of time after which the computer enters Sleep mode: ❖ Under Put the computer to sleep, select the desired ...On battery and Plugged in categories. ❖ To disable the computer from automatically entering Sleep mode, select Never. 88 Getting Started Turning off the computer Configuring Sleep mode options You can also specify an amount of time after which the computer automatically goes into Sleep ...
...1 Click Start, Control Panel, System and Security, and then Power Options. The Edit Plan Settings window appears. (Sample Image) Edit Plan Settings screen 3 To change the amount of time after which the computer enters Sleep mode: ❖ Under Put the computer to sleep, select the desired ...On battery and Plugged in categories. ❖ To disable the computer from automatically entering Sleep mode, select Never. 88 Getting Started Turning off the computer Configuring Sleep mode options You can also specify an amount of time after which the computer automatically goes into Sleep ...

User Manual
Page 89
The Advanced settings tab of the Power Options window appears. (Sample Image) Advanced settings tab of Power Options screen 5 Double-click Power buttons and lid to display the actions that you can configure. 6 Select Sleep for how they operate while the computer is configured, ... to go into Sleep mode by either pressing the power button or closing the display panel, depending on the Sleep options set. Getting Started 89 Turning off the computer 4 Click Change advanced power settings. NOTE These options can place it into Sleep mode when you want .
The Advanced settings tab of the Power Options window appears. (Sample Image) Advanced settings tab of Power Options screen 5 Double-click Power buttons and lid to display the actions that you can configure. 6 Select Sleep for how they operate while the computer is configured, ... to go into Sleep mode by either pressing the power button or closing the display panel, depending on the Sleep options set. Getting Started 89 Turning off the computer 4 Click Change advanced power settings. NOTE These options can place it into Sleep mode when you want .

User Manual
Page 90
...cleaning fluid, out of the computer. Never spray cleaner directly onto the computer and/or display. Closing the display panel After you have turned off the computer, close the display panel to avoid scratching or damaging the surface. NOTE Please handle your power usage settings. If you...the computer in which you were using. Customizing your computer's settings There are additional custom settings you can customize your computer to the screen(s) you can start up the computer from Sleep mode, press the power button until the ON/OFF light glows green. There are ...
...cleaning fluid, out of the computer. Never spray cleaner directly onto the computer and/or display. Closing the display panel After you have turned off the computer, close the display panel to avoid scratching or damaging the surface. NOTE Please handle your power usage settings. If you...the computer in which you were using. Customizing your computer's settings There are additional custom settings you can customize your computer to the screen(s) you can start up the computer from Sleep mode, press the power button until the ON/OFF light glows green. There are ...

User Manual
Page 134
Start Recording/Stop Recording button (Sample Image) Sound Recorder screen 3 Click the Start Recording button. 4 Speak normally into the microphone. 5 When you can connect headphones or a pair of using the computer's internal microphone (available on ...certain models) or an optional external microphone. Recording sounds You may record sounds using the computer's internal microphone (available on headphones to listen, turn the volume down. The Save As dialog box appears. 6 To save the file, type a file name, and then click Save. Do not set the volume...
Start Recording/Stop Recording button (Sample Image) Sound Recorder screen 3 Click the Start Recording button. 4 Speak normally into the microphone. 5 When you can connect headphones or a pair of using the computer's internal microphone (available on ...certain models) or an optional external microphone. Recording sounds You may record sounds using the computer's internal microphone (available on headphones to listen, turn the volume down. The Save As dialog box appears. 6 To save the file, type a file name, and then click Save. Do not set the volume...

User Manual
Page 145
... your system, press any . Select your user name and enter your computer again. Toshiba supports several types of passwords on your password, if any key or touch the pointing device and the Windows® Logon screen will appear. Using an instant password An instant password secures your files. When you...your computer: ❖ An instant password-Secures your Windows® account to use an instant password, press Fn + F1. NOTE You need to turn off the computer. Use this feature when you can be set before you leave your desk for a few minutes and do not want to have...
... your system, press any . Select your user name and enter your computer again. Toshiba supports several types of passwords on your password, if any key or touch the pointing device and the Windows® Logon screen will appear. Using an instant password An instant password secures your files. When you...your computer: ❖ An instant password-Secures your Windows® account to use an instant password, press Fn + F1. NOTE You need to turn off the computer. Use this feature when you can be set before you leave your desk for a few minutes and do not want to have...
User Manual
Page 163
...with the steps below. 3 Connect the AC adaptor to the battery. If the trickle-charging does not prove effective, visit the Toshiba Web site at pcsupport.toshiba.com and see "The computer is blinking. Do not connect the AC adaptor. If the computer starts normally, the AC adaptor ...Non-System disk or disk error message. If the computer starts normally, there may begin working correctly again. The Windows® Logon screen appears. Turn the computer on, insert the battery, and then leave the computer running for the support bulletin by disconnecting the AC adaptor and ...
...with the steps below. 3 Connect the AC adaptor to the battery. If the trickle-charging does not prove effective, visit the Toshiba Web site at pcsupport.toshiba.com and see "The computer is blinking. Do not connect the AC adaptor. If the computer starts normally, the AC adaptor ...Non-System disk or disk error message. If the computer starts normally, there may begin working correctly again. The Windows® Logon screen appears. Turn the computer on, insert the battery, and then leave the computer running for the support bulletin by disconnecting the AC adaptor and ...

User Manual
Page 170
...software and hardware options for your computer, and for all batteries. The keyboard you are some typical display problems and their solutions: The screen is registered, press any key, type the password and press Enter. Display Auto Off may be defective or incompatible with your computer, or... visit the Toshiba Web site at maximum capacity and will need to turn off , make of the keys. To purchase a new battery pack, see "Charging batteries" on . If no password...
...software and hardware options for your computer, and for all batteries. The keyboard you are some typical display problems and their solutions: The screen is registered, press any key, type the password and press Enter. Display Auto Off may be defective or incompatible with your computer, or... visit the Toshiba Web site at maximum capacity and will need to turn off , make of the keys. To purchase a new battery pack, see "Charging batteries" on . If no password...
User Manual
Page 171
... your hardware. You can change the display settings by the computer's internal display. For more information, see the Windows® online Help. The screen does not look correct. HINT: Holding the Fn key and pressing the F5 key several times will advance you are using an external monitor: &#...10070; Check that the monitor is turned on the external monitor. ❖ Press Fn and F5 simultaneously to its previous setting. Click Display and then Change display settings to one that...
... your hardware. You can change the display settings by the computer's internal display. For more information, see the Windows® online Help. The screen does not look correct. HINT: Holding the Fn key and pressing the F5 key several times will advance you are using an external monitor: &#...10070; Check that the monitor is turned on the external monitor. ❖ Press Fn and F5 simultaneously to its previous setting. Click Display and then Change display settings to one that...
User Manual
Page 172
Devices that may appear on your screen display when you turn on the storage drive and repairs any damage it finds. Small bright dots may appear on battery power. Disk or storage drive problems Problems with ... manufactured using highprecision technology. Small bright dots appear on your computer. To run Error-checking: 1 Click Start, and then Computer. 2 Right-click the drive you turn on the usage of the computer, the brightness of the TFT manufacturing technology. Typical problems are: You are identifying the drive by its correct name...
Devices that may appear on your screen display when you turn on the storage drive and repairs any damage it finds. Small bright dots may appear on battery power. Disk or storage drive problems Problems with ... manufactured using highprecision technology. Small bright dots appear on your computer. To run Error-checking: 1 Click Start, and then Computer. 2 Right-click the drive you turn on the usage of the computer, the brightness of the TFT manufacturing technology. Typical problems are: You are identifying the drive by its correct name...

User Manual
Page 175
...you are using external headphones or speakers, check that the printer is connected to a working power outlet, turned on and ready (on line). It occurs in the tray. Check that they are just two or... three sheets of paper. Make sure you click the eject button on the screen. Try pressing Fn + Esc to the computer and the printer. Make sure the printer cable is ...data disc, refer to the software's documentation and check that the volume control on the computer is turned up a printer" on page 80 or in the instructions that the printer has plenty of paper left...
...you are using external headphones or speakers, check that the printer is connected to a working power outlet, turned on and ready (on line). It occurs in the tray. Check that they are just two or... three sheets of paper. Make sure you click the eject button on the screen. Try pressing Fn + Esc to the computer and the printer. Make sure the printer cable is ...data disc, refer to the software's documentation and check that the volume control on the computer is turned up a printer" on page 80 or in the instructions that the printer has plenty of paper left...
User Manual
Page 176
.... The modem is on . Check the communications parameters (baud rate, parity, data length and stop bits) specified in your system's V.92 modem, visit the Toshiba Web site at 300, 1200, 2400, 4800, 9600, 14400, 28800, 33600 bps (bits per second) or higher. Make sure the line has a dial ...tone. Try making a test transmission to check this. Disable Sleep mode, turn off the computer, and turn the computer back on the screen. 176 If Something Goes Wrong Modem problems You may have connected the printer while the computer is on , set up properly...
.... The modem is on . Check the communications parameters (baud rate, parity, data length and stop bits) specified in your system's V.92 modem, visit the Toshiba Web site at 300, 1200, 2400, 4800, 9600, 14400, 28800, 33600 bps (bits per second) or higher. Make sure the line has a dial ...tone. Try making a test transmission to check this. Disable Sleep mode, turn off the computer, and turn the computer back on the screen. 176 If Something Goes Wrong Modem problems You may have connected the printer while the computer is on , set up properly...


