
User Guide
Page 5
... equipment, the telephone company will be necessary for them to make any changes necessary to maintain uninterrupted service. If trouble is experienced with this equipment, for information. Disconnection If you disconnect the equipment until the problem is resolved. Telephone Company Procedures The goal of Toshiba, or the Toshiba Support Centre within the United States at (800) 457-7777...
... equipment, the telephone company will be necessary for them to make any changes necessary to maintain uninterrupted service. If trouble is experienced with this equipment, for information. Disconnection If you disconnect the equipment until the problem is resolved. Telephone Company Procedures The goal of Toshiba, or the Toshiba Support Centre within the United States at (800) 457-7777...
User Guide
Page 29
... specifications ....53 Turning on the power 53 Adding memory 54 Installing a memory module 55 Removing a memory module 60 Using the TouchPad 62 Scrolling with the TouchPad 62 Control buttons 63 Disabling or enabling the TouchPad 63 Turning off the computer 64 Closing the display panel 65 Using external display devices 65 Directing the display output when you turn on the computer 66 Adjusting the quality of the external display......67 Using an external keyboard 67 Using a mouse 68 Connecting a printer 68 Setting up your printer 69 Connecting an optional external diskette drive...
... specifications ....53 Turning on the power 53 Adding memory 54 Installing a memory module 55 Removing a memory module 60 Using the TouchPad 62 Scrolling with the TouchPad 62 Control buttons 63 Disabling or enabling the TouchPad 63 Turning off the computer 64 Closing the display panel 65 Using external display devices 65 Directing the display output when you turn on the computer 66 Adjusting the quality of the external display......67 Using an external keyboard 67 Using a mouse 68 Connecting a printer 68 Setting up your printer 69 Connecting an optional external diskette drive...

User Guide
Page 34
... the battery is not fully charged 210 Power usage mode 211 Standby mode 212 Hibernation mode 213 Display modes 214 Display brightness 214 Disabling or enabling the TouchPad 215 Zooming applications in/out 215 Keyboard hot keys 216 Appendix B: Power Cord/Cable Connectors 217 Appendix C: Using ConfigFree™ with your Toshiba Computer 218 Getting Started 219 Starting ConfigFree 219 ConfigFree Utilities 221 Connectivity Doctor 221 Search for Wireless Devices 224 Profile Settings 229 ConfigFree SUMMIT 233 Quick Connect 237 Using...
... the battery is not fully charged 210 Power usage mode 211 Standby mode 212 Hibernation mode 213 Display modes 214 Display brightness 214 Disabling or enabling the TouchPad 215 Zooming applications in/out 215 Keyboard hot keys 216 Appendix B: Power Cord/Cable Connectors 217 Appendix C: Using ConfigFree™ with your Toshiba Computer 218 Getting Started 219 Starting ConfigFree 219 ConfigFree Utilities 221 Connectivity Doctor 221 Search for Wireless Devices 224 Profile Settings 229 ConfigFree SUMMIT 233 Quick Connect 237 Using...
User Guide
Page 47
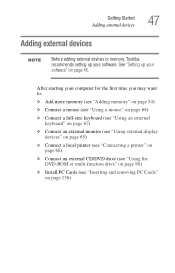
... keyboard (see "Using an external keyboard" on page 67) ❖ Connect an external monitor (see "Using external display devices" on page 65) ❖ Connect a local printer (see "Connecting a printer" on page 68) ❖ Connect an external CD/DVD drive (see "Using the DVD-ROM or multi-function drive" on page 88) ❖ Install PC Cards (see "Inserting and removing PC Cards" on page 45. See "Setting up your software. Getting Started Adding external devices 47 Adding external devices NOTE Before adding external devices or memory, Toshiba recommends setting...
... keyboard (see "Using an external keyboard" on page 67) ❖ Connect an external monitor (see "Using external display devices" on page 65) ❖ Connect a local printer (see "Connecting a printer" on page 68) ❖ Connect an external CD/DVD drive (see "Using the DVD-ROM or multi-function drive" on page 88) ❖ Install PC Cards (see "Inserting and removing PC Cards" on page 45. See "Setting up your software. Getting Started Adding external devices 47 Adding external devices NOTE Before adding external devices or memory, Toshiba recommends setting...

User Guide
Page 55
... external devices or memory, Toshiba recommends setting up your software. The Turn off computer. Installing a memory module with the computer's power on the base of the computer. To avoid damaging the computer's screws, use a standard Phillips No. 1 screwdriver that is on , begin at step 1; otherwise, skip to step 3. 1 If the computer is in good condition. If you install or remove a memory module, turn off the computer using the Start menu...
... external devices or memory, Toshiba recommends setting up your software. The Turn off computer. Installing a memory module with the computer's power on the base of the computer. To avoid damaging the computer's screws, use a standard Phillips No. 1 screwdriver that is on , begin at step 1; otherwise, skip to step 3. 1 If the computer is in good condition. If you install or remove a memory module, turn off the computer using the Start menu...

User Guide
Page 57
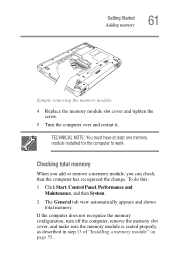
... cause memory access problems. 10 Insert the memory module into the computer. 9 Remove the new memory module from its antistatic packaging. Getting Started Adding memory 57 7 Remove the memory slot cover. 8 Place the screw and the cover in a safe place so that you can damage the memory module. Avoid touching the connectors on the memory module or on the underside of the computer. Sample inserting the memory module into the slot Before you handle the module, touch...
... cause memory access problems. 10 Insert the memory module into the computer. 9 Remove the new memory module from its antistatic packaging. Getting Started Adding memory 57 7 Remove the memory slot cover. 8 Place the screw and the cover in a safe place so that you can damage the memory module. Avoid touching the connectors on the memory module or on the underside of the computer. Sample inserting the memory module into the slot Before you handle the module, touch...
User Guide
Page 60
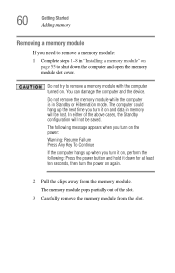
..., perform the following: Press the power button and hold it on page 55 to shut down for at least ten seconds, then turn it down the computer and open the memory module slot cover. In either of the slot. 3 Carefully remove the memory module from the memory module. 60 Getting Started Adding memory Removing a memory module If you need to remove a memory module: 1 Complete steps 1-8 in "Installing a memory module" on and data in Standby or Hibernation mode.
..., perform the following: Press the power button and hold it on page 55 to shut down for at least ten seconds, then turn it down the computer and open the memory module slot cover. In either of the slot. 3 Carefully remove the memory module from the memory module. 60 Getting Started Adding memory Removing a memory module If you need to remove a memory module: 1 Complete steps 1-8 in "Installing a memory module" on and data in Standby or Hibernation mode.
User Guide
Page 61
... one memory module installed for the computer to work. Checking total memory When you add or remove a memory module, you can check that the computer has recognized the change. To do this: 1 Click Start, Control Panel, Performance and Maintenance, and then System. 2 The General tab view automatically appears and shows total memory. If the computer does not recognize the memory configuration, turn off the computer, remove the memory slot cover, and make...
... one memory module installed for the computer to work. Checking total memory When you add or remove a memory module, you can check that the computer has recognized the change. To do this: 1 Click Start, Control Panel, Performance and Maintenance, and then System. 2 The General tab view automatically appears and shows total memory. If the computer does not recognize the memory configuration, turn off the computer, remove the memory slot cover, and make...

User Guide
Page 65
... use . Closing the display panel When you are finished, shut the computer down command when connected to a domain server instead. For more information, see "Setting user passwords" on . ❖ If you can also connect an external display device to the available video port: ❖ An external monitor or projector via the RGB (monitor) port. To do this, refer to the documentation for the type of device you are connecting. Getting Started Using external display devices...
... use . Closing the display panel When you are finished, shut the computer down command when connected to a domain server instead. For more information, see "Setting user passwords" on . ❖ If you can also connect an external display device to the available video port: ❖ An external monitor or projector via the RGB (monitor) port. To do this, refer to the documentation for the type of device you are connecting. Getting Started Using external display devices...

User Guide
Page 66
... for the display to change the display output settings is to a live electrical outlet. 3 Turn on the computer Once you have connected an external display device, you turn on the external device. 4 Set the display mode by pressing Fn + F5, or by configuring the Display Properties settings. To do this: 1 Connect the monitor's video cable to the RGB (monitor) port on the left side of the computer. 2 Connect the device's power cable to use the internal display only, the external device only, or...
... for the display to change the display output settings is to a live electrical outlet. 3 Turn on the computer Once you have connected an external display device, you turn on the external device. 4 Set the display mode by pressing Fn + F5, or by configuring the Display Properties settings. To do this: 1 Connect the monitor's video cable to the RGB (monitor) port on the left side of the computer. 2 Connect the device's power cable to use the internal display only, the external device only, or...

User Guide
Page 78
...'s keyboard. Used in Windows: ❖ Start key-Opens the Start menu ❖ Application key-Has the same function as you would using the 10-key keypad on page 208. For example, Fn+F9 turns off the TouchPad. This overlay lets you enter numeric data or control the cursor as the secondary mouse button Overlay keys The keys with gray numbers and symbols on the front of the keyboard. Windows special keys Start key Application key Sample Windows special keys...
...'s keyboard. Used in Windows: ❖ Start key-Opens the Start menu ❖ Application key-Has the same function as you would using the 10-key keypad on page 208. For example, Fn+F9 turns off the TouchPad. This overlay lets you enter numeric data or control the cursor as the secondary mouse button Overlay keys The keys with gray numbers and symbols on the front of the keyboard. Windows special keys Start key Application key Sample Windows special keys...

User Guide
Page 130
... to work together using a specific Internet protocol called Web browsers are specifically designed to share information. The World Wide Web offers information as text, images, audio, or video to a particular network address and send and receive information. They make it easier to connect to be referenced from , the Internet The Internet The Internet is a subset of the Internet - a collection of interlinked documents (located on computers connected...
... to work together using a specific Internet protocol called Web browsers are specifically designed to share information. The World Wide Web offers information as text, images, audio, or video to a particular network address and send and receive information. They make it easier to connect to be referenced from , the Internet The Internet The Internet is a subset of the Internet - a collection of interlinked documents (located on computers connected...
User Guide
Page 168
Make sure there is not accessing the hard disk or the optional external diskette drive." on battery power, it and press any key to continue. For more information see "Charging the batteries" on page 106. If pressing any of time. The Windows® operating system is not working Once you are running on page 167. Unless a hardware device has failed, problems usually occur when you experience any key does not...
Make sure there is not accessing the hard disk or the optional external diskette drive." on battery power, it and press any key to continue. For more information see "Charging the batteries" on page 106. If pressing any of time. The Windows® operating system is not working Once you are running on page 167. Unless a hardware device has failed, problems usually occur when you experience any key does not...

User Guide
Page 179
.... ❖ Try adjusting the contrast and brightness controls on the external monitor. ❖ Press Fn and F5 simultaneously to its previous setting. If this , press Fn and F5 simultaneously (once). If you through the display options. If no password is registered, press any key, type the password and press Enter. If you to activate the screen. To do this does not correct the problem, press Fn...
.... ❖ Try adjusting the contrast and brightness controls on the external monitor. ❖ Press Fn and F5 simultaneously to its previous setting. If this , press Fn and F5 simultaneously (once). If you through the display options. If no password is registered, press any key, type the password and press Enter. If you to activate the screen. To do this does not correct the problem, press Fn...
User Guide
Page 194
... Start, Control Panel, Appearance and Themes, and double-click Display. ❖ Click on the Settings tab and check the Color Palette. If it is the case, contact that the Display properties are using an external Wi-Fi adapter (a PC Card, USB adapter, or other variety), check if the adapter comes with its own management utility. DVD operating problems If you experience a problem playing DVDs, you must use the adapter's management utility. It should be disabling...
... Start, Control Panel, Appearance and Themes, and double-click Display. ❖ Click on the Settings tab and check the Color Palette. If it is the case, contact that the Display properties are using an external Wi-Fi adapter (a PC Card, USB adapter, or other variety), check if the adapter comes with its own management utility. DVD operating problems If you experience a problem playing DVDs, you must use the adapter's management utility. It should be disabling...

User Guide
Page 219
... Getting Started ❖ Profile Settings-The Profiles utility lets you can customize by adding identifying text to access the screen saver option. Then perform any of the following steps: ❖ (Microsoft® Windows® XP or 2000) Click the Start button, and select All Programs, TOSHIBA, Networking, ConfigFree. ❖ Double-click the ConfigFree icon on the Connectivity Doctor screen to devices. Starting ConfigFree To start and setup...
... Getting Started ❖ Profile Settings-The Profiles utility lets you can customize by adding identifying text to access the screen saver option. Then perform any of the following steps: ❖ (Microsoft® Windows® XP or 2000) Click the Start button, and select All Programs, TOSHIBA, Networking, ConfigFree. ❖ Double-click the ConfigFree icon on the Connectivity Doctor screen to devices. Starting ConfigFree To start and setup...

User Guide
Page 251
... the operating system automatically recognize the change. Internet - K keyboard shortcut - A group of data equal to create a complete screen image. See also diskette. I icon - Interlaced monitors take two passes to 1024 bytes. A unit of computers or other services. L2 (level two) cache - LAN (local area network) - hot swapping - See also World Wide Web. Memory cache installed on the network. 251 Glossary high-density diskette - internal device - L L1...
... the operating system automatically recognize the change. Internet - K keyboard shortcut - A group of data equal to create a complete screen image. See also diskette. I icon - Interlaced monitors take two passes to 1024 bytes. A unit of computers or other services. L2 (level two) cache - LAN (local area network) - hot swapping - See also World Wide Web. Memory cache installed on the network. 251 Glossary high-density diskette - internal device - L L1...

User Guide
Page 258
... disk or disk error message 168 not accessing disk drives 167 setting up 44, 55 turning off 64 warning resume failure message 167 computing tips 74 connecting to a power source 48 connection set up 128 control buttons 63 critical applications 3 Ctrl keys 77 D desktop creating new icon 122 major features 122 desktop exploration 121 desktop icons 122 Device Manager 173 checking properties 174 disabling a device 174 devices keyboard 67 mouse 68 disable/enable TOSHIBA Touch and Launch 163 Disk...
... disk or disk error message 168 not accessing disk drives 167 setting up 44, 55 turning off 64 warning resume failure message 167 computing tips 74 connecting to a power source 48 connection set up 128 control buttons 63 critical applications 3 Ctrl keys 77 D desktop creating new icon 122 major features 122 desktop exploration 121 desktop icons 122 Device Manager 173 checking properties 174 disabling a device 174 devices keyboard 67 mouse 68 disable/enable TOSHIBA Touch and Launch 163 Disk...

User Guide
Page 259
... DVD-ROM/multi-function drive problems 184 E energy saving features 104 environment computer-friendly 40 error messages device driver conflict 171 general hardware problem 171 non-system disk or disk error 168, 183 problem with display settings/ current settings not working with hardware 180 program has performed an illegal operation 165 warning resume failure 167 Error-checking 182 Ethernet LAN port 128 expansion memory slot 57 exploring the desktop 121 external monitor not working 181 mouse 68 external devices 47 external diskette drive connecting...
... DVD-ROM/multi-function drive problems 184 E energy saving features 104 environment computer-friendly 40 error messages device driver conflict 171 general hardware problem 171 non-system disk or disk error 168, 183 problem with display settings/ current settings not working with hardware 180 program has performed an illegal operation 165 warning resume failure 167 Error-checking 182 Ethernet LAN port 128 expansion memory slot 57 exploring the desktop 121 external monitor not working 181 mouse 68 external devices 47 external diskette drive connecting...

User Guide
Page 260
... existing 156 key assignments changing or removing existing 156 keyboard character keys 76 function keys 78 hot keys 216 not working 167 overlay keys 78 troubleshooting 178 Windows special keys 78 keyboard, external 67 keyboard, full-size 77 keyboard, PS/2-compatible 67 L LCD power-saver 65 M memory adding 54 expansion slots 55 problem solving 175 removing expansion slot cover 57 memory module inserting 58 installation 55 removing 61 microphone 134 modem determining COM port 125 problem solving 190 resetting port to default settings 125 upgrading 125 monitor 65 connecting 66
... existing 156 key assignments changing or removing existing 156 keyboard character keys 76 function keys 78 hot keys 216 not working 167 overlay keys 78 troubleshooting 178 Windows special keys 78 keyboard, external 67 keyboard, full-size 77 keyboard, PS/2-compatible 67 L LCD power-saver 65 M memory adding 54 expansion slots 55 problem solving 175 removing expansion slot cover 57 memory module inserting 58 installation 55 removing 61 microphone 134 modem determining COM port 125 problem solving 190 resetting port to default settings 125 upgrading 125 monitor 65 connecting 66


