
User Manual
Page 6
... at the factory. When the DVD/VCR is not a malfunction. If you bring the DVD/VCR directly from a cold place to contact the DVD/VCR for a long period, the unit may become disaligned and damage the DVD/ VCR. Notes on locating Place the DVD/VCR on cleaning Moisture condensation damages the DVD/VCR. In this DVD/VCR near the DVD/VCR. Notes on a level surface. Drops...
... at the factory. When the DVD/VCR is not a malfunction. If you bring the DVD/VCR directly from a cold place to contact the DVD/VCR for a long period, the unit may become disaligned and damage the DVD/ VCR. Notes on locating Place the DVD/VCR on cleaning Moisture condensation damages the DVD/VCR. In this DVD/VCR near the DVD/VCR. Notes on a level surface. Drops...

User Manual
Page 9
... displayed on copyright This owner's manual explains the basic instructions of this copyright protection technology must be played on this DVD/VCR in this owner's manual may subject you can enjoy two playback variations depending on types of the United States and ... button is not permitted by Macrovision Corporation. For example, sometimes it is not available for their playable area, are produced in the DVD/ VCR. Reverse engineering or disassembly is 1. If region numbers, which stand for the disc. This product incorporates copyright protection technology that allows...
... displayed on copyright This owner's manual explains the basic instructions of this copyright protection technology must be played on this DVD/VCR in this owner's manual may subject you can enjoy two playback variations depending on types of the United States and ... button is not permitted by Macrovision Corporation. For example, sometimes it is not available for their playable area, are produced in the DVD/ VCR. Reverse engineering or disassembly is 1. If region numbers, which stand for the disc. This product incorporates copyright protection technology that allows...
User Manual
Page 10
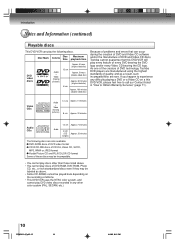
...Some CD-R/RWs cannot be played back depending on a this DVD/VCR will play every feature of every DVD bearing the DVD logo and/or every Video CD bearing the CD logo. As one of the creators of DVD technology, Toshiba DVD players are manufactured using the highest standards of quality, and ...01 PM Introduction Notes and Information (continued) Playable discs This DVD/VCR can occur during the creation of DVD and Video CD software and/or the manufacture of DVD and Video CD discs, Toshiba cannot guarantee that this DVD/VCR, please feel free to call our Contact listed in any difficulty...
...Some CD-R/RWs cannot be played back depending on a this DVD/VCR will play every feature of every DVD bearing the DVD logo and/or every Video CD bearing the CD logo. As one of the creators of DVD technology, Toshiba DVD players are manufactured using the highest standards of quality, and ...01 PM Introduction Notes and Information (continued) Playable discs This DVD/VCR can occur during the creation of DVD and Video CD software and/or the manufacture of DVD and Video CD discs, Toshiba cannot guarantee that this DVD/VCR, please feel free to call our Contact listed in any difficulty...

User Manual
Page 12
... cap and fit the connector into the jack firmly. DVD S-VIDEO OUT jack HDMI OUT jack DVD/VCR common AUDIO (L/R)/VIDEO OUT jacks ANT IN jack $ AC power cord 5 12 DVD AUDIO (L/R) DVD COMPONENT OUT jacks OUT jacks DVD OPTICAL DIGITAL AUDIO OUT jacks ! Front panel OPEN/CLOSE... 2F90201A (E)p02-15 12 4/4/05, 9:01 PM Media card slot #$ [CompactFlash memory card] Media card slot #$ SD memory card MMC (MultiMediaCard) xD-Picture Card Memory Stick (PRO) Rear panel DVD COAXIAL DIGITAL AUDIO OUT jack ! CHANNEL / AUDIO (L/R)/VIDEO IN (LINE IN 2) jacks "! ON/STANDBY button...
... cap and fit the connector into the jack firmly. DVD S-VIDEO OUT jack HDMI OUT jack DVD/VCR common AUDIO (L/R)/VIDEO OUT jacks ANT IN jack $ AC power cord 5 12 DVD AUDIO (L/R) DVD COMPONENT OUT jacks OUT jacks DVD OPTICAL DIGITAL AUDIO OUT jacks ! Front panel OPEN/CLOSE... 2F90201A (E)p02-15 12 4/4/05, 9:01 PM Media card slot #$ [CompactFlash memory card] Media card slot #$ SD memory card MMC (MultiMediaCard) xD-Picture Card Memory Stick (PRO) Rear panel DVD COAXIAL DIGITAL AUDIO OUT jack ! CHANNEL / AUDIO (L/R)/VIDEO IN (LINE IN 2) jacks "! ON/STANDBY button...
User Manual
Page 14
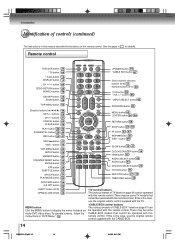
... DVD/VCR button 25 * TV button 66 * POWER button 25 CABLE BOX button 67 * CALL button 13 DISPLAY button 13 * CH / button 66 ZERO RETURN button 35 SEARCH button 48 CM SKIP button 34 ZOOM button 48 Direct channel selection buttons (0-9) 31 Number buttons (0-9) 48 * 100 button 66 * VOL +/- button 36 VCR...button 36 HDMI button 22 AUDIO SELECT button 42 AUDIO button 53 DVD/VCR SELECT button 25 TV/VCR button 25 REC/OTR button 37 39 TIMER REC button 40 DVD/CARD button 56 A-B RPT button 50 EJECT button (VCR) 32 OPEN/CLOSE (DVD) 45 MENU button Use the MENU button to display the menu included...
... DVD/VCR button 25 * TV button 66 * POWER button 25 CABLE BOX button 67 * CALL button 13 DISPLAY button 13 * CH / button 66 ZERO RETURN button 35 SEARCH button 48 CM SKIP button 34 ZOOM button 48 Direct channel selection buttons (0-9) 31 Number buttons (0-9) 48 * 100 button 66 * VOL +/- button 36 VCR...button 36 HDMI button 22 AUDIO SELECT button 42 AUDIO button 53 DVD/VCR SELECT button 25 TV/VCR button 25 REC/OTR button 37 39 TIMER REC button 40 DVD/CARD button 56 A-B RPT button 50 EJECT button (VCR) 32 OPEN/CLOSE (DVD) 45 MENU button Use the MENU button to display the menu included...

User Manual
Page 15
Remote control basics • Press DVD/VCR to Operate the DVD/VCR. • Press POWER to turn the DVD/VCR on or off. • Select your desired operating mode (DVD or VCR) using Direct channel selection buttons (0-9). • Each press of DVD/VCR SELECT on either side of the remote sensor, up to a distance of...Be sure to use new and used to navigate on-screen menu system. • You can directly access specific channels using DVD/VCR SELECT. (DVD or VCR indicator on the front panel will prevent battery acid from remote control if they are dead or if the remote control is selected...
Remote control basics • Press DVD/VCR to Operate the DVD/VCR. • Press POWER to turn the DVD/VCR on or off. • Select your desired operating mode (DVD or VCR) using Direct channel selection buttons (0-9). • Each press of DVD/VCR SELECT on either side of the remote sensor, up to a distance of...Be sure to use new and used to navigate on-screen menu system. • You can directly access specific channels using DVD/VCR SELECT. (DVD or VCR indicator on the front panel will prevent battery acid from remote control if they are dead or if the remote control is selected...

User Manual
Page 16
Connections Antenna connections If you are using and follow these instructions. Then connect the DVD/VCR to DVD/VCR connection The DVD/VCR must be obtained by the DVD/VCR unless the antenna signal is good. Below are 3 common methods of antenna system you are using an antenna system, follow the ...an antenna system to qualified service personnel. 2F90201A (E)p16-28 16 4/4/05, 9:01 PM Antenna to the TV. Connect the antenna to the DVD/VCR properly. • For better quality recording, an indoor antenna or a telescopic antenna is required. 16 • If you are not sure about...
Connections Antenna connections If you are using and follow these instructions. Then connect the DVD/VCR to DVD/VCR connection The DVD/VCR must be obtained by the DVD/VCR unless the antenna signal is good. Below are 3 common methods of antenna system you are using an antenna system, follow the ...an antenna system to qualified service personnel. 2F90201A (E)p16-28 16 4/4/05, 9:01 PM Antenna to the TV. Connect the antenna to the DVD/VCR properly. • For better quality recording, an indoor antenna or a telescopic antenna is required. 16 • If you are not sure about...

User Manual
Page 17
... the TV. Find the type of connecting your TV has separate VHF and UHF antenna inputs (numbers 2 and 3 below), use a splitter to connect the DVD/VCR to the TV for connection to a TV. TV with single 75 ohm VHF/UHF antenna input 75 ohm Coaxial Cable (supplied) Splitter 75 ohm Input ... inputs TV UHF VHF Note: If a VHF or UHF antenna is used , set the TV/CABLE menu option to the "TV" mode. If your DVD/VCR to a TV. This DVD/VCR has a single 75 ohm output for VHF and UHF reception. 75 ohm Coaxial Cable (supplied) TV VHF/UHF IN Note: If a VHF or...
... the TV. Find the type of connecting your TV has separate VHF and UHF antenna inputs (numbers 2 and 3 below), use a splitter to connect the DVD/VCR to the TV for connection to a TV. TV with single 75 ohm VHF/UHF antenna input 75 ohm Coaxial Cable (supplied) Splitter 75 ohm Input ... inputs TV UHF VHF Note: If a VHF or UHF antenna is used , set the TV/CABLE menu option to the "TV" mode. If your DVD/VCR to a TV. This DVD/VCR has a single 75 ohm output for VHF and UHF reception. 75 ohm Coaxial Cable (supplied) TV VHF/UHF IN Note: If a VHF or...
User Manual
Page 18
...: * Recording of nonscrambled channels. * Use of the programmable timer. * Recording of one channel while watching another . 2 Converter/ Descrambler Incoming Cable DVD/VCR IN (ANT) OUT (TV) TV VHF/UHF IN (ANT) Allows: * Recording of channels through the converter box (scrambled and unscrambled). * Using... Note: If you must be set to select channels. Prevents: * Recording one channel while watching another . * Using the DVD/VCR tuner to the video channel output of extra channels including pay or subscription channels. Connections Cable TV connections Many cable companies offer ...
...: * Recording of nonscrambled channels. * Use of the programmable timer. * Recording of one channel while watching another . 2 Converter/ Descrambler Incoming Cable DVD/VCR IN (ANT) OUT (TV) TV VHF/UHF IN (ANT) Allows: * Recording of channels through the converter box (scrambled and unscrambled). * Using... Note: If you must be set to select channels. Prevents: * Recording one channel while watching another . * Using the DVD/VCR tuner to the video channel output of extra channels including pay or subscription channels. Connections Cable TV connections Many cable companies offer ...

User Manual
Page 19
... channels through the converter box. * Recording a scrambled or unscrambled channel while watching another . * Using the programmable timer to their descrambler equipment. DVD/VCR 6 Converter/Descrambler Splitter IN (ANT) OUT (TV) Converter/Descrambler Incoming Cable A/B Switch A B TV VHF/UHF IN (ANT) Allows: *...record only the channel selected at the converter box. Prevents: Recording scrambled channels. Below are six common methods of connection. 4 Splitter DVD/VCR TV IN (ANT) Incoming Cable Converter/Descrambler OUT (TV) A/B Switch A B VHF/UHF IN (ANT) Allows: * Recording ...
... channels through the converter box. * Recording a scrambled or unscrambled channel while watching another . * Using the programmable timer to their descrambler equipment. DVD/VCR 6 Converter/Descrambler Splitter IN (ANT) OUT (TV) Converter/Descrambler Incoming Cable A/B Switch A B TV VHF/UHF IN (ANT) Allows: *...record only the channel selected at the converter box. Prevents: Recording scrambled channels. Below are six common methods of connection. 4 Splitter DVD/VCR TV IN (ANT) Incoming Cable Converter/Descrambler OUT (TV) A/B Switch A B VHF/UHF IN (ANT) Allows: * Recording ...
User Manual
Page 20
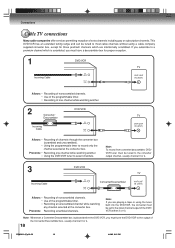
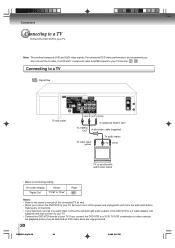
... your TV, be distorted as well. • When you connect the DVD/VCR to your TV. Connections Connecting to a TV Connect the DVD/VCR to a TV Signal flow To wall outlet (yellow) (red) (white) To VIDEO OUT To ANALOG AUDIO OUT Audio/video cable (supplied) To audio inputs... Out" Select: "PCM" or "Raw" Page $ Notes: • Refer to the owner's manual of the DVD/VCR to a Y cable adapter (not supplied) and then connect to your TV. • Connect the DVD/VCR directly to a VCR, TV/VCR combination or video selector, the playback picture may be sure to turn off the power and unplug...
... your TV, be distorted as well. • When you connect the DVD/VCR to your TV. Connections Connecting to a TV Connect the DVD/VCR to a TV Signal flow To wall outlet (yellow) (red) (white) To VIDEO OUT To ANALOG AUDIO OUT Audio/video cable (supplied) To audio inputs... Out" Select: "PCM" or "Raw" Page $ Notes: • Refer to the owner's manual of the DVD/VCR to a Y cable adapter (not supplied) and then connect to your TV. • Connect the DVD/VCR directly to a VCR, TV/VCR combination or video selector, the playback picture may be sure to turn off the power and unplug...

User Manual
Page 21
... Audio system Notes: • Refer to the owner's manual of reproducing a progressively scanned video signal. To turn off the power and unplug all of the DVD/VCR has a wide dynamic range. Y, R-Y, B-Y or Y, CB, CR) • In some TVs or monitors, the color levels of the amplifier (red) .... 21 2F90201A (E)p16-28 21 4/4/05, 9:02 PM Connecting to these inputs allows you connect the DVD/VCR to your television to Video (Yellow) output. Use this case, place the DVD/ VCR away from the tuner and radio. • The output sound of the equipment from the wall outlet before...
... Audio system Notes: • Refer to the owner's manual of reproducing a progressively scanned video signal. To turn off the power and unplug all of the DVD/VCR has a wide dynamic range. Y, R-Y, B-Y or Y, CB, CR) • In some TVs or monitors, the color levels of the amplifier (red) .... 21 2F90201A (E)p16-28 21 4/4/05, 9:02 PM Connecting to these inputs allows you connect the DVD/VCR to your television to Video (Yellow) output. Use this case, place the DVD/ VCR away from the tuner and radio. • The output sound of the equipment from the wall outlet before...
User Manual
Page 22
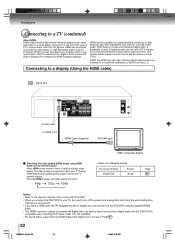
... cable if the Digital Out is compatible with HDTV signals), one specification. HDMI features include uncompressed digital video, a bandwidth of digital audio that the DVD/VCR is not set -top boxes, and other AV devices. On-screen display "Digital Out" Select: "PCM" Page $ Notes: • Refer to...the remote control Press HDMI on a single digital connection for use with HDCP) equipped monitor or display, you can connect it to the DVD/VCR using the supplied HDMI cable. • The HDMI connector outputs uncompressed digital video, as well as follows: 480p 720p 1080i HDMI-compatible ...
... cable if the Digital Out is compatible with HDTV signals), one specification. HDMI features include uncompressed digital video, a bandwidth of digital audio that the DVD/VCR is not set -top boxes, and other AV devices. On-screen display "Digital Out" Select: "PCM" Page $ Notes: • Refer to...the remote control Press HDMI on a single digital connection for use with HDCP) equipped monitor or display, you can connect it to the DVD/VCR using the supplied HDMI cable. • The HDMI connector outputs uncompressed digital video, as well as follows: 480p 720p 1080i HDMI-compatible ...

User Manual
Page 23
...see "Connecting to an amplifier equipped with a Dolby Digital decoder." You can enjoy the dynamic realistic sound of DVD video discs or audio CDs by connecting the DVD/VCR to that provide full 5.1-channel Dolby Digital soundtracks, as well as follows. • This connection is now... available to reproduce this dynamic realistic sound by connecting the DVD/VCR to an amplifier equipped with the Dolby Surround mark. Refer to a 6 channel amplifier equipped with Dolby Surround Pro Logic To audio input...
...see "Connecting to an amplifier equipped with a Dolby Digital decoder." You can enjoy the dynamic realistic sound of DVD video discs or audio CDs by connecting the DVD/VCR to that provide full 5.1-channel Dolby Digital soundtracks, as well as follows. • This connection is now... available to reproduce this dynamic realistic sound by connecting the DVD/VCR to an amplifier equipped with the Dolby Surround mark. Refer to a 6 channel amplifier equipped with Dolby Surround Pro Logic To audio input...
User Manual
Page 24
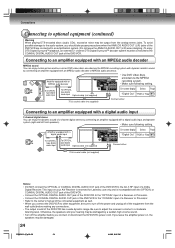
... before you leave the amplifier power on, the speakers may be connected to the COAXIAL DIGITAL AUDIO OUT jack of the DVD/VCR. If you connect or disconnect the DVD/VCR's power cord. To COAXIAL type digital audio input To OPTICAL type digital audio input Optical cable (not supplied) 75 Ω...Receiver is reserved for Laserdisc use only and is incompatible with the OPTICAL or COAXIAL DIGITAL AUDIO OUT jack of the DVD/VCR. • Connect the OPTICAL DIGITAL AUDIO OUT jack of the DVD/VCR to the "OPTICAL" input of a Receiver or Processor. • Connect the COAXIAL DIGITAL AUDIO OUT jack of...
... before you leave the amplifier power on, the speakers may be connected to the COAXIAL DIGITAL AUDIO OUT jack of the DVD/VCR. If you connect or disconnect the DVD/VCR's power cord. To COAXIAL type digital audio input To OPTICAL type digital audio input Optical cable (not supplied) 75 Ω...Receiver is reserved for Laserdisc use only and is incompatible with the OPTICAL or COAXIAL DIGITAL AUDIO OUT jack of the DVD/VCR. • Connect the OPTICAL DIGITAL AUDIO OUT jack of the DVD/VCR to the "OPTICAL" input of a Receiver or Processor. • Connect the COAXIAL DIGITAL AUDIO OUT jack of...

User Manual
Page 25
...program selected by the unit and/or the remote control): Static electricity, etc., may affect the player's operation. POWER DVD/VCR 3 4 Setting the video channel 1 Press DVD/VCR to operate the DVD/VCR. 2 Press and hold 3 or 4 on the screen for 3 seconds in the display window. The video channel ...operate properly, or No key operation (by the VCR's channel selector, the TV must be tuned on your TV owner's manual for 3 seconds in standby mode. The VCR indicator on the DVD/VCR. 4 Press DVD/VCR SELECT selector to select the VCR mode. Basic setup Basic setup Setting the video ...
...program selected by the unit and/or the remote control): Static electricity, etc., may affect the player's operation. POWER DVD/VCR 3 4 Setting the video channel 1 Press DVD/VCR to operate the DVD/VCR. 2 Press and hold 3 or 4 on the screen for 3 seconds in the display window. The video channel ...operate properly, or No key operation (by the VCR's channel selector, the TV must be tuned on your TV owner's manual for 3 seconds in standby mode. The VCR indicator on the DVD/VCR. 4 Press DVD/VCR SELECT selector to select the VCR mode. Basic setup Basic setup Setting the video ...
User Manual
Page 26
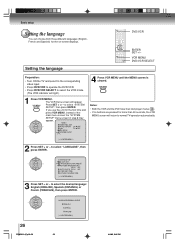
...If you use the unit for the on-screen displays. VCR MENU DVD/VCR SELECT Preparation: • Turn ON the TV and select to the corresponding video input. • Press DVD/VCR to operate the DVD/VCR. • Press DVD/VCR SELECT to select "SYSTEM SETUP", then press ENTER. ...CSASTYUIHAMMSTPSETOEERENTRMRUUEESPPCEETASUTEPT OONN OOFFFF 4 Press VCR MENU until the MENU screen is cleared. Setting the language DVD/VCR ENTER SET +/- to select the VCR mode. (The VCR indicator will...
...If you use the unit for the on-screen displays. VCR MENU DVD/VCR SELECT Preparation: • Turn ON the TV and select to the corresponding video input. • Press DVD/VCR to operate the DVD/VCR. • Press DVD/VCR SELECT to select "SYSTEM SETUP", then press ENTER. ...CSASTYUIHAMMSTPSETOEERENTRMRUUEESPPCEETASUTEPT OONN OOFFFF 4 Press VCR MENU until the MENU screen is cleared. Setting the language DVD/VCR ENTER SET +/- to select the VCR mode. (The VCR indicator will...

User Manual
Page 27
...: • Turn ON the TV and select the corresponding video input. • Press DVD/VCR to operate the DVD/VCR. • Press DVD/VCR SELECT to select the VCR mode. (The VCR indicator will light.) 1 Connect the Antenna or Cable system. • If you use ... received, it will take approx. TSCSAIAYUHMMPSTESTOEREENRTMRUUEESPPCEETASUTEPT OONN OOFFFF +/Ð/ENTER/MENU 2 Press SET + or - to select "AUTO CLOCK". POWER DVD/VCR CALL ENTER SET +/- TSCSAIAYUHMMPSTESTOEREENRTMRUUEESPPCEETASUTEPT OONN OOFFFF +/Ð/ENTER/MENU 3 Press SET + or - thirty minutes. • If you press POWER...
...: • Turn ON the TV and select the corresponding video input. • Press DVD/VCR to operate the DVD/VCR. • Press DVD/VCR SELECT to select the VCR mode. (The VCR indicator will light.) 1 Connect the Antenna or Cable system. • If you use ... received, it will take approx. TSCSAIAYUHMMPSTESTOEREENRTMRUUEESPPCEETASUTEPT OONN OOFFFF +/Ð/ENTER/MENU 2 Press SET + or - to select "AUTO CLOCK". POWER DVD/VCR CALL ENTER SET +/- TSCSAIAYUHMMPSTESTOEREENRTMRUUEESPPCEETASUTEPT OONN OOFFFF +/Ð/ENTER/MENU 3 Press SET + or - thirty minutes. • If you press POWER...

User Manual
Page 28
... in your time zone, then press ENTER. function properly, set the AUTO CLOCK menu option to "AUTO" position. TSCSAIAYUHMMPSTESTOEREENTRMRUUEESPPCEETASUTEPT OONN OOFFFF 1 Press VCR MENU. to select "DAYLIGHT SAVING TIME", then press ENTER. 3 Press SET + or - SYSTEM SETUP CLOCK SET LANGUAGE/IDIOMA/LANGUE NO NOISE ...) for manual setting (back one of two You can set the DAYLIGHT SAVING TIME automatically or stations in two different time zones, the DVD/VCR may recognize manually. ways select "OFF" position in October you set to select one hour) for the AUTO CLOCK setting. to select...
... in your time zone, then press ENTER. function properly, set the AUTO CLOCK menu option to "AUTO" position. TSCSAIAYUHMMPSTESTOEREENTRMRUUEESPPCEETASUTEPT OONN OOFFFF 1 Press VCR MENU. to select "DAYLIGHT SAVING TIME", then press ENTER. 3 Press SET + or - SYSTEM SETUP CLOCK SET LANGUAGE/IDIOMA/LANGUE NO NOISE ...) for manual setting (back one of two You can set the DAYLIGHT SAVING TIME automatically or stations in two different time zones, the DVD/VCR may recognize manually. ways select "OFF" position in October you set to select one hour) for the AUTO CLOCK setting. to select...
User Manual
Page 30
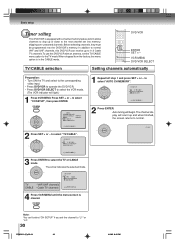
... OONN OOFFFF +/Ð/ENTER/MENU 2 Press SET + or - The channel display will begin. In addition to normal VHF and UHF channels, this DVD/VCR can 't select "CH SETUP" if you set the channel to "L1" or "L2". 30 2F90201A (E)p29-34 30 4/4/05, 9:48 PM... selected mode. Before selecting channels, they must be programmed into memory, skipping over unwanted channels. TV - When shipped from the factory, this DVD/VCR with a channel memory feature which allows channels to skip up and when finished, the screen returns to normal. +0 +/Ð/ENTER/MENU...
... OONN OOFFFF +/Ð/ENTER/MENU 2 Press SET + or - The channel display will begin. In addition to normal VHF and UHF channels, this DVD/VCR can 't select "CH SETUP" if you set the channel to "L1" or "L2". 30 2F90201A (E)p29-34 30 4/4/05, 9:48 PM... selected mode. Before selecting channels, they must be programmed into memory, skipping over unwanted channels. TV - When shipped from the factory, this DVD/VCR with a channel memory feature which allows channels to skip up and when finished, the screen returns to normal. +0 +/Ð/ENTER/MENU...

