User Manual
Page 4
... wall outlets and extension cords, as contact with respect to proper grounding of the mast and supporting structure, grounding of the lead-in a risk of antenna discharge unit, connection to service this unit, as opening or removing covers may touch dangerous voltage points or short out parts that are covered by following the operating instructions. b. d. e. LIGHTNING To protect your...
... wall outlets and extension cords, as contact with respect to proper grounding of the mast and supporting structure, grounding of the lead-in a risk of antenna discharge unit, connection to service this unit, as opening or removing covers may touch dangerous voltage points or short out parts that are covered by following the operating instructions. b. d. e. LIGHTNING To protect your...
User Manual
Page 5
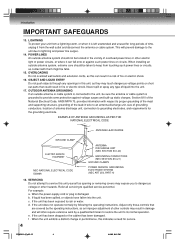
... personal injury and product malfunction. 26. Read the owner's manual of cable entry as radiators, heat registers, stoves, or other equipment carefully and follow the instructions when making any service or repairs to this unit, ask the service technician to perform safety checks to Article 820-40 of the disc tray as the original part. REPLACEMENT PARTS When replacement parts are easily broken and may cause...
... personal injury and product malfunction. 26. Read the owner's manual of cable entry as radiators, heat registers, stoves, or other equipment carefully and follow the instructions when making any service or repairs to this unit, ask the service technician to perform safety checks to Article 820-40 of the disc tray as the original part. REPLACEMENT PARTS When replacement parts are easily broken and may cause...
User Manual
Page 7
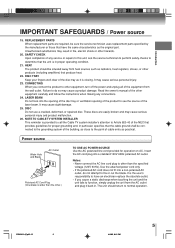
... Repeat playback 50 A-B Repeat playback 50 Program playback 51 Random playback 51 Changing angles 52 Title selection 52 DVD menu 52 Changing soundtrack language 53 Setting surround sound 53 Subtitles 54 To turn off the PBC (Video CD version 2.0) ... 54 MP3/WMA/JPEG operation 55 Function setup (DVD) Customizing the function settings 58 Temporary disabling of rating level by DVD disc 64 Others Language code list 65 Multi brand remote control 66 Troubleshooting 68 Specifications 69 Limited warranty 70 Other functions (VCR) Stereo recording and playback 42 Second Audio Program...
... Repeat playback 50 A-B Repeat playback 50 Program playback 51 Random playback 51 Changing angles 52 Title selection 52 DVD menu 52 Changing soundtrack language 53 Setting surround sound 53 Subtitles 54 To turn off the PBC (Video CD version 2.0) ... 54 MP3/WMA/JPEG operation 55 Function setup (DVD) Customizing the function settings 58 Temporary disabling of rating level by DVD disc 64 Others Language code list 65 Multi brand remote control 66 Troubleshooting 68 Specifications 69 Limited warranty 70 Other functions (VCR) Stereo recording and playback 42 Second Audio Program...
User Manual
Page 10
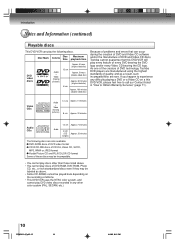
.... 160 minutes (double sided disc) Because of problems and errors that this DVD/VCR, please feel free to Obtain Warranty Services" (page 71). Introduction Notes and Information (continued) Playable discs This DVD/VCR can occur during the creation of DVD and Video CD software and/or the manufacture of DVD and Video CD discs, Toshiba cannot guarantee that can play the following discs are manufactured using the highest standards of...
.... 160 minutes (double sided disc) Because of problems and errors that this DVD/VCR, please feel free to Obtain Warranty Services" (page 71). Introduction Notes and Information (continued) Playable discs This DVD/VCR can occur during the creation of DVD and Video CD software and/or the manufacture of DVD and Video CD discs, Toshiba cannot guarantee that can play the following discs are manufactured using the highest standards of...
User Manual
Page 14
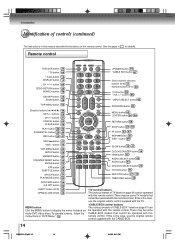
... be operated with this remote control. Remote control DVD/VCR button 25 * TV button 66 * POWER button 25 CABLE BOX button 67 * CALL button 13 DISPLAY button 13 * CH / button 66 ZERO RETURN button 35 SEARCH button 48 CM SKIP button 34 ZOOM button 48 Direct channel selection buttons (0-9) 31 Number buttons (0-9) 48 * 100 button 66 * VOL +/- buttons 66 * INPUT SELECT button 43 TOP MENU button 52 PROGRAM button 66 Direction buttons ( / / / ) 48 SET+/- Introduction Identification of controls (continued) The instructions in this manual describe the functions on many DVD video discs...
... be operated with this remote control. Remote control DVD/VCR button 25 * TV button 66 * POWER button 25 CABLE BOX button 67 * CALL button 13 DISPLAY button 13 * CH / button 66 ZERO RETURN button 35 SEARCH button 48 CM SKIP button 34 ZOOM button 48 Direct channel selection buttons (0-9) 31 Number buttons (0-9) 48 * 100 button 66 * VOL +/- buttons 66 * INPUT SELECT button 43 TOP MENU button 52 PROGRAM button 66 Direction buttons ( / / / ) 48 SET+/- Introduction Identification of controls (continued) The instructions in this manual describe the functions on many DVD video discs...

User Manual
Page 19
...) A/B Switch A B TV VHF/UHF IN (ANT) Allows: * Recording of nonscrambled channels. * Recording of one channel while watching another . * Watching premium channels through the converter box. Connections IMPORTANT: Make sure the TV/CABLE menu option is set to select channels. 2F90201A (E)p16-28 19 4/4/05, 9:01 PM 19 This DVD/VCR cannot receive scrambled programs since it does not contain a descrambler. Prevents: * Watching scrambled channels while recording another channel. * Using the DVD/VCR tuner to record only...
...) A/B Switch A B TV VHF/UHF IN (ANT) Allows: * Recording of nonscrambled channels. * Recording of one channel while watching another . * Watching premium channels through the converter box. Connections IMPORTANT: Make sure the TV/CABLE menu option is set to select channels. 2F90201A (E)p16-28 19 4/4/05, 9:01 PM 19 This DVD/VCR cannot receive scrambled programs since it does not contain a descrambler. Prevents: * Watching scrambled channels while recording another channel. * Using the DVD/VCR tuner to record only...
User Manual
Page 20
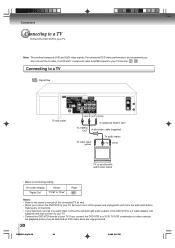
... method transports VHS and DVD-video signals. On-screen display "Digital Out" Select: "PCM" or "Raw" Page $ Notes: • Refer to the owner's manual of the DVD/VCR to a Y cable adapter (not supplied) and then connect to your TV. • Connect the DVD/VCR directly to your TV. Connections Connecting to a TV Connect the DVD/VCR to your TV. For enhanced DVD-video performance, we recommend you connect the DVD/VCR to your TV, be sure to turn off the power and...
... method transports VHS and DVD-video signals. On-screen display "Digital Out" Select: "PCM" or "Raw" Page $ Notes: • Refer to the owner's manual of the DVD/VCR to a Y cable adapter (not supplied) and then connect to your TV. • Connect the DVD/VCR directly to your TV. Connections Connecting to a TV Connect the DVD/VCR to your TV. For enhanced DVD-video performance, we recommend you connect the DVD/VCR to your TV, be sure to turn off the power and...

User Manual
Page 21
... not have component video inputs. S-video output An S-Video connection is not lit. Connecting to watch DVD video discs. Signal flow Connections To ANALOG AUDIO OUT (white) (red) To wall outlet To switch the scan mode between the interlace and progressive modes, see any connections. • If you connect or disconnect the DVD/VCR's power cord. Use this case, place the DVD/ VCR away from the wall outlet before you place the DVD/VCR near a tuner or radio, the radio broadcast sound might...
... not have component video inputs. S-video output An S-Video connection is not lit. Connecting to watch DVD video discs. Signal flow Connections To ANALOG AUDIO OUT (white) (red) To wall outlet To switch the scan mode between the interlace and progressive modes, see any connections. • If you connect or disconnect the DVD/VCR's power cord. Use this case, place the DVD/ VCR away from the wall outlet before you place the DVD/VCR near a tuner or radio, the radio broadcast sound might...
User Manual
Page 22
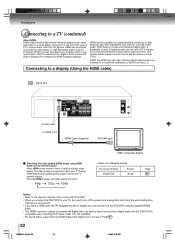
.... • When you connect the DVD/VCR to your TV owner's manual. Connecting to a display (Using the HDMI cable) Signal flow To wall outlet To HDMI OUT HDMI Cable (supplied) To HDMI input Switching the video quality (HDMI mode) using HDMI button on the remote control Press HDMI on a single digital connection for use with DVD players, DTV, set to 2.2 gigabytes per second (with HDCP) equipped monitor or display, you can connect it to the DVD/VCR using the supplied HDMI cable. • The HDMI connector outputs uncompressed digital video, as well as...
.... • When you connect the DVD/VCR to your TV owner's manual. Connecting to a display (Using the HDMI cable) Signal flow To wall outlet To HDMI OUT HDMI Cable (supplied) To HDMI input Switching the video quality (HDMI mode) using HDMI button on the remote control Press HDMI on a single digital connection for use with DVD players, DTV, set to 2.2 gigabytes per second (with HDCP) equipped monitor or display, you can connect it to the DVD/VCR using the supplied HDMI cable. • The HDMI connector outputs uncompressed digital video, as well as...

User Manual
Page 23
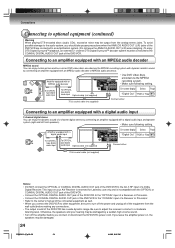
... rear speakers. If you have a DTS decoder or processor, you can enjoy high quality dynamic sounds of Digital Theater Systems, Inc. • Use DVD video discs or audio CDs encoded via the Dolby Digital recording system. • Make sure following setting. On-screen display Select: Page With an amplifier not equipped with Dolby Digital Connect the equipment as from Dolby Laboratories. To COAXIAL type digital audio input To OPTICAL type digital audio input Optical cable (not supplied) On-screen display Select: Page "Digital...
... rear speakers. If you have a DTS decoder or processor, you can enjoy high quality dynamic sounds of Digital Theater Systems, Inc. • Use DVD video discs or audio CDs encoded via the Dolby Digital recording system. • Make sure following setting. On-screen display Select: Page With an amplifier not equipped with Dolby Digital Connect the equipment as from Dolby Laboratories. To COAXIAL type digital audio input To OPTICAL type digital audio input Optical cable (not supplied) On-screen display Select: Page "Digital...
User Manual
Page 24
...-screen display Select: Page "Digital Out" "PCM" or "Raw" $ Connect either 75 Ω coaxial cable (not supplied) Notes: • DO NOT connect the OPTICAL or COAXIAL DIGITAL AUDIO OUT jack of the DVD/VCR to the AC-3 RF input of the DVD/VCR has a wide dynamic range. Amplifier equipped with an MPEG2 audio decoder • Use DVD video discs encoded via the MPEG2 recording system with dynamic realistic sound by a sudden high volume sound...
...-screen display Select: Page "Digital Out" "PCM" or "Raw" $ Connect either 75 Ω coaxial cable (not supplied) Notes: • DO NOT connect the OPTICAL or COAXIAL DIGITAL AUDIO OUT jack of the DVD/VCR to the AC-3 RF input of the DVD/VCR has a wide dynamic range. Amplifier equipped with an MPEG2 audio decoder • Use DVD video discs encoded via the MPEG2 recording system with dynamic realistic sound by a sudden high volume sound...

User Manual
Page 25
... on the screen for details. The channel number will appear in the display window. 7 Select any channel to receive a TV station in your TV owner's manual for about 4 seconds. 2F90201A (E)p16-28 25 4/4/05, 9:02 PM 25 TV/VCR DVD/VCR SELECT For a push-button TV tuner If CH 3 or 4 corresponding to the video channel cannot be set the VCR 3/4 channel selector and the TV to CH 3 or 4, play back a prerecorded...
... on the screen for details. The channel number will appear in the display window. 7 Select any channel to receive a TV station in your TV owner's manual for about 4 seconds. 2F90201A (E)p16-28 25 4/4/05, 9:02 PM 25 TV/VCR DVD/VCR SELECT For a push-button TV tuner If CH 3 or 4 corresponding to the video channel cannot be set the VCR 3/4 channel selector and the TV to CH 3 or 4, play back a prerecorded...

User Manual
Page 27
VCR MENU DVD/VCR SELECT AUTO CLOCK setting To set AUTO CLOCK to off Preparation: • Turn ON the TV and select the corresponding video input. • Press DVD/VCR to operate the DVD/VCR. • Press DVD/VCR SELECT to select the VCR mode. (The VCR indicator will light.) 1 Connect the Antenna or Cable system. • If you use a cable box and you do not want AUTO CLOCK adjustment to be performed, the cable box must be updated at least three minutes and press POWER. 5 Press CALL to check the...
VCR MENU DVD/VCR SELECT AUTO CLOCK setting To set AUTO CLOCK to off Preparation: • Turn ON the TV and select the corresponding video input. • Press DVD/VCR to operate the DVD/VCR. • Press DVD/VCR SELECT to select the VCR mode. (The VCR indicator will light.) 1 Connect the Antenna or Cable system. • If you use a cable box and you do not want AUTO CLOCK adjustment to be performed, the cable box must be updated at least three minutes and press POWER. 5 Press CALL to check the...
User Manual
Page 29
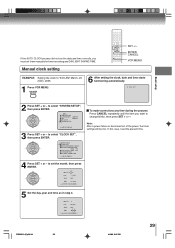
.... ENTER CANCEL VCR MENU EXAMPLE: Setting the clock to change blinks, then press SET + or -. Note: After a power failure or disconnection of the power, the timer settings will be lost. MONTH 3 DAY 26 (SAT) YEAR 2005 TIME 8 : 30AM 〈+/Ð/ENTER/CANCEL/MENU 〉 2F90201A (E)p29-34 29 4/4/05, 9:02 PM 29 Manual clock setting SET +/- to set them manually for timer recording and DAYLIGHT SAVING TIME. to select "SYSTEM SETUP", then press...
.... ENTER CANCEL VCR MENU EXAMPLE: Setting the clock to change blinks, then press SET + or -. Note: After a power failure or disconnection of the power, the timer settings will be lost. MONTH 3 DAY 26 (SAT) YEAR 2005 TIME 8 : 30AM 〈+/Ð/ENTER/CANCEL/MENU 〉 2F90201A (E)p29-34 29 4/4/05, 9:02 PM 29 Manual clock setting SET +/- to set them manually for timer recording and DAYLIGHT SAVING TIME. to select "SYSTEM SETUP", then press...
User Manual
Page 42
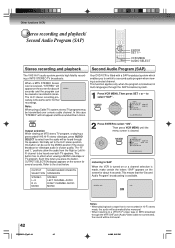
... TV broadcasts. VCR MENU AUDIO SELECT Stereo recording and playback Second Audio Program (SAP) The VHS Hi-Fi audio system permits high fidelity recording of poor quality. STEREO Note: When using a Cable TV system, stereo TV programs may be heard through the SAP broadcast system. 1 Press VCR MENU. Each time when you to switch to select how the audio will be in multi-languages through the speakers. OUTPUT SOUND HEARD ON BOTH SELECTION SPEAKERS STEREO...
... TV broadcasts. VCR MENU AUDIO SELECT Stereo recording and playback Second Audio Program (SAP) The VHS Hi-Fi audio system permits high fidelity recording of poor quality. STEREO Note: When using a Cable TV system, stereo TV programs may be heard through the SAP broadcast system. 1 Press VCR MENU. Each time when you to switch to select how the audio will be in multi-languages through the speakers. OUTPUT SOUND HEARD ON BOTH SELECTION SPEAKERS STEREO...
User Manual
Page 44
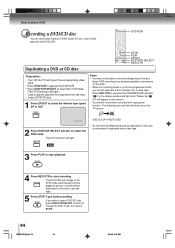
... intact. • Load a DVD/CD disc. 1 Press SP/SLP to select the desired tape speed SP or SLP. Begin VCR recording once program playback commences on the DVD. • When the scanning mode is set to the VCR mode automatically and the playback picture or sound will show up on the TV screen. 00 : 00 : 00 SP 2 Press DVD/VCR SELECT selector to change to the progressive mode, you finish recording. The DVD/VCR will appear on...
... intact. • Load a DVD/CD disc. 1 Press SP/SLP to select the desired tape speed SP or SLP. Begin VCR recording once program playback commences on the DVD. • When the scanning mode is set to the VCR mode automatically and the playback picture or sound will show up on the TV screen. 00 : 00 : 00 SP 2 Press DVD/VCR SELECT selector to change to the progressive mode, you finish recording. The DVD/VCR will appear on...

User Manual
Page 61
... apply HDMI connection to TV, make sure to select "PCM", audio signal passing to your equipment. It can continuously play back all JPEG files automatically. The DVD player automatically detects source content, film or video, of playback source, and converts that signal in the progressive output format in the progressive output format appropriately. Note: Depending on the disc, pictures may differ depending on the remote control #! . This makes it in the progressive output format appropriately. On: The QSound operates. Picture Mode...
... apply HDMI connection to TV, make sure to select "PCM", audio signal passing to your equipment. It can continuously play back all JPEG files automatically. The DVD player automatically detects source content, film or video, of playback source, and converts that signal in the progressive output format in the progressive output format appropriately. Note: Depending on the disc, pictures may differ depending on the remote control #! . This makes it in the progressive output format appropriately. On: The QSound operates. Picture Mode...
User Manual
Page 68
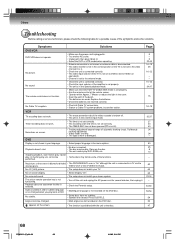
...). • Channel is set to VIDEO. Try Manual tracking adjustment. • Video heads are dirty. • The tape is not recorded on the screen. • The function is connected correctly. • Check the input selector of automatic tracking circuit. Stopping playback, slow-motion play, repeat play, or memory play DVD-ROMs, etc. No 4:3 (16:9) picture. • The setup does not match your language. No surround sound. Audio soundtrack and/or subtitle language is not changed . • Multi-angles...
...). • Channel is set to VIDEO. Try Manual tracking adjustment. • Video heads are dirty. • The tape is not recorded on the screen. • The function is connected correctly. • Check the input selector of automatic tracking circuit. Stopping playback, slow-motion play, repeat play, or memory play DVD-ROMs, etc. No 4:3 (16:9) picture. • The setup does not match your language. No surround sound. Audio soundtrack and/or subtitle language is not changed . • Multi-angles...
User Manual
Page 69
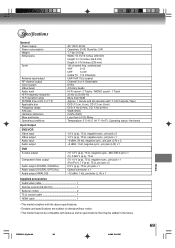
... 69 4/4/05, 9:04 PM 69 Specifications General Power supply Power consumption Weight Dimensions Tuner Antenna input/output RF channel output Color system Video head Audio track Hi-Fi frequency response Hi-Fi dynamic range FF/REW time at 25˚C (77˚F) Applicable disc Frequency range S/N ratio Harmonic distortion Wow and flutter Operating conditions Input/Output DVD/VCR Video input Video output Audio input Audio output DVD S-video output Component video output Audio output (DIGITAL COAXIAL) Audio output (DIGITAL OPTICAL) Audio output (ANALOG) AC 120 V 60 Hz Operation: 20 W, Stand by...
... 69 4/4/05, 9:04 PM 69 Specifications General Power supply Power consumption Weight Dimensions Tuner Antenna input/output RF channel output Color system Video head Audio track Hi-Fi frequency response Hi-Fi dynamic range FF/REW time at 25˚C (77˚F) Applicable disc Frequency range S/N ratio Harmonic distortion Wow and flutter Operating conditions Input/Output DVD/VCR Video input Video output Audio input Audio output DVD S-video output Component video output Audio output (DIGITAL COAXIAL) Audio output (DIGITAL OPTICAL) Audio output (ANALOG) AC 120 V 60 Hz Operation: 20 W, Stand by...
User Manual
Page 70
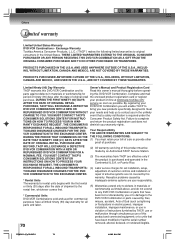
... FOR ALL INBOUND TRANSPORTA- (4) Labor service charges for all parts and labor. repair of instructions furnished by an Authorized TACP Service Station. Reception problems caused by this warranty. use or malfunction through simultaneous use in the United States. Limited Ninety (90) Day Warranty Owner's Manual and Product Registration Card TACP warrants this DVD/VCR Combination and its Read this product and connected equipment; DURING THE PERIOD THAT...
... FOR ALL INBOUND TRANSPORTA- (4) Labor service charges for all parts and labor. repair of instructions furnished by an Authorized TACP Service Station. Reception problems caused by this warranty. use or malfunction through simultaneous use in the United States. Limited Ninety (90) Day Warranty Owner's Manual and Product Registration Card TACP warrants this DVD/VCR Combination and its Read this product and connected equipment; DURING THE PERIOD THAT...


