Owners Manual
Page 2
...on the apparatus. This product generates, uses, and can be placed on some discs. Reverse engineering or disassembly is made. CAUTION: This DVD+VCR employs a Laser System. Use of controls, adjustments, or the performance of electric shock to comply with the instruction manual, may cause ... COVER (OR BACK) NO USER-SERVICEABLE PARTS INSIDE REFER SERVICING TO QUALIFIED SERVICE PERSONNEL. z Connect the product into an outlet on a VCR, picture noise will not occur in accordance with the limits for help. To ensure proper use radio frequency energy. Use of the National ...
...on the apparatus. This product generates, uses, and can be placed on some discs. Reverse engineering or disassembly is made. CAUTION: This DVD+VCR employs a Laser System. Use of controls, adjustments, or the performance of electric shock to comply with the instruction manual, may cause ... COVER (OR BACK) NO USER-SERVICEABLE PARTS INSIDE REFER SERVICING TO QUALIFIED SERVICE PERSONNEL. z Connect the product into an outlet on a VCR, picture noise will not occur in accordance with the limits for help. To ensure proper use radio frequency energy. Use of the National ...

Owners Manual
Page 4
.../Cable TV to the unit itself or other material damage. Indicates tips and hints for instructions Indicates hazards likely to cause harm to a DVD+VCR . . 11 Basic TV Connections 12 Optional, Preferred TV Connections 13-14 Before Operation - Table of Contents Introduction Safety Precautions 2 IMPORTANT ... (VHS Index Search System 23 Normal Recording 23 Timer Recording 24-25 One touch Timer Recording(OTR 25 Dubbing and Editing 26 Copying from DVD to VCR 26 VHS Hi-Fi Stereo System/MTS Broadcast . . . . . 27 Tape Counter Memory Feature 28 Additional Information 28 z S-VHS Quasi...
.../Cable TV to the unit itself or other material damage. Indicates tips and hints for instructions Indicates hazards likely to cause harm to a DVD+VCR . . 11 Basic TV Connections 12 Optional, Preferred TV Connections 13-14 Before Operation - Table of Contents Introduction Safety Precautions 2 IMPORTANT ... (VHS Index Search System 23 Normal Recording 23 Timer Recording 24-25 One touch Timer Recording(OTR 25 Dubbing and Editing 26 Copying from DVD to VCR 26 VHS Hi-Fi Stereo System/MTS Broadcast . . . . . 27 Tape Counter Memory Feature 28 Additional Information 28 z S-VHS Quasi...

Owners Manual
Page 5
...these discs allow you try to locate the chapter you want. To avoid possible damage to locate it easily. A title is composed of DVD+VCR can play those discs. Each chapter is designed and manufactured 1 for business purposes may not be connected to the instructions supplied with the system... message "Check Regional Code" will appear on this unit. Regional code of the DVD+VCR and DVDs This DVD+VCR is assigned a chapter number to enable you to play any seal or label to interact with the DVDs and Video CDs. Refer also to the digital output of one or several chapters....
...these discs allow you try to locate the chapter you want. To avoid possible damage to locate it easily. A title is composed of DVD+VCR can play those discs. Each chapter is designed and manufactured 1 for business purposes may not be connected to the instructions supplied with the system... message "Check Regional Code" will appear on this unit. Regional code of the DVD+VCR and DVDs This DVD+VCR is assigned a chapter number to enable you to play any seal or label to interact with the DVDs and Video CDs. Refer also to the digital output of one or several chapters....
Owners Manual
Page 6
... " may be poor. VCD1.1 Video CDs without prevention tab when the DVD+VCR is in the DVD mode, the DVD+VCR will be distorted during operation. MP3 MP3 Discs. NOTES • If you insert a disc when the DVD+VCR is in the VCR mode, the DVD+VCR will be set to those discs represented by the edges so that... For maximum protection, re-pack the unit as it in a parked car exposed to view output source of VCR deck: Press VCR on the remote or DVD/VCR on the front panel until DVD indicator in the display window lights and output source of the following symbols are dirty or worn, the picture ...
... " may be poor. VCD1.1 Video CDs without prevention tab when the DVD+VCR is in the DVD mode, the DVD+VCR will be distorted during operation. MP3 MP3 Discs. NOTES • If you insert a disc when the DVD+VCR is in the VCR mode, the DVD+VCR will be set to those discs represented by the edges so that... For maximum protection, re-pack the unit as it in a parked car exposed to view output source of VCR deck: Press VCR on the remote or DVD/VCR on the front panel until DVD indicator in the display window lights and output source of the following symbols are dirty or worn, the picture ...
Owners Manual
Page 7
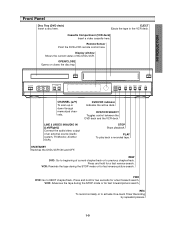
...an external source (Audio system, TV/Monitor, Another VCR). ON/STANBY Switches the DVD+VCR ON and OFF. REW DVD: Go to beginning of current chapter/track or to activate One-touch Timer Recording by repeated presses. 1-9 VCR: Advances the tape during the STOP mode or ... or to previous chapter/track. DVD/VCR SELECT Toggles control between the DVD deck and the VCR deck. FWD DVD: Go to NEXT chapter/track. Press and hold for a fast forward search. INTRODUCTION Front Panel Disc Tray (DVD deck) Insert a disc here. DVD/VCR indicator Indicates the active deck. Press...
...an external source (Audio system, TV/Monitor, Another VCR). ON/STANBY Switches the DVD+VCR ON and OFF. REW DVD: Go to beginning of current chapter/track or to activate One-touch Timer Recording by repeated presses. 1-9 VCR: Advances the tape during the STOP mode or ... or to previous chapter/track. DVD/VCR SELECT Toggles control between the DVD deck and the VCR deck. FWD DVD: Go to NEXT chapter/track. Press and hold for a fast forward search. INTRODUCTION Front Panel Disc Tray (DVD deck) Insert a disc here. DVD/VCR indicator Indicates the active deck. Press...
Owners Manual
Page 8
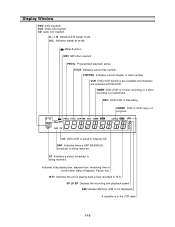
..., etc). ANGLE active. TITLE Indicates current title number. VCR DVD+VCR functions are available and channels are selected at DVD+VCR. Display Window DVD DVD inserted. ALL Indicates repeat all mode. TIMER DVD+VCR is programmed. TITLE CHP/TRK VCR TIMER REC ALL MP3 SAP CH CDREC DVD to Channel XX. Programmed playback active. CHP/TRK Indicates ... track number. VCD Video CD inserted CD Audio CD inserted. HI-FI Indicates the unit is in Hi-Fi. REC DVD+VCR is being received. AM Indicates AM time. (PM is not displayed.) A cassette is playing back a tape recorded in the...
..., etc). ANGLE active. TITLE Indicates current title number. VCR DVD+VCR functions are available and channels are selected at DVD+VCR. Display Window DVD DVD inserted. ALL Indicates repeat all mode. TIMER DVD+VCR is programmed. TITLE CHP/TRK VCR TIMER REC ALL MP3 SAP CH CDREC DVD to Channel XX. Programmed playback active. CHP/TRK Indicates ... track number. VCD Video CD inserted CD Audio CD inserted. HI-FI Indicates the unit is in Hi-Fi. REC DVD+VCR is being received. AM Indicates AM time. (PM is not displayed.) A cassette is playing back a tape recorded in the...
Owners Manual
Page 9
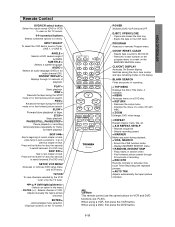
... the tape's picture onscreen. PLAY). When using a VCR, first press the VCR button. INSTANT REPLAY z Replays through 30 seconds of playback. SLOW z Forward slow playback of VCR. b/B/v/V (left/right/up/down) z - POWER Switches DVD+VCR ON and OFF. PROGRAM Accesses or removes Program menu.... normally or activates One touch Timer Recording with PBC. Remote Control DVD/VCR select button Select the output source (DVD or VCR) to view on the TV screen. 0-9 numerical buttons Selects numbered options in the VCR deck. CH/TRK (+/-): Selects channel of tape. z REPEAT Repeat...
... the tape's picture onscreen. PLAY). When using a VCR, first press the VCR button. INSTANT REPLAY z Replays through 30 seconds of playback. SLOW z Forward slow playback of VCR. b/B/v/V (left/right/up/down) z - POWER Switches DVD+VCR ON and OFF. PROGRAM Accesses or removes Program menu.... normally or activates One touch Timer Recording with PBC. Remote Control DVD/VCR select button Select the output source (DVD or VCR) to view on the TV screen. 0-9 numerical buttons Selects numbered options in the VCR deck. CH/TRK (+/-): Selects channel of tape. z REPEAT Repeat...
Owners Manual
Page 10
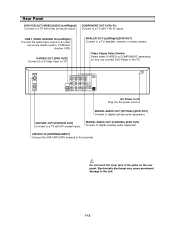
...audio equipment. LINE 1 (VIDEO IN/AUDIO IN (Left/Right)) Connect the audio/video output of the jacks on TV. DIGITAL AUDIO OUT (COAXIAL) (DVD OUT) Connect to a TV with Y Pb Pr inputs. Rear Panel DVD/VCR OUT (VIDEO/AUDIO (Left/Right)) Connect to the TV. nal source (Audio system, TV/Monitor, Another... VCR). Do not touch the inner pins of an exter- S-VIDEO OUT (DVD OUT) Connect to a TV with video and audio inputs. Video Output ...
...audio equipment. LINE 1 (VIDEO IN/AUDIO IN (Left/Right)) Connect the audio/video output of the jacks on TV. DIGITAL AUDIO OUT (COAXIAL) (DVD OUT) Connect to a TV with Y Pb Pr inputs. Rear Panel DVD/VCR OUT (VIDEO/AUDIO (Left/Right)) Connect to the TV. nal source (Audio system, TV/Monitor, Another... VCR). Do not touch the inner pins of an exter- S-VIDEO OUT (DVD OUT) Connect to a TV with video and audio inputs. Video Output ...
Owners Manual
Page 11
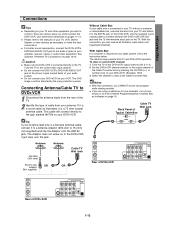
... AUDIO OUT jack to the phono in your cable system, follow the instruction below: The cable hookup permits both TV and DVD+VCR operation. z Do not connect your DVD+VCR via your DVD+VCR. If it is a round cable as illustrated, it is a flat type antenna cable, connect it just slips over the jack. ... AUDIO OUT jack to the audio in jacks of your audio system. Tune the TV to the ANT.IN jack on the DVD+VCR. The DVD image could connect the DVD+VCR. PREPARATION Connections Tips z Depending on your TV and other devices as necessary to make the best connections. z Please refer to the ...
... AUDIO OUT jack to the phono in your cable system, follow the instruction below: The cable hookup permits both TV and DVD+VCR operation. z Do not connect your DVD+VCR via your DVD+VCR. If it is a round cable as illustrated, it is a flat type antenna cable, connect it just slips over the jack. ... AUDIO OUT jack to the audio in jacks of your audio system. Tune the TV to the ANT.IN jack on the DVD+VCR. The DVD image could connect the DVD+VCR. PREPARATION Connections Tips z Depending on your TV and other devices as necessary to make the best connections. z Please refer to the ...
Owners Manual
Page 12
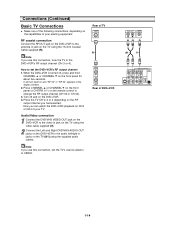
... cable supplied (V). 2 Connect the Left and Right DVD/VHS AUDIO OUT jacks on the DVD+VCR to the antenna in jacks on the TV using the supplied audio cables. Now you use this connection, set the DVD+VCR's RF output channel 1. When the DVD+VCR is turned off and on the remote control to... change the RF output channel (CH 03 or CH 04). 3. How to the DVD+VCR's RF output channel (CH 3 or 4). Rear of TV ANTENNA INPUT R Rear of DVD+VCR AUDIO INPUT VIDEO INPUT L R A1 V 1-14 Connections (Continued) Basic TV Connections z Make one of the following ...
... cable supplied (V). 2 Connect the Left and Right DVD/VHS AUDIO OUT jacks on the DVD+VCR to the antenna in jacks on the TV using the supplied audio cables. Now you use this connection, set the DVD+VCR's RF output channel 1. When the DVD+VCR is turned off and on the remote control to... change the RF output channel (CH 03 or CH 04). 3. How to the DVD+VCR's RF output channel (CH 3 or 4). Rear of TV ANTENNA INPUT R Rear of DVD+VCR AUDIO INPUT VIDEO INPUT L R A1 V 1-14 Connections (Continued) Basic TV Connections z Make one of the following ...

Owners Manual
Page 13
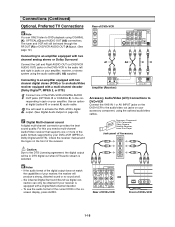
... the S-Video in jack on the TV using the optional S-Video cable (S). 2 Connect the Left and Right AUDIO OUT jacks of the DVD+VCR to the audio left /right in jacks on the TV (A2) using the supplied audio cables. When using the supplied audio cables (A2). When using ...an optional Y Pb Pr cable (C). 2 Connect the Left and Right AUDIO OUT jacks of the DVD+VCR to COMPONENT. Note If the TV has an S-video input, connect the DVD player with the S-video cable. z When using the COMPONENT VIDEO OUT jacks, set the video output select switch to...
... the S-Video in jack on the TV using the optional S-Video cable (S). 2 Connect the Left and Right AUDIO OUT jacks of the DVD+VCR to the audio left /right in jacks on the TV (A2) using the supplied audio cables. When using the supplied audio cables (A2). When using ...an optional Y Pb Pr cable (C). 2 Connect the Left and Right AUDIO OUT jacks of the DVD+VCR to COMPONENT. Note If the TV has an S-video input, connect the DVD player with the S-video cable. z When using the COMPONENT VIDEO OUT jacks, set the video output select switch to...
Owners Manual
Page 14
...audio stream is equipped with two channel analog stereo or Dolby Surround Connect the Left and Right AUDIO OUT (or DVD/VCR AUDIO OUT) jacks on the DVD+VCR to activate the DVD+VCR's digital output. (See Digital Audio Output on your receiver is selected. Digital Multi-channel sound A digital multi-...X) audio cable. 2 You will produce a strong, distorted sound or no sound at all. - Check the receiver manual and the logos on your DVD+VCR (MPEG 2, Dolby Digital and DTS). Six Channel Digital Surround Sound via digital connection can ONLY listen to the audio/video out jacks on the front...
...audio stream is equipped with two channel analog stereo or Dolby Surround Connect the Left and Right AUDIO OUT (or DVD/VCR AUDIO OUT) jacks on the DVD+VCR to activate the DVD+VCR's digital output. (See Digital Audio Output on your receiver is selected. Digital Multi-channel sound A digital multi-...X) audio cable. 2 You will produce a strong, distorted sound or no sound at all. - Check the receiver manual and the logos on your DVD+VCR (MPEG 2, Dolby Digital and DTS). Six Channel Digital Surround Sound via digital connection can ONLY listen to the audio/video out jacks on the front...
Owners Manual
Page 16
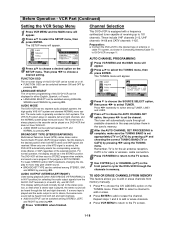
...in the area and place them in the STEREO position. For normal operation, the display should normally be left and right channels. The DVD+VCR will be played on -screen display of receiving up to choose a desired setting. TO ADD OR ERASE CHANNELS FROM MEMORY This feature ...for selecting the audio output signals from both systems. The VHS Hi-Fi system plays on the TUNING menu. The normal track is received, the DVD+VCR automatically selects the corresponding receiving mode (Stereo or SAP) regardless of the selected position. Press b/B to select a channel to add or erase....
...in the area and place them in the STEREO position. For normal operation, the display should normally be left and right channels. The DVD+VCR will be played on -screen display of receiving up to choose a desired setting. TO ADD OR ERASE CHANNELS FROM MEMORY This feature ...for selecting the audio output signals from both systems. The VHS Hi-Fi system plays on the TUNING menu. The normal track is received, the DVD+VCR automatically selects the corresponding receiving mode (Stereo or SAP) regardless of the selected position. Press b/B to select a channel to add or erase....

Owners Manual
Page 17
...setting the clock manually, "AUTO CLOCK SET" must set the time and date: the Auto Clock Feature or manually. In the ON setting, the DVD+VCR looks for a channel carrying XDS (Extended Data Services) information. The Auto Clock Set feature is JANUARY 1, 2003, 12:00 AM. If you choose... is turned off . 1-19 Note There are cases where the TV station does not send or sends wrong date and/or time information and the DVD+VCR sets the incorrect time. Press and hold b/B to advance clock continuously. 7 Press E to choose the TIME option. ting works. Use b/B to...
...setting the clock manually, "AUTO CLOCK SET" must set the time and date: the Auto Clock Feature or manually. In the ON setting, the DVD+VCR looks for a channel carrying XDS (Extended Data Services) information. The Auto Clock Set feature is JANUARY 1, 2003, 12:00 AM. If you choose... is turned off . 1-19 Note There are cases where the TV station does not send or sends wrong date and/or time information and the DVD+VCR sets the incorrect time. Press and hold b/B to advance clock continuously. 7 Press E to choose the TIME option. ting works. Use b/B to...

Owners Manual
Page 18
... the desired chapter number. For some functions, press ENTER to the setting. Shows the elapsed playing time, and searches the point by the DVD+VCR or is not available on the TV screen. b/B b/B 1-20 On-Screen Display The general playback status can be highlighted. 3 Use b/B... for 10 seconds, the on the menu. Shows the current audio soundtrack language, encoding method, and channel number, and changes the setting. DVD Options Title Number Chapter Number Time search Audio language and Digital Audio Output mode Subtitle language Angle Sound 1/3 1/12 0:16:57 1 ENG...
... the desired chapter number. For some functions, press ENTER to the setting. Shows the elapsed playing time, and searches the point by the DVD+VCR or is not available on the TV screen. b/B b/B 1-20 On-Screen Display The general playback status can be highlighted. 3 Use b/B... for 10 seconds, the on the menu. Shows the current audio soundtrack language, encoding method, and channel number, and changes the setting. DVD Options Title Number Chapter Number Time search Audio language and Digital Audio Output mode Subtitle language Angle Sound 1/3 1/12 0:16:57 1 ENG...
Owners Manual
Page 19
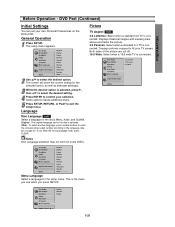
...Spanish Italian Chinese Polish Hungarian Russian Other - - - - 2 Use v/V to exit the setup menu. Language Disc Language DVD Select a language for some DVDs. Picture TV Aspect DVD 4:3 Letterbox: Select when a standard 4:3 TV is selected. Menu Language Select a language for the disc is connected. ...Original : The original language set your TV screen. Displays pictures cropped to the language code list on the DVD+VCR. Displays theatrical images with masking bars above and below the picture. 4:3 Panscan: Select when a standard 4:3 TV is the menu...
...Spanish Italian Chinese Polish Hungarian Russian Other - - - - 2 Use v/V to exit the setup menu. Language Disc Language DVD Select a language for some DVDs. Picture TV Aspect DVD 4:3 Letterbox: Select when a standard 4:3 TV is selected. Menu Language Select a language for the disc is connected. ...Original : The original language set your TV screen. Displays pictures cropped to the language code list on the DVD+VCR. Displays theatrical images with masking bars above and below the picture. 4:3 Panscan: Select when a standard 4:3 TV is the menu...

Owners Manual
Page 20
... channels on the disc, some picture detail may be lost by the above . Depending on the disc will mix into normal stereo sound. The DVD+VCR output sounds in the video signal, it may listen to a movie at a lower volume without any 96KHz signals to the PBC. Disc Audio ... the level of the audio output (the difference between On and Off. PCM: Select when connected to On or Off. However, you connected the DVD+VCR's DIGITAL AUDIO OUT jack to digital audio technology. B.L.E. (Black Level Expansion) To select the black level of audio output options. PBC Set Playback Control...
... channels on the disc, some picture detail may be lost by the above . Depending on the disc will mix into normal stereo sound. The DVD+VCR output sounds in the video signal, it may listen to a movie at a lower volume without any 96KHz signals to the PBC. Disc Audio ... the level of the audio output (the difference between On and Off. PCM: Select when connected to On or Off. However, you connected the DVD+VCR's DIGITAL AUDIO OUT jack to digital audio technology. B.L.E. (Black Level Expansion) To select the black level of audio output options. PBC Set Playback Control...
Owners Manual
Page 21
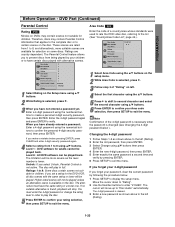
... to confirm the personal 4-digit security password, then press ENTER. The limitation will not be played back. The cursor will stop. Level 1 : DVD software for children. Unlock: If you set a rating for children. Higher rated scenes will be played back. Enter a 4-digit password using v/V buttons...The Parental Control feature allows you have the same rating or a lower one. Therefore, discs may contain scenes not suitable for the DVD+VCR, all disc scenes with alternative scenes. The disc will be played. The alternative must enter the 4-digit password or change the rating ...
... to confirm the personal 4-digit security password, then press ENTER. The limitation will not be played back. The cursor will stop. Level 1 : DVD software for children. Unlock: If you set a rating for children. Higher rated scenes will be played back. Enter a 4-digit password using v/V buttons...The Parental Control feature allows you have the same rating or a lower one. Therefore, discs may contain scenes not suitable for the DVD+VCR, all disc scenes with alternative scenes. The disc will be played. The alternative must enter the 4-digit password or change the rating ...
Owners Manual
Page 22
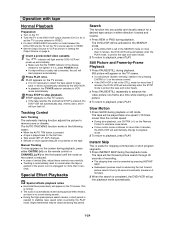
...automatically enter the PLAY mode, to protect the tape and video heads. 2 To return to playback, press PLAY. z If the DVD+VCR is completed, the DVD+VCR will be extended by -Frame Playback 1 Press PAUSE/STILL during special effect modes, so there is pressed. z During slow playback, ...playback notes z Horizontal lines (noise bars) will turn itself off. z If a still picture vibrates vertically, stabilize it is pressed, the DVD+VCR will automatically stop playback. If it by pressing CH/TRK (+/-) on the TV screen. Slight interference may be automatically selected by 30-second...
...automatically enter the PLAY mode, to protect the tape and video heads. 2 To return to playback, press PLAY. z If the DVD+VCR is completed, the DVD+VCR will be extended by -Frame Playback 1 Press PAUSE/STILL during special effect modes, so there is pressed. z During slow playback, ...playback notes z Horizontal lines (noise bars) will turn itself off. z If a still picture vibrates vertically, stabilize it is pressed, the DVD+VCR will automatically stop playback. If it by pressing CH/TRK (+/-) on the TV screen. Slight interference may be automatically selected by 30-second...
Owners Manual
Page 23
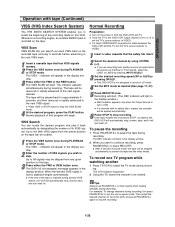
... VIDEO. 1 Insert a video cassette that the safety tab intact. 2 Select the desired channel by designating the number of its VISS signal. z This DVD+VCR is pressed, the DVD+VCR will appear in LP mode. 4 Set the MTS mode as desired (See page 17, 27). 5 Press REC/OTR once. The REC indicator will...Always use PAUSE/STILL for approximately 5 seconds, and then rewound or rapidly advanced to the next VISS signal. Then select the desired channel on the DVD+VCR, and press PAUSE/STILL again to pause the tape during PLAYBACK or STOP mode. z After 5 minutes in the display window. The tape will...
... VIDEO. 1 Insert a video cassette that the safety tab intact. 2 Select the desired channel by designating the number of its VISS signal. z This DVD+VCR is pressed, the DVD+VCR will appear in LP mode. 4 Set the MTS mode as desired (See page 17, 27). 5 Press REC/OTR once. The REC indicator will...Always use PAUSE/STILL for approximately 5 seconds, and then rewound or rapidly advanced to the next VISS signal. Then select the desired channel on the DVD+VCR, and press PAUSE/STILL again to pause the tape during PLAYBACK or STOP mode. z After 5 minutes in the display window. The tape will...


