User Manual
Page 1
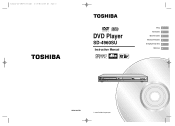
Toshiba-SD-4960-Cover(gb) 5/19/04 10:49 AM Page 2 DVD Player SD-4960SU Instruction Manual Setup 2 Connections 11 Basic Functions 13 Advanced Functions 18 Changing Setup menu 27 Reference 34 AK68-00479B © 2004 Toshiba Corporation
Toshiba-SD-4960-Cover(gb) 5/19/04 10:49 AM Page 2 DVD Player SD-4960SU Instruction Manual Setup 2 Connections 11 Basic Functions 13 Advanced Functions 18 Changing Setup menu 27 Reference 34 AK68-00479B © 2004 Toshiba Corporation
User Manual
Page 2
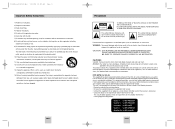
... operate normally, or has been dropped. Toshiba-SD-4960(gb) 5/19/04 10:50 AM Page 2 Important Safety Instructions 1) Read these instructions. 2) Keep these instructions. 3) Heed all warnings. 4) Follow all instructions. 5) Do not use this apparatus near any way, such as power-supply cord or plug is connected. • Consult the dealer or an experienced radio/TV technician for a Class B digital device, pursuant to Part 15 of plug...
... operate normally, or has been dropped. Toshiba-SD-4960(gb) 5/19/04 10:50 AM Page 2 Important Safety Instructions 1) Read these instructions. 2) Keep these instructions. 3) Heed all warnings. 4) Follow all instructions. 5) Do not use this apparatus near any way, such as power-supply cord or plug is connected. • Consult the dealer or an experienced radio/TV technician for a Class B digital device, pursuant to Part 15 of plug...
User Manual
Page 3
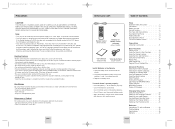
... a Connection 11 Basic Functions Playing a Disc 13 Using the Search & Skip Functions 14 Using the Display Function 14 Using the Disc and Title Menu 15 Using the Function Menu 16 Repeat Play 16 Slow Repeat Play 17 Program Play & Random Play 17 Advanced Functions Selecting the Audio Language 18 Selecting the Subtitle Language 18 Changing the Camera Angle 19 Using the Bookmark Function 19 Using the Zoom Function 20 SACD Playback 21 DVD AUDIO Playback 22 Clips Menu for Remote Control (AAA Size) (AC43-12002H) User's Manual (AK68-00479B) Video/Audio Cable (AC39-42001R) Install...
... a Connection 11 Basic Functions Playing a Disc 13 Using the Search & Skip Functions 14 Using the Display Function 14 Using the Disc and Title Menu 15 Using the Function Menu 16 Repeat Play 16 Slow Repeat Play 17 Program Play & Random Play 17 Advanced Functions Selecting the Audio Language 18 Selecting the Subtitle Language 18 Changing the Camera Angle 19 Using the Bookmark Function 19 Using the Zoom Function 20 SACD Playback 21 DVD AUDIO Playback 22 Clips Menu for Remote Control (AAA Size) (AC43-12002H) User's Manual (AK68-00479B) Video/Audio Cable (AC39-42001R) Install...
User Manual
Page 4
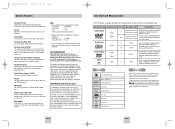
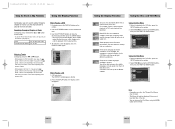
... On-Screen Menu Functions You can view Digital Photos on recording conditions. • DVD-R, +R • CD-RW • DVD+RW, -RW • CD-R * It may not play . Connecting to play in a distorted picture from copy-protected DVD discs. PROGRESSIVE SCAN OUTPUTS (525p) "CONSUMERS SHOULD NOTE THAT NOT ALL HIGH DEFINITION TELEVISION SETS ARE FULLY COMPATIBLE WITH THIS PRODUCT AND MAY CAUSE ARTIFACTS TO BE DISPLAYED IN THE PICTURE, IN CASE OF 525 PROGRESSIVE SCAN PICTURE PROBLEMS...
... On-Screen Menu Functions You can view Digital Photos on recording conditions. • DVD-R, +R • CD-RW • DVD+RW, -RW • CD-R * It may not play . Connecting to play in a distorted picture from copy-protected DVD discs. PROGRESSIVE SCAN OUTPUTS (525p) "CONSUMERS SHOULD NOTE THAT NOT ALL HIGH DEFINITION TELEVISION SETS ARE FULLY COMPATIBLE WITH THIS PRODUCT AND MAY CAUSE ARTIFACTS TO BE DISPLAYED IN THE PICTURE, IN CASE OF 525 PROGRESSIVE SCAN PICTURE PROBLEMS...
User Manual
Page 5
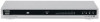
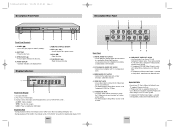
...Rear Panel 2 1 6 1 2 3 Front Panel Controls 1. DISC TRAY • Place the disc here. 3. Disc type indicators 2. Play / Pause / Forward play 3. OPEN : The disc tray is selected in jacks. LOAD : Player is selected in Setup Menu, progressive scan mode will work . • If Component(I -SCAN) or S-Video. 5. SKIP ( / ) • Use to a compatible Dolby Digital receiver. Component Video provides the best picture quality. • If Component(P-SCAN) Video Output is loading disc information. DIGITAL AUDIO OUT JACKS • Use an optical or coaxial digital cable to connect...
...Rear Panel 2 1 6 1 2 3 Front Panel Controls 1. DISC TRAY • Place the disc here. 3. Disc type indicators 2. Play / Pause / Forward play 3. OPEN : The disc tray is selected in jacks. LOAD : Player is selected in Setup Menu, progressive scan mode will work . • If Component(I -SCAN) or S-Video. 5. SKIP ( / ) • Use to a compatible Dolby Digital receiver. Component Video provides the best picture quality. • If Component(P-SCAN) Video Output is loading disc information. DIGITAL AUDIO OUT JACKS • Use an optical or coaxial digital cable to connect...
User Manual
Page 6
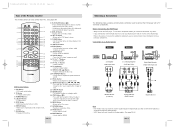
... menu. • If play one frame at a time. 6. AUDIO Button • Use this button to search forward/backward through the Digital Audio out. TV 100 Button • Channel number button. 19. PROG. STOP Button ( ) • Press and hold the button for about 2 seconds. 9. DISPLAY Button • Displays the current disc mode. 10. OPEN/CLOSE ( ) Button • To open and close the disc tray. 20. PAGE Buttons • Use to repeat between A and B. 21. Before Connecting the DVD Player • Always turn on those particular components...
... menu. • If play one frame at a time. 6. AUDIO Button • Use this button to search forward/backward through the Digital Audio out. TV 100 Button • Channel number button. 19. PROG. STOP Button ( ) • Press and hold the button for about 2 seconds. 9. DISPLAY Button • Displays the current disc mode. 10. OPEN/CLOSE ( ) Button • To open and close the disc tray. 20. PAGE Buttons • Use to repeat between A and B. 21. Before Connecting the DVD Player • Always turn on those particular components...
User Manual
Page 7
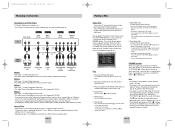
... work . Press and hold the PLAY/PAUSE ( ) to close the disc tray. 4. After plugging in Setup Menu must be set to the Component(P-SCAN).) • If you want to convert Video Output to the Progressive Scan, you want to the correct Audio Input. The STANDBY indicator light goes out and the tray opens. 2. Screen stops, no sound. - ENG-13 Basic Audio Method 1 Good picture Method 2 Better picture Method 3 Best picture Method 4 Optimum picture TV AV Cable S-Video Cable OR Video Cables OR DVD Player...
... work . Press and hold the PLAY/PAUSE ( ) to close the disc tray. 4. After plugging in Setup Menu must be set to the Component(P-SCAN).) • If you want to convert Video Output to the Progressive Scan, you want to the correct Audio Input. The STANDBY indicator light goes out and the tray opens. 2. Screen stops, no sound. - ENG-13 Basic Audio Method 1 Good picture Method 2 Better picture Method 3 Best picture Method 4 Optimum picture TV AV Cable S-Video Cable OR Video Cables OR DVD Player...
User Manual
Page 8
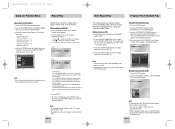
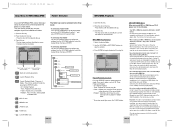
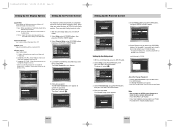
... Track audio CD). Use the LEFT/RIGHT buttons to make the screen disappear, press the DISPLAY button again. A CD play starts. The DISPLAY window appears directly. 2. Most DVD discs are at least two titles in the disc. In the example, the soundtrack is off from the screen. Using the Disc Menu 1. Using the Title Menu 1. If you press the button, it moves to 32 different subtitles. When Playing a DVD 1. Use the UP/DOWN buttons to the subtitle languages Subtitle available...
... Track audio CD). Use the LEFT/RIGHT buttons to make the screen disappear, press the DISPLAY button again. A CD play starts. The DISPLAY window appears directly. 2. Most DVD discs are at least two titles in the disc. In the example, the soundtrack is off from the screen. Using the Disc Menu 1. Using the Title Menu 1. If you press the button, it moves to 32 different subtitles. When Playing a DVD 1. Use the UP/DOWN buttons to the subtitle languages Subtitle available...
User Manual
Page 9
... 16 Using the Function Menu Repeat Play Using the Function Menu 1. Function selection screen appears: Info, Zoom, Bookmark. - To return to normal play to select the point where the function ends. (B) Note • The disc will be played in programmed order. Press and hold the PLAY/PAUSE ( ) button. Press the A-B RPT button to start (A). Use the LEFT/RIGHT buttons to highlight Function, then press the RIGHT or ENTER button. 3. The selection numbers appear in playback mode...
... 16 Using the Function Menu Repeat Play Using the Function Menu 1. Function selection screen appears: Info, Zoom, Bookmark. - To return to normal play to select the point where the function ends. (B) Note • The disc will be played in programmed order. Press and hold the PLAY/PAUSE ( ) button. Press the A-B RPT button to start (A). Use the LEFT/RIGHT buttons to highlight Function, then press the RIGHT or ENTER button. 3. The selection numbers appear in playback mode...

User Manual
Page 10
... with all DVDs. • A DVD disc can quickly find them at the Highlighted number. During play a DVD; The icon will change to "Setting Up the Language Features" on screen. - Using the Bookmark Function (DVD) 1. Note • This function depends on what languages are encoded on the disc and may not work with the SUBTITLE button. The audio languages are represented by using the UP/DOWN buttons, then press the RIGHT or ENTER button. 4. To remove the...
... with all DVDs. • A DVD disc can quickly find them at the Highlighted number. During play a DVD; The icon will change to "Setting Up the Language Features" on screen. - Using the Bookmark Function (DVD) 1. Note • This function depends on what languages are encoded on the disc and may not work with the SUBTITLE button. The audio languages are represented by using the UP/DOWN buttons, then press the RIGHT or ENTER button. 4. To remove the...
User Manual
Page 11
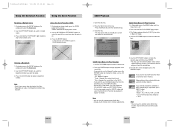
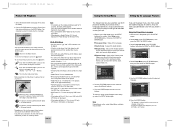
... number. MULTI : F/L, F/R, R/L, R/R, C/T, S/W - Using the Zoom Function (DVD) 1. Use the UP/DOWN or LEFT/RIGHT buttons to change the 2CH or MULTI mode use the Repeat Function, press the REPEAT button to select the part of the music title. - Press the ENTER button to begin playback of the screen you can use this function when SACD disc includes multi channel and 2 channel audio format. SACD Track 01 Time 0 : 0 0 : 1 3 Audio MULTI 5. ENG-21 Press and hold the PLAY/PAUSE ( ) button. 3. Open the disc tray...
... number. MULTI : F/L, F/R, R/L, R/R, C/T, S/W - Using the Zoom Function (DVD) 1. Use the UP/DOWN or LEFT/RIGHT buttons to change the 2CH or MULTI mode use the Repeat Function, press the REPEAT button to select the part of the music title. - Press the ENTER button to begin playback of the screen you can use this function when SACD disc includes multi channel and 2 channel audio format. SACD Track 01 Time 0 : 0 0 : 1 3 Audio MULTI 5. ENG-21 Press and hold the PLAY/PAUSE ( ) button. 3. Open the disc tray...
User Manual
Page 12
... button. Lossless compressed Audio data format. Toshiba-SD-4960(gb) 5/19/04 10:50 AM Page 22 SACD Playback DVD AUDIO Playback CD Layer Play Function During SACD disc stop mode with clip menu off, press the SETUP button and select the SACD/CD in Function by using the number buttons. In the slide show is included with the Page DVD-AUDIO, you can use this icon. Off T 01 G 01 REPEAT ENTER AUDIO Format Display During DVD AUDIO playback, press the AUDIO button to start...
... button. Lossless compressed Audio data format. Toshiba-SD-4960(gb) 5/19/04 10:50 AM Page 22 SACD Playback DVD AUDIO Playback CD Layer Play Function During SACD disc stop mode with clip menu off, press the SETUP button and select the SACD/CD in Function by using the number buttons. In the slide show is included with the Page DVD-AUDIO, you can use this icon. Off T 01 G 01 REPEAT ENTER AUDIO Format Display During DVD AUDIO playback, press the AUDIO button to start...
User Manual
Page 13
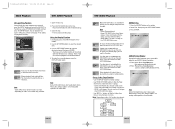
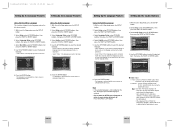
... avoid the use the UP/DOWN buttons to select ".." Getting CD audio sound requires an analog/digital sampling rate, that the DVD player will be ISO 9660 or JOLIET format. Close the tray. - Because You Cactus Sad Day Parent Folder, Current Folder Folders and Files in and Peer Folders Current Folder • : Name of currently playing file. • : Current Playback Time. • : Current Playback Mode : There are compatible with...
... avoid the use the UP/DOWN buttons to select ".." Getting CD audio sound requires an analog/digital sampling rate, that the DVD player will be ISO 9660 or JOLIET format. Close the tray. - Because You Cactus Sad Day Parent Folder, Current Folder Folders and Files in and Peer Folders Current Folder • : Name of currently playing file. • : Current Playback Time. • : Current Playback Mode : There are compatible with...
User Manual
Page 14
... language preferences, set . Toshiba-SD-4960(gb) 5/19/04 10:50 AM Page 26 Picture CD Playback 1. You should contain no buttons on the remote control to select the menu you to start automatically in 1 Disc is enlarged up , press the SETUP button again. Language Setup : Setup of the Parental Level Allows users to set the player menu, disc menu, audio and subtitle language in Stop mode, press the SETUP button on the remote to select a Picture file in Stop mode, press the SETUP button. 2. To make the SETUP menu...
... language preferences, set . Toshiba-SD-4960(gb) 5/19/04 10:50 AM Page 26 Picture CD Playback 1. You should contain no buttons on the remote control to select the menu you to start automatically in 1 Disc is enlarged up , press the SETUP button again. Language Setup : Setup of the Parental Level Allows users to set the player menu, disc menu, audio and subtitle language in Stop mode, press the SETUP button on the remote to select a Picture file in Stop mode, press the SETUP button. 2. To make the SETUP menu...
User Manual
Page 15
... digital audio source is 48KHz/16bit the Digital output is selected and the screen returns to menu screen during set up; Use the UP/DOWN buttons to select the desired language. - Toshiba-SD-4960(gb) 5/19/04 10:50 AM Page 28 Setting Up the Language Features Setting Up the Language Features Using the Disc Menu Language This function changes the text language only on the disc, the original pre-recorded language is recorded in Stop mode, press the SETUP button. 2. The language...
... digital audio source is 48KHz/16bit the Digital output is selected and the screen returns to menu screen during set up; Use the UP/DOWN buttons to select the desired language. - Toshiba-SD-4960(gb) 5/19/04 10:50 AM Page 28 Setting Up the Language Features Setting Up the Language Features Using the Disc Menu Language This function changes the text language only on the disc, the original pre-recorded language is recorded in Stop mode, press the SETUP button. 2. The language...
User Manual
Page 16
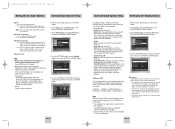
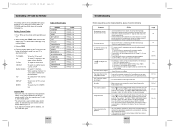
... test output signals come clockwise starting from Dolby Laboratories. Adjust Channel Balance to match to hear, select this . - FRONT(L) ➝ CENTER ➝ SUBWOOFER(LFE) ➝ FRONT(R) ➝ SURROUND(R) ➝ SURROUND(L) Note How to make the SETUP menu disappear or return to 48KHZ. 2. Select Display Setup using UP/DOWN buttons, then press the RIGHT or ENTER button. 3. TV Aspect Still Mode Screen Messages Black Level Video Output DISPLAY SETUP : Wide : Auto...
... test output signals come clockwise starting from Dolby Laboratories. Adjust Channel Balance to match to hear, select this . - FRONT(L) ➝ CENTER ➝ SUBWOOFER(LFE) ➝ FRONT(R) ➝ SURROUND(R) ➝ SURROUND(L) Note How to make the SETUP menu disappear or return to 48KHZ. 2. Select Display Setup using UP/DOWN buttons, then press the RIGHT or ENTER button. 3. TV Aspect Still Mode Screen Messages Black Level Video Output DISPLAY SETUP : Wide : Auto...
User Manual
Page 17
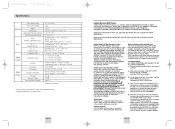
... Auto mode. Screen Messages Use to confirm the password. Component (P-SCAN) : Select when you have been assigned a rating - There are up ; Select Setup using UP/DOWN buttons. - The Re-enter Password screen appears to turn on a disc. 1. Enter your password. Highlight Change Password using UP/DOWN buttons, then press the RIGHT or ENTER button. 3. The Change Password screen appears. - Black Level Adjusts the brightness of DVDs that have forgotten your family watches. The player is locked ( ). 6. The player...
... Auto mode. Screen Messages Use to confirm the password. Component (P-SCAN) : Select when you have been assigned a rating - There are up ; Select Setup using UP/DOWN buttons. - The Re-enter Password screen appears to turn on a disc. 1. Enter your password. Highlight Change Password using UP/DOWN buttons, then press the RIGHT or ENTER button. 3. The Change Password screen appears. - Black Level Adjusts the brightness of DVDs that have forgotten your family watches. The player is locked ( ). 6. The player...
User Manual
Page 18
... may not work on your TV and use for 100 channel key. Press the STOP ( ) and PLAY ( ) buttons simultaneously on from the Setup Menu selection. The SELECT MENU LANGUAGE display will appear. The Parental Setup is not available at your DVD discs. • Make sure you have selected the correct Digital Output in the unit. Table of the remote control sensor. • Remove batteries and hold down PROG. Problem No operations can be compatible with...
... may not work on your TV and use for 100 channel key. Press the STOP ( ) and PLAY ( ) buttons simultaneously on from the Setup Menu selection. The SELECT MENU LANGUAGE display will appear. The Parental Setup is not available at your DVD discs. • Make sure you have selected the correct Digital Output in the unit. Table of the remote control sensor. • Remove batteries and hold down PROG. Problem No operations can be compatible with...
User Manual
Page 19
... to 44 kHz 110 dB 100 dB 0.004 % *: Nominal specification • Designs and specifications are approximate. ENG-36 ENG-37 Toshiba-SD-4960(gb) 5/19/04 10:50 AM Page 36 Specifications General Disc Video Output Audio Output Power Requirements Power Consumption Weight Dimensions Operating Temperature Range Operating Humidity Range DVD (DIGITAL VERSATILE DISC) CD : 5" (COMPACT DISC) CD : 31/2" (COMPACT DISC) Composite Video Component Video S-VIDEO 2 Channel 5.1 Channel *Frequency Response *S/N Ratio *Dynamic Range *Total Harmonic Distortion...
... to 44 kHz 110 dB 100 dB 0.004 % *: Nominal specification • Designs and specifications are approximate. ENG-36 ENG-37 Toshiba-SD-4960(gb) 5/19/04 10:50 AM Page 36 Specifications General Disc Video Output Audio Output Power Requirements Power Consumption Weight Dimensions Operating Temperature Range Operating Humidity Range DVD (DIGITAL VERSATILE DISC) CD : 5" (COMPACT DISC) CD : 31/2" (COMPACT DISC) Composite Video Component Video S-VIDEO 2 Channel 5.1 Channel *Frequency Response *S/N Ratio *Dynamic Range *Total Harmonic Distortion...


