
Owners Manual
Page 3
... 3 mm in each pole shall be connected to the grounding system of the building, as practical. located on the rear panel of cable entry as close to do not perform any servicing other than that contained in the operating instructions unless you are for use by qualified service personnel only. Model No. CAUTION: These servicing instructions are qualified to the point of your recorder.
... 3 mm in each pole shall be connected to the grounding system of the building, as practical. located on the rear panel of cable entry as close to do not perform any servicing other than that contained in the operating instructions unless you are for use by qualified service personnel only. Model No. CAUTION: These servicing instructions are qualified to the point of your recorder.
Owners Manual
Page 7
... the power plug, be erased. Basic Setup 7 Downloaded from the wall outlet or break the power supply to record is not liable for incidental damages (such as profit loss or interruption in the owner's manual. Toshiba is not liable for any damage caused by use or inability to use of this product and the connected equipment or software that a program you want to the unit during recording or playing. Power...
... the power plug, be erased. Basic Setup 7 Downloaded from the wall outlet or break the power supply to record is not liable for incidental damages (such as profit loss or interruption in the owner's manual. Toshiba is not liable for any damage caused by use or inability to use of this product and the connected equipment or software that a program you want to the unit during recording or playing. Power...

Owners Manual
Page 11
... recording, use over time. Basic Setup Downloaded from a DVD-RAM disc) may not operate properly in a program that bear a DVD-RAM or DVD-R logo, but you should not encounter difficulty if you turn the DVD recorder on other times during operation. Introduction Connections Introduction About this product Some differences Because of software discs (including blank discs). The operating system includes software stored on the TV screen during operation. " " may restrict copying or editing. Contents without limitation, television programs...
... recording, use over time. Basic Setup Downloaded from a DVD-RAM disc) may not operate properly in a program that bear a DVD-RAM or DVD-R logo, but you should not encounter difficulty if you turn the DVD recorder on other times during operation. Introduction Connections Introduction About this product Some differences Because of software discs (including blank discs). The operating system includes software stored on the TV screen during operation. " " may restrict copying or editing. Contents without limitation, television programs...
Owners Manual
Page 21
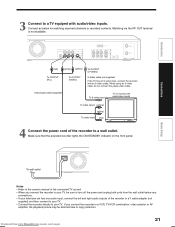
... a TV equiped with audio/video inputs To video inputs (yellow) (white) To audio input (red) 4 Connect the power cord of the recorder to a wall outlet. When using an S-video cable, do not connect the yellow video cable. Connect as well. • When you connect the recorder to a VCR, TV/VCR combination, video selector or AV amplifier, the playback picture may be sure to copy protection. DIGITAL AUDIO OUTPUT Y PB PR BITSTREAM/PCM COMPONENT OUTPUT OPTICAL R L VIDEO S-VIDEO OUTPUT HDMI OUTPUT R L VIDEO S-VIDEO INPUT1 INPUT3 CHANNEL R L VIDEO S-VIDEO CHANGE IR RF IN...
... a TV equiped with audio/video inputs To video inputs (yellow) (white) To audio input (red) 4 Connect the power cord of the recorder to a wall outlet. When using an S-video cable, do not connect the yellow video cable. Connect as well. • When you connect the recorder to a VCR, TV/VCR combination, video selector or AV amplifier, the playback picture may be sure to copy protection. DIGITAL AUDIO OUTPUT Y PB PR BITSTREAM/PCM COMPONENT OUTPUT OPTICAL R L VIDEO S-VIDEO OUTPUT HDMI OUTPUT R L VIDEO S-VIDEO INPUT1 INPUT3 CHANNEL R L VIDEO S-VIDEO CHANGE IR RF IN...

Owners Manual
Page 25
... the owner's manual of the set top box. When you use the recorder for the first time, also make the necessary setting ( page 42). DIGITAL AUDIO OUTPUT Y PB PR BITSTREAM/PCM COMPONENT OUTPUT OPTICAL R L VIDEO S-VIDEO OUTPUT HDMI OUTPUT R L VIDEO S-VIDEO INPUT1 INPUT3 CHANNEL R L VIDEO S-VIDEO CHANGE IR 1 Cable box / satellite system (Keep the power on the recorder. 2 Place the transmitter near the set top box connected to control the channels of it is turned off. • Refer to the signal sensor of the connected set top box as...
... the owner's manual of the set top box. When you use the recorder for the first time, also make the necessary setting ( page 42). DIGITAL AUDIO OUTPUT Y PB PR BITSTREAM/PCM COMPONENT OUTPUT OPTICAL R L VIDEO S-VIDEO OUTPUT HDMI OUTPUT R L VIDEO S-VIDEO INPUT1 INPUT3 CHANNEL R L VIDEO S-VIDEO CHANGE IR 1 Cable box / satellite system (Keep the power on the recorder. 2 Place the transmitter near the set top box connected to control the channels of it is turned off. • Refer to the signal sensor of the connected set top box as...
Owners Manual
Page 26
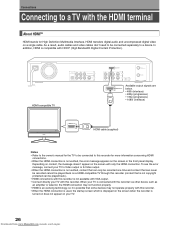
HDMI-compatible TV DIGITAL AUDIO Y OUTPUT PB PR BITSTREAM/PCM COMPONENT OUTPUT OPTICAL R L VIDEO S-VIDEO OUTPUT HDMI OUTPUT R L VIDEO S-VIDEO INPUT1 INPUT3 CHANNEL R L VIDEO S-VIDEO CHANGE IR RF IN (FROM ANT.) RF OUT (TO TV) VHF / UHF HDMI OUTPUT Available output signals are below. • 480i (interlace) • 480p (progressive) • 720p (progressive) • 1080i (interlace) HDMI INPUT HDMI cable (supplied) Notes • Refer to the owner's manual for the TV to be played back.). • HDMI connections with this recorder is turned on does...
HDMI-compatible TV DIGITAL AUDIO Y OUTPUT PB PR BITSTREAM/PCM COMPONENT OUTPUT OPTICAL R L VIDEO S-VIDEO OUTPUT HDMI OUTPUT R L VIDEO S-VIDEO INPUT1 INPUT3 CHANNEL R L VIDEO S-VIDEO CHANGE IR RF IN (FROM ANT.) RF OUT (TO TV) VHF / UHF HDMI OUTPUT Available output signals are below. • 480i (interlace) • 480p (progressive) • 720p (progressive) • 1080i (interlace) HDMI INPUT HDMI cable (supplied) Notes • Refer to the owner's manual for the TV to be played back.). • HDMI connections with this recorder is turned on does...
Owners Manual
Page 27
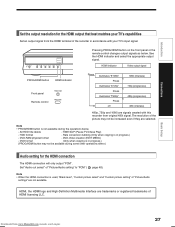
... MODE DIMMER PROG/HDMI Pressing PROG/HDMI button on the front panel or the remote control changes output signals as below . - TIME SLIP (Pause TV/Chase Play) - Basic Setup Downloaded from original 480i signal. See the HDMI indicator and select the appropriate output signal. All HDD title delete - HDD format - DVD-Video creation (EDIT MENU) - The resolution of HDMI licensing LLC. Rate conversion dubbing (Only when copying is used, "Black level", "Custom picture select" and "Custom picture setting" of "Picture/Audio setting...
... MODE DIMMER PROG/HDMI Pressing PROG/HDMI button on the front panel or the remote control changes output signals as below . - TIME SLIP (Pause TV/Chase Play) - Basic Setup Downloaded from original 480i signal. See the HDMI indicator and select the appropriate output signal. All HDD title delete - HDD format - DVD-Video creation (EDIT MENU) - The resolution of HDMI licensing LLC. Rate conversion dubbing (Only when copying is used, "Black level", "Custom picture select" and "Custom picture setting" of "Picture/Audio setting...
Owners Manual
Page 28
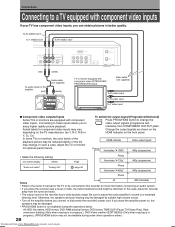
... the recorder's power cord. Be sure to adjust the audio amplifier's volume to change . Otherwise, the speakers and your TV has component video inputs, you to a TV equipped with component video inputs. In this recorder for optimum performance. HDMI indicator Video output signal Press illuminates " 1080i" 480p (progressive) • Make the following setting. Actual labels for component video inputs may be damaged by sudden high volume sound. • Turn off 480i (interlace) • Refer to the owner's manual...
... the recorder's power cord. Be sure to adjust the audio amplifier's volume to change . Otherwise, the speakers and your TV has component video inputs, you to a TV equipped with component video inputs. In this recorder for optimum performance. HDMI indicator Video output signal Press illuminates " 1080i" 480p (progressive) • Make the following setting. Actual labels for component video inputs may be damaged by sudden high volume sound. • Turn off 480i (interlace) • Refer to the owner's manual...
Owners Manual
Page 32
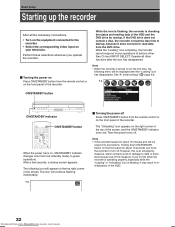
... settings Language English Time & Date setting TV/Cable TV Channel setting Guide channel setting Set Top Box setting ON/STANDBY indicator OPEN/CLOSE TV TV /VIDEO CH VOLUME CH HDD TIMESLIP DVD EASY NAVI INSTANT REPLAY INSTANT SKIP VCR Plus+ REC MENU EXTEND CONTENT MENU OW SK ON/STANDBY button SL IP When the power turns on, ON/STANDBY indicator changes color from the DVD drive. e.g. However, this is flashing, the recorder cannot respond to the recorder. • Select the corresponding video input...
... settings Language English Time & Date setting TV/Cable TV Channel setting Guide channel setting Set Top Box setting ON/STANDBY indicator OPEN/CLOSE TV TV /VIDEO CH VOLUME CH HDD TIMESLIP DVD EASY NAVI INSTANT REPLAY INSTANT SKIP VCR Plus+ REC MENU EXTEND CONTENT MENU OW SK ON/STANDBY button SL IP When the power turns on, ON/STANDBY indicator changes color from the DVD drive. e.g. However, this is flashing, the recorder cannot respond to the recorder. • Select the corresponding video input...

Owners Manual
Page 34
... ENTER. e.g. Initial settings Language English Time & Date setting TV/Cable TV Channel setting Guide channel setting Set Top Box setting Auto Manual SETUP When the recorder is operated for the first time, input settings in P PROG/HDMI LIBRARY FL SELECT DIMMER REC MODE CHP DIVIDE Start DISPLAY REMAIN TIME BAR INPUT SELECT SETUP CLEAR DELETE When the recorder is operated for the first time, begin from www.Manualslib.com manuals search engine Basic Setup A: Initial settings This step sets the recorder's clock and tuner to record broadcasting TV programs. Once you...
... ENTER. e.g. Initial settings Language English Time & Date setting TV/Cable TV Channel setting Guide channel setting Set Top Box setting Auto Manual SETUP When the recorder is operated for the first time, input settings in P PROG/HDMI LIBRARY FL SELECT DIMMER REC MODE CHP DIVIDE Start DISPLAY REMAIN TIME BAR INPUT SELECT SETUP CLEAR DELETE When the recorder is operated for the first time, begin from www.Manualslib.com manuals search engine Basic Setup A: Initial settings This step sets the recorder's clock and tuner to record broadcasting TV programs. Once you...

Owners Manual
Page 35
... button. Refer to the previous page. Each message varies according to operational status. message OK e.g. message YOeKs No 2 selections Set Select either response (by highlighting in a few seconds. To display/exit a setting menu. message No selection Basic Setup Downloaded from www.Manualslib.com manuals search engine 35 Initial settings Language English Time & Date setting TV/Cable TV Channel setting Guide channel setting Set Top Box setting Select Return Set SETUP Exit Operation guide Example of setting, playback or recording...
... button. Refer to the previous page. Each message varies according to operational status. message OK e.g. message YOeKs No 2 selections Set Select either response (by highlighting in a few seconds. To display/exit a setting menu. message No selection Basic Setup Downloaded from www.Manualslib.com manuals search engine 35 Initial settings Language English Time & Date setting TV/Cable TV Channel setting Guide channel setting Set Top Box setting Select Return Set SETUP Exit Operation guide Example of setting, playback or recording...
Owners Manual
Page 37
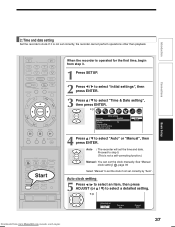
... VCR Plus+ REC MENU EXTEND CONTENT MENU OW SK SL SEARCH ENTER /ADJUST PAUSE STOP PICTURE PLAY REC QUICK MENU DVD ANGLE SUBTITLE AUDIO EDIT MENU ZOOM P in P PROG/HDMI LIBRARY FL SELECT DIMMER REC MODE CHP DIVIDE Start DISPLAY REMAIN TIME BAR INPUT SELECT SETUP CLEAR DELETE When the recorder is operated for the first time, begin from www.Manualslib.com manuals search engine 37 Auto : The recorder will set Summer time Use FRAME/ADJUST Time zone Auto Channel Auto Downloaded from step 3. 1 Press SETUP...
... VCR Plus+ REC MENU EXTEND CONTENT MENU OW SK SL SEARCH ENTER /ADJUST PAUSE STOP PICTURE PLAY REC QUICK MENU DVD ANGLE SUBTITLE AUDIO EDIT MENU ZOOM P in P PROG/HDMI LIBRARY FL SELECT DIMMER REC MODE CHP DIVIDE Start DISPLAY REMAIN TIME BAR INPUT SELECT SETUP CLEAR DELETE When the recorder is operated for the first time, begin from www.Manualslib.com manuals search engine 37 Auto : The recorder will set Summer time Use FRAME/ADJUST Time zone Auto Channel Auto Downloaded from step 3. 1 Press SETUP...
Owners Manual
Page 38
... use DST function. 2) Set "Time zone". Auto Use No Use : The recorder uses clock data Broadcast by the local (PBS) TV stations. : You want to "Auto", you set time is set the clock. The clock setting starts. IP FRAME OPEN/CLOSE TV TV /VIDEO CH VOLUME CH HDD TIMESLIP DVD EASY NAVI INSTANT REPLAY INSTANT SKIP VCR Plus+ REC MENU EXTEND CONTENT MENU OW SK SL SEARCH ENTER /ADJUST PAUSE STOP PICTURE PLAY REC QUICK MENU DVD TOP MENU 1 2 3 MENU 4 5 6 RETURN 7 8 9 T.SEARCH TV CODE 0 +10 1) Set "Summer time...
... use DST function. 2) Set "Time zone". Auto Use No Use : The recorder uses clock data Broadcast by the local (PBS) TV stations. : You want to "Auto", you set time is set the clock. The clock setting starts. IP FRAME OPEN/CLOSE TV TV /VIDEO CH VOLUME CH HDD TIMESLIP DVD EASY NAVI INSTANT REPLAY INSTANT SKIP VCR Plus+ REC MENU EXTEND CONTENT MENU OW SK SL SEARCH ENTER /ADJUST PAUSE STOP PICTURE PLAY REC QUICK MENU DVD TOP MENU 1 2 3 MENU 4 5 6 RETURN 7 8 9 T.SEARCH TV CODE 0 +10 1) Set "Summer time...
Owners Manual
Page 43
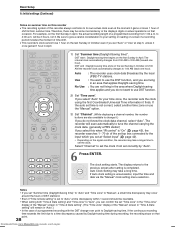
... output channel /ADJUST number 4 of set top box connected to have it receive commands from the recorder.) FRAME Basic Setup (Continued) Downloaded from the set top box, select "Not used" then press ENTER button. Line3 : For type B connection via the INPUT1 jacks using the audio/video cable. 7 Press , then press ADJUST (or / ) to step 9. If you do not connect a set top box. On : The recorder can change channels of the set top box powered on to this recorder. Skip to the CHANNEL CHANGE...
... output channel /ADJUST number 4 of set top box connected to have it receive commands from the recorder.) FRAME Basic Setup (Continued) Downloaded from the set top box, select "Not used" then press ENTER button. Line3 : For type B connection via the INPUT1 jacks using the audio/video cable. 7 Press , then press ADJUST (or / ) to step 9. If you do not connect a set top box. On : The recorder can change channels of the set top box powered on to this recorder. Skip to the CHANNEL CHANGE...

Owners Manual
Page 44
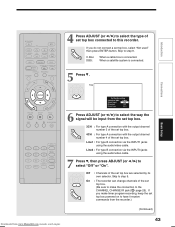
... /ADJUST PAUSE STOP PICTURE PLAY REC QUICK MENU DVD TOP MENU 1 2 3 MENU 4 5 6 RETURN 7 8 9 T.SEARCH TV CODE 0 +10 DVD ANGLE SUBTITLE AUDIO EDIT MENU ZOOM P in P PROG/HDMI LIBRARY FL SELECT DIMMER REC MODE CHP DIVIDE DISPLAY REMAIN TIME BAR INPUT SELECT SETUP CLEAR DELETE SEARCH 8 Press , then press the number buttons to enter the 3 digits of a brand code of your set top box and confirm that set top box channels are selected by the number buttons or CH buttons of the IR control cable...
... /ADJUST PAUSE STOP PICTURE PLAY REC QUICK MENU DVD TOP MENU 1 2 3 MENU 4 5 6 RETURN 7 8 9 T.SEARCH TV CODE 0 +10 DVD ANGLE SUBTITLE AUDIO EDIT MENU ZOOM P in P PROG/HDMI LIBRARY FL SELECT DIMMER REC MODE CHP DIVIDE DISPLAY REMAIN TIME BAR INPUT SELECT SETUP CLEAR DELETE SEARCH 8 Press , then press the number buttons to enter the 3 digits of a brand code of your set top box and confirm that set top box channels are selected by the number buttons or CH buttons of the IR control cable...
Owners Manual
Page 48
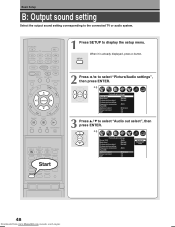
... FRAME OPEN/CLOSE TV TV /VIDEO CH VOLUME CH HDD TIMESLIP DVD EASY NAVI INSTANT REPLAY INSTANT SKIP VCR Plus+ REC MENU EXTEND CONTENT MENU OW SK SL SEARCH ENTER /ADJUST PAUSE STOP PICTURE PLAY REC QUICK MENU DVD ANGLE SUBTITLE AUDIO EDIT MENU ZOOM P in P PROG/HDMI LIBRARY FL SELECT DIMMER REC MODE CHP DIVIDE Start DISPLAY REMAIN TIME BAR INPUT SELECT SETUP CLEAR DELETE 1 Press SETUP to the connected TV or audio system. e.g. e.g. Basic Setup B: Output sound setting Select the output sound setting...
... FRAME OPEN/CLOSE TV TV /VIDEO CH VOLUME CH HDD TIMESLIP DVD EASY NAVI INSTANT REPLAY INSTANT SKIP VCR Plus+ REC MENU EXTEND CONTENT MENU OW SK SL SEARCH ENTER /ADJUST PAUSE STOP PICTURE PLAY REC QUICK MENU DVD ANGLE SUBTITLE AUDIO EDIT MENU ZOOM P in P PROG/HDMI LIBRARY FL SELECT DIMMER REC MODE CHP DIVIDE Start DISPLAY REMAIN TIME BAR INPUT SELECT SETUP CLEAR DELETE 1 Press SETUP to the connected TV or audio system. e.g. e.g. Basic Setup B: Output sound setting Select the output sound setting...

Owners Manual
Page 54
.../HDMI LIBRARY FL SELECT DIMMER REC MODE CHP DIVIDE Start DISPLAY REMAIN TIME BAR INPUT SELECT SETUP CLEAR DELETE ENTER Operational settings Operation beep Off Recording complete beep On IR code DR 1 Instant skip interval 30 sec. Instant replay internal 10 sec. Proceed to select "IR code", then press ENTER. Photo SETUP 3 Press / to the next setting. 54 Downloaded from www.Manualslib.com manuals search engine DVD ANGLE SUBTITLE AUDIO EDIT MENU...
.../HDMI LIBRARY FL SELECT DIMMER REC MODE CHP DIVIDE Start DISPLAY REMAIN TIME BAR INPUT SELECT SETUP CLEAR DELETE ENTER Operational settings Operation beep Off Recording complete beep On IR code DR 1 Instant skip interval 30 sec. Instant replay internal 10 sec. Proceed to select "IR code", then press ENTER. Photo SETUP 3 Press / to the next setting. 54 Downloaded from www.Manualslib.com manuals search engine DVD ANGLE SUBTITLE AUDIO EDIT MENU...
Owners Manual
Page 55
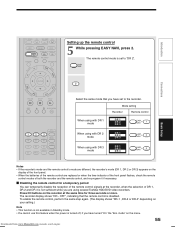
... you have turned "On" the "Eco. EASY NAVI SL SEARCH ENTER /ADJUST PAUSE STOP PICTURE PLAY REC QUICK MENU DVD TOP MENU 1 2 3 MENU 4 5 6 RETURN 7 8 9 T.SEARCH TV CODE 0 +10 2 Select the same mode that the remote control is set to "DR 2". Press CH buttons on the display of the front panel. • When the batteries of both the recorder and the remote control, and re-program it if necessary. Mode setting Recorder Remote control When using with DR 1 mode DR...
... you have turned "On" the "Eco. EASY NAVI SL SEARCH ENTER /ADJUST PAUSE STOP PICTURE PLAY REC QUICK MENU DVD TOP MENU 1 2 3 MENU 4 5 6 RETURN 7 8 9 T.SEARCH TV CODE 0 +10 2 Select the same mode that the remote control is set to "DR 2". Press CH buttons on the display of the front panel. • When the batteries of both the recorder and the remote control, and re-program it if necessary. Mode setting Recorder Remote control When using with DR 1 mode DR...

Owners Manual
Page 56
... the date of instructions furnished by these warranties. Reception problems caused by inadequate antenna systems are your product on-line at www.tacp.toshiba.com/ service as soon as lightning or fluctuations in electric power, improper installation, improper maintenance or use in materials or workmanship as limited above and do not extend to any DVD PLAYER/RECORDER or parts which have been...
... the date of instructions furnished by these warranties. Reception problems caused by inadequate antenna systems are your product on-line at www.tacp.toshiba.com/ service as soon as lightning or fluctuations in electric power, improper installation, improper maintenance or use in materials or workmanship as limited above and do not extend to any DVD PLAYER/RECORDER or parts which have been...

Owners Manual
Page 57
...Setup Connections Introduction WITH THE EXCEPTION OF ANY WARRANTIES IMPLIED BY THE LAW OF ANY STATE OF THE U.S.A. IN NO EVENT SHALL TACP BE LIABLE FOR CONSEQUENTIAL OR INCIDENTAL DAMAGES (INCLUDING, BUT NOT LIMITED TO, LOST PROFITS, BUSINESS INTERRUPTION, OR MODIFICATION OR ERASURE OF RECORDED DATA CAUSED BY USE, MISUSE OR INABILITY TO USE THIS PRODUCT). The time...AND SIMILAR OBLIGATIONS OF TACP WITH RESPECT TO THE REPAIR OR REPLACEMENT OF ANY PARTS. How to Obtain Warranty Services If, after following all of the operating instructions in any manner whatsoever. For additional information, ...
...Setup Connections Introduction WITH THE EXCEPTION OF ANY WARRANTIES IMPLIED BY THE LAW OF ANY STATE OF THE U.S.A. IN NO EVENT SHALL TACP BE LIABLE FOR CONSEQUENTIAL OR INCIDENTAL DAMAGES (INCLUDING, BUT NOT LIMITED TO, LOST PROFITS, BUSINESS INTERRUPTION, OR MODIFICATION OR ERASURE OF RECORDED DATA CAUSED BY USE, MISUSE OR INABILITY TO USE THIS PRODUCT). The time...AND SIMILAR OBLIGATIONS OF TACP WITH RESPECT TO THE REPAIR OR REPLACEMENT OF ANY PARTS. How to Obtain Warranty Services If, after following all of the operating instructions in any manner whatsoever. For additional information, ...


