Owner's Manual - English
Page 3
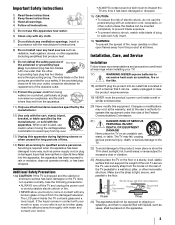
...grounding prong. Servicing is required when the apparatus has been damaged in case the product requires service. 19) NEVER route the product's power cord inside the TV contains glass and a toxic liquid. fully insert. 16) WARNING: To prevent the spread of fire, keep candles or other open flames... for long periods of time. 14) Refer all times. Install in direct sunlight; The LCD panel inside a wall or similar enclosed area. 20) Never modify this product, never place or store the TV in accordance with the manufacturer's instructions. 8) Do not install near water. 6) Clean only...
...grounding prong. Servicing is required when the apparatus has been damaged in case the product requires service. 19) NEVER route the product's power cord inside the TV contains glass and a toxic liquid. fully insert. 16) WARNING: To prevent the spread of fire, keep candles or other open flames... for long periods of time. 14) Refer all times. Install in direct sunlight; The LCD panel inside a wall or similar enclosed area. 20) Never modify this product, never place or store the TV in accordance with the manufacturer's instructions. 8) Do not install near water. 6) Clean only...
Owner's Manual - English
Page 4
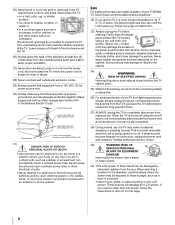
... your TV from lightning and power surges, always unplug the power cord and disconnect the antenna from the TV if you use , the TV may damage the surface. If you need to clean the LCD screen, follow these sounds become frequent or continuous, unplug the power cord and contact a Toshiba Authorized Service... or unused for the television, avoid locations where the screen may vary until the LCD warms up static charges (see Section 810 of your TOSHIBA TV, follow the instructions in a room whose temperature is 32 °F (0 °C) or below, the picture brightness may be damaged...
... your TV from lightning and power surges, always unplug the power cord and disconnect the antenna from the TV if you use , the TV may damage the surface. If you need to clean the LCD screen, follow these sounds become frequent or continuous, unplug the power cord and contact a Toshiba Authorized Service... or unused for the television, avoid locations where the screen may vary until the LCD warms up static charges (see Section 810 of your TOSHIBA TV, follow the instructions in a room whose temperature is 32 °F (0 °C) or below, the picture brightness may be damaged...
Owner's Manual - English
Page 6
... functionality (e.g. To ensure your LCD TV The following symptoms are technical limitations of LCD Display technology and are trademarks of the FCC rules. ENERGY STAR® qualified TV. marks. 6 Important notes ...Power-On Mode) may cause undesired operation. Such pixels are registered U.S. Environmental Protection Agency. Products that may increase energy consumption, possibly beyond the limits required for perceived issues resulting from Dolby Laboratories. FCC Declaration of Conformity Compliance Statement (Part 15): The Toshiba 42ZV650U, 47ZV650U and 55ZV650U...
... functionality (e.g. To ensure your LCD TV The following symptoms are technical limitations of LCD Display technology and are trademarks of the FCC rules. ENERGY STAR® qualified TV. marks. 6 Important notes ...Power-On Mode) may cause undesired operation. Such pixels are registered U.S. Environmental Protection Agency. Products that may increase energy consumption, possibly beyond the limits required for perceived issues resulting from Dolby Laboratories. FCC Declaration of Conformity Compliance Statement (Part 15): The Toshiba 42ZV650U, 47ZV650U and 55ZV650U...

Owner's Manual - English
Page 7
...LCD TV 5 Chapter 1: Introduction 9 Features of your new TV 9 Overview of steps for installing, setting up, and using your new TV 9 TV front and side panel controls and connections . . . . 10 TV back panel connections 11 Chapter 2: Connecting your TV... the time zone 39 Selecting the location 39 Selecting the TOSHIBA Illumination mode 39 Selecting the Power-On Mode 40 Using Blue Screen 40 Setting the screen...your PIN code 53 Blocking TV programs and movies by rating (V-Chip 54 Downloading an additional rating system for blocking TV programs and movies 54 Unlocking programs 55 Locking ...
...LCD TV 5 Chapter 1: Introduction 9 Features of your new TV 9 Overview of steps for installing, setting up, and using your new TV 9 TV front and side panel controls and connections . . . . 10 TV back panel connections 11 Chapter 2: Connecting your TV... the time zone 39 Selecting the location 39 Selecting the TOSHIBA Illumination mode 39 Selecting the Power-On Mode 40 Using Blue Screen 40 Setting the screen...your PIN code 53 Blocking TV programs and movies by rating (V-Chip 54 Downloading an additional rating system for blocking TV programs and movies 54 Unlocking programs 55 Locking ...
Owner's Manual - English
Page 8
... Link 60 Using the HDMI settings feature 61 Setting the HDMI audio mode 61 Displaying TV status information 62 Understanding the auto power off feature 62 Understanding the last mode memory feature 62 Chapter 7: Using the TV's advanced features 63 Using the advanced picture settings features 63 Using Resolution 63 Using DynaLight...Acceptable signal formats for PC IN and HDMI terminals 75 PC IN signal formats 75 HDMI signal formats 76 Limited United States Warranty for LCD Televisions 26" and Larger 77 Limited Canadian Warranty for Toshiba Brand Flat Panel Televisions 78 Index 81 8
... Link 60 Using the HDMI settings feature 61 Setting the HDMI audio mode 61 Displaying TV status information 62 Understanding the auto power off feature 62 Understanding the last mode memory feature 62 Chapter 7: Using the TV's advanced features 63 Using the advanced picture settings features 63 Using Resolution 63 Using DynaLight...Acceptable signal formats for PC IN and HDMI terminals 75 PC IN signal formats 75 HDMI signal formats 76 Limited United States Warranty for LCD Televisions 26" and Larger 77 Limited Canadian Warranty for Toshiba Brand Flat Panel Televisions 78 Index 81 8
Owner's Manual - English
Page 9
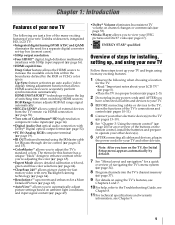
...and blue color selections (- page 19). •IR OUT infrared terminal using its many exciting features of your new Toshiba widescreen, integrated HD, LCD TV: •Integrated digital tuning (8VSB ATSC and QAM) eliminates the need for a separate digital converter set up your... page 63). •AutoView™ allows you have connected all cables and devices, plug in the power cords for your TV and other electronic device(s) to the TV, learn the functions of the TV's connections and controls (- page 67). • ENERGY STAR® qualified Overview of external devices from...
...and blue color selections (- page 19). •IR OUT infrared terminal using its many exciting features of your new Toshiba widescreen, integrated HD, LCD TV: •Integrated digital tuning (8VSB ATSC and QAM) eliminates the need for a separate digital converter set up your... page 63). •AutoView™ allows you have connected all cables and devices, plug in the power cords for your TV and other electronic device(s) to the TV, learn the functions of the TV's connections and controls (- page 67). • ENERGY STAR® qualified Overview of external devices from...
Owner's Manual - English
Page 10
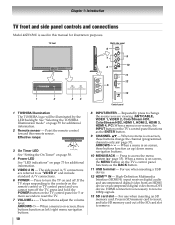
See "Selecting the TOSHIBA Illumination mode" on the TV's control panel functions as the ENTER button. 9 CHANNEL Bb - ARROWS I i - Repeatedly press to turn off . When a menu is on and off the TV, press and hold the POWER button on the TV's control panel functions as up/down menu ...these buttons function as the BACK button. 11 USB terminal - TV front Right side panel 6 7 9 10 8 11 12 5 1 2 34 13 Control panel 1 TOSHIBA Illumination The TOSHIBA logo will be illuminated by the LED backlight. If the TV stops responding to receive 1080p signals. 13 SD card slot ...
See "Selecting the TOSHIBA Illumination mode" on the TV's control panel functions as the ENTER button. 9 CHANNEL Bb - ARROWS I i - Repeatedly press to turn off . When a menu is on and off the TV, press and hold the POWER button on the TV's control panel functions as up/down menu ...these buttons function as the BACK button. 11 USB terminal - TV front Right side panel 6 7 9 10 8 11 12 5 1 2 34 13 Control panel 1 TOSHIBA Illumination The TOSHIBA logo will be illuminated by the LED backlight. If the TV stops responding to receive 1080p signals. 13 SD card slot ...
Owner's Manual - English
Page 11
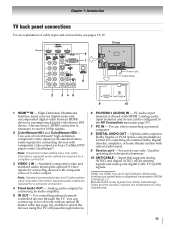
... optical IR blaster cable (- Dolby and the double-D symbol are required for connecting devices with component video output, such as a Toshiba DVD player with optical audio input. 9 Service port - Standard (composite) video and standard audio inputs plus optional S-video inputs for... HDMI logo and High-Definition Multimedia Interface are required for a complete connection. 3 VIDEO 1 IN - Also see pages 12-19. 1 6 7 TV back Power cord Cable Strap 8 2 345 9 10 1 HDMI™ IN - separate audio cables are trademarks or registered trademarks of Dolby Laboratories. 11 For ...
... optical IR blaster cable (- Dolby and the double-D symbol are required for connecting devices with component video output, such as a Toshiba DVD player with optical audio input. 9 Service port - Standard (composite) video and standard audio inputs plus optional S-video inputs for... HDMI logo and High-Definition Multimedia Interface are required for a complete connection. 3 VIDEO 1 IN - Also see pages 12-19. 1 6 7 TV back Power cord Cable Strap 8 2 345 9 10 1 HDMI™ IN - separate audio cables are trademarks or registered trademarks of Dolby Laboratories. 11 For ...
Owner's Manual - English
Page 15
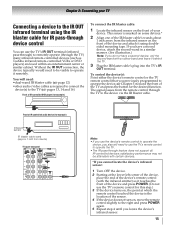
...other audio/video cables as Toshiba infrared remote-controlled VCRs or DVD players) enclosed within an entertainment center or similar cabinet. satisfactory performance may not be visible to the TV (- To control the device(s): Point either the device's remote control or the TV remote control (that you ...: •dual-wand IR blaster cable (- Chapter 2: Connecting your device. pages 13, 14 and 16) Front of your TV Connecting a device to the right and press POWER again. 5 Repeat step 4 until you do not have a second device, coil the second wand with the infrared emitter) so...
...other audio/video cables as Toshiba infrared remote-controlled VCRs or DVD players) enclosed within an entertainment center or similar cabinet. satisfactory performance may not be visible to the TV (- To control the device(s): Point either the device's remote control or the TV remote control (that you ...: •dual-wand IR blaster cable (- Chapter 2: Connecting your device. pages 13, 14 and 16) Front of your TV Connecting a device to the right and press POWER again. 5 Repeat step 4 until you do not have a second device, coil the second wand with the infrared emitter) so...
Owner's Manual - English
Page 21
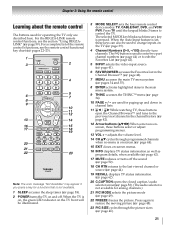
...page 34). 10 PAGE + / - page 50). (The audio selector is not available for paging up and down in channel lists. 11 3 C / # c While watching TV, these buttons select or adjust programming menus. 13 VOL + - For the REGZA-LINK remote control functions, see the remote control functional key chart (- When the... on, the green LED indicator on and off the sound (- Press again to the last viewed channel or source (- page 58). 2 POWER turns the TV on the TV front will be used to the previous/next channel in the channel history (page 42). 12 Arrow buttons (BbC c) When a menu is ...
...page 34). 10 PAGE + / - page 50). (The audio selector is not available for paging up and down in channel lists. 11 3 C / # c While watching TV, these buttons select or adjust programming menus. 13 VOL + - For the REGZA-LINK remote control functions, see the remote control functional key chart (- When the... on, the green LED indicator on and off the sound (- Press again to the last viewed channel or source (- page 58). 2 POWER turns the TV on the TV front will be used to the previous/next channel in the channel history (page 42). 12 Arrow buttons (BbC c) When a menu is ...
Owner's Manual - English
Page 34
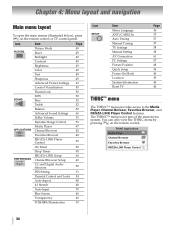
... Control and Locks 54 Auto Aspect 48 4:3 Stretch 48 Auto Input 39 Blue Screen 40 Transparency 40 TOSHIBA Illumination 39 Icon SETUP Item Menu Language ANT/CABLE In Auto Tuning Manual Tuning TV Settings Manual Setting AV Connection PC Settings Picture Position Quick Setup Power-On Mode Location... System Information Reset TV Page 36 37 37 37 38 ...
... Control and Locks 54 Auto Aspect 48 4:3 Stretch 48 Auto Input 39 Blue Screen 40 Transparency 40 TOSHIBA Illumination 39 Icon SETUP Item Menu Language ANT/CABLE In Auto Tuning Manual Tuning TV Settings Manual Setting AV Connection PC Settings Picture Position Quick Setup Power-On Mode Location... System Information Reset TV Page 36 37 37 37 38 ...
Owner's Manual - English
Page 39
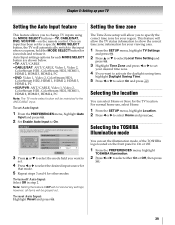
... Home and press O. Note: Setting the feature to Off will be restricted to the ANT/CABLE input. UP menu, highlight TV Settings 2 Press press BTo. Selecting the TOSHIBA Illumination mode You can select Home or Store for your viewing area. 1 aFnrodmprtehsesSTET. Auto Input Use this menu to enable your... cancel any settings; Setting the time zone The Time Zone setup will allow you to select On and press O. SLEEP POWER MODE SELECT CABLE/SAT DVD TV VCR/PVR Enable Auto Input TV CABLE/SAT DVD VCR/PVR On -ColorStream HD1 HDMI 1 Video 1 Reset 3 Press B or b to select the ...
... Home and press O. Note: Setting the feature to Off will be restricted to the ANT/CABLE input. UP menu, highlight TV Settings 2 Press press BTo. Selecting the TOSHIBA Illumination mode You can select Home or Store for your viewing area. 1 aFnrodmprtehsesSTET. Auto Input Use this menu to enable your... cancel any settings; Setting the time zone The Time Zone setup will allow you to select On and press O. SLEEP POWER MODE SELECT CABLE/SAT DVD TV VCR/PVR Enable Auto Input TV CABLE/SAT DVD VCR/PVR On -ColorStream HD1 HDMI 1 Video 1 Reset 3 Press B or b to select the ...

Owner's Manual - English
Page 40
... Screen feature, the screen will turn off automatically. SETUP menu, highlight Reset TV and 2 Enter your TV Selecting the Power-On Mode You can select either Power-Saving or Select Power-Saving for the TV to turn blue and the sound will be deleted. No To cancel the ... 3 Press C or c to below 1W. Reset TV All previous settings will turn on more quickly. 1 From the SETUP menu, highlight Power-On Mode. 2 Press Fast, C or then pcrteossseOlec.t either Power-Saving or Fast mode. •Power-Saving mode keeps power consumption in standby mode. As a result, it takes...
... Screen feature, the screen will turn off automatically. SETUP menu, highlight Reset TV and 2 Enter your TV Selecting the Power-On Mode You can select either Power-Saving or Select Power-Saving for the TV to turn blue and the sound will be deleted. No To cancel the ... 3 Press C or c to below 1W. Reset TV All previous settings will turn on more quickly. 1 From the SETUP menu, highlight Power-On Mode. 2 Press Fast, C or then pcrteossseOlec.t either Power-Saving or Fast mode. •Power-Saving mode keeps power consumption in standby mode. As a result, it takes...
Owner's Manual - English
Page 42
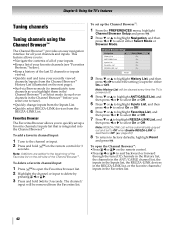
... inputs from the Inputs List. •Quickly select REGZA-LINK devices from the REGZA-LINK List. The channel/ input will be cleared every time the TV is powered off. 4 Press b or B to highlight ANT/CABLE List, and then press C or c to select On or Off. 5 Press b or B to... a favorite channels/inputs list that is switched to Off when Enable REGZA-LINK is integrated into the Channel Browser™. Chapter 6: Using the TV's features Tuning channels Tuning channels using the Channel Browser™ The Channel Browser™ provides an easy navigation interface for 3 seconds. To delete...
... inputs from the Inputs List. •Quickly select REGZA-LINK devices from the REGZA-LINK List. The channel/ input will be cleared every time the TV is powered off. 4 Press b or B to highlight ANT/CABLE List, and then press C or c to select On or Off. 5 Press b or B to... a favorite channels/inputs list that is switched to Off when Enable REGZA-LINK is integrated into the Channel Browser™. Chapter 6: Using the TV's features Tuning channels Tuning channels using the Channel Browser™ The Channel Browser™ provides an easy navigation interface for 3 seconds. To delete...
Owner's Manual - English
Page 56
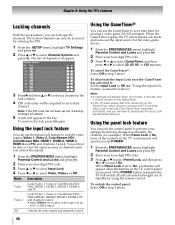
... inputs and channels 3 and 4. 56 Using the GameTimer® You can lock specific channels. If the POWER button is On, none of standby by using the remote control. menu, highlight TV Settings 2 Press press T B o. To deactivate the Input Lock once the GameTimer has activated it: Set... Note: •A message will appear when 10 minutes, 3 minutes, and 1 minute remain on the GameTimer. • If the TV loses power with time remaining on the TV control panel will be able to select On. Note: If the PIN code has not been set yet, a warning message will appear...
... inputs and channels 3 and 4. 56 Using the GameTimer® You can lock specific channels. If the POWER button is On, none of standby by using the remote control. menu, highlight TV Settings 2 Press press T B o. To deactivate the Input Lock once the GameTimer has activated it: Set... Note: •A message will appear when 10 minutes, 3 minutes, and 1 minute remain on the GameTimer. • If the TV loses power with time remaining on the TV control panel will be able to select On. Note: If the PIN code has not been set yet, a warning message will appear...
Owner's Manual - English
Page 58
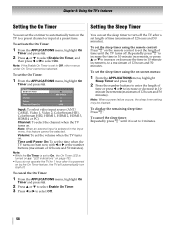
...select video input source (ANT/ CABLE, Video 1, Video 2, ColorStream HD1, ColorStream HD2, HDMI 1, HDMI 2, HDMI 3, HDMI 4 or PC) Channel: To select the channel when the TV turns on from now with C or c or the number buttons (maximum of 12 hours and 50 minutes). IONS menu, highlight On 2 Press B or b to select... Timer. 3 Press C or c to select Enable On Timer, and then press C or cto select On. To display the remaining sleep time: Press [. Note: When a power failure occurs, the sleep timer setting may be selected. "LED indications" on page 73). • If you do not operate the...
...select video input source (ANT/ CABLE, Video 1, Video 2, ColorStream HD1, ColorStream HD2, HDMI 1, HDMI 2, HDMI 3, HDMI 4 or PC) Channel: To select the channel when the TV turns on from now with C or c or the number buttons (maximum of 12 hours and 50 minutes). IONS menu, highlight On 2 Press B or b to select... Timer. 3 Press C or c to select Enable On Timer, and then press C or cto select On. To display the remaining sleep time: Press [. Note: When a power failure occurs, the sleep timer setting may be selected. "LED indications" on page 73). • If you do not operate the...
Owner's Manual - English
Page 59
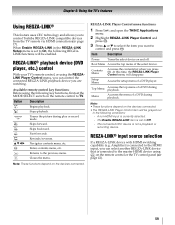
... is not a playback or recording device. Button S D Description Begins playback. A G F J H Pauses the picture during playback. Item Description Power Turns the select device on the devices connected. Contents Menu Accesses the contents list when you are watching. page 41). 59 Available remote control key... Note: • These functions depend on the remote control to TV. The Enable REGZA-LINK item is connected to the HDMI input, you want to control Toshiba REGZA-LINK compatible devices from the TV remote via HDMI connection (- Amplifier) is set the MODE SELECT...
... is not a playback or recording device. Button S D Description Begins playback. A G F J H Pauses the picture during playback. Item Description Power Turns the select device on the devices connected. Contents Menu Accesses the contents list when you are watching. page 41). 59 Available remote control key... Note: • These functions depend on the remote control to TV. The Enable REGZA-LINK item is connected to the HDMI input, you want to control Toshiba REGZA-LINK compatible devices from the TV remote via HDMI connection (- Amplifier) is set the MODE SELECT...
Owner's Manual - English
Page 60
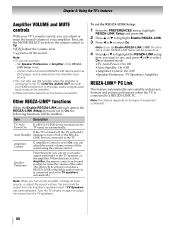
... off the sound using the remote control. Item Description TV Auto Power On If a REGZA-LINK device is set your audio output preference to the TV speakers or the amplifier. Amplifier Control If Amplifier Control is turned on, the TV turns on automatically. Note: When you can set to...can also use , and press C or c to select On or desired mode. •TV Auto Power: On/Off •Auto Standby: On/Off •Amplifier Control: On/Off •Speaker Preference: TV Speakers/Amplifier REGZA-LINK® PC Link This feature automatically sets suitable widescreen formats and picture preferences...
... off the sound using the remote control. Item Description TV Auto Power On If a REGZA-LINK device is set your audio output preference to the TV speakers or the amplifier. Amplifier Control If Amplifier Control is turned on, the TV turns on automatically. Note: When you can set to...can also use , and press C or c to select On or desired mode. •TV Auto Power: On/Off •Auto Standby: On/Off •Amplifier Control: On/Off •Speaker Preference: TV Speakers/Amplifier REGZA-LINK® PC Link This feature automatically sets suitable widescreen formats and picture preferences...

Owner's Manual - English
Page 62
... •Detailed description TreomdoitseplcaoyntNroelxat ginafionr.mPraetsiosinn,gpQ ressa Q on the remote control. Chapter 6: Using the TV's features Displaying TV status information TProesdsisE plaoynTtVhesrtaetmuostiencfoonrmtroatl.ion using INFO: (only available for an extended period of time, you should unplug the power cord. for the day. ANT 2-2 Stereo 480i 4:3 NONE Nashville WX Channel 8:59am - 4:59pm EST...
... •Detailed description TreomdoitseplcaoyntNroelxat ginafionr.mPraetsiosinn,gpQ ressa Q on the remote control. Chapter 6: Using the TV's features Displaying TV status information TProesdsisE plaoynTtVhesrtaetmuostiencfoonrmtroatl.ion using INFO: (only available for an extended period of time, you should unplug the power cord. for the day. ANT 2-2 Stereo 480i 4:3 NONE Nashville WX Channel 8:59am - 4:59pm EST...
Owner's Manual - English
Page 71
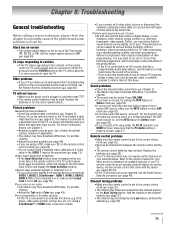
... turn off the TV, press and hold the POWER button on the TV control panel for your other device to VIDEO 1, VIDEO 2, ColorStream®, HDMI 1, HDMI 2, HDMI 3, HDMI 4, PC or from channels 3 or 4, make sure that the PC ... the correct device mode (- For device connection details, see Chapter 2. • Antenna reception may not operate certain features on your TV's problem is connected to a particular input on • Make sure the power cord is set to Off (- Try another channel. • The sound may have broadcast difficulties. page 22). • Do...
... turn off the TV, press and hold the POWER button on the TV control panel for your other device to VIDEO 1, VIDEO 2, ColorStream®, HDMI 1, HDMI 2, HDMI 3, HDMI 4, PC or from channels 3 or 4, make sure that the PC ... the correct device mode (- For device connection details, see Chapter 2. • Antenna reception may not operate certain features on your TV's problem is connected to a particular input on • Make sure the power cord is set to Off (- Try another channel. • The sound may have broadcast difficulties. page 22). • Do...


