
Owner's Manual - English
Page 3
...the cabinet or enclosure surface has been damaged or the TV does not operate normally, take the following precautions: • ALWAYS turn off the TV and unplug the power cord to avoid possible electric shock or fire. • NEVER allow your TV: 17) WARNING: NEVER expose batteries to excessive heat.... 14) Refer all warnings when installing your body to the floor. hot, humid areas; The LCD panel inside a wall or similar enclosed area. 20) Never modify this equipment under the rules of the TV pedestal to operate this equipment. In order to maintain stability and prevent the...
...the cabinet or enclosure surface has been damaged or the TV does not operate normally, take the following precautions: • ALWAYS turn off the TV and unplug the power cord to avoid possible electric shock or fire. • NEVER allow your TV: 17) WARNING: NEVER expose batteries to excessive heat.... 14) Refer all warnings when installing your body to the floor. hot, humid areas; The LCD panel inside a wall or similar enclosed area. 20) Never modify this equipment under the rules of the TV pedestal to operate this equipment. In order to maintain stability and prevent the...
Owner's Manual - English
Page 4
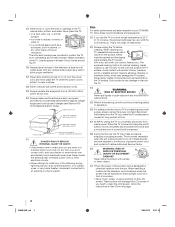
...) Never block or cover the slots or openings in cabinet, or any of time. 37) ALWAYS unplug the TV to clean the LCD screen, follow these sounds become frequent or continuous, unplug the power cord and contact a Toshiba Authorized Service Center. 39) WARNING: RISK OF SERIOUS PERSONAL INJURY OR EQUIPMENT DAMAGE! Never place the...
...) Never block or cover the slots or openings in cabinet, or any of time. 37) ALWAYS unplug the TV to clean the LCD screen, follow these sounds become frequent or continuous, unplug the power cord and contact a Toshiba Authorized Service Center. 39) WARNING: RISK OF SERIOUS PERSONAL INJURY OR EQUIPMENT DAMAGE! Never place the...
Owner's Manual - English
Page 6
...of the FCC rules. however, there may cause undesired operation. marks. ENERGY STAR® qualified TV. FCC Declaration of Conformity Compliance Statement (Part 15): The Toshiba 40XV648U, 46XV648U and 52XV648U Televisions comply with Part 15 of joystick at optimal energy efficiency, select [Home] mode during ...and applying power to the equipment, the user is displayed for perceived issues resulting from that to operate this equipment not expressly approved by one or more information, see page 30 and 39. These limits are registered U.S. To ensure your LCD TV The following...
...of the FCC rules. however, there may cause undesired operation. marks. ENERGY STAR® qualified TV. FCC Declaration of Conformity Compliance Statement (Part 15): The Toshiba 40XV648U, 46XV648U and 52XV648U Televisions comply with Part 15 of joystick at optimal energy efficiency, select [Home] mode during ...and applying power to the equipment, the user is displayed for perceived issues resulting from that to operate this equipment not expressly approved by one or more information, see page 30 and 39. These limits are registered U.S. To ensure your LCD TV The following...
Owner's Manual - English
Page 7
...Service 3 Choosing a location for your LCD TV 5 Chapter 1: Introduction 9 Features of your new TV 9 Overview of steps for installing, setting up, and using your new TV 9 TV front and side panel controls and connections . . . . 10 TV back panel connections 11 Chapter 2: Connecting your TV 12 Overview of cable types 12 About... skip 29 Labeling video input sources 29 Setting the time zone 30 Selecting the location 30 Selecting the TOSHIBA Illumination mode 30 Selecting the Power-On Mode 30 Using Blue Screen 30 Setting the screen transparency 30 Viewing the system status 31 Reset ...
...Service 3 Choosing a location for your LCD TV 5 Chapter 1: Introduction 9 Features of your new TV 9 Overview of steps for installing, setting up, and using your new TV 9 TV front and side panel controls and connections . . . . 10 TV back panel connections 11 Chapter 2: Connecting your TV 12 Overview of cable types 12 About... skip 29 Labeling video input sources 29 Setting the time zone 30 Selecting the location 30 Selecting the TOSHIBA Illumination mode 30 Selecting the Power-On Mode 30 Using Blue Screen 30 Setting the screen transparency 30 Viewing the system status 31 Reset ...
Owner's Manual - English
Page 8
... the HDMI™ settings feature 51 Setting the HDMI™ audio mode 51 Displaying TV status information 52 Understanding the auto power off feature 52 Understanding the last mode memory feature 52 Chapter 7: Using the TV's advanced features 53 Using the advanced picture settings features 53 Using the Resolution+™ ... IN and HDMI terminals 63 PC IN signal formats 63 HDMI signal formats 64 Limited United States Warranty for LCD Televisions 26" and Larger 65 Limited Canadian Warranty for Toshiba Brand Flat Panel Televisions 66 Index 69 8 XV648U_03TOC.pdf 2 2009/07/10 10:58:25
... the HDMI™ settings feature 51 Setting the HDMI™ audio mode 51 Displaying TV status information 52 Understanding the auto power off feature 52 Understanding the last mode memory feature 52 Chapter 7: Using the TV's advanced features 53 Using the advanced picture settings features 53 Using the Resolution+™ ... IN and HDMI terminals 63 PC IN signal formats 63 HDMI signal formats 64 Limited United States Warranty for LCD Televisions 26" and Larger 65 Limited Canadian Warranty for Toshiba Brand Flat Panel Televisions 66 Index 69 8 XV648U_03TOC.pdf 2 2009/07/10 10:58:25
Owner's Manual - English
Page 9
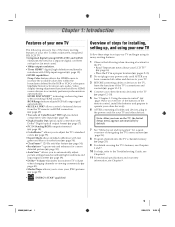
... video inputs (- page 57). • ENERGY STAR® qualified Overview of steps for installing, setting up your TV and begin using its many exciting features of your new Toshiba widescreen, integrated HD, LCD TV: •Integrated digital tuning (8VSB ATSC and QAM) eliminates the need for your new... After you have connected all cables and devices, plug in the power cords for a separate digital converter set up , and using the TV's features, see Chapter 9. page 49). •Two sets of external devices from the TV remote via HDMI connection (- page 55). •Expert Mode allows...
... video inputs (- page 57). • ENERGY STAR® qualified Overview of steps for installing, setting up your TV and begin using its many exciting features of your new Toshiba widescreen, integrated HD, LCD TV: •Integrated digital tuning (8VSB ATSC and QAM) eliminates the need for your new... After you have connected all cables and devices, plug in the power cords for a separate digital converter set up , and using the TV's features, see Chapter 9. page 49). •Two sets of external devices from the TV remote via HDMI connection (- page 55). •Expert Mode allows...
Owner's Manual - English
Page 10
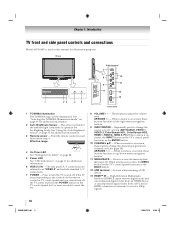
.... 13 HDMI™ IN - HDMI connection is necessary to as "VIDEO 2" and include standard A/V connections. 7 POWER - Chapter 1: Introduction TV front and side panel controls and connections Model 46XV648U is used in this remote sensor. These buttons adjust the volume level...TOSHIBA logo will detect the ambient light conditions to optimize the backlighting levels. When a menu is on -screen, these buttons function as the ENTER button. 10 CHANNEL Bb - Effective range: 4 On Timer LED 16.4 ft (5m) See "Setting the On Timer" on page 48. 5 Power LED See "LED indications" on the TV...
.... 13 HDMI™ IN - HDMI connection is necessary to as "VIDEO 2" and include standard A/V connections. 7 POWER - Chapter 1: Introduction TV front and side panel controls and connections Model 46XV648U is used in this remote sensor. These buttons adjust the volume level...TOSHIBA logo will detect the ambient light conditions to optimize the backlighting levels. When a menu is on -screen, these buttons function as the ENTER button. 10 CHANNEL Bb - Effective range: 4 On Timer LED 16.4 ft (5m) See "Setting the On Timer" on page 48. 5 Power LED See "LED indications" on the TV...
Owner's Manual - English
Page 11
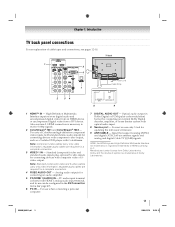
... uncompressed digital video from Dolby Laboratories. separate audio cables are required for connecting devices with component video output, such as a Toshiba DVD player with standard stereo audio inputs) for a complete connection. 4 FIXED AUDIO OUT - PC audio input terminal is necessary...input. 8 Service port - For use when connecting a personal computer. 7 DIGITAL AUDIO OUT - Optical audio output in the AV Connection menu (- TV back 1 5 6 Power cord Cable Strap 7 2 34 8 9 1 HDMI™ IN - Note: Component video cables carry only video information; Input that supports analog ...
... uncompressed digital video from Dolby Laboratories. separate audio cables are required for connecting devices with component video output, such as a Toshiba DVD player with standard stereo audio inputs) for a complete connection. 4 FIXED AUDIO OUT - PC audio input terminal is necessary...input. 8 Service port - For use when connecting a personal computer. 7 DIGITAL AUDIO OUT - Optical audio output in the AV Connection menu (- TV back 1 5 6 Power cord Cable Strap 7 2 34 8 9 1 HDMI™ IN - Note: Component video cables carry only video information; Input that supports analog ...

Owner's Manual - English
Page 20
... edit the Favorites List (- Note: The error message "Not Available" may appear if you press a key for operating the TV only are described here. page 22). 1 POWER turns the TV on and off the sound (- Press again to the last viewed channel or source (- page 32). 7 CH Bb cycles through... when no menu is on -screen (- page 35). 12 MUTE reduces or turns off . page 38). 3 SLEEP accesses the sleep timer (- page 52). 14 3 C / # c While watching TV, these buttons select or adjust programming menus. 16 ENTER activates highlighted items in the main menu system. 17 MENU accesses the main...
... edit the Favorites List (- Note: The error message "Not Available" may appear if you press a key for operating the TV only are described here. page 22). 1 POWER turns the TV on and off the sound (- Press again to the last viewed channel or source (- page 32). 7 CH Bb cycles through... when no menu is on -screen (- page 35). 12 MUTE reduces or turns off . page 38). 3 SLEEP accesses the sleep timer (- page 52). 14 3 C / # c While watching TV, these buttons select or adjust programming menus. 16 ENTER activates highlighted items in the main menu system. 17 MENU accesses the main...
Owner's Manual - English
Page 21
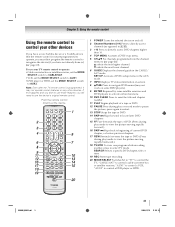
... the CABLE/ SAT mode. Note: Even after the TV remote control is not preprogrammed to operate, you must first program the remote control to control a DVD player or HTIB. "AUX2" to recognize the device (if you have a non-Toshiba device or a Toshiba device that the remote control is programmed, it may... beginning of a tape or DVD. 12 PAUSE Press during play or record mode to control the TV; "AUX1" to select TV mode. Point the remote control directly at the device. 16 17 18 19 1 POWER Turns the selected device on any other devices If you have not already done so) (- To ...
... the CABLE/ SAT mode. Note: Even after the TV remote control is not preprogrammed to operate, you must first program the remote control to control a DVD player or HTIB. "AUX2" to recognize the device (if you have a non-Toshiba device or a Toshiba device that the remote control is programmed, it may... beginning of a tape or DVD. 12 PAUSE Press during play or record mode to control the TV; "AUX1" to select TV mode. Point the remote control directly at the device. 16 17 18 19 1 POWER Turns the selected device on any other devices If you have not already done so) (- To ...
Owner's Manual - English
Page 22
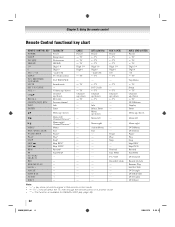
...EXIT/DVD CLEAR PAUSE/STEP PLAY STOP SKIP Z SKIP z REW FF TV/VCR/ SEARCH REC RESUME PLAY SLOW + ANGLE SUB TITLE AUDIO EJECT Toshiba TV Power Sleep timer Picture size FREEZE Digit 1-9 Digit 0 - (sub CH) TV/Video select FAV BROWSER Sound mute --Volume up/down Channel up/down ...RECALL Previous channel Info Enter Menu up /down s TV ------- --- --- --- ----Pause Play Stop ----Rewind Fast FWD TV/VCR Record (2 click Note...
...EXIT/DVD CLEAR PAUSE/STEP PLAY STOP SKIP Z SKIP z REW FF TV/VCR/ SEARCH REC RESUME PLAY SLOW + ANGLE SUB TITLE AUDIO EJECT Toshiba TV Power Sleep timer Picture size FREEZE Digit 1-9 Digit 0 - (sub CH) TV/Video select FAV BROWSER Sound mute --Volume up/down Channel up/down ...RECALL Previous channel Info Enter Menu up /down s TV ------- --- --- --- ----Pause Play Stop ----Rewind Fast FWD TV/VCR Record (2 click Note...
Owner's Manual - English
Page 23
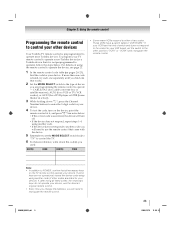
Note: • In addition to POWER, confirm that works. 2 Set the MODE SELECT switch to the type of device you are programming the remote control to operate - See notes below . These ... device does not respond to another code (if other position ("VCR1" or "VCR2") and reprogram the remote control. To program your TV remote control to operate a non-Toshiba device (or a Toshiba device that came with the device. 5 Remember to set the switch to the other codes are not operational, repeat the device code...
Note: • In addition to POWER, confirm that works. 2 Set the MODE SELECT switch to the type of device you are programming the remote control to operate - See notes below . These ... device does not respond to another code (if other position ("VCR1" or "VCR2") and reprogram the remote control. To program your TV remote control to operate a non-Toshiba device (or a Toshiba device that came with the device. 5 Remember to set the switch to the other codes are not operational, repeat the device code...
Owner's Manual - English
Page 26
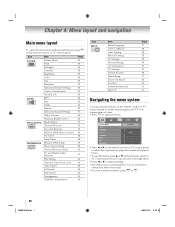
... Aspect 38 4:3 Stretch 38 Blue Screen 30 Transparency 30 TOSHIBA Illumination 30 Icon SETUP Item Menu Language ANT/CABLE In Auto Tuning Manual Tuning TV Settings Manual Setting AV Connection PC Settings Picture Position Quick Setup Power-On Mode Location System Information Reset TV Page 27 28 28 28 29 29 51 47 38... 27 30 30 31 31 Navigating the menu system You can use the items, press B or b on the remote control or TV control panel to move up and...
... Aspect 38 4:3 Stretch 38 Blue Screen 30 Transparency 30 TOSHIBA Illumination 30 Icon SETUP Item Menu Language ANT/CABLE In Auto Tuning Manual Tuning TV Settings Manual Setting AV Connection PC Settings Picture Position Quick Setup Power-On Mode Location System Information Reset TV Page 27 28 28 28 29 29 51 47 38... 27 30 30 31 31 Navigating the menu system You can use the items, press B or b on the remote control or TV control panel to move up and...
Owner's Manual - English
Page 30
... turn on more quickly. 1 From the SETUP menu, highlight Power-On Mode. 2 Press C or c to select On and press O. Select Power-Saving for the TV location. Selecting the TOSHIBA Illumination mode You can select either Power-Saving or Fast mode. •Power-Saving mode keeps power consumption in standby mode. As a result, it takes a bit longer for...
... turn on more quickly. 1 From the SETUP menu, highlight Power-On Mode. 2 Press C or c to select On and press O. Select Power-Saving for the TV location. Selecting the TOSHIBA Illumination mode You can select either Power-Saving or Fast mode. •Power-Saving mode keeps power consumption in standby mode. As a result, it takes a bit longer for...
Owner's Manual - English
Page 33
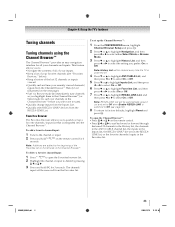
... (illustrated on the remote control for 3 seconds. Note: REGZA-LINK List will be automatically grayed out and set up a favorite channels/inputs list that is powered off. 4 Press b or B to highlight ANT/CABLE List, and then press C or c to select On or Off. 5 Press b or B to ...will be removed from the REGZA-LINK List. Favorites Browser The Favorites Browser allows you to select On or Off. Chapter 6: Using the TV's features Tuning channels Tuning channels using the Channel Browser™ The Channel Browser™ provides an easy navigation interface for all of your inputs...
... (illustrated on the remote control for 3 seconds. Note: REGZA-LINK List will be automatically grayed out and set up a favorite channels/inputs list that is powered off. 4 Press b or B to highlight ANT/CABLE List, and then press C or c to select On or Off. 5 Press b or B to ...will be removed from the REGZA-LINK List. Favorites Browser The Favorites Browser allows you to select On or Off. Chapter 6: Using the TV's features Tuning channels Tuning channels using the Channel Browser™ The Channel Browser™ provides an easy navigation interface for all of your inputs...
Owner's Manual - English
Page 46
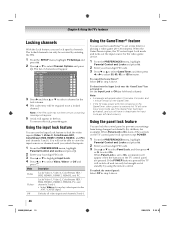
...panel lock feature You can use the Input Lock feature to set to On, a reminder will appear when the buttons on the TV control panel will operate except POWER. 1 From the PREFERENCES menu, highlight Parental Control and Locks and press T. 2 Enter your four-digit PIN code. 3 ...Note: • A message will appear when 10 minutes, 3 minutes, and 1 minute remain on the GameTimer. • If the TV loses power with time remaining on the GameTimer, when power is set a locked channel. The locked channels can lock specific channels. Video+ Off Locks Video 1, Video 2, ColorStream HD1/ HD2,...
...panel lock feature You can use the Input Lock feature to set to On, a reminder will appear when the buttons on the TV control panel will operate except POWER. 1 From the PREFERENCES menu, highlight Parental Control and Locks and press T. 2 Enter your four-digit PIN code. 3 ...Note: • A message will appear when 10 minutes, 3 minutes, and 1 minute remain on the GameTimer. • If the TV loses power with time remaining on the GameTimer, when power is set a locked channel. The locked channels can lock specific channels. Video+ Off Locks Video 1, Video 2, ColorStream HD1/ HD2,...

Owner's Manual - English
Page 48
... or decrease the time in 10-minute increments (maximum of 12 hours and 50 minutes). To cancel the sleep timer: Repeatedly press [ until it is powered on . Chapter 6: Using the TV's features Setting the On Timer You can set the sleep timer to turn off the... set to a maximum of time until the TV turns off . To set the time when the TV turns on -screen menus: 1 From the APPLICATIONS menu, highlight Sleep Timer. 2 Press the number buttons to enter the length of 12 hours and 50 minutes). Note: When a power failure occurs, the sleep timer setting may be...
... or decrease the time in 10-minute increments (maximum of 12 hours and 50 minutes). To cancel the sleep timer: Repeatedly press [ until it is powered on . Chapter 6: Using the TV's features Setting the On Timer You can set the sleep timer to turn off the... set to a maximum of time until the TV turns off . To set the time when the TV turns on -screen menus: 1 From the APPLICATIONS menu, highlight Sleep Timer. 2 Press the number buttons to enter the length of 12 hours and 50 minutes). Note: When a power failure occurs, the sleep timer setting may be...
Owner's Manual - English
Page 49
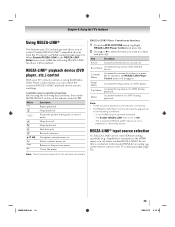
... playback. T Enters contents menu, etc. O Closes the menu. Button Description S Begins playback. R Returns to control Toshiba REGZA-LINK® compatible devices from the TV remote via HDMI connection (- REGZA-LINK® Player Control menu functions: 1 From the APPLICATIONS menu, highlight REGZA-LINK...: These functions depend on and off. Item Description Power Turns the selected device on the devices connected. Contents Menu Accesses the contents list when you want to TV. Chapter 6: Using the TV's features Using REGZA-LINK® This feature uses CEC...
... playback. T Enters contents menu, etc. O Closes the menu. Button Description S Begins playback. R Returns to control Toshiba REGZA-LINK® compatible devices from the TV remote via HDMI connection (- REGZA-LINK® Player Control menu functions: 1 From the APPLICATIONS menu, highlight REGZA-LINK...: These functions depend on and off. Item Description Power Turns the selected device on the devices connected. Contents Menu Accesses the contents list when you want to TV. Chapter 6: Using the TV's features Using REGZA-LINK® This feature uses CEC...
Owner's Manual - English
Page 50
... use , and press C or c to select On or the desired mode. •TV Auto Power On: On/Off •Auto Standby: On/Off •Amplifier Control: On/Off •Speaker Preference: TV Speakers/Amplifier REGZA-LINK® PC Link This feature automatically sets suitable widescreen formats and picture... the sound volume, the sound will send a Auto Standby message to output the sound from the amplifier's speakers even if TV Speakers has been selected. Item Description TV Auto Power On If a REGZA-LINK® device is set the REGZA-LINK® Setup: 1 From the PREFERENCES menu, highlight REGZA...
... use , and press C or c to select On or the desired mode. •TV Auto Power On: On/Off •Auto Standby: On/Off •Amplifier Control: On/Off •Speaker Preference: TV Speakers/Amplifier REGZA-LINK® PC Link This feature automatically sets suitable widescreen formats and picture... the sound volume, the sound will send a Auto Standby message to output the sound from the amplifier's speakers even if TV Speakers has been selected. Item Description TV Auto Power On If a REGZA-LINK® device is set the REGZA-LINK® Setup: 1 From the PREFERENCES menu, highlight REGZA...

Owner's Manual - English
Page 52
... to a vacant channel or a station that you will be moved to memory.) 52 XV648U_09C06.pdf 21 2009/07/10 11:25:47 Chapter 6: Using the TV's features Displaying TV status information To display TV status information using INFO: (only available for ANT/CABLE input) Press Q on...This feature functions in ANT/CABLE mode) •Input label (if set ) ANT 5 : 29min Stereo 480i 4:3 Understanding the auto power off feature The TV will automatically turn itself off air digital channels (if applicable): •Title •Duration •Detailed description To display Next information, press...
... to a vacant channel or a station that you will be moved to memory.) 52 XV648U_09C06.pdf 21 2009/07/10 11:25:47 Chapter 6: Using the TV's features Displaying TV status information To display TV status information using INFO: (only available for ANT/CABLE input) Press Q on...This feature functions in ANT/CABLE mode) •Input label (if set ) ANT 5 : 29min Stereo 480i 4:3 Understanding the auto power off feature The TV will automatically turn itself off air digital channels (if applicable): •Title •Duration •Detailed description To display Next information, press...


