
Owner's Manual - English
Page 2
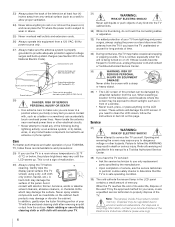
.... REFER SERVICING TO QUALIFIED SERVICE PERSONNEL. Flat panel displays can become excited while watching a program, especially on the proper stands or installed according to Article 820-40 of important operating and maintenance (servicing) instructions in mind: The Issue • The home theater entertainment experience is a growing trend and larger flat panel displays are not always supported on a "larger than a UL Listed wall bracket appropriate for the size and weight of uninsulated...
.... REFER SERVICING TO QUALIFIED SERVICE PERSONNEL. Flat panel displays can become excited while watching a program, especially on the proper stands or installed according to Article 820-40 of important operating and maintenance (servicing) instructions in mind: The Issue • The home theater entertainment experience is a growing trend and larger flat panel displays are not always supported on a "larger than a UL Listed wall bracket appropriate for the size and weight of uninsulated...
Owner's Manual - English
Page 4
... turned on the LCD screen. These actions will scratch your TV. 31) WARNING: RISK OF ELECTRIC SHOCK! Care For better performance and safer operation of your area, or ask a qualified service technician to properly dispose of the TV. When selecting a location for your TOSHIBA TV, follow this product can accidentally touch overhead power lines. Service 37) WARNING: RISK OF ELECTRIC SHOCK! or b) cables...
... turned on the LCD screen. These actions will scratch your TV. 31) WARNING: RISK OF ELECTRIC SHOCK! Care For better performance and safer operation of your area, or ask a qualified service technician to properly dispose of the TV. When selecting a location for your TOSHIBA TV, follow this product can accidentally touch overhead power lines. Service 37) WARNING: RISK OF ELECTRIC SHOCK! or b) cables...
Owner's Manual - English
Page 5
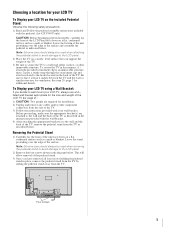
... wall bracket. Four screws 5 Note: Extreme care should always be used when removing the pedestal stand to avoid damage to the hooks located on a flat, cushioned surface such as a quilt or blanket. page 2) : 1) CAUTION: Two people are attached to the wall and the back of the TV as described below . Choosing a location for your LCD TV To Display your LCD TV, always use a ULlisted wall bracket appropriate for the size and weight...
... wall bracket. Four screws 5 Note: Extreme care should always be used when removing the pedestal stand to avoid damage to the hooks located on a flat, cushioned surface such as a quilt or blanket. page 2) : 1) CAUTION: Two people are attached to the wall and the back of the TV as described below . Choosing a location for your LCD TV To Display your LCD TV, always use a ULlisted wall bracket appropriate for the size and weight...
Owner's Manual - English
Page 7
... picture mode 48 Adjusting the picture quality 48 Using the TheaterLock™ feature 49 Using the closed caption mode 49 Base closed captions 49 Digital CC Settings 50 CC Selector 50 Using the Closed Caption button on the remote control 50 Adjusting the audio 50 Muting the sound 50 Using the digital audio selector 51 Selecting stereo/SAP broadcasts 51 Adjusting the audio quality 51 Using the StableSound® feature 52 Selecting the optical audio output format 52 Using the Dolby® Digital Dynamic Range Control feature 52 Using the Locks menu 52...
... picture mode 48 Adjusting the picture quality 48 Using the TheaterLock™ feature 49 Using the closed caption mode 49 Base closed captions 49 Digital CC Settings 50 CC Selector 50 Using the Closed Caption button on the remote control 50 Adjusting the audio 50 Muting the sound 50 Using the digital audio selector 51 Selecting stereo/SAP broadcasts 51 Adjusting the audio quality 51 Using the StableSound® feature 52 Selecting the optical audio output format 52 Using the Dolby® Digital Dynamic Range Control feature 52 Using the Locks menu 52...
Owner's Manual - English
Page 9
...; Digital optical output format (- pages 2-5) 2 Do not plug in any power cords until AFTER you 're adjusting the color (- page 52). • CableClear® digital picture noise reduction (- page 16). • HDMI capabilities Lip-Sync Latency feature activates an auto audio/video display timing adjustment function that allows HDMI source devices to adjust the TV's standard colors. The menu for this feature has a unique "black" design to easily navigate between all channels and inputs (- page 42). • Channel Tuning Mode...
...; Digital optical output format (- pages 2-5) 2 Do not plug in any power cords until AFTER you 're adjusting the color (- page 52). • CableClear® digital picture noise reduction (- page 16). • HDMI capabilities Lip-Sync Latency feature activates an auto audio/video display timing adjustment function that allows HDMI source devices to adjust the TV's standard colors. The menu for this feature has a unique "black" design to easily navigate between all channels and inputs (- page 42). • Channel Tuning Mode...
Owner's Manual - English
Page 10
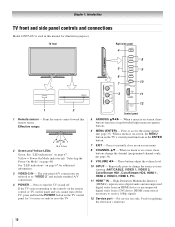
...-On Mode" on page 40) See "LED indications" on the TV's control panel functions as "VIDEO 2" and include standard A/V connections. 4 POWER - When a menu is on-screen, the MENU button on page 67 for updating the television's firmware. 10 High-Definition Multimedia Interface (HDMI 4) input receives digital audio and uncompressed digital video from an HDMI device or uncompressed digital video from a DVI device. For service use only. Used for additional information. 3 VIDEO-2 IN - Press to turn off . These buttons adjust the volume level. 10 INPUT - HDMI connection...
...-On Mode" on page 40) See "LED indications" on the TV's control panel functions as "VIDEO 2" and include standard A/V connections. 4 POWER - When a menu is on-screen, the MENU button on page 67 for updating the television's firmware. 10 High-Definition Multimedia Interface (HDMI 4) input receives digital audio and uncompressed digital video from an HDMI device or uncompressed digital video from a DVI device. For service use only. Used for additional information. 3 VIDEO-2 IN - Press to turn off . These buttons adjust the volume level. 10 INPUT - HDMI connection...

Owner's Manual - English
Page 11
... control the devices using the TV's IR pass-through the TV. HDMI, the HDMI logo and High-Definition Multimedia Interface are trademarks of cable types and connections, see pages 12-19. 1 TV back 2 3 4 Power cord Cable Strap 5 67 8 1 DIGITAL AUDIO OUT - separate audio cables are required for connecting devices with component video output, such as a Toshiba DVD player with composite video or S-video output. Analog audio outputs for connecting devices with ColorStream®. RF input that supports analog (NTSC) and digital (ATSC) off-air antenna signals and analog...
... control the devices using the TV's IR pass-through the TV. HDMI, the HDMI logo and High-Definition Multimedia Interface are trademarks of cable types and connections, see pages 12-19. 1 TV back 2 3 4 Power cord Cable Strap 5 67 8 1 DIGITAL AUDIO OUT - separate audio cables are required for connecting devices with component video output, such as a Toshiba DVD player with composite video or S-video output. Analog audio outputs for connecting devices with ColorStream®. RF input that supports analog (NTSC) and digital (ATSC) off-air antenna signals and analog...
Owner's Manual - English
Page 12
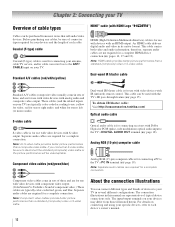
...: Component video cables provide better picture performance than a composite video cable. An HDMI cable delivers digital audio and video in sets of three and are for use with video devices with component video output. (ColorStream® is Toshiba's brand of component video.) These cables are for use : yellow for video, red for stereo right audio, and white for a complete HDMI device connection (- These cables (and the related inputs on your TV. Separate audio cables are typically color-coded according to use with video devices with IR (infrared) remote control...
...: Component video cables provide better picture performance than a composite video cable. An HDMI cable delivers digital audio and video in sets of three and are for use with video devices with component video output. (ColorStream® is Toshiba's brand of component video.) These cables are for use : yellow for video, red for stereo right audio, and white for a complete HDMI device connection (- These cables (and the related inputs on your TV. Separate audio cables are typically color-coded according to use with video devices with IR (infrared) remote control...

Owner's Manual - English
Page 13
... is set to TV You will be unacceptable. • standard audio cables (if your VCR or camcorder has S-video) - If you to use an S-video cable (plus the audio cables) to change channels. For better picture performance, if your camcorder has S-video, connect an S-video cable (plus the audio cables) instead of the VIDEO 2 on the TV right side panel. - To view the antenna or Cable signal: Select the ANT/CABLE video input source on the remote control (- To program the TV remote control to operate other...
... is set to TV You will be unacceptable. • standard audio cables (if your VCR or camcorder has S-video) - If you to use an S-video cable (plus the audio cables) to change channels. For better picture performance, if your camcorder has S-video, connect an S-video cable (plus the audio cables) instead of the VIDEO 2 on the TV right side panel. - To view the antenna or Cable signal: Select the ANT/CABLE video input source on the remote control (- To program the TV remote control to operate other...

Owner's Manual - English
Page 18
... other external audio system with Dolby Digital bitstream signals. Audio Setup PC Audio HDMI 1 Audio MTS Language Optical Output Format Dolby Digital Dynamic Range Control Reset No Auto Stereo English Dolby Digital Compressed Done To control the audio: 1 Turn on page 52). THIS DAMAGE IS NOT COVERED BY YOUR WARRANTY. • The DIGITAL AUDIO OUT terminal may damage speakers or headphones. "Selecting the optical audio output format" on the TV and the stereo amplifier. 2 Minimize the sound volume from Dolby Laboratories. Chapter 2: Connecting...
... other external audio system with Dolby Digital bitstream signals. Audio Setup PC Audio HDMI 1 Audio MTS Language Optical Output Format Dolby Digital Dynamic Range Control Reset No Auto Stereo English Dolby Digital Compressed Done To control the audio: 1 Turn on page 52). THIS DAMAGE IS NOT COVERED BY YOUR WARRANTY. • The DIGITAL AUDIO OUT terminal may damage speakers or headphones. "Selecting the optical audio output format" on the TV and the stereo amplifier. 2 Minimize the sound volume from Dolby Laboratories. Chapter 2: Connecting...
Owner's Manual - English
Page 19
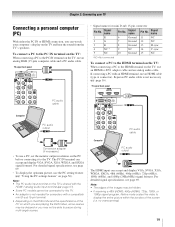
... No. For detailed signal specifications, see page 69. • To display the optimum picture, use a PC, set the monitor output resolution on the TV, use an analog RGB (15-pin) computer cable and a PC audio cable. Note: • The PC audio input terminal on page 56). Computer PC audio output The HDMI input can accept and display VGA, SVGA, XGA, WXGA, and SXGA signal formats. For detailed signal specifications, see page 69. Chapter 2: Connecting your TV Connecting a personal computer...
... No. For detailed signal specifications, see page 69. • To display the optimum picture, use a PC, set the monitor output resolution on the TV, use an analog RGB (15-pin) computer cable and a PC audio cable. Note: • The PC audio input terminal on page 56). Computer PC audio output The HDMI input can accept and display VGA, SVGA, XGA, WXGA, and SXGA signal formats. For detailed signal specifications, see page 69. Chapter 2: Connecting your TV Connecting a personal computer...
Owner's Manual - English
Page 22
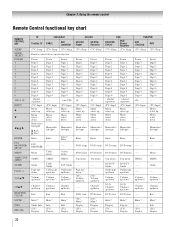
.../down Cable Guide Cable page up/down Volume up/down*1 Channel up/down SAT Guide Guide page up/down Volume up/down*1 Channel up /down ---- Volume up/down*1 Channel up /down Guide ---- Chapter 3: Using the remote control Remote Control functional key chart REMOTE CONTROL KEY SLEEP MODE SELECT POWER 1 2 3 4 5 6 7 8 9 0 100/-/+10 INPUT B b C3 #c ENTER FAV BROWSER/ SETUP MENU THINC/TOP MENU GUIDE PAGE +/- Volume up/down*1 Channel up /down Exit Exit Exit DVD clear DVD clear DVD clear DVD clear ---- Exit Mute*1 Guide Info (TV) Display...
.../down Cable Guide Cable page up/down Volume up/down*1 Channel up/down SAT Guide Guide page up/down Volume up/down*1 Channel up /down ---- Volume up/down*1 Channel up /down Guide ---- Chapter 3: Using the remote control Remote Control functional key chart REMOTE CONTROL KEY SLEEP MODE SELECT POWER 1 2 3 4 5 6 7 8 9 0 100/-/+10 INPUT B b C3 #c ENTER FAV BROWSER/ SETUP MENU THINC/TOP MENU GUIDE PAGE +/- Volume up/down*1 Channel up /down Exit Exit Exit DVD clear DVD clear DVD clear DVD clear ---- Exit Mute*1 Guide Info (TV) Display...
Owner's Manual - English
Page 33
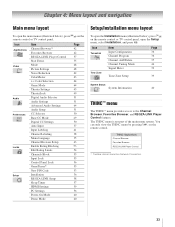
...™ Favorites Browser REGZA-LINK Player Control Start Demo Mode Picture Settings Noise Reduction ColorMaster x.v.Color Selection Game Mode Theater Settings TheaterLock Digital Audio Selector Audio Settings Advanced Audio Settings Audio Setup CC Selector Base CC Mode Digital CC Settings Auto Input Input Labeling Channel Labeling Menu Language Channel Browser Setup Enable Rating Blocking Edit Rating Limits Channels Block Input Lock Control Panel Lock GameTimer® New PIN Code Installation REGZA-LINK Setup Sleep Timer HDMI Settings PC Settings Power-On Mode Demo Mode Page 42 42 57 35 48...
...™ Favorites Browser REGZA-LINK Player Control Start Demo Mode Picture Settings Noise Reduction ColorMaster x.v.Color Selection Game Mode Theater Settings TheaterLock Digital Audio Selector Audio Settings Advanced Audio Settings Audio Setup CC Selector Base CC Mode Digital CC Settings Auto Input Input Labeling Channel Labeling Menu Language Channel Browser Setup Enable Rating Blocking Edit Rating Limits Channels Block Input Lock Control Panel Lock GameTimer® New PIN Code Installation REGZA-LINK Setup Sleep Timer HDMI Settings PC Settings Power-On Mode Demo Mode Page 42 42 57 35 48...

Owner's Manual - English
Page 36
... the Setup menu, highlight Installation and press T. Setup Installation REGZA-LINK Setup Sleep Timer HDMI Settings PC Settings Power-On Mode Demo Mode Power-Saving Off 3 Open the Terrestrial menu, highlight Input Configuration, and press T. After the channels are programmed automatically, you should not have not already done so (- Note: • If the ANT/CABLE input signal type is set of programmed channels (and does NOT erase channels that were previously programmed into the TV's memory.) To remove an Antenna source channel from the...
... the Setup menu, highlight Installation and press T. Setup Installation REGZA-LINK Setup Sleep Timer HDMI Settings PC Settings Power-On Mode Demo Mode Power-Saving Off 3 Open the Terrestrial menu, highlight Input Configuration, and press T. After the channels are programmed automatically, you should not have not already done so (- Note: • If the ANT/CABLE input signal type is set of programmed channels (and does NOT erase channels that were previously programmed into the TV's memory.) To remove an Antenna source channel from the...
Owner's Manual - English
Page 39
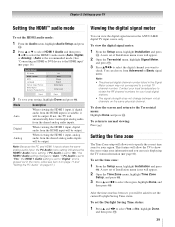
... HDMI™ audio mode To set to "No," the HDMI 1 Audio setting changes to "Auto." Audio Setup PC Audio HDMI 1 Audio MTS Language Optical Output Format Dolby Digital Dynamic Range Control No Auto Stereo English Dolby Digital Compressed Reset Done 3 To save your region. You can choose from the HDMI input is the recommended mode.) See "Connecting an HDMI or DVI device to select the region, highlight Done, and then press T. To close the screen and return to normal viewing...
... HDMI™ audio mode To set to "No," the HDMI 1 Audio setting changes to "Auto." Audio Setup PC Audio HDMI 1 Audio MTS Language Optical Output Format Dolby Digital Dynamic Range Control No Auto Stereo English Dolby Digital Compressed Reset Done 3 To save your region. You can choose from the HDMI input is the recommended mode.) See "Connecting an HDMI or DVI device to select the region, highlight Done, and then press T. To close the screen and return to normal viewing...
Owner's Manual - English
Page 65
... same time. television broadcasts, video games, DVDs), you cannot view signals from external devices connected to VIDEO 1, VIDEO 2, ColorStream®, HDMI 1, HDMI 2, HDMI 3, HDMI 4, PC or from channels 3 or 4, make sure the Input Lock is set to Off (- Chapter 2). • The station may notice that the sound and picture are slightly out of sync. page 41). Noisy picture • If you are watching an analog channel (off the TV, press and hold the POWER button on the TV control panel...
... same time. television broadcasts, video games, DVDs), you cannot view signals from external devices connected to VIDEO 1, VIDEO 2, ColorStream®, HDMI 1, HDMI 2, HDMI 3, HDMI 4, PC or from channels 3 or 4, make sure the Input Lock is set to Off (- Chapter 2). • The station may notice that the sound and picture are slightly out of sync. page 41). Noisy picture • If you are watching an analog channel (off the TV, press and hold the POWER button on the TV control panel...
Owner's Manual - English
Page 70
... LCD Television online at www.tacp.toshiba.com/service as soon as follows: all of the operating instructions in this manual and reviewing the section entitled "Troubleshooting," you or to damage to the LCD Television or parts caused by inadequate antenna systems, misaligned satellite dishes, cable 70 television distribution, VCRs, DVD players/recorders, personal computer level IEEE-1394 devices, and any other proof of purchase. (2) All warranty servicing of this LCD Television...
... LCD Television online at www.tacp.toshiba.com/service as soon as follows: all of the operating instructions in this manual and reviewing the section entitled "Troubleshooting," you or to damage to the LCD Television or parts caused by inadequate antenna systems, misaligned satellite dishes, cable 70 television distribution, VCRs, DVD players/recorders, personal computer level IEEE-1394 devices, and any other proof of purchase. (2) All warranty servicing of this LCD Television...
Owner's Manual - English
Page 71
... MUST DELIVER THE ENTIRE TELEVISION TO AN ASP. b. e. Service on Toshiba-branded accessory items (such accessory items may be performed by an ASP. (3) The warranties from TCL are effective only if the Television is (i) purchased as set installation, setup, adjustment of customer controls, and installation or repair of antenna systems are not covered by failure to follow the specifications, User manuals or guides as limited above, and...
... MUST DELIVER THE ENTIRE TELEVISION TO AN ASP. b. e. Service on Toshiba-branded accessory items (such accessory items may be performed by an ASP. (3) The warranties from TCL are effective only if the Television is (i) purchased as set installation, setup, adjustment of customer controls, and installation or repair of antenna systems are not covered by failure to follow the specifications, User manuals or guides as limited above, and...
Owner's Manual - English
Page 72
... by law, this limited warranty shall be severed from the warranty and deemed not to the ASP. YOU MUST READ AND FOLLOW ALL SET-UP AND USAGE INSTRUCTIONS IN THE APPLICABLE USER GUIDES AND/OR MANUALS. IF THE TELEVISION FAILS TO WORK AS WARRANTED ABOVE, YOUR SOLE AND EXCLUSIVE REMEDY SHALL BE REPAIR OR REPLACEMENT OF THE DEFECTIVE PART. Failing such agreement...
... by law, this limited warranty shall be severed from the warranty and deemed not to the ASP. YOU MUST READ AND FOLLOW ALL SET-UP AND USAGE INSTRUCTIONS IN THE APPLICABLE USER GUIDES AND/OR MANUALS. IF THE TELEVISION FAILS TO WORK AS WARRANTED ABOVE, YOUR SOLE AND EXCLUSIVE REMEDY SHALL BE REPAIR OR REPLACEMENT OF THE DEFECTIVE PART. Failing such agreement...

Owner's Manual - English
Page 73
... Unlocking programs temporarily 55 Video inputs, locking 55 M MODE SELECT 21, 24 MPEG noise reduction 63 MTS feature 51 MUTE button 50 O Optical audio output format 52 P PC Audio 57 PC connection 19 PC settings 56 Picture mode 48 Picture quality 48 Picture scroll 47 Picture size selection 45 POWER button 10, 21 Power-On Mode 40 R RECALL button 60 REGZA-LINK connection 17 REGZA-LINK feature 57 Remote control Battery installation 20 Learning about the buttons .......21 Operational feature 25 Volume lock feature 25 Reset Factory Defaults...
... Unlocking programs temporarily 55 Video inputs, locking 55 M MODE SELECT 21, 24 MPEG noise reduction 63 MTS feature 51 MUTE button 50 O Optical audio output format 52 P PC Audio 57 PC connection 19 PC settings 56 Picture mode 48 Picture quality 48 Picture scroll 47 Picture size selection 45 POWER button 10, 21 Power-On Mode 40 R RECALL button 60 REGZA-LINK connection 17 REGZA-LINK feature 57 Remote control Battery installation 20 Learning about the buttons .......21 Operational feature 25 Volume lock feature 25 Reset Factory Defaults...


