Owner's Manual - English
Page 3
... tip-over. 13) Unplug this apparatus during lightning storms or when unused for long periods of at all times. The LCD panel inside the TV contains glass and a toxic liquid. A grounding type plug has two blades and a third grounding prong. fully insert. 16) WARNING: To prevent the ...Make sure the strap is dropped and the cabinet or enclosure surface has been damaged or the TV does not operate normally, take the following precautions: • ALWAYS turn off the TV and unplug the power cord to avoid possible electric shock or fire. • NEVER allow your body to operate ...
... tip-over. 13) Unplug this apparatus during lightning storms or when unused for long periods of at all times. The LCD panel inside the TV contains glass and a toxic liquid. A grounding type plug has two blades and a third grounding prong. fully insert. 16) WARNING: To prevent the ...Make sure the strap is dropped and the cabinet or enclosure surface has been damaged or the TV does not operate normally, take the following precautions: • ALWAYS turn off the TV and unplug the power cord to avoid possible electric shock or fire. • NEVER allow your body to operate ...

Owner's Manual - English
Page 4
...make sure you are never in a position where your TOSHIBA TV, follow the instructions in front of a window. • Never touch, press, or place anything to rest on or roll over the power cord, and never place the TV where the power cord is subject to wear or abuse. 25) ... from the TV if you use the TV in contact with alcohol, thinner, benzene, acidic or alkaline solvent cleaners, abrasive cleaners, or chemical cloths, which may expose you need to clean the LCD screen, follow these sounds become frequent or continuous, unplug the power cord and contact a Toshiba Authorized Service ...
...make sure you are never in a position where your TOSHIBA TV, follow the instructions in front of a window. • Never touch, press, or place anything to rest on or roll over the power cord, and never place the TV where the power cord is subject to wear or abuse. 25) ... from the TV if you use the TV in contact with alcohol, thinner, benzene, acidic or alkaline solvent cleaners, abrasive cleaners, or chemical cloths, which may expose you need to clean the LCD screen, follow these sounds become frequent or continuous, unplug the power cord and contact a Toshiba Authorized Service ...
Owner's Manual - English
Page 6
...52RV530U Televisions comply with the instructions, may cause harmful interference to radio communications. moving image is not permanent and will not occur in accordance with Part 15 of malfunction; The afterimage is displayed for a long period of HDMI Licensing LLC. (Only available for 46" and 52... by removing and applying power to the equipment, the user is : Toshiba America Consumer Products, ...LCD TV The following two conditions: (1) this equipment not expressly approved by one or more of precision technology; Important notes about your warranty. therefore, Toshiba...
...52RV530U Televisions comply with the instructions, may cause harmful interference to radio communications. moving image is not permanent and will not occur in accordance with Part 15 of malfunction; The afterimage is displayed for a long period of HDMI Licensing LLC. (Only available for 46" and 52... by removing and applying power to the equipment, the user is : Toshiba America Consumer Products, ...LCD TV The following two conditions: (1) this equipment not expressly approved by one or more of precision technology; Important notes about your warranty. therefore, Toshiba...
Owner's Manual - English
Page 7
...32 Viewing the digital signal meter 33 Setting the time zone 33 Viewing the system status 34 Selecting the Power-On Mode 34 Chapter 6: Using the TV's features 35 Selecting the video input source to view 35 Labeling the video input sources 35 Tuning channels 36... DVD player, etc.) control 51 REGZA-LINK input source selection 52 VOLUME and MUTE controls of Audio Receiver . . . . 52 Other REGZA-LINK functions 52 Using the HDMI settings feature 53 Displaying TV status information 54 Understanding the auto power off feature 54 Understanding the last mode memory feature 54 (continued...
...32 Viewing the digital signal meter 33 Setting the time zone 33 Viewing the system status 34 Selecting the Power-On Mode 34 Chapter 6: Using the TV's features 35 Selecting the video input source to view 35 Labeling the video input sources 35 Tuning channels 36... DVD player, etc.) control 51 REGZA-LINK input source selection 52 VOLUME and MUTE controls of Audio Receiver . . . . 52 Other REGZA-LINK functions 52 Using the HDMI settings feature 53 Displaying TV status information 54 Understanding the auto power off feature 54 Understanding the last mode memory feature 54 (continued...

Owner's Manual - English
Page 9
... power cords for your TV and other devices. 7 See "Menu layout and navigation" for a quick overview of navigating the TV's menu system (- pages 10-11). 4 Connect your other device(s). 6 AFTER connecting all cables and devices to your TV. 3 BEFORE connecting cables or devices to the TV, learn the functions of your new Toshiba widescreen, integrated HD, LCD TV...
... power cords for your TV and other devices. 7 See "Menu layout and navigation" for a quick overview of navigating the TV's menu system (- pages 10-11). 4 Connect your other device(s). 6 AFTER connecting all cables and devices to your TV. 3 BEFORE connecting cables or devices to the TV, learn the functions of your new Toshiba widescreen, integrated HD, LCD TV...

Owner's Manual - English
Page 10
...page 34) See "LED indications" on -screen, these buttons change the source you cannot turn the TV on the TV's control panel functions as "VIDEO 2" and include standard A/V connections. 4 POWER - When a menu is necessary to access the menu system (- High-Definition Multimedia Interface (HDMI 4)...or uncompressed digital video from a DVI device. HDMI connection is on-screen, the MENU button on and off the TV, press and hold the POWER button on the TV control panel for illustration purposes. The side panel A/V connections are viewing (ANT/CABLE, VIDEO 1, VIDEO 2, ColorStream ...
...page 34) See "LED indications" on -screen, these buttons change the source you cannot turn the TV on the TV's control panel functions as "VIDEO 2" and include standard A/V connections. 4 POWER - When a menu is necessary to access the menu system (- High-Definition Multimedia Interface (HDMI 4)...or uncompressed digital video from a DVI device. HDMI connection is on-screen, the MENU button on and off the TV, press and hold the POWER button on the TV control panel for illustration purposes. The side panel A/V connections are viewing (ANT/CABLE, VIDEO 1, VIDEO 2, ColorStream ...
Owner's Manual - English
Page 11
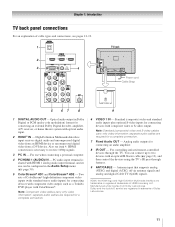
...You can be configured in Dolby Digital or PCM (pulse-code modulation) format for connecting devices with component video output, such as a Toshiba DVD player with an optical IR blaster cable (- HDMI connection is shared with optical audio input. 2 HDMI™ IN - Two ... video and standard audio inputs plus optional S-video inputs for a complete connection. 7 Fixed Audio OUT - Also see pages 12-19. 1 TV back 2 3 4 Power cord Cable Strap 5 67 8 9 1 DIGITAL AUDIO OUT - High-Definition Multimedia Interface input receives digital audio and uncompressed digital video from an...
...You can be configured in Dolby Digital or PCM (pulse-code modulation) format for connecting devices with component video output, such as a Toshiba DVD player with an optical IR blaster cable (- HDMI connection is shared with optical audio input. 2 HDMI™ IN - Two ... video and standard audio inputs plus optional S-video inputs for a complete connection. 7 Fixed Audio OUT - Also see pages 12-19. 1 TV back 2 3 4 Power cord Cable Strap 5 67 8 9 1 DIGITAL AUDIO OUT - High-Definition Multimedia Interface input receives digital audio and uncompressed digital video from an...
Owner's Manual - English
Page 15
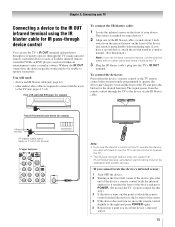
... Starting at which the remote control touched the device is marked on some devices.* 2 Align one of the device and press POWER. (Do not use the TV's remote control to the device via the IR blaster cable. satisfactory performance may not be visible to remotely operate (through feature does... not support all IR-controlled devices; page 12) • other audio/video cables as Toshiba infrared remotecontrolled VCRs or DVD players)...
... Starting at which the remote control touched the device is marked on some devices.* 2 Align one of the device and press POWER. (Do not use the TV's remote control to the device via the IR blaster cable. satisfactory performance may not be visible to remotely operate (through feature does... not support all IR-controlled devices; page 12) • other audio/video cables as Toshiba infrared remotecontrolled VCRs or DVD players)...

Owner's Manual - English
Page 21
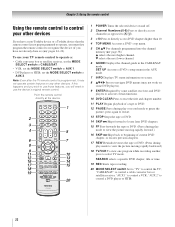
...control The buttons used for a function that is used to tune digital channels (- page 23). 1 POWER turns the TV on the TV front will be illuminated. 2 FREEZE freezes the picture. When the TV is on, the green LED indicator on and off the sound (- page 42). 3 SLEEP accesses ...35). 7 CH Bb cycles through the picture sizes: Natural, TheaterWide 1/2/3, Full, 4:3 HD, Native, and Dot by Dot (- page 36). 10 RECALL displays TV status information (- page 36). 6 INPUT selects the video input source (- page 51). 4 PIC SIZE cycles through programmed channels when no menu is on -screen...
...control The buttons used for a function that is used to tune digital channels (- page 23). 1 POWER turns the TV on the TV front will be illuminated. 2 FREEZE freezes the picture. When the TV is on, the green LED indicator on and off the sound (- page 42). 3 SLEEP accesses ...35). 7 CH Bb cycles through the picture sizes: Natural, TheaterWide 1/2/3, Full, 4:3 HD, Native, and Dot by Dot (- page 36). 10 RECALL displays TV status information (- page 36). 6 INPUT selects the video input source (- page 51). 4 PIC SIZE cycles through programmed channels when no menu is on -screen...
Owner's Manual - English
Page 22
...Channel Numbers (0-9) Press to directly access channels (as opposed to < ,). 3 +10 Press to control the TV; Point the remote control directly at the device. 16 17 18 19 1 POWER Turns the selected device on some DVD players). 9 ENTER Required by some satellite receivers and DVD players to activate...Displays the channel guide in the AUX mode. 7 INFO Displays TV status information on-screen. 8 BbC c Press to navigate DVD menus (may not operate certain features on any other devices If you have a non-Toshiba device or a Toshiba device that the remote control is not preprogrammed to operate, you...
...Channel Numbers (0-9) Press to directly access channels (as opposed to < ,). 3 +10 Press to control the TV; Point the remote control directly at the device. 16 17 18 19 1 POWER Turns the selected device on some DVD players). 9 ENTER Required by some satellite receivers and DVD players to activate...Displays the channel guide in the AUX mode. 7 INFO Displays TV status information on-screen. 8 BbC c Press to navigate DVD menus (may not operate certain features on any other devices If you have a non-Toshiba device or a Toshiba device that the remote control is not preprogrammed to operate, you...
Owner's Manual - English
Page 23
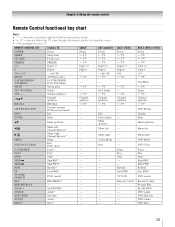
... search* REC MENU* --SLOW FWD* Angle* --- --- --- --- --- --- --- --- --- --- --- --- AUX 1 (VCR) Power s TV s TV s TV Digit 1-9 Digit 0 100 s TV --- Exit PAUSE/STEP Pause* --- --- s TV --s TV Channel up /down s TV CH RTN/DVD RTN Previous channel DVD previous menu* --- --- REMOTE CONTROL KEY Toshiba TV CABLE SAT (satellite) POWER SLEEP PIC SIZE FREEZE Power Sleep timer Picture size FREEZE Power s TV s TV s TV Power s TV s TV s TV 1-9 Digit 1-9 Digit 1-9 Digit 1-9 0 Digit 0 Digit 0 Digit 0 100/-/+10...
... search* REC MENU* --SLOW FWD* Angle* --- --- --- --- --- --- --- --- --- --- --- --- AUX 1 (VCR) Power s TV s TV s TV Digit 1-9 Digit 0 100 s TV --- Exit PAUSE/STEP Pause* --- --- s TV --s TV Channel up /down s TV CH RTN/DVD RTN Previous channel DVD previous menu* --- --- REMOTE CONTROL KEY Toshiba TV CABLE SAT (satellite) POWER SLEEP PIC SIZE FREEZE Power Sleep timer Picture size FREEZE Power s TV s TV s TV Power s TV s TV s TV 1-9 Digit 1-9 Digit 1-9 Digit 1-9 0 Digit 0 Digit 0 Digit 0 100/-/+10...
Owner's Manual - English
Page 24
... are not operational, repeat the device code setup using another code, you will need to reprogram the remote control. • Some newer VCRs respond to POWER, confirm that it , and press p. If some keys are listed for your device. 4 To test the code, turn off. • If the...Number buttons to enter the 3-digit code for your device). Chapter 3: Using the remote control Programming the remote control to control your other devices Your Toshiba TV remote control is listed, try each one separately until you find the code for a DVD player or HTIB [home theater in a box]). 3 ...
... are not operational, repeat the device code setup using another code, you will need to reprogram the remote control. • Some newer VCRs respond to POWER, confirm that it , and press p. If some keys are listed for your device. 4 To test the code, turn off. • If the...Number buttons to enter the 3-digit code for your device). Chapter 3: Using the remote control Programming the remote control to control your other devices Your Toshiba TV remote control is listed, try each one separately until you find the code for a DVD player or HTIB [home theater in a box]). 3 ...
Owner's Manual - English
Page 27
... Input Lock Control Panel Lock GameTimer® New PIN Code Installation REGZA-LINK Setup Sleep Timer HDMI Settings PC Settings Power-On Mode Page 36 36 51 42 42 56 57 57 39 43 44 45 58 45 44 43 43 35... 31 29 37 47 47 48 49 49 49 47 29 52 51 53 50 34 Setup/Installation menu layout To open the Setup menu, select Installation, and press T. Icon Terrestrial ...navigation Main menu layout To open the main menus (illustrated below ), press Y on the remote control or TV control panel, open the Installation menu (illustrated below ), press Y on the remote control or...
... Input Lock Control Panel Lock GameTimer® New PIN Code Installation REGZA-LINK Setup Sleep Timer HDMI Settings PC Settings Power-On Mode Page 36 36 51 42 42 56 57 57 39 43 44 45 58 45 44 43 43 35... 31 29 37 47 47 48 49 49 49 47 29 52 51 53 50 34 Setup/Installation menu layout To open the Setup menu, select Installation, and press T. Icon Terrestrial ...navigation Main menu layout To open the main menus (illustrated below ), press Y on the remote control or TV control panel, open the Installation menu (illustrated below ), press Y on the remote control or...

Owner's Manual - English
Page 29
... the menu language You can choose from three different languages (English, French and Spanish) for the on the TV. Preferences CC Selector Base CC Mode Digital CC Settings Input Labeling Channel Labeling Menu Language Channel Browser Setup Off English English Français Espa&#... Preferences menu. 2 Highlight Menu Language and press c. 3 Press B or b to close the Preferences menu. Setup Installation REGZA-LINK Setup Sleep Timer HDMI Settings PC Settings Power-On Mode Power-Saving 3 (A new set of menus and messages.
... the menu language You can choose from three different languages (English, French and Spanish) for the on the TV. Preferences CC Selector Base CC Mode Digital CC Settings Input Labeling Channel Labeling Menu Language Channel Browser Setup Off English English Français Espa&#... Preferences menu. 2 Highlight Menu Language and press c. 3 Press B or b to close the Preferences menu. Setup Installation REGZA-LINK Setup Sleep Timer HDMI Settings PC Settings Power-On Mode Power-Saving 3 (A new set of menus and messages.
Owner's Manual - English
Page 34
... through the menu bar to below 3W. To set the Power-On Mode feature: 1 From the Setup menu, highlight Power-On Mode and press c. 2 Press B or b to select Factory Defaults. 4 Enter your TV Viewing the system status Selecting the Power-On Mode To view the system status: 1 From the Setup...will be lit. To return to the Installation menu: Highlight Done and press T. After the TV turns off automatically after a few seconds. As a result, the TV will turn on . • Fast mode increases power consumption in again to turn on more quickly. As a result, it in standby mode. ...
... through the menu bar to below 3W. To set the Power-On Mode feature: 1 From the Setup menu, highlight Power-On Mode and press c. 2 Press B or b to select Factory Defaults. 4 Enter your TV Viewing the system status Selecting the Power-On Mode To view the system status: 1 From the Setup...will be lit. To return to the Installation menu: Highlight Done and press T. After the TV turns off automatically after a few seconds. As a result, the TV will turn on . • Fast mode increases power consumption in again to turn on more quickly. As a result, it in standby mode. ...

Owner's Manual - English
Page 37
... Press O to close the Channel Browser™. Elements of the last selected list in the Channel Browser™, it will be cleared every time the TV is powered off. 4 Press b to highlight ANT/CABLE List, and then press C or c to select On or Off. 5 Press b to highlight Inputs ...C or c to select On or Off. 7 Press b to highlight REGZA-LINK List, and then press C or c to select On or Off. Chapter 6: Using the TV's features To set up the Channel Browser™ Favorites list regardless of the Channel Browser™ 1 History 88 2 10 TVLAND 2 ABCHD 3 4 11 3 8 WEATHER 5...
... Press O to close the Channel Browser™. Elements of the last selected list in the Channel Browser™, it will be cleared every time the TV is powered off. 4 Press b to highlight ANT/CABLE List, and then press C or c to select On or Off. 5 Press b to highlight Inputs ...C or c to select On or Off. 7 Press b to highlight REGZA-LINK List, and then press C or c to select On or Off. Chapter 6: Using the TV's features To set up the Channel Browser™ Favorites list regardless of the Channel Browser™ 1 History 88 2 10 TVLAND 2 ABCHD 3 4 11 3 8 WEATHER 5...
Owner's Manual - English
Page 49
... described below. Note: • A message will appear when 10 minutes, 3 minutes, and 1 minute remain on the GameTimer. • If the TV loses power with time remaining on the TV control panel will enter Input Lock mode (as described above , or press and hold the VOLUME - When the control panel is restored... the TV will operate except POWER. Using the GameTimer® You can lock the control panel to select the level of video input locking you play video tapes via...
... described below. Note: • A message will appear when 10 minutes, 3 minutes, and 1 minute remain on the GameTimer. • If the TV loses power with time remaining on the TV control panel will enter Input Lock mode (as described above , or press and hold the VOLUME - When the control panel is restored... the TV will operate except POWER. Using the GameTimer® You can lock the control panel to select the level of video input locking you play video tapes via...
Owner's Manual - English
Page 51
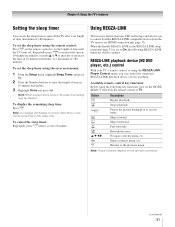
...forwards. Navigate contents menu, etc. page 52) is set to the previous menu. Chapter 6: Using the TV's features Setting the sleep timer You can control the connected REGZA-LINK playback device you to control Toshiba REGZA-LINK compatible devices from the TV remote via HDMI connection (- To set... the sleep timer using the following REGZA-LINK functions will display on-screen when there is a new feature that uses CEC technology and allows you are watching. Note: When a power failure ...
...forwards. Navigate contents menu, etc. page 52) is set to the previous menu. Chapter 6: Using the TV's features Setting the sleep timer You can control the connected REGZA-LINK playback device you to control Toshiba REGZA-LINK compatible devices from the TV remote via HDMI connection (- To set... the sleep timer using the following REGZA-LINK functions will display on-screen when there is a new feature that uses CEC technology and allows you are watching. Note: When a power failure ...
Owner's Manual - English
Page 52
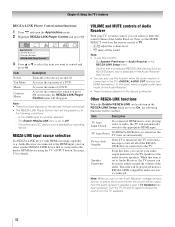
... or b to the appropriate HDMI input. At this function when the audio receiver is connected to TV. • z Z adjust the volume level. • W turns off the TV will be output from the TV speakers. 52 The connected CEC device is connected to the HDMI input, you can also use this case, select...source. • You can adjust or mute the sound volume of the audio. Device Auto Standby If the TV is connected. Speaker Preference From this item is currently selected. - Item Power Top Menu Menu Contents Menu Description Turns the select device on the remote control to the...
... or b to the appropriate HDMI input. At this function when the audio receiver is connected to TV. • z Z adjust the volume level. • W turns off the TV will be output from the TV speakers. 52 The connected CEC device is connected to the HDMI input, you can also use this case, select...source. • You can adjust or mute the sound volume of the audio. Device Auto Standby If the TV is connected. Speaker Preference From this item is currently selected. - Item Power Top Menu Menu Contents Menu Description Turns the select device on the remote control to the...
Owner's Manual - English
Page 53
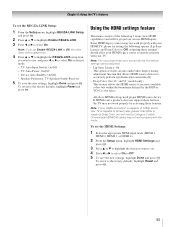
...highlight Enable REGZA-LINK. 3 Press C or c to select On or desired mode. • TV Auto Input Switch: On/Off • TV Auto Power: On/Off • Device Auto Standby: On/Off • Speaker Preference: TV Speakers/Audio Receiver 5 To save the new settings, highlight Done and press T. Note: You ...display timing adjustment function that allows HDMI source devices to accurately perform synchronization automatically. • Deep Color: On (46" and 52" models only) This feature allows the HDMI source to increase available colors bits within the boundaries defined by activating these settings ...
...highlight Enable REGZA-LINK. 3 Press C or c to select On or desired mode. • TV Auto Input Switch: On/Off • TV Auto Power: On/Off • Device Auto Standby: On/Off • Speaker Preference: TV Speakers/Audio Receiver 5 To save the new settings, highlight Done and press T. Note: You ...display timing adjustment function that allows HDMI source devices to accurately perform synchronization automatically. • Deep Color: On (46" and 52" models only) This feature allows the HDMI source to increase available colors bits within the boundaries defined by activating these settings ...


