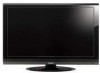
Printable Spec Sheet
Page 2
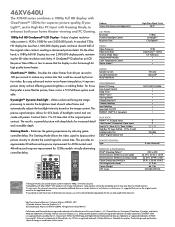
... action video. Cabinet Screen Size (measured diagonally) LCD PANEL: Resolution Dynamic Backlight Control Response Time VIDEO: Video Processor Video Scan Rate Cinema Mode 24fps1 TheaterWide® Modes Color Temperature Control Native ModeTM AUDIO: Speaker System Sound Enhancement Mute/Half Mute CONVENIENCE: Built-in TV Tuning Auto Aspect Control Sleep Timer HDMITM-CEC2 Gaming Mode Channel BrowserTM Channel Labeling Input Labeling Logo Light On/Off ENERGY STAR® 3.0 Compliant JACK PACK: HDMITM v1.3 Digital Inputs ColorStream® Component Video Inputs Front A/V / Rear A/V / Rear S-Video...
... action video. Cabinet Screen Size (measured diagonally) LCD PANEL: Resolution Dynamic Backlight Control Response Time VIDEO: Video Processor Video Scan Rate Cinema Mode 24fps1 TheaterWide® Modes Color Temperature Control Native ModeTM AUDIO: Speaker System Sound Enhancement Mute/Half Mute CONVENIENCE: Built-in TV Tuning Auto Aspect Control Sleep Timer HDMITM-CEC2 Gaming Mode Channel BrowserTM Channel Labeling Input Labeling Logo Light On/Off ENERGY STAR® 3.0 Compliant JACK PACK: HDMITM v1.3 Digital Inputs ColorStream® Component Video Inputs Front A/V / Rear A/V / Rear S-Video...
Owner's Manual - English
Page 2
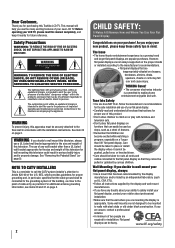
... wall mount this manual completely, and keep these safety tips in accordance with arrowhead symbol, within an equilateral triangle, is a reminder to call the CATV system installer's attention to the point of cable entry as close to Article 820-40 of the building, as practical. The use a UL Listed wall bracket appropriate for wall mounting this Toshiba LCD TV. However, flat panel displays are required for purchasing this television...
... wall mount this manual completely, and keep these safety tips in accordance with arrowhead symbol, within an equilateral triangle, is a reminder to call the CATV system installer's attention to the point of cable entry as close to Article 820-40 of the building, as practical. The use a UL Listed wall bracket appropriate for wall mounting this Toshiba LCD TV. However, flat panel displays are required for purchasing this television...

Owner's Manual - English
Page 3
... grounding type plug. The TV may void: a) the warranty, and b) the user's authority to operate this product, never place or store the TV in accordance with the apparatus. Never place the TV: • on the floor or a sturdy, level, stable surface that produce heat. 9) Do not defeat the safety purpose of time. 14) Refer all servicing to qualified service personnel. Install in...
... grounding type plug. The TV may void: a) the warranty, and b) the user's authority to operate this product, never place or store the TV in accordance with the apparatus. Never place the TV: • on the floor or a sturdy, level, stable surface that produce heat. 9) Do not defeat the safety purpose of time. 14) Refer all servicing to qualified service personnel. Install in...

Owner's Manual - English
Page 4
... TV where the power cord is subject to wear or abuse. 28) Never overload wall outlets and extension cords. 29) Always operate this manual to a Toshiba Authorized Service Center. 41) If you use only replacement parts specified by the manufacturer. • Upon completion of service, ask the service technician to perform routine safety checks to determine that the TV is thundering, do not touch the connecting cables...
... TV where the power cord is subject to wear or abuse. 28) Never overload wall outlets and extension cords. 29) Always operate this manual to a Toshiba Authorized Service Center. 41) If you use only replacement parts specified by the manufacturer. • Upon completion of service, ask the service technician to perform routine safety checks to determine that the TV is thundering, do not touch the connecting cables...
Owner's Manual - English
Page 5
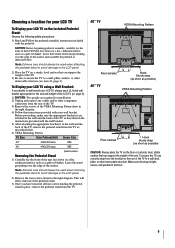
... wall mount your wall bracket. CAUTION: Before beginning pedestal assembly, carefully lay the front of the LCD Panel face down on a flat, cushioned surface such as a quilt or blanket. Choosing a location for your LCD TV To Display your LCD TV on the included Pedestal Stand: Observe the following safety precautions: 1) Read and Follow the pedestal assembly instructions included with your LCD TV, always use a sturdy strap from the TV. 40" TV VESA Mounting Pattern Four screws 46" TV Hook...
... wall mount your wall bracket. CAUTION: Before beginning pedestal assembly, carefully lay the front of the LCD Panel face down on a flat, cushioned surface such as a quilt or blanket. Choosing a location for your LCD TV To Display your LCD TV on the included Pedestal Stand: Observe the following safety precautions: 1) Read and Follow the pedestal assembly instructions included with your LCD TV, always use a sturdy strap from the TV. 40" TV VESA Mounting Pattern Four screws 46" TV Hook...
Owner's Manual - English
Page 7
... the menu language 28 TOSHIBA Logo LED 28 Configuring the antenna input source for the ANT/CABLE terminal 28 Programming channels into the TV's channel memory ........29 Programming channels automatically 29 Manually adding and deleting channels in the channel memory 29 Labeling channels 30 Setting the HDMI™ audio mode 31 Viewing the digital signal meter 32 Setting the time zone 32 Viewing the system status 32 Chapter 6: Using the TV's features 33 Selecting the video input source to view 33 Labeling the video input sources...
... the menu language 28 TOSHIBA Logo LED 28 Configuring the antenna input source for the ANT/CABLE terminal 28 Programming channels into the TV's channel memory ........29 Programming channels automatically 29 Manually adding and deleting channels in the channel memory 29 Labeling channels 30 Setting the HDMI™ audio mode 31 Viewing the digital signal meter 32 Setting the time zone 32 Viewing the system status 32 Chapter 6: Using the TV's features 33 Selecting the video input source to view 33 Labeling the video input sources...

Owner's Manual - English
Page 9
... choosing a location for installing, setting up, and using your new TV Follow these steps to set up your TV and begin using the TV's features, see Chapters 6 and 7. 13 For help, refer to the Troubleshooting Guide, Chapter 8. 14 For technical specifications and warranty information, see Chapter 9. 15 Enjoy your new TV! 9 Then press POWER on the TV control panel or remote control to turn the TV off or on, please unplug the power cords few...
... choosing a location for installing, setting up, and using your new TV Follow these steps to set up your TV and begin using the TV's features, see Chapters 6 and 7. 13 For help, refer to the Troubleshooting Guide, Chapter 8. 14 For technical specifications and warranty information, see Chapter 9. 15 Enjoy your new TV! 9 Then press POWER on the TV control panel or remote control to turn the TV off or on, please unplug the power cords few...
Owner's Manual - English
Page 10
... are viewing (ANT/CABLE, VIDEO 1, VIDEO 2, ColorStream HD1, ColorStream HD2, HDMI 1, HDMI 2, HDMI 3, PC). 10 These buttons adjust the volume level. 11 INPUT - Press to reset the TV. 6 ARROWS STWX - Chapter 1: Introduction TV front and side panel controls and connections Model 40XV640U is used in this remote sensor ( "Remote control effective range" on page 19). 3 VIDEO-2 IN - Left side panel TV front TV top Control panel 1 Green LED and TOSHIBA Logo LED Power LED(Green) = Power indicator TOSHIBA Logo LED= On or Off ( page 28). 2 Remote sensor - When a menu is on -screen...
... are viewing (ANT/CABLE, VIDEO 1, VIDEO 2, ColorStream HD1, ColorStream HD2, HDMI 1, HDMI 2, HDMI 3, PC). 10 These buttons adjust the volume level. 11 INPUT - Press to reset the TV. 6 ARROWS STWX - Chapter 1: Introduction TV front and side panel controls and connections Model 40XV640U is used in this remote sensor ( "Remote control effective range" on page 19). 3 VIDEO-2 IN - Left side panel TV front TV top Control panel 1 Green LED and TOSHIBA Logo LED Power LED(Green) = Power indicator TOSHIBA Logo LED= On or Off ( page 28). 2 Remote sensor - When a menu is on -screen...

Owner's Manual - English
Page 11
Two sets of ColorStream® high-definition component video inputs (with standard stereo audio inputs) for connecting devices with component video output, such as a Toshiba DVD player with HDMI-1 analog audio input terminals, and their use when connecting a personal computer. Antenna input that supports analog (NTSC) and digital (ATSC) off-air antenna signals and analog and digital Cable TV (QAM) signals. 6 Digital Audio OUT - PC audio input terminals are shared with ColorStream®. HDMI connection is necessary to receive 1080p signals. 2 ColorStream® HD-1 and ColorStream...
Two sets of ColorStream® high-definition component video inputs (with standard stereo audio inputs) for connecting devices with component video output, such as a Toshiba DVD player with HDMI-1 analog audio input terminals, and their use when connecting a personal computer. Antenna input that supports analog (NTSC) and digital (ATSC) off-air antenna signals and analog and digital Cable TV (QAM) signals. 6 Digital Audio OUT - PC audio input terminals are shared with ColorStream®. HDMI connection is necessary to receive 1080p signals. 2 ColorStream® HD-1 and ColorStream...
Owner's Manual - English
Page 12
...An HDMI cable delivers digital audio and video in this manual are representative of typical device connections only. This cable carries both video and audio information; Optical audio cable Optical audio cable is for connecting receivers with Dolby Digital or PCM (pulse-code modulation) optical audio input to use: yellow for video, red for stereo right audio, and white for connecting your antenna, cable TV service, and/or cable converter box to each cable. The input/output terminals on your TV. Separate audio cables are required for a complete connection. S-video cable S-video cable...
...An HDMI cable delivers digital audio and video in this manual are representative of typical device connections only. This cable carries both video and audio information; Optical audio cable Optical audio cable is for connecting receivers with Dolby Digital or PCM (pulse-code modulation) optical audio input to use: yellow for video, red for stereo right audio, and white for connecting your antenna, cable TV service, and/or cable converter box to each cable. The input/output terminals on your TV. Separate audio cables are required for a complete connection. S-video cable S-video cable...
Owner's Manual - English
Page 13
... TV. To view the antenna or Cable signal: Select the ANT/CABLE video input source on the remote control ( page 20). Select the ANT/CABLE video input source on the TV.* Tune the TV to channel 3 or 4 (whichever channel the Cable box output is prohibited under the Copyright Laws of television programs, videotapes, DVDs, and other devices, see Chapter 3. Chapter 2: Connecting your TV Connecting a VCR ( or a VCR with S-video) and antenna, Cable TV or Camcorder Camcorder AUDIO OUT L VIDEO R TV back panel VIDEO 2 inputs on TV right side panel From Cable TV...
... TV. To view the antenna or Cable signal: Select the ANT/CABLE video input source on the remote control ( page 20). Select the ANT/CABLE video input source on the TV.* Tune the TV to channel 3 or 4 (whichever channel the Cable box output is prohibited under the Copyright Laws of television programs, videotapes, DVDs, and other devices, see Chapter 3. Chapter 2: Connecting your TV Connecting a VCR ( or a VCR with S-video) and antenna, Cable TV or Camcorder Camcorder AUDIO OUT L VIDEO R TV back panel VIDEO 2 inputs on TV right side panel From Cable TV...
Owner's Manual - English
Page 17
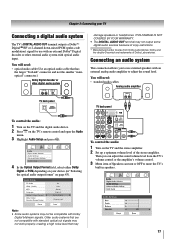
... sound volume level from Dolby Laboratories. Connecting an audio system This connection allows you can turn to OFF to adjust the sound level. Chapter 2: Connecting your device ( "Selecting the optical audio output format" on the TV's remote control and open the Audio menu. 3 Highlight Audio Setup and press . You will need : • optical audio cable (Use an optical audio cable that has the larger "TosLink" connector and not the smaller "minioptical" connector.) Dolby Digital decoder or other external audio system with optical audio input. Audio Digital Audio...
... sound volume level from Dolby Laboratories. Connecting an audio system This connection allows you can turn to OFF to adjust the sound level. Chapter 2: Connecting your device ( "Selecting the optical audio output format" on the TV's remote control and open the Audio menu. 3 Highlight Audio Setup and press . You will need : • optical audio cable (Use an optical audio cable that has the larger "TosLink" connector and not the smaller "minioptical" connector.) Dolby Digital decoder or other external audio system with optical audio input. Audio Digital Audio...
Owner's Manual - English
Page 18
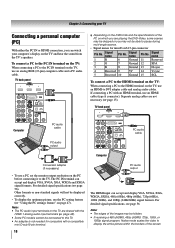
... 15). For detailed signal specifications, see page 56. Separate analog cables are shared with the HDMI-1 analog audio input terminals ( page 48). • Some PC models cannot be displayed correctly. • To display the optimum picture, use an HDMI cable (type A connector). Other formats or non-standard signals will not be connected to DVI adapter cable and analog audio cables. Note: • The PC audio input terminals on the TV and hear the sound from the TV's speakers. The PC...
... 15). For detailed signal specifications, see page 56. Separate analog cables are shared with the HDMI-1 analog audio input terminals ( page 48). • Some PC models cannot be displayed correctly. • To display the optimum picture, use an HDMI cable (type A connector). Other formats or non-standard signals will not be connected to DVI adapter cable and analog audio cables. Note: • The PC audio input terminals on the TV and hear the sound from the TV's speakers. The PC...
Owner's Manual - English
Page 26
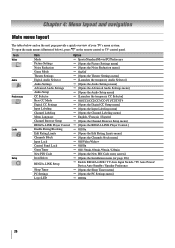
...(illustrated below and on the remote control or TV control panel. Icon Video Audio Preferences Locks Setup Item Mode Picture Settings Noise Reduction Game Mode Theater Settings Digital Audio Selector Audio Settings Advanced Audio Settings Audio Setup CC Selector Base CC Mode Digital CC Settings Input Labeling Channel Labeling Menu Language Channel Browser Setup REGZA-LINK Player Control Enable Rating Blocking Edit Rating Limits Channels Block Input Lock Control Panel Lock GameTimer New PIN Code Installation REGZA-LINK Setup Sleep Timer PC Settings Logo LED Option p Sports/Standard/Movie/PC...
...(illustrated below and on the remote control or TV control panel. Icon Video Audio Preferences Locks Setup Item Mode Picture Settings Noise Reduction Game Mode Theater Settings Digital Audio Selector Audio Settings Advanced Audio Settings Audio Setup CC Selector Base CC Mode Digital CC Settings Input Labeling Channel Labeling Menu Language Channel Browser Setup REGZA-LINK Player Control Enable Rating Blocking Edit Rating Limits Channels Block Input Lock Control Panel Lock GameTimer New PIN Code Installation REGZA-LINK Setup Sleep Timer PC Settings Logo LED Option p Sports/Standard/Movie/PC...
Owner's Manual - English
Page 27
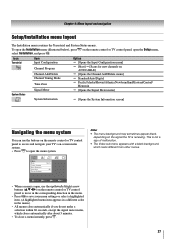
... a menu is open, use the buttons on the remote control or TV control panel to access and navigate your menu settings or select a highlighted item. (A highlighted menu item appears in a different color in the menu. • Press to save your TV's on the remote control or TV control panel to open the menu system. To open the Setup menu, select Installation, and press . Icon Terrestrial System Status Item Input Configuration Channel Program Channel Add/Delete Channel Tuning Mode Time Zone Signal Meter...
... a menu is open, use the buttons on the remote control or TV control panel to access and navigate your menu settings or select a highlighted item. (A highlighted menu item appears in a different color in the menu. • Press to save your TV's on the remote control or TV control panel to open the menu system. To open the Setup menu, select Installation, and press . Icon Terrestrial System Status Item Input Configuration Channel Program Channel Add/Delete Channel Tuning Mode Time Zone Signal Meter...
Owner's Manual - English
Page 31
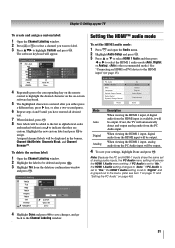
...," the HDMI 1 Audio setting changes to "Auto." Assigned channel labels will be deleted and press . 3 Highlight Yes from the HDMI input will be output. Highlight the new custom label and press to the HDMI input" ( page 15). If PC Audio is available, it will be output. When viewing the HDMI 1 input, digital audio from the deletion confirmation window and press . Audio Setup PC Audio HDMI 1 Audio MTS Language Optical Output Format Dolby Digital Dynamic Range Control Reset No Auto Stereo...
...," the HDMI 1 Audio setting changes to "Auto." Assigned channel labels will be deleted and press . 3 Highlight Yes from the HDMI input will be output. Highlight the new custom label and press to the HDMI input" ( page 15). If PC Audio is available, it will be output. When viewing the HDMI 1 input, digital audio from the deletion confirmation window and press . Audio Setup PC Audio HDMI 1 Audio MTS Language Optical Output Format Dolby Digital Dynamic Range Control Reset No Auto Stereo...
Owner's Manual - English
Page 48
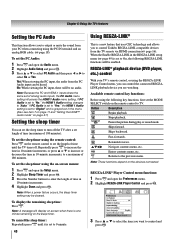
... control Toshiba REGZA-LINK compatible devices from the TV remote via HDMI connection ( page 16). Note: When a power failure occurs, the sleep timer setting may be no audio. When the Enable REGZA-LINK in 10-minute increments, to the previous menu. Skips backward. To display the remaining sleep time: Press . REGZA-LINK® playback device (DVD player, etc.) control With your PC when connecting using the PC IN terminal and an analog...
... control Toshiba REGZA-LINK compatible devices from the TV remote via HDMI connection ( page 16). Note: When a power failure occurs, the sleep timer setting may be no audio. When the Enable REGZA-LINK in 10-minute increments, to the previous menu. Skips backward. To display the remaining sleep time: Press . REGZA-LINK® playback device (DVD player, etc.) control With your PC when connecting using the PC IN terminal and an analog...
Owner's Manual - English
Page 54
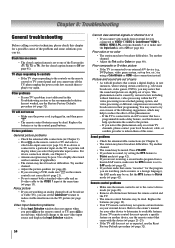
... connected to Off ( page 46). TV will not turn off the TV, please unplug the power cords few seconds then replug to reduce visible interference in their programming. If no picture will change to the next video input source and display the Input Selection window. 54 Cannot view external signals or channel 3 or 4 • If you can try again. Poor color or no sound, try using a VCR, make sure on the remote control or TV control panel...
... connected to Off ( page 46). TV will not turn off the TV, please unplug the power cords few seconds then replug to reduce visible interference in their programming. If no picture will change to the next video input source and display the Input Selection window. 54 Cannot view external signals or channel 3 or 4 • If you can try again. Poor color or no sound, try using a VCR, make sure on the remote control or TV control panel...
Owner's Manual - English
Page 58
... manual and reviewing the section entitled "Troubleshooting," you or to damage to original consumers in electric power), improper installation, improper maintenance, or use of instructions furnished by an Authorized TACP Service Station. (3) The warranties from the date you . Reception problems caused 58 by inadequate antenna systems, misaligned satellite dishes, cable television distribution, VCRs, DVD players/recorders, personal computer level IEEE-1394 devices, and any LCD Television or parts...
... manual and reviewing the section entitled "Troubleshooting," you or to damage to original consumers in electric power), improper installation, improper maintenance, or use of instructions furnished by an Authorized TACP Service Station. (3) The warranties from the date you . Reception problems caused 58 by inadequate antenna systems, misaligned satellite dishes, cable television distribution, VCRs, DVD players/recorders, personal computer level IEEE-1394 devices, and any LCD Television or parts...

Owner's Manual - English
Page 60
... the laws of the warranty. YOU MUST READ AND FOLLOW ALL SET-UP AND USAGE INSTRUCTIONS IN THE APPLICABLE USER GUIDES AND/OR MANUALS. If and where applicable and to the extent not precluded by law, you find that service is needed: (1) To find the nearest ASP, visit TCL's web site at www.toshiba.ca If and...
... the laws of the warranty. YOU MUST READ AND FOLLOW ALL SET-UP AND USAGE INSTRUCTIONS IN THE APPLICABLE USER GUIDES AND/OR MANUALS. If and where applicable and to the extent not precluded by law, you find that service is needed: (1) To find the nearest ASP, visit TCL's web site at www.toshiba.ca If and...


