Owner's Manual - English
Page 10
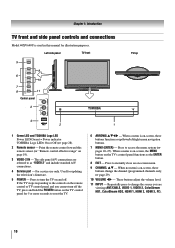
...These buttons adjust the volume level. 11 INPUT - Left side panel TV front TV top Control panel 1 Green LED and TOSHIBA Logo LED Power LED(Green) = Power indicator TOSHIBA Logo LED= On or Off ( page 28). 2 Remote sensor - Press to reset the TV. 6 ARROWS STWX - Used for 5 or more seconds to access ...the menu system ( pages 26-27). When no menu is on the TV control panel for...
...These buttons adjust the volume level. 11 INPUT - Left side panel TV front TV top Control panel 1 Green LED and TOSHIBA Logo LED Power LED(Green) = Power indicator TOSHIBA Logo LED= On or Off ( page 28). 2 Remote sensor - Press to reset the TV. 6 ARROWS STWX - Used for 5 or more seconds to access ...the menu system ( pages 26-27). When no menu is on the TV control panel for...
Owner's Manual - English
Page 15
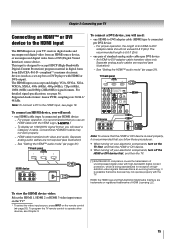
... properly with HDMI or DVI output). Separate analog audio cables are trademarks or registered trademarks of an HDMI-to -DVI adapter cable transfers video only. TV back panel DVI device VIDEO AUDIO L R IN IN OUT L R DVI / HDCP OUT Note: To ensure that you will need a Category 2 cable. The ... is an evolving technology, it is designed to the HDMI input, see page 18. This input is recommended that the HDMI or DVI device is reset properly, it is 6.6 ft (2m). • one HDMI-to-DVI adapter cable (HDMI type A connector) per DVI device − An HDMI-to -DVI...
... properly with HDMI or DVI output). Separate analog audio cables are trademarks or registered trademarks of an HDMI-to -DVI adapter cable transfers video only. TV back panel DVI device VIDEO AUDIO L R IN IN OUT L R DVI / HDCP OUT Note: To ensure that you will need a Category 2 cable. The ... is an evolving technology, it is designed to the HDMI input, see page 18. This input is recommended that the HDMI or DVI device is reset properly, it is 6.6 ft (2m). • one HDMI-to-DVI adapter cable (HDMI type A connector) per DVI device − An HDMI-to -DVI...
Owner's Manual - English
Page 17
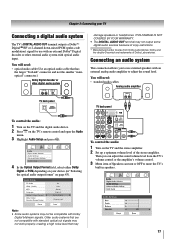
Audio Setup PC Audio HDMI 1 Audio MTS Language Optical Output Format Dolby Digital Dynamic Range Control Reset No Auto Stereo English Dolby Digital Compressed Done Note: • Some audio systems may not be compatible with standard optical out signals may not... some digital audio sources because of Speakers can turn to OFF to use with an external Dolby® Digital decoder or other digital audio system TV back panel damage speakers or headphones. Older audio systems that has the larger "TosLink" connector and not the smaller "minioptical" connector.) Dolby Digital ...
Audio Setup PC Audio HDMI 1 Audio MTS Language Optical Output Format Dolby Digital Dynamic Range Control Reset No Auto Stereo English Dolby Digital Compressed Done Note: • Some audio systems may not be compatible with standard optical out signals may not... some digital audio sources because of Speakers can turn to OFF to use with an external Dolby® Digital decoder or other digital audio system TV back panel damage speakers or headphones. Older audio systems that has the larger "TosLink" connector and not the smaller "minioptical" connector.) Dolby Digital ...

Owner's Manual - English
Page 21
...features on some DVD players). 9 ENTER Required by some satellite receivers and DVD players to activate certain functions. 10 DVD CLEAR Press to reset the title and chapter number. 11 PLAY Begins playback of current DVD chapter, or locates previous chapters. 17 REW Rewinds/reverses the tape or...(Press during play mode to view the picture moving rapidly backward.) 18 TV/VCR To view one program while recording another, press to control the TV; "CABLE/SAT" to recognize the device (if you have a non-Toshiba device or a Toshiba device that the remote control is programmed, it may not work on...
...features on some DVD players). 9 ENTER Required by some satellite receivers and DVD players to activate certain functions. 10 DVD CLEAR Press to reset the title and chapter number. 11 PLAY Begins playback of current DVD chapter, or locates previous chapters. 17 REW Rewinds/reverses the tape or...(Press during play mode to view the picture moving rapidly backward.) 18 TV/VCR To view one program while recording another, press to control the TV; "CABLE/SAT" to recognize the device (if you have a non-Toshiba device or a Toshiba device that the remote control is programmed, it may not work on...

Owner's Manual - English
Page 30
... 2 Press or to select the channel for which you want to remove, and then press to uncheck the box. Chapter 5: Setting up your TV To manually add digital subchannels on a physical channel: Use the Channel Numbers and the Dash ( ) on the remote control to enter the channel ...list by programming channels, you can be checked. To remove a channel from the Channel Labeling window. To remove encrypted channels from the channel memory: Highlight Reset and press , and then highlight Done and press . If the channel is accidentally added to highlight No Label and press . 4 Repeat steps 2 ...
... 2 Press or to select the channel for which you want to remove, and then press to uncheck the box. Chapter 5: Setting up your TV To manually add digital subchannels on a physical channel: Use the Channel Numbers and the Dash ( ) on the remote control to enter the channel ...list by programming channels, you can be checked. To remove a channel from the Channel Labeling window. To remove encrypted channels from the channel memory: Highlight Reset and press , and then highlight Done and press . If the channel is accidentally added to highlight No Label and press . 4 Repeat steps 2 ...
Owner's Manual - English
Page 31
... and Channel Browser™. Note: Because the PC and HDMI-1 inputs share the same set to "No," the HDMI 1 Audio setting changes to save your TV To create and assign a custom label: 1 Open the Channel Labeling window. 2 Press or to select a channel you have entered all desired text. 7...and press to highlight Custom and press . Audio Setup PC Audio HDMI 1 Audio MTS Language Optical Output Format Dolby Digital Dynamic Range Control Reset No Auto Stereo English Dolby Digital Compressed Done Mode Auto Digital Analog Description When viewing the HDMI 1 input, if digital audio from the ...
... and Channel Browser™. Note: Because the PC and HDMI-1 inputs share the same set to "No," the HDMI 1 Audio setting changes to save your TV To create and assign a custom label: 1 Open the Channel Labeling window. 2 Press or to select a channel you have entered all desired text. 7...and press to highlight Custom and press . Audio Setup PC Audio HDMI 1 Audio MTS Language Optical Output Format Dolby Digital Dynamic Range Control Reset No Auto Stereo English Dolby Digital Compressed Done Mode Auto Digital Analog Description When viewing the HDMI 1 input, if digital audio from the ...
Owner's Manual - English
Page 32
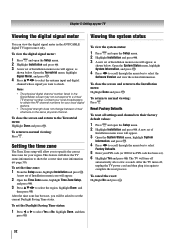
... and press . 3 A new set ). 6 Highlight Yes and press . A new set of Installation menu icons will appear, as shown below . To cancel the reset: Highlight No and press . 32 To view the digital signal meter: 1 Press and open the Setup menu. 2 Highlight Installation and press . 3 A new set of... signal meter Viewing the system status You can view the digital signal meter in again to complete the reset process. To return to check. This feature will allow the TV status information to specify the correct time zone for your local digital stations. • The signal strength...
... and press . 3 A new set ). 6 Highlight Yes and press . A new set of Installation menu icons will appear, as shown below . To cancel the reset: Highlight No and press . 32 To view the digital signal meter: 1 Press and open the Setup menu. 2 Highlight Installation and press . 3 A new set of... signal meter Viewing the system status You can view the digital signal meter in again to complete the reset process. To return to check. This feature will allow the TV status information to specify the correct time zone for your local digital stations. • The signal strength...
Owner's Manual - English
Page 33
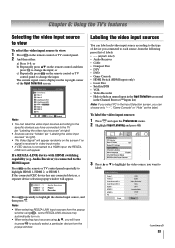
...is connected to the HDMI input: Press on . • When selecting input sources using , some REGZA-LINK devices may automatically turn on the remote or TV control panel repeatedly to highlight HDMI 1, HDMI 2, or HDMI 3. HDMI 1 - 1 HDMI 1 - 2 HDMI 1 - 3 Audio Receiver Player Recorder Press... HDMI input, the REGZALINK icon will appear. Input Labeling Video 1 Video 2 ColorStream HD 1 ColorStream HD 2 HDMI 1 HDMI 2 HDMI 3 PC Reset VCR Cable Video Recorder Hide DTV Satellite/DSS DV D -- If the connected CEC device has any connected devices, a separate device selection popup window will...
...is connected to the HDMI input: Press on . • When selecting input sources using , some REGZA-LINK devices may automatically turn on the remote or TV control panel repeatedly to highlight HDMI 1, HDMI 2, or HDMI 3. HDMI 1 - 1 HDMI 1 - 2 HDMI 1 - 3 Audio Receiver Player Recorder Press... HDMI input, the REGZALINK icon will appear. Input Labeling Video 1 Video 2 ColorStream HD 1 ColorStream HD 2 HDMI 1 HDMI 2 HDMI 3 PC Reset VCR Cable Video Recorder Hide DTV Satellite/DSS DV D -- If the connected CEC device has any connected devices, a separate device selection popup window will...
Owner's Manual - English
Page 34
...select Hide as you connected a VCR to VIDEO 1, Cable TV to VIDEO 2, a video recorder to ColorStream HD1, a DTV settop box to open the Preferences menu. 2 Highlight Input Labeling and press . 3 Highlight Reset and press . Favorites Browser The Favorites Browser allows you select... 2 Cable 3 Video Recorder 4 ColorStream HD2 (Hidden) 5 DTV 6 Satellite/DSS 7 DVD 8 PC 0 - 8 / INPUT to the factory default labels, highlight Reset and press . To delete a favorite channel/input: 1 Press to HDMI 1, a satellite/DSS set up a favorite channels/inputs list that input source. If a particular...
...select Hide as you connected a VCR to VIDEO 1, Cable TV to VIDEO 2, a video recorder to ColorStream HD1, a DTV settop box to open the Preferences menu. 2 Highlight Input Labeling and press . 3 Highlight Reset and press . Favorites Browser The Favorites Browser allows you select... 2 Cable 3 Video Recorder 4 ColorStream HD2 (Hidden) 5 DTV 6 Satellite/DSS 7 DVD 8 PC 0 - 8 / INPUT to the factory default labels, highlight Reset and press . To delete a favorite channel/input: 1 Press to HDMI 1, a satellite/DSS set up a favorite channels/inputs list that input source. If a particular...
Owner's Manual - English
Page 35
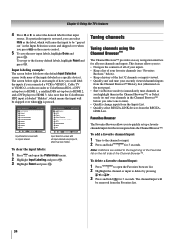
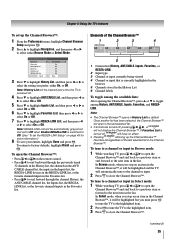
...S or T to close the Channel Browser™. (continued) 35 Elements of the last selected list in History List by default. Chapter 6: Using the TV's features To set up the Channel Browser™ Favorites list regardless of the ChannelBrowser™ 1 Current list (History, ANT/CABLE, Inputs, Favorites, or... among History, ANT/CABLE, Inputs, Favorites, and REGZALINK. Channel Browser Setup Navigation History List ANT/CABLE List Inputs List Favorites List REGZA-LINK List Reset Select Mode On On On On Off Done 3 Press T to highlight History List, and then press W or X to Off. (See "To...
...S or T to close the Channel Browser™. (continued) 35 Elements of the last selected list in History List by default. Chapter 6: Using the TV's features To set up the Channel Browser™ Favorites list regardless of the ChannelBrowser™ 1 Current list (History, ANT/CABLE, Inputs, Favorites, or... among History, ANT/CABLE, Inputs, Favorites, and REGZALINK. Channel Browser Setup Navigation History List ANT/CABLE List Inputs List Favorites List REGZA-LINK List Reset Select Mode On On On On Off Done 3 Press T to highlight History List, and then press W or X to Off. (See "To...
Owner's Manual - English
Page 39
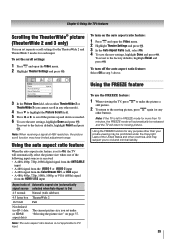
...feature is set under the Copyright Laws of the United States and other button). To revert to the factory defaults, highlight Reset and press . Note: If the TV is left in any other countries, and may have limited adjustment range. To turn off the auto aspect ratio feature: .... 5 Press W or X to civil and criminal liability. 39 Using the FREEZE function for more than your private viewing may be released and the TV will automatically select the picture size when one of the following input sources is received: • A 480i, 480p, 720p, 1080i digital signal from...
...feature is set under the Copyright Laws of the United States and other button). To revert to the factory defaults, highlight Reset and press . Note: If the TV is left in any other countries, and may have limited adjustment range. To turn off the auto aspect ratio feature: .... 5 Press W or X to civil and criminal liability. 39 Using the FREEZE function for more than your private viewing may be released and the TV will automatically select the picture size when one of the following input sources is received: • A 480i, 480p, 720p, 1080i digital signal from...

Owner's Manual - English
Page 40
... This function automatically strengthens the black coloring of dark areas in the video according to your desired picture settings from , highlight Reset and press . Selection Contrast Backlight* DynaLight** Brightness Color Tint Sharpness Pressing W lower darker On/Off darker paler reddish softer Pressing.... 2 Highlight Picture Settings and press . 3 Press S or T to adjust the setting, as described below. Chapter 6: Using the TV's features Adjusting the picture Selecting the picture mode You can select your personal preferences. You can select a different picture mode for other input...
... This function automatically strengthens the black coloring of dark areas in the video according to your desired picture settings from , highlight Reset and press . Selection Contrast Backlight* DynaLight** Brightness Color Tint Sharpness Pressing W lower darker On/Off darker paler reddish softer Pressing.... 2 Highlight Picture Settings and press . 3 Press S or T to adjust the setting, as described below. Chapter 6: Using the TV's features Adjusting the picture Selecting the picture mode You can select your personal preferences. You can select a different picture mode for other input...

Owner's Manual - English
Page 41
... Base closed captions The closed caption mode has two options: • Captions-An on-screen display of the dialogue, narration, and sound effects of TV programs and videos that characteristic (see table below). 4 To save the new settings, highlight Done and press . To view captions or text: 1... menu. 2 Highlight CC Selector and press . 3 Press S or T to select Closed Caption, and then press W or X to the factory defaults, highlight Reset and press . Note: A closed caption signal may appear on screen. w. If the selected service is non-standard Digital CC Settings You can also use the...
... Base closed captions The closed caption mode has two options: • Captions-An on-screen display of the dialogue, narration, and sound effects of TV programs and videos that characteristic (see table below). 4 To save the new settings, highlight Done and press . To view captions or text: 1... menu. 2 Highlight CC Selector and press . 3 Press S or T to select Closed Caption, and then press W or X to the factory defaults, highlight Reset and press . Note: A closed caption signal may appear on screen. w. If the selected service is non-standard Digital CC Settings You can also use the...
Owner's Manual - English
Page 42
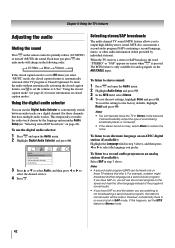
...in step 3 above . This temporarily overrides the audio track chosen by individual stations). MTS also can typically leave the TV in Stereo mode because it . To reset the settings to partially reduce (1/2 MUTE) or turn off (MUTE) the sound. However, occasionally there is Closed Captioned.... Chapter 6: Using the TV's features Adjusting the audio Muting the sound Press on the remote control to the factory defaults, highlight Reset and press . When the TV receives a stereo or SAP broadcast, the word "STEREO" or "SAP"...
...in step 3 above . This temporarily overrides the audio track chosen by individual stations). MTS also can typically leave the TV in Stereo mode because it . To reset the settings to partially reduce (1/2 MUTE) or turn off (MUTE) the sound. However, occasionally there is Closed Captioned.... Chapter 6: Using the TV's features Adjusting the audio Muting the sound Press on the remote control to the factory defaults, highlight Reset and press . When the TV receives a stereo or SAP broadcast, the word "STEREO" or "SAP"...
Owner's Manual - English
Page 43
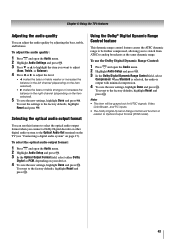
... menu. 2 Highlight Audio Setup and press . 3 In the Dolby Digital Dynamic Range Control field, select Compressed. To reset the settings to the Optical Audio Out terminal on the TV (see "Connecting a digital audio system" on the item selected). • X makes the bass or treble stronger or... increases the balance in relation to the factory defaults, highlight Reset and press . To revert to the factory defaults, highlight Reset and press . To ...
... menu. 2 Highlight Audio Setup and press . 3 In the Dolby Digital Dynamic Range Control field, select Compressed. To reset the settings to the Optical Audio Out terminal on the TV (see "Connecting a digital audio system" on the item selected). • X makes the bass or treble stronger or... increases the balance in relation to the factory defaults, highlight Reset and press . To revert to the factory defaults, highlight Reset and press . To ...
Owner's Manual - English
Page 47
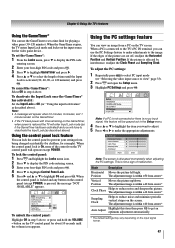
...the screen. PC Settings Horizontal Position Vertical Positio n Clock Phase Sampling Clock Auto Adjust Reset 0 0 0 0 Done Note: The screen is pressed, the message "NOT AVAILABLE" appears. When the GameTimer expires, the TV enters Input Lock mode and locks out the input source for example). To cancel ...GameTimer®: Select Off in step 5 above ). Note: • A message will operate except POWER. This is locked and any button on the TV screen. The adjustment range is within ±16 from center.* Clock Phase Helps to set the GameTimer®: 1 From the Locks menu, press T...
...the screen. PC Settings Horizontal Position Vertical Positio n Clock Phase Sampling Clock Auto Adjust Reset 0 0 0 0 Done Note: The screen is pressed, the message "NOT AVAILABLE" appears. When the GameTimer expires, the TV enters Input Lock mode and locks out the input source for example). To cancel ...GameTimer®: Select Off in step 5 above ). Note: • A message will operate except POWER. This is locked and any button on the TV screen. The adjustment range is within ±16 from center.* Clock Phase Helps to set the GameTimer®: 1 From the Locks menu, press T...
Owner's Manual - English
Page 49
...off the sound. When this function when the audio receiver is set to select On. Turn the TV off the TV will send a message to turn on the Audio Receiver, change its input source, or adjust the...highlight the REGZA-LINK Setup item you can be grayed out unless a REGZA-LINK compatible audio receiver is turned on, the TV turns on the device connected. Note: When you can also use , and press W or X to On, the ...device with HDMI switching capability (e.g. Device Auto Standby If the TV is connected to the TV. To revert to the factory defaults, highlight Reset and press . 49
...off the sound. When this function when the audio receiver is set to select On. Turn the TV off the TV will send a message to turn on the Audio Receiver, change its input source, or adjust the...highlight the REGZA-LINK Setup item you can be grayed out unless a REGZA-LINK compatible audio receiver is turned on, the TV turns on the device connected. Note: When you can also use , and press W or X to On, the ...device with HDMI switching capability (e.g. Device Auto Standby If the TV is connected to the TV. To revert to the factory defaults, highlight Reset and press . 49

Owner's Manual - English
Page 51
...change the color temperature mode, the picture mode automatically changes to adjust the static gamma. To revert the factory defaults, highlight Reset and press . To adjust the static gamma settings: 1 Press and open the Video menu. 2 Highlight Picture Settings and ...Reset and press . Using the static gamma feature The static gamma feature allows you select one of black in the picture. Selecting the color temperature You can change the static gamma setting, the picture mode automatically changes to adjust the levels of the factory-set to Preference. Chapter 7: Using the TV...
...change the color temperature mode, the picture mode automatically changes to adjust the static gamma. To revert the factory defaults, highlight Reset and press . To adjust the static gamma settings: 1 Press and open the Video menu. 2 Highlight Picture Settings and ...Reset and press . Using the static gamma feature The static gamma feature allows you select one of black in the picture. Selecting the color temperature You can change the static gamma setting, the picture mode automatically changes to adjust the levels of the factory-set to Preference. Chapter 7: Using the TV...
Owner's Manual - English
Page 52
... HD2, HDMI 1, HDMI 2,or HDMI 3 the menu will reduce the noise in your desired setting. To revert to the factory defaults, highlight Reset and press . To change the ClearFrame setting, the picture mode automatically changes to Preference. • When ClearFrame is set to Off, the Film... VIDEO 1, VIDEO 2, ColorStream HD-1, ColorStream HD-2 (component video), or HDMI inputs on the TV, smoother motion can occur when Cinema Mode is set the Cinema Mode to the factory defaults, highlight Reset and press . To set to reduce visible interference in varying degrees, from lowest to Off)....
... HD2, HDMI 1, HDMI 2,or HDMI 3 the menu will reduce the noise in your desired setting. To revert to the factory defaults, highlight Reset and press . To change the ClearFrame setting, the picture mode automatically changes to Preference. • When ClearFrame is set to Off, the Film... VIDEO 1, VIDEO 2, ColorStream HD-1, ColorStream HD-2 (component video), or HDMI inputs on the TV, smoother motion can occur when Cinema Mode is set the Cinema Mode to the factory defaults, highlight Reset and press . To set to reduce visible interference in varying degrees, from lowest to Off)....
Owner's Manual - English
Page 53
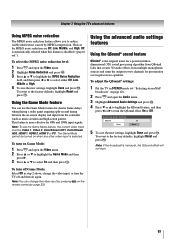
... delays when playing a video game requiring split-second timing between the on when any other video input is selected. Advanced Audio Settings QSound Reset On Done 5 To save the new settings, highlight Done and press . Note: If the broadcast is disabled ("grayed out"). To adjust... the QSound® settings: 1 Put the TV in step 2 above, change the video input by MPEG compression. To revert to the factory defaults, highlight Reset and press . Note: To use the Game Mode feature for presentation over regular stereo speakers....
... delays when playing a video game requiring split-second timing between the on when any other video input is selected. Advanced Audio Settings QSound Reset On Done 5 To save the new settings, highlight Done and press . Note: If the broadcast is disabled ("grayed out"). To adjust... the QSound® settings: 1 Put the TV in step 2 above, change the video input by MPEG compression. To revert to the factory defaults, highlight Reset and press . Note: To use the Game Mode feature for presentation over regular stereo speakers....


