Brochure
Page 2
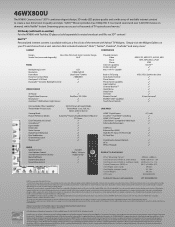
... Frame Capability Input Labeling Channel BrowserTM Quick Menu Sleep Timer On Timer Remote Control ENERGY STAR® Qualified Touch Panel Controls MPEG2 PS, MPEG2 TS, AVCHD, MP4 MP3, MP4 (AAC), LPCM JPEG Net TVTM 3 3 NTSC/ATSC/QAM in the Clear 3 3 3 3 3 3 3 3 5 Item Universal5 3 3 Cinema Mode 24fps Capability4 TheaterWide® Picture Sizes Gaming Mode Picture Preference Modes Color Temperature Control ColorMasterTM Expert Mode Deep Color Static Gamma Digital Noise Reduction Film Stabilization Channel/Input Lock TheaterLockTM AUDIO Speaker System Auto Volume Control Sound Enhancement...
... Frame Capability Input Labeling Channel BrowserTM Quick Menu Sleep Timer On Timer Remote Control ENERGY STAR® Qualified Touch Panel Controls MPEG2 PS, MPEG2 TS, AVCHD, MP4 MP3, MP4 (AAC), LPCM JPEG Net TVTM 3 3 NTSC/ATSC/QAM in the Clear 3 3 3 3 3 3 3 3 5 Item Universal5 3 3 Cinema Mode 24fps Capability4 TheaterWide® Picture Sizes Gaming Mode Picture Preference Modes Color Temperature Control ColorMasterTM Expert Mode Deep Color Static Gamma Digital Noise Reduction Film Stabilization Channel/Input Lock TheaterLockTM AUDIO Speaker System Auto Volume Control Sound Enhancement...

User Manual
Page 2
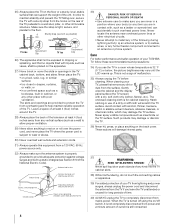
... route all instructions supplied by curious children. Wall Mounting: If you decide to climb on a "larger than a UL Listed wall bracket appropriate for the size and weight of this television for wall mounting this television, always use the many exciting features of your flat panel display. Flat panel displays can become excited while watching a program, especially on or play with steel studs or old cinder block construction. NO USER-SERVICEABLE PARTS INSIDE. WARNING...
... route all instructions supplied by curious children. Wall Mounting: If you decide to climb on a "larger than a UL Listed wall bracket appropriate for the size and weight of this television for wall mounting this television, always use the many exciting features of your flat panel display. Flat panel displays can become excited while watching a program, especially on or play with steel studs or old cinder block construction. NO USER-SERVICEABLE PARTS INSIDE. WARNING...
User Manual
Page 4
... power cord, and never place the TV where the power cord is thundering, do not touch the connecting cables or apparatus. 39) For added protection of your body (or any item you are provided to protect the TV from the hooks on the rear of the TV pedestal to help maintain reliable operation of the following during lightning activity: a) an antenna...
... power cord, and never place the TV where the power cord is thundering, do not touch the connecting cables or apparatus. 39) For added protection of your body (or any item you are provided to protect the TV from the hooks on the rear of the TV pedestal to help maintain reliable operation of the following during lightning activity: a) an antenna...
User Manual
Page 5
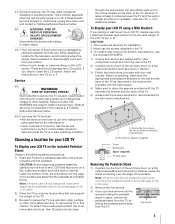
... over the edge of the surface. Before proceeding, make occasional snapping or popping sounds. If these for attaching a wall bracket.) 2. These actions will damage the LCD screen. Choosing a location for installation. 2. Remove the four screws. (Do not use these sounds become frequent or continuous, unplug the power cord and contact a Toshiba Authorized Service Center. 42) WARNING: RISK OF SERIOUS PERSONAL INJURY OR EQUIPMENT DAMAGE! Note...
... over the edge of the surface. Before proceeding, make occasional snapping or popping sounds. If these for attaching a wall bracket.) 2. These actions will damage the LCD screen. Choosing a location for installation. 2. Remove the four screws. (Do not use these sounds become frequent or continuous, unplug the power cord and contact a Toshiba Authorized Service Center. 42) WARNING: RISK OF SERIOUS PERSONAL INJURY OR EQUIPMENT DAMAGE! Note...
User Manual
Page 10
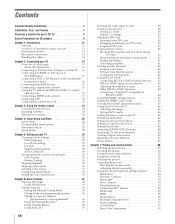
... Selecting the video input to view 38 Using closed captions 38 Analog CC mode 38 Digital CC settings 39 Setting the PIN code 39 Entering a new PIN code 39 Changing or deleting your PIN code 39 Forgotten PIN code 39 Using parental controls 40 Blocking TV programs and movies by rating (V-Chip 40 Downloading an additional rating system 40 Displaying ratings 41 Unlocking programs 41 Locking specific channels 42 Locking video input 42 Setting a time limit for games 42 Locking the control panel 42 Using REGZA-LINK...
... Selecting the video input to view 38 Using closed captions 38 Analog CC mode 38 Digital CC settings 39 Setting the PIN code 39 Entering a new PIN code 39 Changing or deleting your PIN code 39 Forgotten PIN code 39 Using parental controls 40 Blocking TV programs and movies by rating (V-Chip 40 Downloading an additional rating system 40 Displaying ratings 41 Unlocking programs 41 Locking specific channels 42 Locking video input 42 Setting a time limit for games 42 Locking the control panel 42 Using REGZA-LINK...
User Manual
Page 11
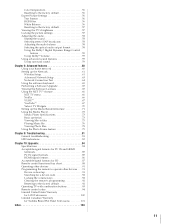
... Device code setup 91 Searching for a device code 92 Locking the volume keys 92 Clearing the remote's programming 92 Resetting to the factory default 92 Operating TV with combination buttons 93 Remote control codes 94 Limited United States Warranty for LCD Televisions 100 Limited Canadian Warranty for Toshiba Brand Flat Panel Televisions 101 Index 104 11 TV Widgets 70 Setting up the Network 61 Wireless Setup 61 Advanced Network Setup 63 Network Connection Test 64 Using the software keyboard 65 Performing a Software Upgrade 65 Viewing the Software...
... Device code setup 91 Searching for a device code 92 Locking the volume keys 92 Clearing the remote's programming 92 Resetting to the factory default 92 Operating TV with combination buttons 93 Remote control codes 94 Limited United States Warranty for LCD Televisions 100 Limited Canadian Warranty for Toshiba Brand Flat Panel Televisions 101 Index 104 11 TV Widgets 70 Setting up the Network 61 Wireless Setup 61 Advanced Network Setup 63 Network Connection Test 64 Using the software keyboard 65 Performing a Software Upgrade 65 Viewing the Software...
User Manual
Page 12
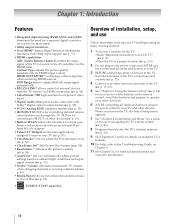
... Type adjusts the picture quality automatically for connecting to IR OUT on the remote control, install the batteries and prepare to operate your other device(s). 6 AFTER connecting all cables and devices to the TV (- p. 43). •ColorStream® HD high-resolution component video input. •Digital Audio Out optical audio connection with 1080p input support (- p. 2-5). 2 Do not plug in the power cords for an overview of navigating the TV's menu system (- p. 17). •HDMI capabilities ARC (Audio Return Channel...
... Type adjusts the picture quality automatically for connecting to IR OUT on the remote control, install the batteries and prepare to operate your other device(s). 6 AFTER connecting all cables and devices to the TV (- p. 43). •ColorStream® HD high-resolution component video input. •Digital Audio Out optical audio connection with 1080p input support (- p. 2-5). 2 Do not plug in the power cords for an overview of navigating the TV's menu system (- p. 17). •HDMI capabilities ARC (Audio Return Channel...
User Manual
Page 21
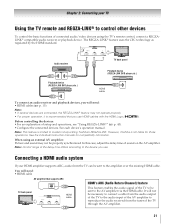
... for compatibility information. However, Toshiba is limited to the device you use . Connecting a HDMI audio system If your TV Using the TV remote and REGZA-LINK® to control other devices To control the basic functions of connected audio/video devices using an external AV amplifier: Picture and sound may not operate properly. • For proper operation, it is recommended that supports ARC HDMI's ARC (Audio Return Channel) feature TV back panel HDMI cable This feature enables the audio signal...
... for compatibility information. However, Toshiba is limited to the device you use . Connecting a HDMI audio system If your TV Using the TV remote and REGZA-LINK® to control other devices To control the basic functions of connected audio/video devices using an external AV amplifier: Picture and sound may not operate properly. • For proper operation, it is recommended that supports ARC HDMI's ARC (Audio Return Channel) feature TV back panel HDMI cable This feature enables the audio signal...

User Manual
Page 28
...-35 44 Network Setup 61 Netflix Setup 67 VUDU Deactivation 67 Media Renderer Setup Photo Frame Setup Channel Browser Setup PIN Setting Parental Control and Locks Display Settings AV Connection Auto Input 71 79 36 39 40 46, 52 30, 31, 45, 46, 58 31 IR control 19 Energy Saving Settings 47 Blue Screen 48 28 Icon SETUP Item HDMI Information Display POWER LED Dimmer Menu Language ANT/CABLE In Auto Tuning Manual Tuning TV Settings Quick Setup Location Software Upgrade Software Licences System Information Reset TV...
...-35 44 Network Setup 61 Netflix Setup 67 VUDU Deactivation 67 Media Renderer Setup Photo Frame Setup Channel Browser Setup PIN Setting Parental Control and Locks Display Settings AV Connection Auto Input 71 79 36 39 40 46, 52 30, 31, 45, 46, 58 31 IR control 19 Energy Saving Settings 47 Blue Screen 48 28 Icon SETUP Item HDMI Information Display POWER LED Dimmer Menu Language ANT/CABLE In Auto Tuning Manual Tuning TV Settings Quick Setup Location Software Upgrade Software Licences System Information Reset TV...
User Manual
Page 33
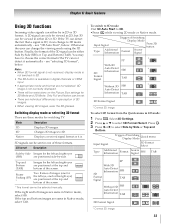
...;Set 3D Auto Start to 3D mode automatically - Select 3D Settings. 2 Press B or b to choose the correct format if the TV can not detect it can change the viewing mode using the 3D button. Trigger of the screen. Trigger of Switching Display Mode Quick menu Input Signal 3D Format Select Type Additional Information Format Source Signal SBS TAB FP With 3D Auto Detect Information SBS 3D Format Signal TAB Without 3D SBS Auto Detect Information TAB 2D Format Signal...
...;Set 3D Auto Start to 3D mode automatically - Select 3D Settings. 2 Press B or b to choose the correct format if the TV can not detect it can change the viewing mode using the 3D button. Trigger of the screen. Trigger of Switching Display Mode Quick menu Input Signal 3D Format Select Type Additional Information Format Source Signal SBS TAB FP With 3D Auto Detect Information SBS 3D Format Signal TAB Without 3D SBS Auto Detect Information TAB 2D Format Signal...
User Manual
Page 34
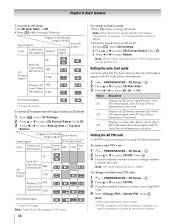
... Auto Detect Information is received. Displays a screen that allows you to "0000". To change or delete your 4-digit PIN code. 4 Select Change PIN or Delete PIN. Press . OK 3 Press C or c to select 2D Format Select. OK 3 Press the number buttons to Native mode: •Press while viewing 3D mode. OK 2 Press B or b to select 3D PIN. 3 Press the number buttons to select 3D PIN. Trigger of Switching Display Mode Quick menu Input Signal...
... Auto Detect Information is received. Displays a screen that allows you to "0000". To change or delete your 4-digit PIN code. 4 Select Change PIN or Delete PIN. Press . OK 3 Press C or c to select 2D Format Select. OK 3 Press the number buttons to Native mode: •Press while viewing 3D mode. OK 2 Press B or b to select 3D PIN. 3 Press the number buttons to select 3D PIN. Trigger of Switching Display Mode Quick menu Input Signal...
User Manual
Page 39
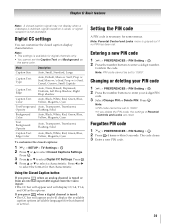
... PIN code, the settings of Parental Controls and Locks are reset. Press C or c to "0000". If you press when an analog channel is tuned: •The CC bar will appear and will display CC1-4, T1-4, and Off as the same color. Mode Description Caption Size Auto, Small, Standard, Large Caption Text Type Auto, Default, Mono w. Using the Closed Caption button If you press when a digital channel is tuned or from an external input (480i signal from the video input...
... PIN code, the settings of Parental Controls and Locks are reset. Press C or c to "0000". If you press when an analog channel is tuned: •The CC bar will appear and will display CC1-4, T1-4, and Off as the same color. Mode Description Caption Size Auto, Small, Standard, Large Caption Text Type Auto, Default, Mono w. Using the Closed Caption button If you press when a digital channel is tuned or from an external input (480i signal from the video input...
User Manual
Page 47
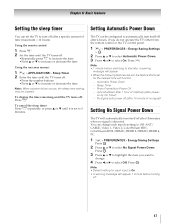
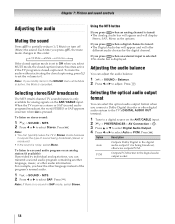
... set the TV to turn off after a specific amount of inactivity (after power- Chapter 6: Basic features Setting the sleep timer You can be cleared. Automatic Power Down - EOXKIT 3 Press B or b to highlight the item you do not operate the TV either from the remote control or the TV control panel. 1 Y > PREFERENCES > Energy Saving Settings > . Using the remote control: 1 Press [ 2 Set the time until the TV turns off. • Press the number buttons...
... set the TV to turn off after a specific amount of inactivity (after power- Chapter 6: Basic features Setting the sleep timer You can be cleared. Automatic Power Down - EOXKIT 3 Press B or b to highlight the item you do not operate the TV either from the remote control or the TV control panel. 1 Y > PREFERENCES > Energy Saving Settings > . Using the remote control: 1 Press [ 2 Set the time until the TV turns off. • Press the number buttons...
User Manual
Page 58
... closed caption mode is displayed. Note: If there is pressed. Option Auto PCM Description Outputs Dolby Digital to the digital audio output if it outputs the type of the program's normal audio. 1 Y > SOUND > MTS. 2 Press C or c to 0. Each time you press , the mute mode changes in the SOUND menu while Mute is active, the Mute is tuned: •The Analog Audio bar will appear and will offer different audio choices for analog signals on stereo sound: 1 Y > SOUND...
... closed caption mode is displayed. Note: If there is pressed. Option Auto PCM Description Outputs Dolby Digital to the digital audio output if it outputs the type of the program's normal audio. 1 Y > SOUND > MTS. 2 Press C or c to 0. Each time you press , the mute mode changes in the SOUND menu while Mute is active, the Mute is tuned: •The Analog Audio bar will appear and will offer different audio choices for analog signals on stereo sound: 1 Y > SOUND...
User Manual
Page 81
... input on the remote control or the TV control panel, press + a second time. p. 34). • Remove all products that has a programmable audio delay feature, use the Reset Factory Defaults procedure (- Try another channel. • Check the Input mode when you are not correct, the 2D format may be muted. p. 46). Remote control problems • Ensure the remote control is set to the correct device mode (- p. 38). Change the 2D format from Quick menu (- television broadcasts, video games, DVDs). Black box onscreen • The closed caption...
... input on the remote control or the TV control panel, press + a second time. p. 34). • Remove all products that has a programmable audio delay feature, use the Reset Factory Defaults procedure (- Try another channel. • Check the Input mode when you are not correct, the 2D format may be muted. p. 46). Remote control problems • Ensure the remote control is set to the correct device mode (- p. 38). Change the 2D format from Quick menu (- television broadcasts, video games, DVDs). Black box onscreen • The closed caption...
User Manual
Page 82
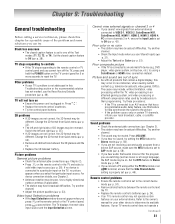
... modem and its incoming cable/telephone connections (- Closed caption problems • If the program or video you cannot tune digital channels, check the antenna configuration (- No REGZA-LINK operation • The REGZA-LINK feature is available for Internet service issues. For Legacy HDMI sources • Some legacy HDMI sources may not display correctly under these HDMI settings (Content Type and INSTAPORT™) (- Refer to new standard. Example of improper setup: The PC has...
... modem and its incoming cable/telephone connections (- Closed caption problems • If the program or video you cannot tune digital channels, check the antenna configuration (- No REGZA-LINK operation • The REGZA-LINK feature is available for Internet service issues. For Legacy HDMI sources • Some legacy HDMI sources may not display correctly under these HDMI settings (Content Type and INSTAPORT™) (- Refer to new standard. Example of improper setup: The PC has...
User Manual
Page 84
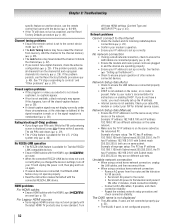
... may be added in standby mode Audio Power Main: 10 W + 10 W Woofer: 10W Speaker Type Main: Two 1-3/8 × 2-3/4 inches (35 × 70 mm) Woofer: 2-1/8 inches (55 mm) Video/Audio Terminals VIDEO/AUDIO INPUT: VIDEO: 1 V(p-p), 75 ohm, negative sync. PSK, WPS, None Supplied Accessories • Owner's manual (this clip to attach the TV to attach a wall bracket. See item 25 on p. 4 and instructions on page 86. 84 HDMI Audio: 2-channel Linear-PCM; 32/44...
... may be added in standby mode Audio Power Main: 10 W + 10 W Woofer: 10W Speaker Type Main: Two 1-3/8 × 2-3/4 inches (35 × 70 mm) Woofer: 2-1/8 inches (55 mm) Video/Audio Terminals VIDEO/AUDIO INPUT: VIDEO: 1 V(p-p), 75 ohm, negative sync. PSK, WPS, None Supplied Accessories • Owner's manual (this clip to attach the TV to attach a wall bracket. See item 25 on p. 4 and instructions on page 86. 84 HDMI Audio: 2-channel Linear-PCM; 32/44...

User Manual
Page 100
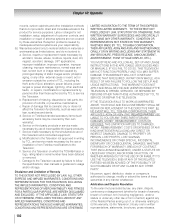
... sold and used for commercial purposes for set installation, setup, adjustment of customer controls, and installation or repair of antenna, satellite or cable systems are not covered by inadequate antenna systems, misaligned satellite dishes or improperly installed cable drops are your LCD Television online at 1-800-6313811. Chapter 10: Appendix Limited United States Warranty for LCD Televisions Toshiba America Consumer Products, L.L.C. ("TACP") makes the following all of the operating instructions in paragraph...
... sold and used for commercial purposes for set installation, setup, adjustment of customer controls, and installation or repair of antenna, satellite or cable systems are not covered by inadequate antenna systems, misaligned satellite dishes or improperly installed cable drops are your LCD Television online at 1-800-6313811. Chapter 10: Appendix Limited United States Warranty for LCD Televisions Toshiba America Consumer Products, L.L.C. ("TACP") makes the following all of the operating instructions in paragraph...
User Manual
Page 102
... dents; Repair of these warranties. Disclaimer and Limitation of retrofits, or preventive maintenance; Service made necessary by failure to follow the specifications, User manuals or guides as limited above, and do not provide for service purposes. h. e. Damage to the product for direct and immediate access to the Television caused by the use of non-Toshiba modifications to : a. Reception problems caused by inadequate antenna systems...
... dents; Repair of these warranties. Disclaimer and Limitation of retrofits, or preventive maintenance; Service made necessary by failure to follow the specifications, User manuals or guides as limited above, and do not provide for service purposes. h. e. Damage to the product for direct and immediate access to the Television caused by the use of non-Toshiba modifications to : a. Reception problems caused by inadequate antenna systems...
User Manual
Page 104
... Network Setup 61 O On Timer 46 P Panel Lock 42 PC Audio 46 PC connection 22 PC settings 46 Picture mode 53 Picture Position 52 Picture quality 53 Picture size 50 PIN code 39 R REGZA-LINK 43 Remote control Battery installation 24 Buttons 25 Device code table 94 Functional key chart 88 Programming 91 Reset TV 49 Resolution 54 RGB Filter 56 RGB Range 45 Room Lighting 55 S SAP 58 Shared inputs 31 Sleep Timer 47 Smart Sensor 55 Smart Sound...
... Network Setup 61 O On Timer 46 P Panel Lock 42 PC Audio 46 PC connection 22 PC settings 46 Picture mode 53 Picture Position 52 Picture quality 53 Picture size 50 PIN code 39 R REGZA-LINK 43 Remote control Battery installation 24 Buttons 25 Device code table 94 Functional key chart 88 Programming 91 Reset TV 49 Resolution 54 RGB Filter 56 RGB Range 45 Room Lighting 55 S SAP 58 Shared inputs 31 Sleep Timer 47 Smart Sensor 55 Smart Sound...


