Brochure
Page 2
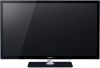
...in emitter) Pair the WX800 with internet access and one-time and/or recurring charges. 2Viewing 3D content requires compatible Toshiba 3D glasses, compatible 3D playback device or 3D source, and 3D capable HDMI cable (all HDMI®-CEC functions may not work even if your device is suggested... always-on your Toshiba television, always use a UL Listed wall bracket appropriate for the applicable device. 6If you use the original remote control for the size and weight of the television. 46WX800U The WX800 Cinema Series® 3DTV combines elegant design, 3D-ready LED picture quality and ...
...in emitter) Pair the WX800 with internet access and one-time and/or recurring charges. 2Viewing 3D content requires compatible Toshiba 3D glasses, compatible 3D playback device or 3D source, and 3D capable HDMI cable (all HDMI®-CEC functions may not work even if your device is suggested... always-on your Toshiba television, always use a UL Listed wall bracket appropriate for the applicable device. 6If you use the original remote control for the size and weight of the television. 46WX800U The WX800 Cinema Series® 3DTV combines elegant design, 3D-ready LED picture quality and ...
User Manual
Page 10
... 31 Setting the Auto Input feature 31 Chapter 6: Basic features 32 Viewing 3D images 32 Using 3D functions 33 Tuning channels 36 Setting the Channel Tuning Mode 36 Tuning to ... input source selection 43 Adjusting the amplifier's audio 44 Other REGZA-LINK® functions 44 Connecting a Toshiba PC compatible to REGZA-LINK 44 Using the HDMI® settings feature 45 Setting the HDMI® audio...Power Down 47 Setting No Signal Power Down 47 Setting Blue Screen 48 Adjusting POWER LED's Dimmer 48 Displaying TV status information 48 Viewing support information 49 Resetting to Factory...
... 31 Setting the Auto Input feature 31 Chapter 6: Basic features 32 Viewing 3D images 32 Using 3D functions 33 Tuning channels 36 Setting the Channel Tuning Mode 36 Tuning to ... input source selection 43 Adjusting the amplifier's audio 44 Other REGZA-LINK® functions 44 Connecting a Toshiba PC compatible to REGZA-LINK 44 Using the HDMI® settings feature 45 Setting the HDMI® audio...Power Down 47 Setting No Signal Power Down 47 Setting Blue Screen 48 Adjusting POWER LED's Dimmer 48 Displaying TV status information 48 Viewing support information 49 Resetting to Factory...
User Manual
Page 11
... files 78 Using the Photo Frame feature 79 Chapter 9: Troubleshooting 81 General troubleshooting 81 LED indications 83 Chapter 10: Appendix 84 Specifications 84 Acceptable signal formats for PC IN and... HDMI terminals 85 PC IN signal formats 85 HDMI signal formats 86 Acceptable signal formats for 3D 87 Remote control functional key chart 88 Operating other devices 91 Programming the remote to operate... other devices . . . 91 Device code setup 91 Searching for Toshiba Brand Flat Panel Televisions 101 Index 104 11 TV Widgets 70 Setting up the Network 61 ...
... files 78 Using the Photo Frame feature 79 Chapter 9: Troubleshooting 81 General troubleshooting 81 LED indications 83 Chapter 10: Appendix 84 Specifications 84 Acceptable signal formats for PC IN and... HDMI terminals 85 PC IN signal formats 85 HDMI signal formats 86 Acceptable signal formats for 3D 87 Remote control functional key chart 88 Operating other devices 91 Programming the remote to operate... other devices . . . 91 Device code setup 91 Searching for Toshiba Brand Flat Panel Televisions 101 Index 104 11 TV Widgets 70 Setting up the Network 61 ...
User Manual
Page 13
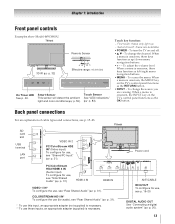
... See "Connecting a digital audio system" (- p. 32) Effective range: 16.4 ft (5m) On Timer LED Smart Sensor Touch Sensor See p. 46. Touch key function: - To adjust the volume level. Second touch:... , see "Shared PC Input" (- When a menu is necessary. This sensor will detect the ambient See "LED indications" light and color conditions (- To change the source you are available. • POWER - p. 31)..... - Chapter 1: Introduction Front panel controls Examples show Model 46WX800U. p. 31). When a menu is onscreen, the INPUT key on and off. • B b - ...
... See "Connecting a digital audio system" (- p. 32) Effective range: 16.4 ft (5m) On Timer LED Smart Sensor Touch Sensor See p. 46. Touch key function: - To adjust the volume level. Second touch:... , see "Shared PC Input" (- When a menu is necessary. This sensor will detect the ambient See "LED indications" light and color conditions (- To change the source you are available. • POWER - p. 31)..... - Chapter 1: Introduction Front panel controls Examples show Model 46WX800U. p. 31). When a menu is onscreen, the INPUT key on and off. • B b - ...

User Manual
Page 28
...Y on the current mode. Note: Quick menu items are different depending on the remote control or TV control panel. Quick menu Item 3D Settings PICTURE Picture Mode Picture Size Photo Frame Sort Repeat SOUND Background Music Speakers Channel Browser Media Player REGZA-LINK Player Control Sleep Timer ...31, 45, 46, 58 31 IR control 19 Energy Saving Settings 47 Blue Screen 48 28 Icon SETUP Item HDMI Information Display POWER LED Dimmer Menu Language ANT/CABLE In Auto Tuning Manual Tuning TV Settings Quick Setup Location Software Upgrade Software Licences System Information Reset TV Page...
...Y on the current mode. Note: Quick menu items are different depending on the remote control or TV control panel. Quick menu Item 3D Settings PICTURE Picture Mode Picture Size Photo Frame Sort Repeat SOUND Background Music Speakers Channel Browser Media Player REGZA-LINK Player Control Sleep Timer ...31, 45, 46, 58 31 IR control 19 Energy Saving Settings 47 Blue Screen 48 28 Icon SETUP Item HDMI Information Display POWER LED Dimmer Menu Language ANT/CABLE In Auto Tuning Manual Tuning TV Settings Quick Setup Location Software Upgrade Software Licences System Information Reset TV Page...
User Manual
Page 48
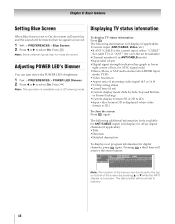
...mode (Side by Side, Top and Bottom, or Frame Packing) •Current display format (3D or 3D to 2D) •Input video format (3D is displayed when video format is onscreen. Adjusting POWER LED's Dimmer You can be stored to memory. 48 for ATSC signal only) •Stereo, ...Basic features Setting Blue Screen Displaying TV status information When Blue Screen is set to On, the screen will turn down the POWER LED's brightness. 1 Y > PREFERENCES > POWER LED Dimmer. 2 Press C or c to select On. The following additional information (only available for ANT/CABLE input) will display for...
...mode (Side by Side, Top and Bottom, or Frame Packing) •Current display format (3D or 3D to 2D) •Input video format (3D is displayed when video format is onscreen. Adjusting POWER LED's Dimmer You can be stored to memory. 48 for ATSC signal only) •Stereo, ...Basic features Setting Blue Screen Displaying TV status information When Blue Screen is set to On, the screen will turn down the POWER LED's brightness. 1 Y > PREFERENCES > POWER LED Dimmer. 2 Press C or c to select On. The following additional information (only available for ANT/CABLE input) will display for...
User Manual
Page 104
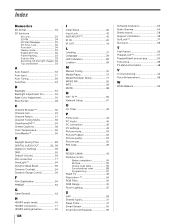
Index Numerics 3D format 33 3D functions 3D Lock 35 3D PIN 34 3D Start Message 35 3D Timer Lock 35 Auto start 34 Display mode 33 Enable 3D Timer 35 Frame Packing 33 Side by Side 33 Switching left and right images . 35 Top and Bottom 33 A Auto Aspect 52 Auto Input 31 ... 17 HDMI® settings feature 45 104 I Initial Setup 26 Input Lock 42 INSTAPORT 45 IR IN 20 IR OUT 19 L Labeling 31 Language 29 LED Indication 83 Location 29 M Manual Tuning 30 Media Player 73 Media Renderer Setup 71 MPEG NR 55 MTS 58 MUTE 58 N NET TV 66 Network...
Index Numerics 3D format 33 3D functions 3D Lock 35 3D PIN 34 3D Start Message 35 3D Timer Lock 35 Auto start 34 Display mode 33 Enable 3D Timer 35 Frame Packing 33 Side by Side 33 Switching left and right images . 35 Top and Bottom 33 A Auto Aspect 52 Auto Input 31 ... 17 HDMI® settings feature 45 104 I Initial Setup 26 Input Lock 42 INSTAPORT 45 IR IN 20 IR OUT 19 L Labeling 31 Language 29 LED Indication 83 Location 29 M Manual Tuning 30 Media Player 73 Media Renderer Setup 71 MPEG NR 55 MTS 58 MUTE 58 N NET TV 66 Network...


