User Manual
Page 2
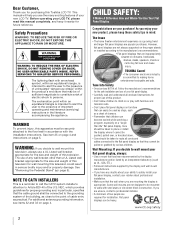
... panel displays are not always supported on the proper stands or installed according to wall mount this television, always use a UL Listed wall bracket appropriate for the size and weight of important operating and maintenance (servicing) instructions in the literature accompanying the appliance. See "Removing the Pedestal Stand" (- For additional antenna grounding information, see items 32 and 33 on page 5. CHILD SAFETY: It Makes A Difference How and Where You Use Your Flat Panel Display...
... panel displays are not always supported on the proper stands or installed according to wall mount this television, always use a UL Listed wall bracket appropriate for the size and weight of important operating and maintenance (servicing) instructions in the literature accompanying the appliance. See "Removing the Pedestal Stand" (- For additional antenna grounding information, see items 32 and 33 on page 5. CHILD SAFETY: It Makes A Difference How and Where You Use Your Flat Panel Display...
User Manual
Page 4
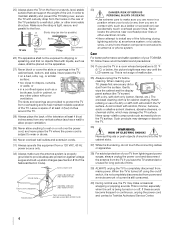
..., shall be exposed to help maintain reliable operation of time. 39) ALWAYS unplug the TV to make sure the antenna system is thundering, do not touch the connecting cables or apparatus. 38) For added protection of your TV from lightning and power surges, always unplug the power cord and disconnect the antenna from the hooks on the rear of the TV pedestal...
..., shall be exposed to help maintain reliable operation of time. 39) ALWAYS unplug the TV to make sure the antenna system is thundering, do not touch the connecting cables or apparatus. 38) For added protection of your TV from lightning and power surges, always unplug the power cord and disconnect the antenna from the hooks on the rear of the TV pedestal...

User Manual
Page 5
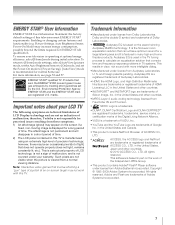
... this WARNING may be used when removing the pedestal stand to avoid damage to leave at least 4 inches between the TV and the wall or similar structure for the size and weight of the LCD Panel face down on a flat, cushioned surface such as a quilt or blanket. This will damage the LCD screen. When selecting a location for installation. 2) Unplug and remove any cables and/or other...
... this WARNING may be used when removing the pedestal stand to avoid damage to leave at least 4 inches between the TV and the wall or similar structure for the size and weight of the LCD Panel face down on a flat, cushioned surface such as a quilt or blanket. This will damage the LCD screen. When selecting a location for installation. 2) Unplug and remove any cables and/or other...
User Manual
Page 7
.... therefore, Toshiba is not responsible for perceived issues resulting from Dolby Laboratories. To return to [Home] mode settings, select [AutoView] picture mode, set the Auto Brightness Sensor to [On] mode, and set by the U.S. Picture Settings, Auto Brightness Sensor, Power-On Mode) may appear on the work with more information, see page 52 and 57. This software is not permanent and will disappear in a short period of time. 2) The LCD panel contained...
.... therefore, Toshiba is not responsible for perceived issues resulting from Dolby Laboratories. To return to [Home] mode settings, select [AutoView] picture mode, set the Auto Brightness Sensor to [On] mode, and set by the U.S. Picture Settings, Auto Brightness Sensor, Power-On Mode) may appear on the work with more information, see page 52 and 57. This software is not permanent and will disappear in a short period of time. 2) The LCD panel contained...
User Manual
Page 8
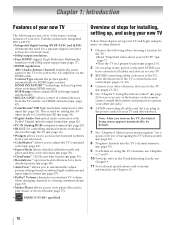
... HDMI® audio mode 49 Viewing the HDMI® signal information 49 Using the PC settings feature 50 Setting the PC Audio 50 Setting the On Timer 51 Setting the Sleep Timer 51 Automatic Power Down 52 No Signal Power Down 52 Power-On Mode 52 Blue Screen 52 TOSHIBA Illumination 52 Displaying TV status information 53 Viewing support information 53 Reset Factory Defaults 53 Understanding the auto power off feature 53 Understanding the last mode memory feature 53 Chapter 7: Picture and sound controls...
... HDMI® audio mode 49 Viewing the HDMI® signal information 49 Using the PC settings feature 50 Setting the PC Audio 50 Setting the On Timer 51 Setting the Sleep Timer 51 Automatic Power Down 52 No Signal Power Down 52 Power-On Mode 52 Blue Screen 52 TOSHIBA Illumination 52 Displaying TV status information 53 Viewing support information 53 Reset Factory Defaults 53 Understanding the auto power off feature 53 Understanding the last mode memory feature 53 Chapter 7: Picture and sound controls...
User Manual
Page 10
...;HDMI capabilities ARC (Audio Return Channel) enables the audio signal of the TV to be sent to ColorStream HD (- page 47). •ColorStream® HD high-resolution component video input (- This is used by default. 7 See "Chapter 4: Menu layout and navigation" for a quick overview of navigating the TV's menu system (- page 60). •Expert Mode allows detailed calibration with Dolby® Digital optical output format (- page 57). •Dolby® Volume eliminates...
...;HDMI capabilities ARC (Audio Return Channel) enables the audio signal of the TV to be sent to ColorStream HD (- page 47). •ColorStream® HD high-resolution component video input (- This is used by default. 7 See "Chapter 4: Menu layout and navigation" for a quick overview of navigating the TV's menu system (- page 60). •Expert Mode allows detailed calibration with Dolby® Digital optical output format (- page 57). •Dolby® Volume eliminates...
User Manual
Page 11
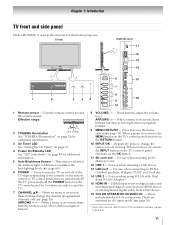
... 9 AUDIO 10 R 8 VOLUME+ - - When no menu is on-screen, the MENU button on -screen, these buttons function as the RETURN button. 10 INPUT/OK - These include standard A/V connections. pages 6 and 64). 11 For use when connecting to the controls on the TV control panel for 5 or more seconds to change the channel (programmed channels only; - HDMI input receives digital audio and uncompressed digital video from an HDMI device or uncompressed digital video from a DVI device. 16 COLOR STREAM HD IN/VIDEO IN...
... 9 AUDIO 10 R 8 VOLUME+ - - When no menu is on-screen, the MENU button on -screen, these buttons function as the RETURN button. 10 INPUT/OK - These include standard A/V connections. pages 6 and 64). 11 For use when connecting to the controls on the TV control panel for 5 or more seconds to change the channel (programmed channels only; - HDMI input receives digital audio and uncompressed digital video from an HDMI device or uncompressed digital video from a DVI device. 16 COLOR STREAM HD IN/VIDEO IN...

User Manual
Page 13
... any cables, be used to connect the TV to directly to use: yellow for video, red for stereo right audio, and white for use with video devices with analog audio and composite video output. Component video cables (red/green/blue) Component video cables come in this manual are required for use with devices with Dolby Digital or PCM (pulse-code modulation) optical audio input to each cable. HDMI® cable (with the TV's IR pass-through feature (- An HDMI cable delivers digital audio and video in sets of cable types Cables...
... any cables, be used to connect the TV to directly to use: yellow for video, red for stereo right audio, and white for use with video devices with analog audio and composite video output. Component video cables (red/green/blue) Component video cables come in this manual are required for use with devices with Dolby Digital or PCM (pulse-code modulation) optical audio input to each cable. HDMI® cable (with the TV's IR pass-through feature (- An HDMI cable delivers digital audio and video in sets of cable types Cables...
User Manual
Page 24
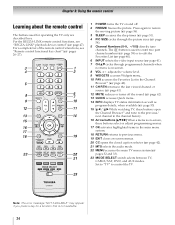
... turns off . 2 FREEZE freezes the picture. The = button is used for a function that is on-screen. 8 VOL + - Press again to enter two part channel numbers (- page 40). 6 INPUT selects the video input source (- page 42). 21 MTS selects the audio mode. 22 MENU accesses the main TV menu system (- pages 32 and 33). 23 MODE SELECT switch selects between TV, CABLE/SAT, DVD, and AUX modes. adjusts the volume level. 9 WIDGETS accesses Widgets menu. 10 FAV accesses...
... turns off . 2 FREEZE freezes the picture. The = button is used for a function that is on-screen. 8 VOL + - Press again to enter two part channel numbers (- page 40). 6 INPUT selects the video input source (- page 42). 21 MTS selects the audio mode. 22 MENU accesses the main TV menu system (- pages 32 and 33). 23 MODE SELECT switch selects between TV, CABLE/SAT, DVD, and AUX modes. adjusts the volume level. 9 WIDGETS accesses Widgets menu. 10 FAV accesses...

User Manual
Page 28
... respond to operate - If your VCR brand, set the MODE SELECT switch back to "TV" to control the TV. 6 For future reference, write down INFO , press the Channel Number buttons to the type of two codes. If more than one code is listed, try each one separately until you find the code for your VCR 28 CABLE/SAT (for a cable converter box or satellite receiver), DVD (for a DVD player, HTIB...
... respond to operate - If your VCR brand, set the MODE SELECT switch back to "TV" to control the TV. 6 For future reference, write down INFO , press the Channel Number buttons to the type of two codes. If more than one code is listed, try each one separately until you find the code for your VCR 28 CABLE/SAT (for a cable converter box or satellite receiver), DVD (for a DVD player, HTIB...

User Manual
Page 32
... mode. Icon PICTURE SOUND APPLICATIONS PREFERENCES Item Picture Mode Reset Backlight Contrast Brightness Color Tint Sharpness Advanced Picture Settings Control Visualization TheaterLock MTS Balance Advanced Sound Settings Dolby Volume Dynamic Range Control Widgets VUDU YouTube Media Player Channel Browser Favorites Browser On Timer Sleep Timer REGZA-LINK Setup Network Setup VUDU Deactivation Media Renderer Setup Photo Frame Setup Channel Browser Setup PIN Setting Parental Control and Locks Display Settings AV Connection Energy Saving Settings Blue Screen HDMI Information Display TOSHIBA...
... mode. Icon PICTURE SOUND APPLICATIONS PREFERENCES Item Picture Mode Reset Backlight Contrast Brightness Color Tint Sharpness Advanced Picture Settings Control Visualization TheaterLock MTS Balance Advanced Sound Settings Dolby Volume Dynamic Range Control Widgets VUDU YouTube Media Player Channel Browser Favorites Browser On Timer Sleep Timer REGZA-LINK Setup Network Setup VUDU Deactivation Media Renderer Setup Photo Frame Setup Channel Browser Setup PIN Setting Parental Control and Locks Display Settings AV Connection Energy Saving Settings Blue Screen HDMI Information Display TOSHIBA...

User Manual
Page 35
... appear warning that previous programs and settings will stop only on the remote control to enter the channel number (up your TV Configuring the antenna input source for the ANT/CABLE terminal 1 From the SETUP menu, highlight ANT/CABLE In. 2 Press C or c to the existing set it to repeat the programming process again unless your Cable TV service lineup changes significantly. 1 Configure the ANT/CABLE input, if you have to...
... appear warning that previous programs and settings will stop only on the remote control to enter the channel number (up your TV Configuring the antenna input source for the ANT/CABLE terminal 1 From the SETUP menu, highlight ANT/CABLE In. 2 Press C or c to the existing set it to repeat the programming process again unless your Cable TV service lineup changes significantly. 1 Configure the ANT/CABLE input, if you have to...

User Manual
Page 53
... •GameTimer (if set ). 3 Press C or c to their factory default values. 1 From the SETUP menu, highlight Reset TV and press . for the day. Pressing INFO a third time will automatically turn off while you want to set ) •Digital signal strength indicator (bar graph in ANT/CABLE mode) •Input label (if set this feature to select No and press . OK Understanding the auto power off feature The...
... •GameTimer (if set ). 3 Press C or c to their factory default values. 1 From the SETUP menu, highlight Reset TV and press . for the day. Pressing INFO a third time will automatically turn off while you want to set ) •Digital signal strength indicator (bar graph in ANT/CABLE mode) •Input label (if set this feature to select No and press . OK Understanding the auto power off feature The...
User Manual
Page 62
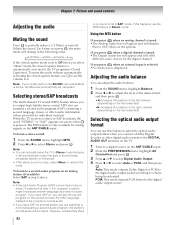
... automatically output the type of sound being broadcasted. Using the MTS button If you select "Mute" mode, the closed caption feature, use this happens, set the MTS feature to a digital source on those TV stations that offer it will automatically be heard only on the ANT/CABLE input. 2 From the PREFERENCES menu, highlight AV Connection and press . If you press when a digital channel is only available for the digital channel...
... automatically output the type of sound being broadcasted. Using the MTS button If you select "Mute" mode, the closed caption feature, use this happens, set the MTS feature to a digital source on those TV stations that offer it will automatically be heard only on the ANT/CABLE input. 2 From the PREFERENCES menu, highlight AV Connection and press . If you press when a digital channel is only available for the digital channel...
User Manual
Page 83
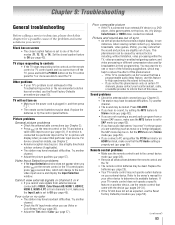
... select a valid video input source (- Press VOLUME. • If you can be dead. Try another device, use the Reset Factory Defaults procedure (- Cannot view external signals or channel 3 or 4 • If you cannot view signals from external devices connected to VIDEO, ColorStream HD, HDMI 1, HDMI 2, HDMI 3, HDMI 4, PC or from a known SAP source, make sure the Input Lock is connected to inform them of the problem and some solutions you hear no sound, try the control panel buttons. page 62...
... select a valid video input source (- Press VOLUME. • If you can be dead. Try another device, use the Reset Factory Defaults procedure (- Cannot view external signals or channel 3 or 4 • If you cannot view signals from external devices connected to VIDEO, ColorStream HD, HDMI 1, HDMI 2, HDMI 3, HDMI 4, PC or from a known SAP source, make sure the Input Lock is connected to inform them of the problem and some solutions you hear no sound, try the control panel buttons. page 62...
User Manual
Page 85
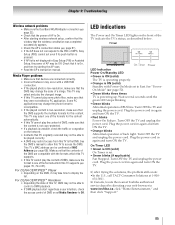
...; Green blinks three times TV is set even if its push-button is pressed. • If AP list is not displayed in again and turn ON the TV. • Orange blinks Abnormal operation of BUS line. Plug the power cord in Easy Setup (PIN) or Assisted Setup, the power of AP may be able to control a DMR playback. • If DMR playback start regardless a user intention, check the access control...
...; Green blinks three times TV is set even if its push-button is pressed. • If AP list is not displayed in again and turn ON the TV. • Orange blinks Abnormal operation of BUS line. Plug the power cord in Easy Setup (PIN) or Assisted Setup, the power of AP may be able to control a DMR playback. • If DMR playback start regardless a user intention, check the access control...
User Manual
Page 90
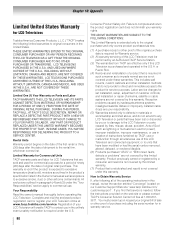
... Consumer Product Safety Act. This includes wall mounts, custom cabinets and other installation methods that do not extend to any LCD Television or parts that are sold and used for commercial purposes for set installation, setup, adjustment of customer controls, and installation or repair of antenna, satellite or cable systems are effective only if this LCD Television must present upon request your LCD Television online at 1-800-6313811. If you find...
... Consumer Product Safety Act. This includes wall mounts, custom cabinets and other installation methods that do not extend to any LCD Television or parts that are sold and used for commercial purposes for set installation, setup, adjustment of customer controls, and installation or repair of antenna, satellite or cable systems are effective only if this LCD Television must present upon request your LCD Television online at 1-800-6313811. If you find...
User Manual
Page 92
... OR EXPENSES. Firmware updates that are not covered by failure to follow the specifications, User manuals or guides as wear and tear, scratches and dents; Damage to the Television caused by these warranties in materials or workmanship as limited above, and do not provide for direct and immediate access to the product for set installation, setup, adjustment of customer controls, and installation or repair of incompatible...
... OR EXPENSES. Firmware updates that are not covered by failure to follow the specifications, User manuals or guides as wear and tear, scratches and dents; Damage to the Television caused by these warranties in materials or workmanship as limited above, and do not provide for direct and immediate access to the product for set installation, setup, adjustment of customer controls, and installation or repair of incompatible...
User Manual
Page 99
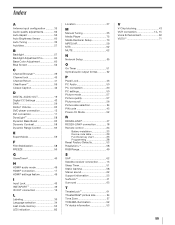
... 62 N Network Setup 65 O On Timer 51 Optical audio output format 62 P Panel Lock 46 PC Audio 50 PC connection 20 PC settings 50 Picture mode 57 Picture quality 57 Picture scroll 56 Picture size selection 54 PIN code 43 Power-On Mode 52 R REGZA-LINK 47 REGZA-LINK® connection 18 Remote control 24 Battery installation 23 Device code table 29 Functional key chart 26 Programming 28 Reset Factory Defaults 53 Resolution 58 RGB Range 49 S SAP 62 Satellite receiver connection........... 15 Sleep Timer 51...
... 62 N Network Setup 65 O On Timer 51 Optical audio output format 62 P Panel Lock 46 PC Audio 50 PC connection 20 PC settings 50 Picture mode 57 Picture quality 57 Picture scroll 56 Picture size selection 54 PIN code 43 Power-On Mode 52 R REGZA-LINK 47 REGZA-LINK® connection 18 Remote control 24 Battery installation 23 Device code table 29 Functional key chart 26 Programming 28 Reset Factory Defaults 53 Resolution 58 RGB Range 49 S SAP 62 Satellite receiver connection........... 15 Sleep Timer 51...
Brochure
Page 2
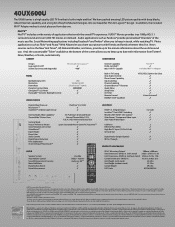
...; Component Video Input Side Audio/Video Inputs USB Ports Ethernet Port (RJ45) High-Res PC Input (15-Pin D-Sub) SD Card Slot Digital Audio Output (Optical) IR Pass Through PRODUCT & PACKAGING 4 (2 side) 3 3 3 3 2 3 3 3 3 3 AUDIO Speaker System Auto Volume Control Sound Enhancement Circuitry Mute/Half Mute Dynamic Bass Boost Voice Enhancement Invisible Dolby® Volume Audyssey EQTM 3 3 3 VESA® Mounting Pattern5 Unit Dimensions (WHD) in. (with deep blacks, robust Internet capability, and a long list of Toshiba America Consumer Products, L.L.C. Internet services available...
...; Component Video Input Side Audio/Video Inputs USB Ports Ethernet Port (RJ45) High-Res PC Input (15-Pin D-Sub) SD Card Slot Digital Audio Output (Optical) IR Pass Through PRODUCT & PACKAGING 4 (2 side) 3 3 3 3 2 3 3 3 3 3 AUDIO Speaker System Auto Volume Control Sound Enhancement Circuitry Mute/Half Mute Dynamic Bass Boost Voice Enhancement Invisible Dolby® Volume Audyssey EQTM 3 3 3 VESA® Mounting Pattern5 Unit Dimensions (WHD) in. (with deep blacks, robust Internet capability, and a long list of Toshiba America Consumer Products, L.L.C. Internet services available...


