User Manual
Page 2
.../wall in accordance with the installation instructions. WARNING RISK OF ELECTRIC SHOCK DO NOT OPEN. REFER SERVICING TO QUALIFIED SERVICE PERSONNEL. page 5). TOSHIBA Cares! • The consumer electronics industry is intended to alert the user to the presence of cable entry as UL, CSA, ETL)....Remember that children can be pulled or grabbed by the display and wall mount manufacturers. • If you decide to wall mount this manual completely, and keep these safety tips in the literature accompanying the appliance. Tune Into Safety • One size does NOT fit ...
.../wall in accordance with the installation instructions. WARNING RISK OF ELECTRIC SHOCK DO NOT OPEN. REFER SERVICING TO QUALIFIED SERVICE PERSONNEL. page 5). TOSHIBA Cares! • The consumer electronics industry is intended to alert the user to the presence of cable entry as UL, CSA, ETL)....Remember that children can be pulled or grabbed by the display and wall mount manufacturers. • If you decide to wall mount this manual completely, and keep these safety tips in the literature accompanying the appliance. Tune Into Safety • One size does NOT fit ...

User Manual
Page 5
..., always use the screws supplied or recommended by ultraviolet radiation from the TV as a quilt or blanket. Failure to follow the instructions in this manual to a Toshiba Authorized Service Center. 44) If you decide to the wall and the back of the LCD Panel face down on the LCD screen. Leave the...
..., always use the screws supplied or recommended by ultraviolet radiation from the TV as a quilt or blanket. Failure to follow the instructions in this manual to a Toshiba Authorized Service Center. 44) If you decide to the wall and the back of the LCD Panel face down on the LCD screen. Leave the...
User Manual
Page 8
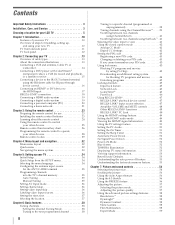
... 34 Configuring the antenna input source for the ANT/CABLE terminal 35 Programming channels into the TV's channel memory 35 Auto Tuning 35 Manual Tuning 35 Setting AV Input mode 36 Setting channel skip 36 Setting video input skip 36 Labeling video input sources 36 Setting the time...On Timer 51 Setting the Sleep Timer 51 Automatic Power Down 52 No Signal Power Down 52 Power-On Mode 52 Blue Screen 52 TOSHIBA Illumination 52 Displaying TV status information 53 Viewing support information 53 Reset Factory Defaults 53 Understanding the auto power off feature 53 Understanding the...
... 34 Configuring the antenna input source for the ANT/CABLE terminal 35 Programming channels into the TV's channel memory 35 Auto Tuning 35 Manual Tuning 35 Setting AV Input mode 36 Setting channel skip 36 Setting video input skip 36 Labeling video input sources 36 Setting the time...On Timer 51 Setting the Sleep Timer 51 Automatic Power Down 52 No Signal Power Down 52 Power-On Mode 52 Blue Screen 52 TOSHIBA Illumination 52 Displaying TV status information 53 Viewing support information 53 Reset Factory Defaults 53 Understanding the auto power off feature 53 Understanding the...
User Manual
Page 11
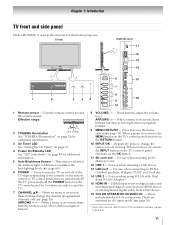
...USB device. 13 LAN port - These include standard A/V connections. Effective range: 2 TOSHIBA Illumination 16.4 ft (5m) See "TOSHIBA Illumination" on page 52 for 5 or more seconds to change the channel (programmed ... 8 PR 5 L/MONO 16 9 AUDIO 10 R 8 VOLUME+ - - Point the remote control toward this manual for additional information. 5 Auto Brightness Sensor - page 35). If the TV stops responding to DLNA Certified products.... 14 USB 2 - Chapter 1: Introduction TV front and side panel Model 40UX600U is used in this remote sensor. When a menu is on page 85 ...
...USB device. 13 LAN port - These include standard A/V connections. Effective range: 2 TOSHIBA Illumination 16.4 ft (5m) See "TOSHIBA Illumination" on page 52 for 5 or more seconds to change the channel (programmed ... 8 PR 5 L/MONO 16 9 AUDIO 10 R 8 VOLUME+ - - Point the remote control toward this manual for additional information. 5 Auto Brightness Sensor - page 35). If the TV stops responding to DLNA Certified products.... 14 USB 2 - Chapter 1: Introduction TV front and side panel Model 40UX600U is used in this remote sensor. When a menu is on page 85 ...

User Manual
Page 13
... (High-Definition Multimedia Interface) cable is for a complete connection. An HDMI cable delivers digital audio and video in this manual are representative of each device's owner's manual. 13 therefore, separate audio cables are not required for use with devices with an HDMI output. This cable can be ...and brands of component video.) These cables are typically color-coded red, green, and blue. Coaxial cable (F-type) Coaxial (F-type) cable is Toshiba's brand of devices to use: yellow for video, red for stereo right audio, and white for stereo left (or mono) audio. Analog ...
... (High-Definition Multimedia Interface) cable is for a complete connection. An HDMI cable delivers digital audio and video in this manual are representative of each device's owner's manual. 13 therefore, separate audio cables are not required for use with devices with an HDMI output. This cable can be ...and brands of component video.) These cables are typically color-coded red, green, and blue. Coaxial cable (F-type) Coaxial (F-type) cable is Toshiba's brand of devices to use: yellow for video, red for stereo right audio, and white for stereo left (or mono) audio. Analog ...

User Manual
Page 15
...;Coaxial cables •Standard A/V cables - Press + and B or b to record. Tune the VCR to the channel to select the ColorStream HD. Please check the Owner's Manual of the United States and other devices, see page 17. If your DVD player or satellite receiver does not have a mono VCR, connect L/MONO on...
...;Coaxial cables •Standard A/V cables - Press + and B or b to record. Tune the VCR to the channel to select the ColorStream HD. Please check the Owner's Manual of the United States and other devices, see page 17. If your DVD player or satellite receiver does not have a mono VCR, connect L/MONO on...

User Manual
Page 18
...174; compatible audio receiver or playback device. For details, see pages 47-48. •The connected devices must also be set. Refer to models incorporating Toshiba's REGZA-LINK. Chapter 2: Connecting your TV REGZA-LINK® connection You can control the basic functions of connected audio/video devices using the TV's remote...LINK DVD player,etc.) VIDEO AUDIO L R HDMI OUT IN OUT L R To connect an audio receiver and playback devices, you will need: •HDMI cables (- However, Toshiba is limited to the individual instruction manuals for compatibility information. 18
...174; compatible audio receiver or playback device. For details, see pages 47-48. •The connected devices must also be set. Refer to models incorporating Toshiba's REGZA-LINK. Chapter 2: Connecting your TV REGZA-LINK® connection You can control the basic functions of connected audio/video devices using the TV's remote...LINK DVD player,etc.) VIDEO AUDIO L R HDMI OUT IN OUT L R To connect an audio receiver and playback devices, you will need: •HDMI cables (- However, Toshiba is limited to the individual instruction manuals for compatibility information. 18

User Manual
Page 32
... Setup Photo Frame Setup Channel Browser Setup PIN Setting Parental Control and Locks Display Settings AV Connection Energy Saving Settings Blue Screen HDMI Information Display TOSHIBA Illumination Page 57 57 57 57 57 57 57 57 58 61 61 62 62 63 63 63 71 71 72 75 39 40 51... 70 81 39 43 43 50, 56 36, 49, 50, 62 52 52 49 52 Icon SETUP Item Menu Language ANT/CABLE In Auto Tuning Manual Tuning TV Settings Quick Setup Location Software Upgrade System Information Reset TV Page 34 35 35 35 36 34 37 69 53 53 Quick menu...
... Setup Photo Frame Setup Channel Browser Setup PIN Setting Parental Control and Locks Display Settings AV Connection Energy Saving Settings Blue Screen HDMI Information Display TOSHIBA Illumination Page 57 57 57 57 57 57 57 57 58 61 61 62 62 63 63 63 71 71 72 75 39 40 51... 70 81 39 43 43 50, 56 36, 49, 50, 62 52 52 49 52 Icon SETUP Item Menu Language ANT/CABLE In Auto Tuning Manual Tuning TV Settings Quick Setup Location Software Upgrade System Information Reset TV Page 34 35 35 35 36 34 37 69 53 53 Quick menu...

User Manual
Page 35
...if the physical channel is normal; Follow the steps below to Skip (- This is known. 1 From the SETUP menu, highlight Manual Tuning and press . Manual Tuning After automatically programming channels into the TV's memory). After the channels are found channels to three-digit number) and press ...of the screen. If channels are programmed automatically, you must use the number buttons on the channels you have to start Manual Tuning. Auto Tuning Your TV can manually add or erase individual channels in its memory. OK 3 A screen will be noted by an "ATV" symbol and ...
...if the physical channel is normal; Follow the steps below to Skip (- This is known. 1 From the SETUP menu, highlight Manual Tuning and press . Manual Tuning After automatically programming channels into the TV's memory). After the channels are found channels to three-digit number) and press ...of the screen. If channels are programmed automatically, you must use the number buttons on the channels you have to start Manual Tuning. Auto Tuning Your TV can manually add or erase individual channels in its memory. OK 3 A screen will be noted by an "ATV" symbol and ...

User Manual
Page 38
Also, the History List will be cleared, but the Favorites List will have priority when manually entering a channel number using the Channel Numbers (09) on the remote control or TV control panel. For example, to choose how tuning will be tuned ...
Also, the History List will be cleared, but the Favorites List will have priority when manually entering a channel number using the Channel Numbers (09) on the remote control or TV control panel. For example, to choose how tuning will be tuned ...
User Manual
Page 65
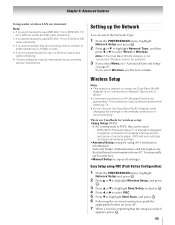
Note: If the Dual Band WLAN Adapter is not connected, Wireless cannot be interrupted by surrounding various interference. You manually set to Wired. • Continued connection of AP (Access Point) is not guaranteed. OK 4 Press C or c to select PBC. 5 Press b to highlight Easy ... Setup Note: • This feature is grayed out when the Dual Band WLAN Adapter is not connected or Network Type is set Security Key. •Manual Setup (to input all wireless settings. •Assisted Setup (setup by using PBC (Push Button Configuration) 1 From the PREFERENCES menu, highlight Network Setup...
Note: If the Dual Band WLAN Adapter is not connected, Wireless cannot be interrupted by surrounding various interference. You manually set to Wired. • Continued connection of AP (Access Point) is not guaranteed. OK 4 Press C or c to select PBC. 5 Press b to highlight Easy ... Setup Note: • This feature is grayed out when the Dual Band WLAN Adapter is not connected or Network Type is set Security Key. •Manual Setup (to input all wireless settings. •Assisted Setup (setup by using PBC (Push Button Configuration) 1 From the PREFERENCES menu, highlight Network Setup...
User Manual
Page 66
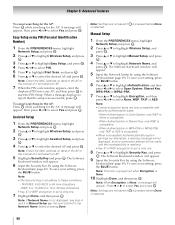
...for the AP: Press RETURN while searching for the AP. OK 2 Press B or b to select None, WEP, TKIP or AES. page 69). Manual Setup 1 From the PREFERENCES menu, highlight Network Setup and press . A message will appear. 5 Input the Network Name by using PIN (Personal Identification... will appear. page 69). page 69). Note: This item is grayed out when Encryption is not displayed, see step 4 and 5 in Manual Setup (- OK Note: Settings are attempted, a warning message will be displayed, and no connection attempt will be made until the incompatibility is resolved...
...for the AP: Press RETURN while searching for the AP. OK 2 Press B or b to select None, WEP, TKIP or AES. page 69). Manual Setup 1 From the PREFERENCES menu, highlight Network Setup and press . A message will appear. 5 Input the Network Name by using PIN (Personal Identification... will appear. page 69). page 69). Note: This item is grayed out when Encryption is not displayed, see step 4 and 5 in Manual Setup (- OK Note: Settings are attempted, a warning message will be displayed, and no connection attempt will be made until the incompatibility is resolved...

User Manual
Page 67
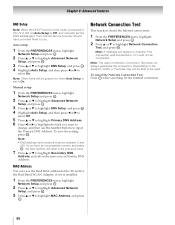
... Item Description Status Connected is displayed when the TV is set IP Address or DNS Address. Encryption is Off, set Auto Setup to Off, and manually set to On.) • When the DHCP function of surrounding APs. Advanced Network Setup Note: • When the DHCP function of USB (Dual... Band WLAN Adapter) is disconnecting with this TV is On, you do not use DHCP. Manual Setup: 1 From the PREFERENCES menu, highlight Network Setup and press . Note: If you manually set it to On. Note: Press the RED button if you must be a private address. OK 4 ...
... Item Description Status Connected is displayed when the TV is set IP Address or DNS Address. Encryption is Off, set Auto Setup to Off, and manually set to On.) • When the DHCP function of surrounding APs. Advanced Network Setup Note: • When the DHCP function of USB (Dual... Band WLAN Adapter) is disconnecting with this TV is On, you do not use DHCP. Manual Setup: 1 From the PREFERENCES menu, highlight Network Setup and press . Note: If you manually set it to On. Note: Press the RED button if you must be a private address. OK 4 ...
User Manual
Page 68
Your internet service provider should have provided these to highlight DNS Setup, and press . Manual setup: 1 From the PREFERENCES menu, highlight Network Setup and press . OK 3 Press B or b to you. OK 4 Highlight Auto Setup, and then press C or c to select ... Network Connection Test: Press EXIT while searching for the Dual Band WLAN Adapter, if one is set to On. OK 2 Press B or b to Off, and manually set the DNS address(es). Chapter 8: Advanced features DNS Setup Note: When the DHCP function of Network Connection Test does not always guarantee the connection...
Your internet service provider should have provided these to highlight DNS Setup, and press . Manual setup: 1 From the PREFERENCES menu, highlight Network Setup and press . OK 3 Press B or b to you. OK 4 Highlight Auto Setup, and then press C or c to select ... Network Connection Test: Press EXIT while searching for the Dual Band WLAN Adapter, if one is set to On. OK 2 Press B or b to Off, and manually set the DNS address(es). Chapter 8: Advanced features DNS Setup Note: When the DHCP function of Network Connection Test does not always guarantee the connection...
User Manual
Page 70
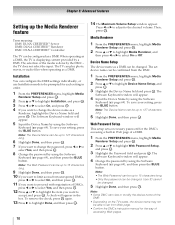
... button. page 69), and then press the BLUE button. OK 10 If you want to limit access from Web page. • Confirm the DMCs instruction manual for the way of the DMR. • Depending on the TV's state, the device name may not be changed . Device Name Setup The device name...
... button. page 69), and then press the BLUE button. OK 10 If you want to limit access from Web page. • Confirm the DMCs instruction manual for the way of the DMR. • Depending on the TV's state, the device name may not be changed . Device Name Setup The device name...
User Manual
Page 76
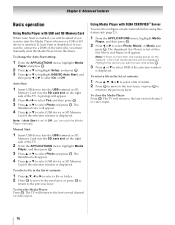
... b to highlight USB/SD Auto Start, and then press C or c to select Photo and press OK . A prompt will appear. 4 Press B or b to the previous layer. Manual Start: 1 Insert USB device into the USB terminal or SD Memory Card into the SD card slot on the network, a list of contents: 1 Press B, b, C or... and press OK . To change the Auto Start setting: 1 From the APPLICATIONS menu, highlight Media Player and press . OK 2 Press B or b to Off, you must manually start the Media Player...
... b to highlight USB/SD Auto Start, and then press C or c to select Photo and press OK . A prompt will appear. 4 Press B or b to the previous layer. Manual Start: 1 Insert USB device into the USB terminal or SD Memory Card into the SD card slot on the network, a list of contents: 1 Press B, b, C or... and press OK . To change the Auto Start setting: 1 From the APPLICATIONS menu, highlight Media Player and press . OK 2 Press B or b to Off, you must manually start the Media Player...
User Manual
Page 83
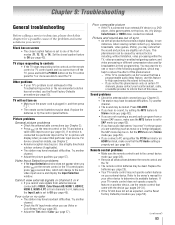
... hear no device is set -top box, etc.) try the control panel buttons. Chapter 2). • The station may have broadcast difficulties. Refer to the owner's manual for your local broadcast, cable, or satellite provider to the correct device mode (- page 45). Poor color or no picture will change to one or...
... hear no device is set -top box, etc.) try the control panel buttons. Chapter 2). • The station may have broadcast difficulties. Refer to the owner's manual for your local broadcast, cable, or satellite provider to the correct device mode (- page 45). Poor color or no picture will change to one or...

User Manual
Page 84
...system only (- No network connection • The LAN cables are not connected properly or at all . Network Setup fails (Manual) • The TV IP address is available for Internet service issues. Connect all cables (- If you previously stored will .... • Internet service is not available, a black rectangle may not operate properly. • Read the instruction manual furnished with netmask 255.255.255.0, then they are used . • When the connected REGZA-LINK device does ... • Confirm your modem's operation. • Make sure your ISP for Toshiba REGZA-
...system only (- No network connection • The LAN cables are not connected properly or at all . Network Setup fails (Manual) • The TV IP address is available for Internet service issues. Connect all cables (- If you previously stored will .... • Internet service is not available, a black rectangle may not operate properly. • Read the instruction manual furnished with netmask 255.255.255.0, then they are used . • When the connected REGZA-LINK device does ... • Confirm your modem's operation. • Make sure your ISP for Toshiba REGZA-
User Manual
Page 85
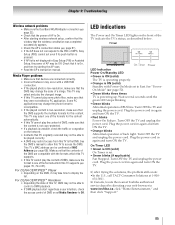
...to control a DMR playback. • If DMR playback start regardless a user intention, check the access control of DMS or set Media Renderer to www.toshiba.ca; TV front On Timer Power LED Indication Power On/Standby LED • Green is ON (solid) The TV is operating properly. • ...On Timer LED • Green is ON (solid) On Timer is On. • After starting the AP scan. • Read the AP's instruction manual. Turn OFF the TV and unplug the power cord. Chapter 9: Troubleshooting Wireless network problems • Make sure the Dual Band WLAN Adapter connection (page 22...
...to control a DMR playback. • If DMR playback start regardless a user intention, check the access control of DMS or set Media Renderer to www.toshiba.ca; TV front On Timer Power LED Indication Power On/Standby LED • Green is ON (solid) The TV is operating properly. • ...On Timer LED • Green is ON (solid) On Timer is On. • After starting the AP scan. • Read the AP's instruction manual. Turn OFF the TV and unplug the power cord. Chapter 9: Troubleshooting Wireless network problems • Make sure the Dual Band WLAN Adapter connection (page 22...
User Manual
Page 87
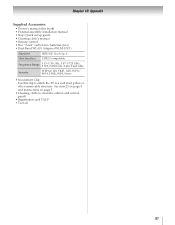
... • Cleaning cloth (to clean the cabinet and control panel) • Registration card TACP • Tool set up guide • Cleaning cloth's manual • Remote control • Size "AAA" carbon zinc batteries (two) • Dual Band WLAN Adapter (WLM-10U1) Standard IEEE 802.11a/b/g/n ..., TKIP, AES, WPA/ WPA2-PSK, WPS, None • Securement Clip Use this book) • Pedestal assembly installation manual • Stop/Quick set 87 Chapter 10: Appendix Supplied Accessories • Owner's manual (this clip to attach the TV to a wall stud, pillar, or other immovable structure.
... • Cleaning cloth (to clean the cabinet and control panel) • Registration card TACP • Tool set up guide • Cleaning cloth's manual • Remote control • Size "AAA" carbon zinc batteries (two) • Dual Band WLAN Adapter (WLM-10U1) Standard IEEE 802.11a/b/g/n ..., TKIP, AES, WPA/ WPA2-PSK, WPS, None • Securement Clip Use this book) • Pedestal assembly installation manual • Stop/Quick set 87 Chapter 10: Appendix Supplied Accessories • Owner's manual (this clip to attach the TV to a wall stud, pillar, or other immovable structure.


