Printable Spec Sheet
Page 2
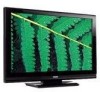
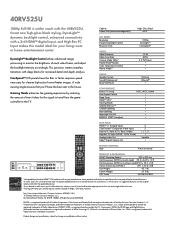
... television. 4Viewing 24 frames per second requires content created in . 49.1 x 30.6 x 8.8 Unit Weight 42.1 lbs Carton Weight 50.3 lbs UPC Code 022265001899 1Compatibility with the 40RV525U. This precision creates seamless transitions with deep blacks for the size and weight of Dolby Laboratories. Cabinet Screen Size (measured diagonally) LCD PANEL: Resolution Dynamic Backlight Control Response Time VIDEO: Video Processor Video Scan Rate Cinema Mode 24fps4 TheaterWide® Modes Color Temperature Control Native ModeTM AUDIO: Speaker...
... television. 4Viewing 24 frames per second requires content created in . 49.1 x 30.6 x 8.8 Unit Weight 42.1 lbs Carton Weight 50.3 lbs UPC Code 022265001899 1Compatibility with the 40RV525U. This precision creates seamless transitions with deep blacks for the size and weight of Dolby Laboratories. Cabinet Screen Size (measured diagonally) LCD PANEL: Resolution Dynamic Backlight Control Response Time VIDEO: Video Processor Video Scan Rate Cinema Mode 24fps4 TheaterWide® Modes Color Temperature Control Native ModeTM AUDIO: Speaker...
Owner's Manual - English
Page 2
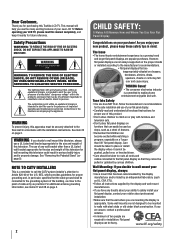
... operating your purchase! WARNING: TO REDUCE THE RISK OF ELECTRIC SHOCK, DO NOT REMOVE COVER (OR BACK). NO USER-SERVICEABLE PARTS INSIDE. NOTE TO CATV INSTALLERS This is a growing trend and larger flat panel displays are inappropriately situated on your LCD TV, please read this television, always use a UL Listed wall bracket appropriate for the size and weight of two people are mounting the display is intended to alert the user...
... operating your purchase! WARNING: TO REDUCE THE RISK OF ELECTRIC SHOCK, DO NOT REMOVE COVER (OR BACK). NO USER-SERVICEABLE PARTS INSIDE. NOTE TO CATV INSTALLERS This is a growing trend and larger flat panel displays are inappropriately situated on your LCD TV, please read this television, always use a UL Listed wall bracket appropriate for the size and weight of two people are mounting the display is intended to alert the user...

Owner's Manual - English
Page 3
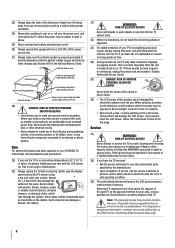
... TV: • on the rear of the obsolete outlet. 10) Protect the power cord from the damaged television. or • in cabinet, or any way, such as power-supply cord or plug is used, use attachments/accessories specified by the manufacturer. 12) Use only with the cart, stand, tripod, bracket, or table specified by broken glass, rinse the affected area thoroughly with poor ventilation. The LCD panel...
... TV: • on the rear of the obsolete outlet. 10) Protect the power cord from the damaged television. or • in cabinet, or any way, such as power-supply cord or plug is used, use attachments/accessories specified by the manufacturer. 12) Use only with the cart, stand, tripod, bracket, or table specified by broken glass, rinse the affected area thoroughly with poor ventilation. The LCD panel...
Owner's Manual - English
Page 4
... or abuse. 25) Never overload wall outlets and extension cords. 26) Always operate this manual to a Toshiba Authorized Service Center. 38) If you to dangerous voltage or other electrical circuits. • Never attempt to install any of the following during lightning activity: a) an antenna system; Opening and removing the covers may vary until the LCD warms up static charges (see...
... or abuse. 25) Never overload wall outlets and extension cords. 26) Always operate this manual to a Toshiba Authorized Service Center. 38) If you to dangerous voltage or other electrical circuits. • Never attempt to install any of the following during lightning activity: a) an antenna system; Opening and removing the covers may vary until the LCD warms up static charges (see...

Owner's Manual - English
Page 5
... the surface. Before proceeding, make sure the appropriate bracket(s) are required for your LCD TV To Display your LCD TV on a flat, cushioned surface such as a quilt or blanket. Choosing a location for installation. 2) Unplug and remove any cables and/or other component connectors from the rear of the TV. 3) Remove the screws of the VESA Mounting Pattern show in mm) Removing the Pedestal Stand 1) Carefully lay the front of the unit...
... the surface. Before proceeding, make sure the appropriate bracket(s) are required for your LCD TV To Display your LCD TV on a flat, cushioned surface such as a quilt or blanket. Choosing a location for installation. 2) Unplug and remove any cables and/or other component connectors from the rear of the TV. 3) Remove the screws of the VESA Mounting Pattern show in mm) Removing the Pedestal Stand 1) Carefully lay the front of the unit...

Owner's Manual - English
Page 7
... Remote control codes 26 Chapter 4: Menu layout and navigation 28 Main menu layout 28 Setup/Installation menu layout 29 Navigating the menu system 29 Chapter 5: Setting up your TV 30 Selecting the menu language 30 TOSHIBA Logo LED 30 Configuring the antenna input source for the ANT/CABLE terminal 30 Programming channels into the TV's channel memory ........31 Programming channels automatically 31 Manually adding and deleting channels in the channel memory 31 Labeling channels 32 Setting the HDMI™ audio mode 33 Viewing...
... Remote control codes 26 Chapter 4: Menu layout and navigation 28 Main menu layout 28 Setup/Installation menu layout 29 Navigating the menu system 29 Chapter 5: Setting up your TV 30 Selecting the menu language 30 TOSHIBA Logo LED 30 Configuring the antenna input source for the ANT/CABLE terminal 30 Programming channels into the TV's channel memory ........31 Programming channels automatically 31 Manually adding and deleting channels in the channel memory 31 Labeling channels 32 Setting the HDMI™ audio mode 33 Viewing...
Owner's Manual - English
Page 9
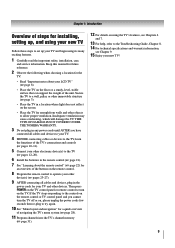
... your LCD TV" ( page 6). • Place the TV on the remote control. 8 Program the remote control to allow proper ventilation. If the TV stops responding to the controls on the remote control or TV control panel and you have connected all cables and devices, plug in the power cords for your TV and other electronic device(s) to the TV ( pages 12-20). 6 Install the batteries in a location where light does not reflect on the screen. •...
... your LCD TV" ( page 6). • Place the TV on the remote control. 8 Program the remote control to allow proper ventilation. If the TV stops responding to the controls on the remote control or TV control panel and you have connected all cables and devices, plug in the power cords for your TV and other electronic device(s) to the TV ( pages 12-20). 6 Install the batteries in a location where light does not reflect on the screen. •...
Owner's Manual - English
Page 11
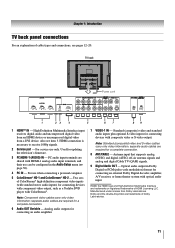
... PC/HDMI-1 (AUDIO) IN - Optical audio output in the Audio Setup menu ( page 50). 4 PC IN - Antenna input that supports analog (NTSC) and digital (ATSC) off-air antenna signals and analog and digital Cable TV (QAM) signals. 9 Digital Audio OUT - For service use only. Note: Standard (composite) video and S-video cables carry only video information; Chapter 1: Introduction TV back panel connections For an explanation of ColorStream® high-definition component video inputs (with standard stereo audio inputs) for connecting devices with component video output, such as a Toshiba DVD player...
... PC/HDMI-1 (AUDIO) IN - Optical audio output in the Audio Setup menu ( page 50). 4 PC IN - Antenna input that supports analog (NTSC) and digital (ATSC) off-air antenna signals and analog and digital Cable TV (QAM) signals. 9 Digital Audio OUT - For service use only. Note: Standard (composite) video and S-video cables carry only video information; Chapter 1: Introduction TV back panel connections For an explanation of ColorStream® high-definition component video inputs (with standard stereo audio inputs) for connecting devices with component video output, such as a Toshiba DVD player...
Owner's Manual - English
Page 12
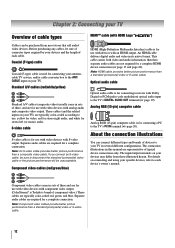
... video devices with component video output. (ColorStream® is Toshiba's brand of component video.) These cables are typically color-coded according to use with devices with Dolby Digital or PCM (pulse-code modulation) optical audio input to each cable. Note: An S-video cable provides better picture performance than a standard (composite) video or S-video cable. The input/output terminals on connecting and using your devices and the length of each device's owner's manual. These cables (and the related inputs on your TV in sets...
... video devices with component video output. (ColorStream® is Toshiba's brand of component video.) These cables are typically color-coded according to use with devices with Dolby Digital or PCM (pulse-code modulation) optical audio input to each cable. Note: An S-video cable provides better picture performance than a standard (composite) video or S-video cable. The input/output terminals on connecting and using your devices and the length of each device's owner's manual. These cables (and the related inputs on your TV in sets...

Owner's Manual - English
Page 14
... program the TV remote control to operate other countries, and may not be unacceptable. • standard audio cables − If you to civil and criminal liability. 14 Select the ANT/CABLE video input source on the TV.* Tune the TV to channel 3 or 4 (whichever channel the Cable box output is prohibited under the Copyright Laws of video cable to program or access certain features on the remote control ( page 22). To view basic and premium Cable channels: Turn...
... program the TV remote control to operate other countries, and may not be unacceptable. • standard audio cables − If you to civil and criminal liability. 14 Select the ANT/CABLE video input source on the TV.* Tune the TV to channel 3 or 4 (whichever channel the Cable box output is prohibited under the Copyright Laws of video cable to program or access certain features on the remote control ( page 22). To view basic and premium Cable channels: Turn...

Owner's Manual - English
Page 20
... HDMI cable (type A connector). Separate analog cables are shared with the HDMI-1 analog audio input terminals ( page 50). • Some PC models cannot be displayed correctly. • To display the optimum picture, use an analog RGB (15-pin) computer cable and a PC audio cable. Chapter 2: Connecting your computer's display on the TV and hear the sound from the TV's speakers. If connecting a PC with a compatible mini D-sub15-pin terminal. • Depending on which you are playing the DVD-Video...
... HDMI cable (type A connector). Separate analog cables are shared with the HDMI-1 analog audio input terminals ( page 50). • Some PC models cannot be displayed correctly. • To display the optimum picture, use an analog RGB (15-pin) computer cable and a PC audio cable. Chapter 2: Connecting your computer's display on the TV and hear the sound from the TV's speakers. If connecting a PC with a compatible mini D-sub15-pin terminal. • Depending on which you are playing the DVD-Video...
Owner's Manual - English
Page 28
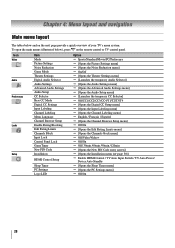
... menus (illustrated below and on the remote control or TV control panel. Icon Video Audio Preferences Locks Setup Item Mode Picture Settings Noise Reduction Game Mode Theater Settings Digital Audio Selector Audio Settings Advanced Audio Settings Audio Setup CC Selector Base CC Mode Digital CC Settings Input Labeling Channel Labeling Menu Language Channel Browser Setup Enable Rating Blocking Edit Rating Limits Channels Block Input Lock Control Panel Lock GameTimer New PIN Code Installation HDMI Control Setup Sleep Timer PC Settings Logo LED Option p Sports/Standard/Movie/PC/Preference...
... menus (illustrated below and on the remote control or TV control panel. Icon Video Audio Preferences Locks Setup Item Mode Picture Settings Noise Reduction Game Mode Theater Settings Digital Audio Selector Audio Settings Advanced Audio Settings Audio Setup CC Selector Base CC Mode Digital CC Settings Input Labeling Channel Labeling Menu Language Channel Browser Setup Enable Rating Blocking Edit Rating Limits Channels Block Input Lock Control Panel Lock GameTimer New PIN Code Installation HDMI Control Setup Sleep Timer PC Settings Logo LED Option p Sports/Standard/Movie/PC/Preference...
Owner's Manual - English
Page 29
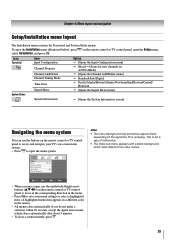
... the Signal Meter menu] p [Opens the System Information screen] Navigating the menu system You can use the up/down/left/right arrow buttons (STWX) on the remote control or TV control panel, open the Setup menu, select Installation, and press . Note: • The menu background may sometimes appear black, depending on -screen menu system. • Press to save your TV's on the signal the TV is receiving. Video Mode Picture Settings Noise Reduction Game Mode Theater Settings Sports Off...
... the Signal Meter menu] p [Opens the System Information screen] Navigating the menu system You can use the up/down/left/right arrow buttons (STWX) on the remote control or TV control panel, open the Setup menu, select Installation, and press . Note: • The menu background may sometimes appear black, depending on -screen menu system. • Press to save your TV's on the signal the TV is receiving. Video Mode Picture Settings Noise Reduction Game Mode Theater Settings Sports Off...

Owner's Manual - English
Page 30
... the ANT/CABLE input on -screen display of Installation menu icons will appear, as shown below.) Open the Terrestrial menu, highlight Input Configuration, and press . To revert to select either On or Off. 1 Press and open the Setup menu. 2 Highlight Installation and press . Installation Terrestrial Input Configuration Channel Program Channel Add/Delete Channel Tuning Mode Auto Time Zone Signal Meter 4 Press W or X to close the Preferences menu. Setup Installation HDMI Control Setup Sleep Timer PC Settings Logo LED Off 3 (A new set of menus...
... the ANT/CABLE input on -screen display of Installation menu icons will appear, as shown below.) Open the Terrestrial menu, highlight Input Configuration, and press . To revert to select either On or Off. 1 Press and open the Setup menu. 2 Highlight Installation and press . Installation Terrestrial Input Configuration Channel Program Channel Add/Delete Channel Tuning Mode Auto Time Zone Signal Meter 4 Press W or X to close the Preferences menu. Setup Installation HDMI Control Setup Sleep Timer PC Settings Logo LED Off 3 (A new set of menus...
Owner's Manual - English
Page 31
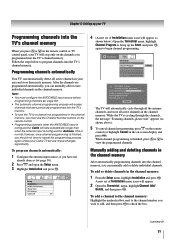
... use the Channel Number buttons on the channels you can manually add or erase individual channels in the channel memory: 1 From the Setup menu, highlight Installation and press . To program channels automatically: 1 Configure the antenna input source, if you have to a channel not programmed in your TV will automatically cycle through the channels, the message "Scanning channels, please wait" appears (as shown below to begin channel programming. The TV will stop only on the remote control. • Programming channels...
... use the Channel Number buttons on the channels you can manually add or erase individual channels in the channel memory: 1 From the Setup menu, highlight Installation and press . To program channels automatically: 1 Configure the antenna input source, if you have to a channel not programmed in your TV will automatically cycle through the channels, the message "Scanning channels, please wait" appears (as shown below to begin channel programming. The TV will stop only on the remote control. • Programming channels...
Owner's Manual - English
Page 33
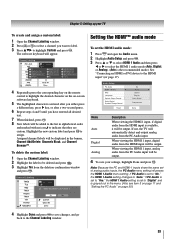
... page 11 and "Setting the PC Audio" on -screen software keyboard. 5 The highlighted character is the recommended mode.) See "Connecting an HDMI or DVI device to "Auto." Audio Setup PC Audio HDMI 1 Audio MTS Language Optical Output Format Dolby Digital Dynamic Range Control Reset No Auto Stereo English Dolby Digital Compressed Done Mode Auto Digital Analog Description When viewing the HDMI 1 input, if digital audio from the PC Audio input will appear. 4 Repeatedly press the corresponding key on the remote control to highlight the...
... page 11 and "Setting the PC Audio" on -screen software keyboard. 5 The highlighted character is the recommended mode.) See "Connecting an HDMI or DVI device to "Auto." Audio Setup PC Audio HDMI 1 Audio MTS Language Optical Output Format Dolby Digital Dynamic Range Control Reset No Auto Stereo English Dolby Digital Compressed Done Mode Auto Digital Analog Description When viewing the HDMI 1 input, if digital audio from the PC Audio input will appear. 4 Repeatedly press the corresponding key on the remote control to highlight the...
Owner's Manual - English
Page 50
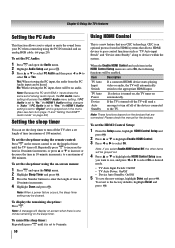
... Sleep Timer and press . 3 Press the Number buttons to On, the following functions will display on-screen when there is an optional protocol used in HDMI systems that are set the HDMI Control Setup: 1 From the Setup menu, highlight HDMI Control Setup and press . 2 Press S or T to highlight Enable HDMI Control. 3 Press W or X to the factory defaults, highlight Reset and press . TV Auto If a device is a new feature that uses CEC technology. Please check the manual...
... Sleep Timer and press . 3 Press the Number buttons to On, the following functions will display on-screen when there is an optional protocol used in HDMI systems that are set the HDMI Control Setup: 1 From the Setup menu, highlight HDMI Control Setup and press . 2 Press S or T to highlight Enable HDMI Control. 3 Press W or X to the factory defaults, highlight Reset and press . TV Auto If a device is a new feature that uses CEC technology. Please check the manual...
Owner's Manual - English
Page 55
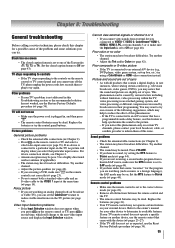
... using a ColorStream or HDMI video connection instead. Remote control problems • Make sure the remote control is plugged in this Troubleshooting section or the recommended solution has not worked, use this feature to help to inform them of this issue. TV stops responding to controls • If the TV stops responding to the controls on certain TV channels, please contact your TV remote control does not operate a specific feature on • Make sure the power cord is set -top box...
... using a ColorStream or HDMI video connection instead. Remote control problems • Make sure the remote control is plugged in this Troubleshooting section or the recommended solution has not worked, use this feature to help to inform them of this issue. TV stops responding to controls • If the TV stops responding to the controls on certain TV channels, please contact your TV remote control does not operate a specific feature on • Make sure the power cord is set -top box...
Owner's Manual - English
Page 59
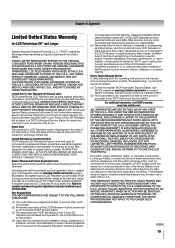
... Responsibility THE ABOVE WARRANTIES ARE SUBJECT TO THE FOLLOWING CONDITIONS: (1) You must be taken to a TACP Authorized Service Station for repair and returned to change, modify, or extend the terms of this manual and reviewing the section entitled "Troubleshooting," you find that are sold and used for set installation, setup, adjustment of customer controls, and installation or repair of this LCD Television must retain your original...
... Responsibility THE ABOVE WARRANTIES ARE SUBJECT TO THE FOLLOWING CONDITIONS: (1) You must be taken to a TACP Authorized Service Station for repair and returned to change, modify, or extend the terms of this manual and reviewing the section entitled "Troubleshooting," you find that are sold and used for set installation, setup, adjustment of customer controls, and installation or repair of this LCD Television must retain your original...
Owner's Manual - English
Page 61
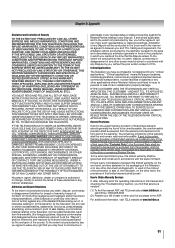
..., POINT OF SALE DISPLAY, ETC.). THIS WARRANTY WILL NOT COVER ANY SERVICE THAT IS REQUIRED, IN PART OR IN WHOLE, AS A RESULT OF ANY FAILURE TO FOLLOW THE SET-UP AND USAGE INSTRUCTIONS. "Critical applications" means life support systems, medical applications, connections to implanted medical devices... any "critical applications." How to Obtain Warranty Services If, after following all of the operating instructions in respect of the warranty. YOU MUST READ AND FOLLOW ALL SET-UP AND USAGE INSTRUCTIONS IN THE APPLICABLE USER GUIDES AND/OR MANUALS. To the extent permitted by law, ...
..., POINT OF SALE DISPLAY, ETC.). THIS WARRANTY WILL NOT COVER ANY SERVICE THAT IS REQUIRED, IN PART OR IN WHOLE, AS A RESULT OF ANY FAILURE TO FOLLOW THE SET-UP AND USAGE INSTRUCTIONS. "Critical applications" means life support systems, medical applications, connections to implanted medical devices... any "critical applications." How to Obtain Warranty Services If, after following all of the operating instructions in respect of the warranty. YOU MUST READ AND FOLLOW ALL SET-UP AND USAGE INSTRUCTIONS IN THE APPLICABLE USER GUIDES AND/OR MANUALS. To the extent permitted by law, ...


