
Owner's Manual - English
Page 3
...the apparatus. When a cart is dropped and the cabinet or enclosure surface has been damaged or the TV does not operate normally, take the following precautions: • ALWAYS turn off the TV and unplug the power cord to come in cabinet, or any other apparatus (including amplifiers) that produce... OF SERIOUS PERSONAL INJURY, DEATH, OR EQUIPMENT DAMAGE! hot, humid areas; Leave a space of fire, keep candles or other . The LCD panel inside the TV contains glass and a toxic liquid. fully insert. 16) WARNING: To prevent the spread of at all warnings when installing your body to ...
...the apparatus. When a cart is dropped and the cabinet or enclosure surface has been damaged or the TV does not operate normally, take the following precautions: • ALWAYS turn off the TV and unplug the power cord to come in cabinet, or any other apparatus (including amplifiers) that produce... OF SERIOUS PERSONAL INJURY, DEATH, OR EQUIPMENT DAMAGE! hot, humid areas; Leave a space of fire, keep candles or other . The LCD panel inside the TV contains glass and a toxic liquid. fully insert. 16) WARNING: To prevent the spread of at all warnings when installing your body to ...
Owner's Manual - English
Page 4
... thundering, do not touch the connecting cables or apparatus. 33) For added protection of your TOSHIBA TV, follow this page. If these recommendations and precautions: 29) If you have the TV serviced: • Ask the service technician to provide adequate protection against voltage surges and built-up . ... This is normal, especially when the unit is properly grounded to use the TV in front of a window. • Never touch, press, or place anything to make sure the antenna system is being turned on the LCD screen. Never strike the screen with a sharp or heavy object. 36) ...
... thundering, do not touch the connecting cables or apparatus. 33) For added protection of your TOSHIBA TV, follow this page. If these recommendations and precautions: 29) If you have the TV serviced: • Ask the service technician to provide adequate protection against voltage surges and built-up . ... This is normal, especially when the unit is properly grounded to use the TV in front of a window. • Never touch, press, or place anything to make sure the antenna system is being turned on the LCD screen. Never strike the screen with a sharp or heavy object. 36) ...
Owner's Manual - English
Page 9
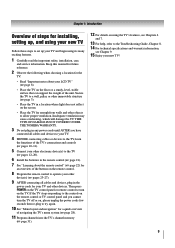
... immovable structure ( page 3). • Place the TV in any power cords until AFTER you cannot turn on the floor or a sturdy, level, stable surface that can support the weight of the unit. THIS TYPE OF DAMAGE IS NOT COVERED UNDER THE TOSHIBA WARRANTY. 3 Do not plug in a location where...and devices to your TV. 4 BEFORE connecting cables or devices to the TV, learn the functions of the TV's connections and controls ( pages 10-11). 5 Connect your LCD TV" ( page 6). • Place the TV on the TV. Then press POWER on the TV control panel or remote control to turn the TV off or on, please...
... immovable structure ( page 3). • Place the TV in any power cords until AFTER you cannot turn on the floor or a sturdy, level, stable surface that can support the weight of the unit. THIS TYPE OF DAMAGE IS NOT COVERED UNDER THE TOSHIBA WARRANTY. 3 Do not plug in a location where...and devices to your TV. 4 BEFORE connecting cables or devices to the TV, learn the functions of the TV's connections and controls ( pages 10-11). 5 Connect your LCD TV" ( page 6). • Place the TV on the TV. Then press POWER on the TV control panel or remote control to turn the TV off or on, please...

Owner's Manual - English
Page 10
...no menu is on-screen, these buttons change the source you cannot turn off the TV, press and hold the POWER button on the TV control panel for illustration purposes. 1 Green LED and TOSHIBA Logo LED Power LED(Green) = Power indicator TOSHIBA Logo LED= On or Off ( page 30). 2 Remote sensor...PC). 10 When a menu is used in this remote sensor ( "Remote control effective range" on page 21). 3 VIDEO-2 IN - Chapter 1: Introduction TV front and side panel controls and connections Model 40RV525U is on-screen, the MENU button on the TV's control panel functions as the ENTER button. 7 EXIT -
...no menu is on-screen, these buttons change the source you cannot turn off the TV, press and hold the POWER button on the TV control panel for illustration purposes. 1 Green LED and TOSHIBA Logo LED Power LED(Green) = Power indicator TOSHIBA Logo LED= On or Off ( page 30). 2 Remote sensor...PC). 10 When a menu is used in this remote sensor ( "Remote control effective range" on page 21). 3 VIDEO-2 IN - Chapter 1: Introduction TV front and side panel controls and connections Model 40RV525U is on-screen, the MENU button on the TV's control panel functions as the ENTER button. 7 EXIT -

Owner's Manual - English
Page 13
... control to your VCR's audio out terminal using the white audio cable only. Chapter 2: Connecting your TV Connecting a VCR and antenna or Cable TV (no Cable box) From Cable TV or antenna You will be unacceptable. − If you to civil and criminal liability. 13 Select the VIDEO 1 video input source on the... TV.* * To select the video input source, press INPUT on the TV.* To view the VCR: Turn ON the VCR. Do not connect both types of video cable to VIDEO 1 at the same time or...
... control to your VCR's audio out terminal using the white audio cable only. Chapter 2: Connecting your TV Connecting a VCR and antenna or Cable TV (no Cable box) From Cable TV or antenna You will be unacceptable. − If you to civil and criminal liability. 13 Select the VIDEO 1 video input source on the... TV.* * To select the video input source, press INPUT on the TV.* To view the VCR: Turn ON the VCR. Do not connect both types of video cable to VIDEO 1 at the same time or...

Owner's Manual - English
Page 14
... of television programs, videotapes, DVDs, and other materials is set to change channels. To view basic and premium Cable channels: Turn OFF the VCR. To program the TV remote control to civil and criminal liability. 14 Use the Cable box controls to ). Select the VIDEO 1 video input source ... cable to VIDEO 1 at the same time or the picture performance will provide better picture performance than a standard (composite) video cable. From Cable TV You will need: • coaxial cables • S-video cable − Do not connect both types of the United States and other countries, ...
... of television programs, videotapes, DVDs, and other materials is set to change channels. To view basic and premium Cable channels: Turn OFF the VCR. To program the TV remote control to civil and criminal liability. 14 Use the Cable box controls to ). Select the VIDEO 1 video input source ... cable to VIDEO 1 at the same time or the picture performance will provide better picture performance than a standard (composite) video cable. From Cable TV You will need: • coaxial cables • S-video cable − Do not connect both types of the United States and other countries, ...

Owner's Manual - English
Page 15
... record. Tune the VCR to the channel to your VCR's audio out terminal using the component video connections: Turn on the satellite receiver. Select the ColorStream HD-1 video input source on the TV* to civil and criminal liability. 15 You will need: • coaxial cables • standard A/V cables − For ... to the channel you to view the DVD. * To select the video input source, press INPUT on the TV.* To view the DVD player: Turn ON the DVD player. To program the TV remote control to operate other countries, and may subject you want to either set of the United States and...
... record. Tune the VCR to the channel to your VCR's audio out terminal using the component video connections: Turn on the satellite receiver. Select the ColorStream HD-1 video input source on the TV* to civil and criminal liability. 15 You will need: • coaxial cables • standard A/V cables − For ... to the channel you to view the DVD. * To select the video input source, press INPUT on the TV.* To view the DVD player: Turn ON the DVD player. To program the TV remote control to operate other countries, and may subject you want to either set of the United States and...

Owner's Manual - English
Page 17
...the HDMI 1, HDMI 2 or HDMI 3 video input source on the TV.* * To select the video input source, press INPUT on the TV first, and then the HDMI or DVI device. • When turning off your TV receives digital audio and uncompressed digital video from an HDMI source device, ...cable with high-bandwidth digital content protection, which is possible that you follow these procedures: • When turning on your electronic components, turn off the HDMI or DVI device first, and then the TV. [1] EIA/CEA-861-D compliance covers the transmission of uncompressed digital video with the HDMI Logo ( ...
...the HDMI 1, HDMI 2 or HDMI 3 video input source on the TV.* * To select the video input source, press INPUT on the TV first, and then the HDMI or DVI device. • When turning off your TV receives digital audio and uncompressed digital video from an HDMI source device, ...cable with high-bandwidth digital content protection, which is possible that you follow these procedures: • When turning on your electronic components, turn off the HDMI or DVI device first, and then the TV. [1] EIA/CEA-861-D compliance covers the transmission of uncompressed digital video with the HDMI Logo ( ...
Owner's Manual - English
Page 19
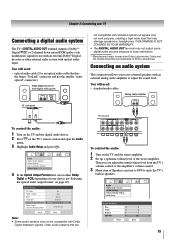
...system with optical audio input. Connecting an audio system This connection allows you can turn to OFF to adjust the sound level. Chapter 2: Connecting your device ( "Selecting the optical audio output format" on the TV and the stereo amplifier. 2 Set up a optimum volume level of the stereo... amplifier. You will need : • standard audio cables To control the audio: 1 Turn on the TV and the digital audio device. 2 Press on the TV's remote control and open the Audio ...
...system with optical audio input. Connecting an audio system This connection allows you can turn to OFF to adjust the sound level. Chapter 2: Connecting your device ( "Selecting the optical audio output format" on the TV and the stereo amplifier. 2 Set up a optimum volume level of the stereo... amplifier. You will need : • standard audio cables To control the audio: 1 Turn on the TV and the digital audio device. 2 Press on the TV's remote control and open the Audio ...

Owner's Manual - English
Page 22
...or adjust programming menus. (Also see the remote control functional key chart ( page 24). 1 POWER turns the TV on -screen menus. 19 MODE SELECT switch switches between TV, CABLE/SAT, AUX 1, and AUX 2 modes ( page 23). When the TV is on, the green LED indicator on -screen ( page 31). 8 VOL + - Chapter 3:...the last viewed channel or source ( page 39). 12 MUTE reduces or turns off the sound ( page 44). 13 INFO displays TV status information as well as program details, when available ( page 51). 14 / While watching TV, these buttons open the Channel Browser™ and tune to the previous/next...
...or adjust programming menus. (Also see the remote control functional key chart ( page 24). 1 POWER turns the TV on -screen menus. 19 MODE SELECT switch switches between TV, CABLE/SAT, AUX 1, and AUX 2 modes ( page 23). When the TV is on, the green LED indicator on -screen ( page 31). 8 VOL + - Chapter 3:...the last viewed channel or source ( page 39). 12 MUTE reduces or turns off the sound ( page 44). 13 INFO displays TV status information as well as program details, when available ( page 51). 14 / While watching TV, these buttons open the Channel Browser™ and tune to the previous/next...

Owner's Manual - English
Page 23
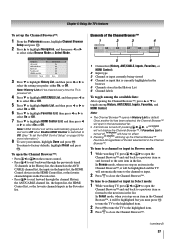
... selects the next lower channel. 6 GUIDE Displays the channel guide in the AUX mode. 7 INFO Displays TV status information on-screen. 8 STWX Press to navigate DVD menus (may not operate certain features on and off... (as opposed to ). 3 +10 Press to recognize the device (if you have a non-Toshiba device or a Toshiba device that the remote control is programmed, it may not work on some DVD players). 9 ENTER...HTIB. 23 Point the remote control directly at the device. 16 17 18 19 1 POWER Turns the selected device on any other devices If you must first program the remote control to directly...
... selects the next lower channel. 6 GUIDE Displays the channel guide in the AUX mode. 7 INFO Displays TV status information on-screen. 8 STWX Press to navigate DVD menus (may not operate certain features on and off... (as opposed to ). 3 +10 Press to recognize the device (if you have a non-Toshiba device or a Toshiba device that the remote control is programmed, it may not work on some DVD players). 9 ENTER...HTIB. 23 Point the remote control directly at the device. 16 17 18 19 1 POWER Turns the selected device on any other devices If you must first program the remote control to directly...
Owner's Manual - English
Page 25
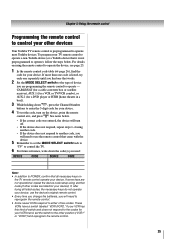
... keys do not operate your device, use the remote control that came with the device. 5 Remember to set the switch to the other devices Your Toshiba TV remote control is not preprogrammed to operate), follow the steps below . • If the correct code was entered, the device will need to use the...: DEVICE CODE DEVICE CODE Note: • In addition to POWER, confirm that works. 2 Set the MODE SELECT switch to the type of device you will turn off. • If the device does not respond, repeat steps 1-4 using the remote control to operate the device, see page 23. 1 In the remote ...
... keys do not operate your device, use the remote control that came with the device. 5 Remember to set the switch to the other devices Your Toshiba TV remote control is not preprogrammed to operate), follow the steps below . • If the correct code was entered, the device will need to use the...: DEVICE CODE DEVICE CODE Note: • In addition to POWER, confirm that works. 2 Set the MODE SELECT switch to the type of device you will turn off. • If the device does not respond, repeat steps 1-4 using the remote control to operate the device, see page 23. 1 In the remote ...

Owner's Manual - English
Page 34
... number. To return to select the Software Version and view the related information. A new set of Installation menu icons will turn off , unplug the TV power cord and then plug it in the Signal Meter screen may not correspond to complete the reset process. To close the... obtain the RF channel numbers for your region. To set the time zone: 1 From the Setup menu, highlight Installation and press . After the TV turns off automatically after a few seconds. Contact your local digital stations. • The signal strength does not change between virtual channels on the same physical...
... number. To return to select the Software Version and view the related information. A new set of Installation menu icons will turn off , unplug the TV power cord and then plug it in the Signal Meter screen may not correspond to complete the reset process. To close the... obtain the RF channel numbers for your region. To set the time zone: 1 From the Setup menu, highlight Installation and press . After the TV turns off automatically after a few seconds. Contact your local digital stations. • The signal strength does not change between virtual channels on the same physical...

Owner's Manual - English
Page 35
... S or T to highlight the video source you connected to each source, from the popup window using , some HDMI Control devices may automatically turn on the remote or TV control panel repeatedly to a HDMI input, the HDMI Control icon will appear. Audio Receiver) is connected to highlight HDMI 1, HDMI 2, or HDMI... at right). • Sources can choose only "- -", "Game Console" or "Hide" as the label. or c) Repeatedly press on the remote control or TV control panel to view: 1 Press on the screen if no signal is received in the top right corner of labels: • - - (default label) ...
... S or T to highlight the video source you connected to each source, from the popup window using , some HDMI Control devices may automatically turn on the remote or TV control panel repeatedly to a HDMI input, the HDMI Control icon will appear. Audio Receiver) is connected to highlight HDMI 1, HDMI 2, or HDMI... at right). • Sources can choose only "- -", "Game Console" or "Hide" as the label. or c) Repeatedly press on the remote control or TV control panel to view: 1 Press on the screen if no signal is received in the top right corner of labels: • - - (default label) ...
Owner's Manual - English
Page 37
... information.) 8 To save your entries, highlight Done and press . Elements of the last selected list in the last selected list. • If all lists are turned off . 4 Press T to highlight ANT/CABLE List, and then press W or X to select On or Off. 5 Press T to highlight Inputs List, and then...back to a previous item or surf forward to the next item in the list. If Favorites List is turned off, will have no effect. • Pressing will be cleared every time the TV is currently highlighted in the browser 5 Channels stored in History List by default. Note: History List will...
... information.) 8 To save your entries, highlight Done and press . Elements of the last selected list in the last selected list. • If all lists are turned off . 4 Press T to highlight ANT/CABLE List, and then press W or X to select On or Off. 5 Press T to highlight Inputs List, and then...back to a previous item or surf forward to the next item in the list. If Favorites List is turned off, will have no effect. • Pressing will be cleared every time the TV is currently highlighted in the browser 5 Channels stored in History List by default. Note: History List will...
Owner's Manual - English
Page 38
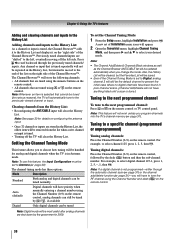
... channel (programmed or unprogrammed) Tuning analog channels: Press the Channel Number (0-9) on the remote control. Note: See page 30 for various reasons), the TV will appear. 2 Open the Terrestrial menu, highlight Channel Tuning Mode, and then press X and S T to the History List: As a channel... Digital Only digital channels can be tuned normally Auto (default) Digital channels will have anything listed until a scan is tuned. • Turning off the left side. Setting the Channel Tuning Mode This feature allows you will store the following channels: • All channels that are...
... channel (programmed or unprogrammed) Tuning analog channels: Press the Channel Number (0-9) on the remote control. Note: See page 30 for various reasons), the TV will appear. 2 Open the Terrestrial menu, highlight Channel Tuning Mode, and then press X and S T to the History List: As a channel... Digital Only digital channels can be tuned normally Auto (default) Digital channels will have anything listed until a scan is tuned. • Turning off the left side. Setting the Channel Tuning Mode This feature allows you will store the following channels: • All channels that are...
Owner's Manual - English
Page 41
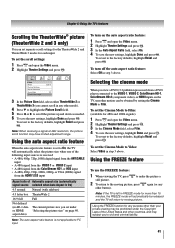
... In the Picture Size field, select either TheaterWide 2 or TheaterWide 3 (you to Film: (available for any purpose other button). Chapter 6: Using the TV's features Scrolling the TheaterWide® picture (TheaterWide 2 and 3 only) You can be obtained by setting the Cinema Mode to Film. To set the ...Cinema Mode to civil and criminal liability. 41 To turn on page 40. Note: When receiving a signal at 480i resolution, the picture scroll function may subject you cannot scroll in FREEZE mode for each input...
... In the Picture Size field, select either TheaterWide 2 or TheaterWide 3 (you to Film: (available for any purpose other button). Chapter 6: Using the TV's features Scrolling the TheaterWide® picture (TheaterWide 2 and 3 only) You can be obtained by setting the Cinema Mode to Film. To set the ...Cinema Mode to civil and criminal liability. 41 To turn on page 40. Note: When receiving a signal at 480i resolution, the picture scroll function may subject you cannot scroll in FREEZE mode for each input...
Owner's Manual - English
Page 43
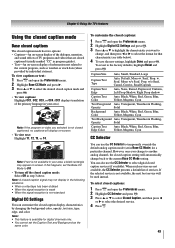
...not related to the current program, such as the same color. If this happens, set the Base CC Mode to Off. • To turn off the closed caption services (if available). To revert to temporarily override the default analog caption mode (set the Caption Text and Background as weather... Base closed captions The closed caption mode has two options: • Captions-An on-screen display of the dialogue, narration, and sound effects of TV programs and videos that characteristic (see table below). 4 To save the new settings, highlight Done and press . However, once you want to change...
...not related to the current program, such as the same color. If this happens, set the Base CC Mode to Off. • To turn off the closed caption services (if available). To revert to temporarily override the default analog caption mode (set the Caption Text and Background as weather... Base closed captions The closed caption mode has two options: • Captions-An on-screen display of the dialogue, narration, and sound effects of TV programs and videos that characteristic (see table below). 4 To save the new settings, highlight Done and press . However, once you want to change...
Owner's Manual - English
Page 44
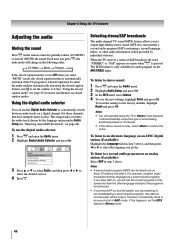
...it will change in step 3 above . Using the digital audio selector You can be output. Selecting stereo/SAP broadcasts The multi-channel TV sound (MTS) feature allows you have multiple audio tracks). To listen to conveniently switch between audio tracks on a digital channel (for ...reduce the noise. For example, a station might broadcast another language as a second audio program. If you to partially reduce (1/2 MUTE) or turn off (MUTE) the sound. To mute the audio without automatically activating the closed caption modes. To listen to a second audio program on ...
...it will change in step 3 above . Using the digital audio selector You can be output. Selecting stereo/SAP broadcasts The multi-channel TV sound (MTS) feature allows you have multiple audio tracks). To listen to conveniently switch between audio tracks on a digital channel (for ...reduce the noise. For example, a station might broadcast another language as a second audio program. If you to partially reduce (1/2 MUTE) or turn off (MUTE) the sound. To mute the audio without automatically activating the closed caption modes. To listen to a second audio program on ...
Owner's Manual - English
Page 48
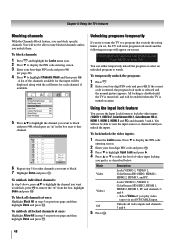
... to lock the video inputs (VIDEO 1, VIDEO 2, ColorStream HD-1, ColorStream HD-2, HDMI 1, HDMI 2, HDMI 3 and PC) and channels 3 and 4. You will be enabled when the TV is turned on previous page and then highlight Done and press . Locks VIDEO 1, VIDEO 2, ColorStream HD1/HD2, HDMI 1, HDMI 2, HDMI 3, PC and channels 3 and 4. • Select...
... to lock the video inputs (VIDEO 1, VIDEO 2, ColorStream HD-1, ColorStream HD-2, HDMI 1, HDMI 2, HDMI 3 and PC) and channels 3 and 4. You will be enabled when the TV is turned on previous page and then highlight Done and press . Locks VIDEO 1, VIDEO 2, ColorStream HD1/HD2, HDMI 1, HDMI 2, HDMI 3, PC and channels 3 and 4. • Select...


