
Owners Manual
Page 2
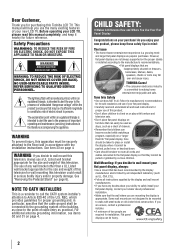
... any wall bracket other than life" flat panel display. Some wall mounts are required for installation. Dear Customer, Thank you for purchasing this television. Before operating your flat panel display. • Carefully read this product. • Don't allow children to climb on or play with furniture and television sets. • Don't place flat panel displays on the proper stands or installed according to walls with the installation instructions. NO USER-SERVICEABLE PARTS INSIDE. However, flat panel displays are not always supported...
... any wall bracket other than life" flat panel display. Some wall mounts are required for installation. Dear Customer, Thank you for purchasing this television. Before operating your flat panel display. • Carefully read this product. • Don't allow children to climb on or play with furniture and television sets. • Don't place flat panel displays on the proper stands or installed according to walls with the installation instructions. NO USER-SERVICEABLE PARTS INSIDE. However, flat panel displays are not always supported...
Owners Manual
Page 4
... the connecting cables or apparatus. 36) For added protection of your TV from lightning and power surges, always unplug the power cord and disconnect the antenna from overheating and to help maintain reliable operation of the TV. Never spray volatile compounds such as insecticide on a bed, sofa, rug, or similar surface; • too close to drapes, curtains, or walls; The...
... the connecting cables or apparatus. 36) For added protection of your TV from lightning and power surges, always unplug the power cord and disconnect the antenna from overheating and to help maintain reliable operation of the TV. Never spray volatile compounds such as insecticide on a bed, sofa, rug, or similar surface; • too close to drapes, curtains, or walls; The...
Owners Manual
Page 5
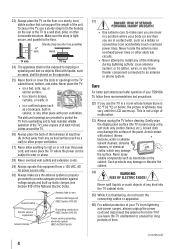
... when the unit is still consumed. 38) During normal use a UL listed wall bracket appropriate for your LCD TV on the included Pedestal Stand: Observe the following safety precautions: 1) Read and Follow the pedestal assembly instructions included with a sharp or heavy object. 40) • The LCD screen of this product can support the weight of the TV. 3) Be sure to secure the...
... when the unit is still consumed. 38) During normal use a UL listed wall bracket appropriate for your LCD TV on the included Pedestal Stand: Observe the following safety precautions: 1) Read and Follow the pedestal assembly instructions included with a sharp or heavy object. 40) • The LCD screen of this product can support the weight of the TV. 3) Be sure to secure the...
Owners Manual
Page 8
... the menu language 29 TOSHIBA Logo LED 29 Configuring the antenna input source for the ANT/CABLE terminal 29 Programming channels into the TV's channel memory..... 30 Programming channels automatically 30 Manually adding and deleting channels in the channel memory 30 Labeling channels 31 Setting the HDMI™ audio mode 32 Viewing the digital signal meter 33 Setting the time zone 33 Viewing the system status 33 Chapter 6: Using the TV's features 34 Selecting the video input source to view 34...
... the menu language 29 TOSHIBA Logo LED 29 Configuring the antenna input source for the ANT/CABLE terminal 29 Programming channels into the TV's channel memory..... 30 Programming channels automatically 30 Manually adding and deleting channels in the channel memory 30 Labeling channels 31 Setting the HDMI™ audio mode 32 Viewing the digital signal meter 33 Setting the time zone 33 Viewing the system status 33 Chapter 6: Using the TV's features 34 Selecting the video input source to view 34...

Owners Manual
Page 11
...). Point the remote control toward this manual for updating the television's firmware. 5無 POWER - Press to reset the TV. 6無 ARROWS pqtu - Press to instantly close an on-screen menu. 9無 CHANNEL pq - These buttons adjust the volume level. 11無 INPUT - Used for illustration purposes. When a menu is onscreen, the MENU button on the TV's control panel functions as "VIDEO 2" and include standard A/V connections. 4無 Service port - The side panel A/V connections are referred to change the channel (programmed channels only; ...
...). Point the remote control toward this manual for updating the television's firmware. 5無 POWER - Press to reset the TV. 6無 ARROWS pqtu - Press to instantly close an on-screen menu. 9無 CHANNEL pq - These buttons adjust the volume level. 11無 INPUT - Used for illustration purposes. When a menu is onscreen, the MENU button on the TV's control panel functions as "VIDEO 2" and include standard A/V connections. 4無 Service port - The side panel A/V connections are referred to change the channel (programmed channels only; ...
Owners Manual
Page 12
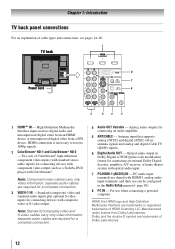
HDMI connection is necessary to receive 1080p signals. 2無 ColorStream® HD-1 and ColorStream® HD-2 - Antenna input that supports analog (NTSC) and digital (ATSC) off-air antenna signals and analog and digital Cable TV (QAM) signals. 6無 Digital Audio OUT - Optical audio output in the Audio Setup menu ( page 50). 8無 PC IN - Dolby and the double-D symbol are trademarks or registered trademarks of Dolby Laboratories. 12 Note: Standard (composite) video and S-video cables carry...
HDMI connection is necessary to receive 1080p signals. 2無 ColorStream® HD-1 and ColorStream® HD-2 - Antenna input that supports analog (NTSC) and digital (ATSC) off-air antenna signals and analog and digital Cable TV (QAM) signals. 6無 Digital Audio OUT - Optical audio output in the Audio Setup menu ( page 50). 8無 PC IN - Dolby and the double-D symbol are trademarks or registered trademarks of Dolby Laboratories. 12 Note: Standard (composite) video and S-video cables carry...
Owners Manual
Page 13
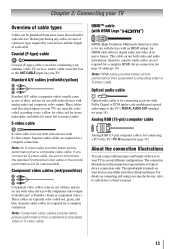
... antenna, cable TV service, and/or cable converter box to the TV's DIGITAL AUDIO OUT terminal ( page 18). The input/output terminals on connecting and using your specific devices, refer to each cable. Coaxial (F-type) cable Coaxial (F-type) cable is used for use with video devices with analog audio and composite video output. Note: Component video cables provide better picture performance than a standard (composite) video or S-video cable. Note: HDMI cable provides better picture performance than a standard (composite) video or S-video cable. S-video cable...
... antenna, cable TV service, and/or cable converter box to the TV's DIGITAL AUDIO OUT terminal ( page 18). The input/output terminals on connecting and using your specific devices, refer to each cable. Coaxial (F-type) cable Coaxial (F-type) cable is used for use with video devices with analog audio and composite video output. Note: Component video cables provide better picture performance than a standard (composite) video or S-video cable. Note: HDMI cable provides better picture performance than a standard (composite) video or S-video cable. S-video cable...
Owners Manual
Page 14
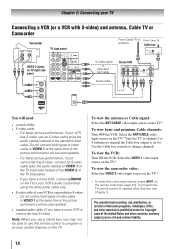
To view the antenna or Cable signal: Select the ANT/CABLE video input source on the TV. To view the VCR: Turn ON the VCR. To program the TV remote control to change channels. Do not connect both types of video cable to VIDEO 1 at the same time or the picture performance will need: • coaxial cables • S-video cable −− For better picture performance, if your VCR has S-video, use an S-video cable (plus the audio cables) to VIDEO 1 on the TV back...
To view the antenna or Cable signal: Select the ANT/CABLE video input source on the TV. To view the VCR: Turn ON the VCR. To program the TV remote control to change channels. Do not connect both types of video cable to VIDEO 1 at the same time or the picture performance will need: • coaxial cables • S-video cable −− For better picture performance, if your VCR has S-video, use an S-video cable (plus the audio cables) to VIDEO 1 on the TV back...
Owners Manual
Page 16
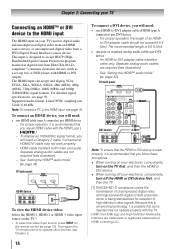
... will need: • one HDMI-to-DVI adapter cable (HDMI type A connector) per HDMI device −− For proper operation, it is designed to the HDMI input The HDMI input on the remote control ( page 21). compliant[1] consumer electronic devices (such as a set-top box or DVD player with the HDMI Logo ( ). −− To display an 1080i/60Hz signal format, you follow these procedures: •• When turning on your electronic components, turn...
... will need: • one HDMI-to-DVI adapter cable (HDMI type A connector) per HDMI device −− For proper operation, it is designed to the HDMI input The HDMI input on the remote control ( page 21). compliant[1] consumer electronic devices (such as a set-top box or DVD player with the HDMI Logo ( ). −− To display an 1080i/60Hz signal format, you follow these procedures: •• When turning on your electronic components, turn...
Owners Manual
Page 18
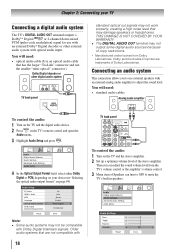
... are not compatible with Dolby Digital bitstream signals. Chapter 2: Connecting your device ("Selecting the optical audio output format" on page 44). You will need : • optical audio cable (Use an optical audio cable that has the larger "TosLink" connector and not the smaller "mini-optical" connector.) Dolby Digital decoder or other external audio system with an external analog audio amplifier to mute the TV's built in speakers. Audio Digital Audio Selector Audio Settings Advanced Audio Settings Audio Setup 4無 In the Optical Output Format field...
... are not compatible with Dolby Digital bitstream signals. Chapter 2: Connecting your device ("Selecting the optical audio output format" on page 44). You will need : • optical audio cable (Use an optical audio cable that has the larger "TosLink" connector and not the smaller "mini-optical" connector.) Dolby Digital decoder or other external audio system with an external analog audio amplifier to mute the TV's built in speakers. Audio Digital Audio Selector Audio Settings Advanced Audio Settings Audio Setup 4無 In the Optical Output Format field...
Owners Manual
Page 19
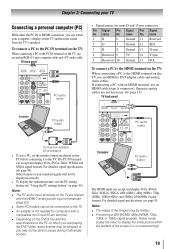
... PC IN or HDMI connection, you can watch your computer's display on the TV, use an analog RGB (15-pin) computer cable and a PC audio cable. Separate analog cables are playing the DVD-Video, some scenes may not be displayed correctly. • To display the optimum picture, use a PC, set the monitor output resolution on page 49). TV back panel PC audio cable • Signal names for computers with an HDMI terminal, use an HDMI cable (type A connector). name Pin...
... PC IN or HDMI connection, you can watch your computer's display on the TV, use an analog RGB (15-pin) computer cable and a PC audio cable. Separate analog cables are playing the DVD-Video, some scenes may not be displayed correctly. • To display the optimum picture, use a PC, set the monitor output resolution on page 49). TV back panel PC audio cable • Signal names for computers with an HDMI terminal, use an HDMI cable (type A connector). name Pin...
Owners Manual
Page 27
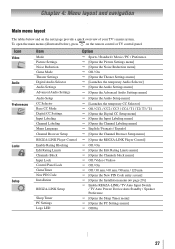
...(illustrated below and on the remote control or TV control panel. Icon Video Audio Preferences Locks Setup Item Mode Picture Settings Noise Reduction Game Mode Theater Settings Digital Audio Selector Audio Settings Advanced Audio Settings Audio Setup CC Selector Base CC Mode Digital CC Settings Input Labeling Channel Labeling Menu Language Channel Browser Setup REGZA-LINK Player Control Enable Rating Blocking Edit Rating Limits Channels Block Input Lock Control Panel Lock GameTimer New PIN Code Installation REGZA-LINK Setup Sleep Timer PC Settings Logo LED Option Sports / Standard...
...(illustrated below and on the remote control or TV control panel. Icon Video Audio Preferences Locks Setup Item Mode Picture Settings Noise Reduction Game Mode Theater Settings Digital Audio Selector Audio Settings Advanced Audio Settings Audio Setup CC Selector Base CC Mode Digital CC Settings Input Labeling Channel Labeling Menu Language Channel Browser Setup REGZA-LINK Player Control Enable Rating Blocking Edit Rating Limits Channels Block Input Lock Control Panel Lock GameTimer New PIN Code Installation REGZA-LINK Setup Sleep Timer PC Settings Logo LED Option Sports / Standard...

Owners Manual
Page 32
... Channel BrowserTM. Setting the HDMI™ audio mode To set to "No," the HDMI 1 Audio setting changes to indicate that they are custom. If not, the TV will be output. If PC Audio is set the HDMI audio mode: 1無 Press and open the Audio menu. 2無 Highlight Audio Setup and press . 3無 Press p or q to select HDMI 1 Audio and then press t or u to select the HDMI 1 audio mode (Auto, Digital, or Analog). (Auto is the recommended mode.) See "Connecting an HDMI...
... Channel BrowserTM. Setting the HDMI™ audio mode To set to "No," the HDMI 1 Audio setting changes to indicate that they are custom. If not, the TV will be output. If PC Audio is set the HDMI audio mode: 1無 Press and open the Audio menu. 2無 Highlight Audio Setup and press . 3無 Press p or q to select HDMI 1 Audio and then press t or u to select the HDMI 1 audio mode (Auto, Digital, or Analog). (Auto is the recommended mode.) See "Connecting an HDMI...
Owners Manual
Page 43
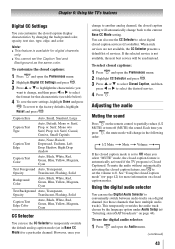
... if the TV program is not available, the next best service will automatically change in Base CC Mode) for more information on the remote control to conveniently switch between audio tracks on page 44). You can use the Digital Audio Selector to partially reduce (1/2 MUTE) or turn off (MUTE) the sound. Using the digital audio selector You can also use the CC Selector to temporarily override the default analog caption mode (set in the...
... if the TV program is not available, the next best service will automatically change in Base CC Mode) for more information on the remote control to conveniently switch between audio tracks on page 44). You can use the Digital Audio Selector to partially reduce (1/2 MUTE) or turn off (MUTE) the sound. Using the digital audio selector You can also use the CC Selector to temporarily override the default analog caption mode (set in the...

Owners Manual
Page 50
... one minute remaining on the input signal format. No: When viewing the PC input, there will display on-screen when there is within ±10 from the TV remote via HDMI connection ( page 17). If PC Audio is set of 180 minutes. To set to "No," the HDMI 1 Audio setting changes to a maximum of analog audio inputs, the PC Audio menu setting influences the HDMI 1 Audio menu setting. To cancel the sleep timer: Repeatedly press until the TV...
... one minute remaining on the input signal format. No: When viewing the PC input, there will display on-screen when there is within ±10 from the TV remote via HDMI connection ( page 17). If PC Audio is set of 180 minutes. To set to "No," the HDMI 1 Audio setting changes to a maximum of analog audio inputs, the PC Audio menu setting influences the HDMI 1 Audio menu setting. To cancel the sleep timer: Repeatedly press until the TV...
Owners Manual
Page 51
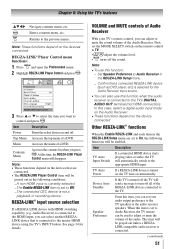
... sound volume of Audio Receiver With your audio output preference to turn off . In this time, the REGZA-LINK Player Control menu will be enabled. Chapter 6: Using the TV's features pqtu Navigate contents menu, etc. Top Menu Accesses the top menu of a DVD. Audio Receiver) is connected to select the item you press . Item Description TV Auto Input Switch If a connected HDMI device starts playing video or audio, the TV will send a message to the TV speakers or the audio receiver speakers...
... sound volume of Audio Receiver With your audio output preference to turn off . In this time, the REGZA-LINK Player Control menu will be enabled. Chapter 6: Using the TV's features pqtu Navigate contents menu, etc. Top Menu Accesses the top menu of a DVD. Audio Receiver) is connected to select the item you press . Item Description TV Auto Input Switch If a connected HDMI device starts playing video or audio, the TV will send a message to the TV speakers or the audio receiver speakers...

Owners Manual
Page 52
... the factory defaults, highlight Reset and press . for over-the-air broadcasts). • Channel number (if in ANT/CABLE mode) • Channel label (if set) • Digital signal strength indicator (bar graph in ANT/CABLE mode only. Understanding the auto power off feature The TV will automatically turn on the Audio Receiver, change its broadcast for the day. The following additional information will display for off and on the remote control. This...
... the factory defaults, highlight Reset and press . for over-the-air broadcasts). • Channel number (if in ANT/CABLE mode) • Channel label (if set) • Digital signal strength indicator (bar graph in ANT/CABLE mode only. Understanding the auto power off feature The TV will automatically turn on the Audio Receiver, change its broadcast for the day. The following additional information will display for off and on the remote control. This...
Owners Manual
Page 56
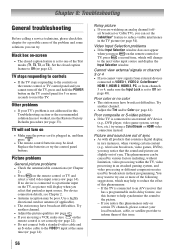
...'s problem is connected to an external A/V device (e.g., DVD player, video game system, set-top box, etc.) try . If no color •• The station may be dead. Picture and sound are slightly out of sync. TV will change to the next video input source and display the Input Selection window. Cannot view external signals or channel 3 or 4 •• If you select that particular input source. If you cannot turn on -screen •• The closed caption feature...
...'s problem is connected to an external A/V device (e.g., DVD player, video game system, set-top box, etc.) try . If no color •• The station may be dead. Picture and sound are slightly out of sync. TV will change to the next video input source and display the Input Selection window. Cannot view external signals or channel 3 or 4 •• If you select that particular input source. If you cannot turn on -screen •• The closed caption feature...
Owners Manual
Page 60
... TO THE DURATION OF THE LIMITED WARRANTIES SET FORTH ABOVE. Rental Units The warranty for set installation, setup, adjustment of customer controls, and installation or repair of the operating instructions in electric power), improper installation, improper maintenance, or use of shipment to the TACP Authorized Service Station. or Puerto Rico. (4) Labor service charges for LCD Television rental units begins on the type of repair required, the service will either be performed in...
... TO THE DURATION OF THE LIMITED WARRANTIES SET FORTH ABOVE. Rental Units The warranty for set installation, setup, adjustment of customer controls, and installation or repair of the operating instructions in electric power), improper installation, improper maintenance, or use of shipment to the TACP Authorized Service Station. or Puerto Rico. (4) Labor service charges for LCD Television rental units begins on the type of repair required, the service will either be performed in...
Owners Manual
Page 62
... TO FOLLOW THE SET-UP AND USAGE INSTRUCTIONS. b. f. IF THE TELEVISION FAILS TO WORK AS WARRANTED ABOVE, YOUR SOLE AND EXCLUSIVE REMEDY SHALL BE REPAIR OR REPLACEMENT OF THE DEFECTIVE PART. Repair of damage that is authorized to change, modify or extend the terms of these warranties in writing by TCL, and service made necessary by use or installation of non-Toshiba modifications to...
... TO FOLLOW THE SET-UP AND USAGE INSTRUCTIONS. b. f. IF THE TELEVISION FAILS TO WORK AS WARRANTED ABOVE, YOUR SOLE AND EXCLUSIVE REMEDY SHALL BE REPAIR OR REPLACEMENT OF THE DEFECTIVE PART. Repair of damage that is authorized to change, modify or extend the terms of these warranties in writing by TCL, and service made necessary by use or installation of non-Toshiba modifications to...


