Printable Spec Sheet
Page 2
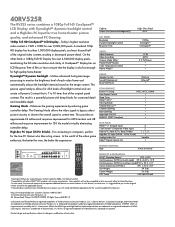
...; Component Video Inputs Front A/V / Rear A/V / Rear S-Video High Res PC Input (S-XGA, 15 Pin, D-sub) Analog Audio Out Dolby® Digital Optical Out 3 2 1 / 1 /1 1 Variable • REMOTE CONTROL: Type 4 Item Universal3 PRODUCT & PACKAGING: VESA® Mounting Pattern4 200 x 200 Unit Dimensions (WHD) in. (with stand) 39.2 x 26.9 x 10.9 Unit Dimensions (WHD) in. (without notice. Some products will vary by reducing game controller delay. Utilizes advanced histogram image processing to wall mount your Toshiba television, always use a UL Listed wall bracket...
...; Component Video Inputs Front A/V / Rear A/V / Rear S-Video High Res PC Input (S-XGA, 15 Pin, D-sub) Analog Audio Out Dolby® Digital Optical Out 3 2 1 / 1 /1 1 Variable • REMOTE CONTROL: Type 4 Item Universal3 PRODUCT & PACKAGING: VESA® Mounting Pattern4 200 x 200 Unit Dimensions (WHD) in. (with stand) 39.2 x 26.9 x 10.9 Unit Dimensions (WHD) in. (without notice. Some products will vary by reducing game controller delay. Utilizes advanced histogram image processing to wall mount your Toshiba television, always use a UL Listed wall bracket...

Owners Manual
Page 2
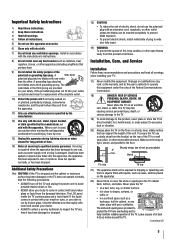
... purchases. Before operating your purchase! NO USER-SERVICEABLE PARTS INSIDE. The lightning flash with furniture and television sets. • Don't place flat panel displays on page 3. WARNING: If you enjoy your new LCD TV. NOTE TO CATV INSTALLERS This is a growing trend and larger flat panel displays are mounting the display is committed to Article 820-40 of the U.S. As you decide to wall mount this television, always use of this Toshiba LCD TV. TOSHIBA Cares! •...
... purchases. Before operating your purchase! NO USER-SERVICEABLE PARTS INSIDE. The lightning flash with furniture and television sets. • Don't place flat panel displays on page 3. WARNING: If you enjoy your new LCD TV. NOTE TO CATV INSTALLERS This is a growing trend and larger flat panel displays are mounting the display is committed to Article 820-40 of the U.S. As you decide to wall mount this television, always use of this Toshiba LCD TV. TOSHIBA Cares! •...
Owners Manual
Page 3
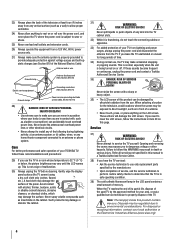
.... • ALWAYS contact a service technician to avoid injury from the damaged television. The slots and openings are provided for replacement of the obsolete outlet. 10) Protect the power cord from being walked on or pinched, particularly at plugs, convenience receptacles, and the point where they exit from the hook(s) on the rear of at all times. When a cart is...
.... • ALWAYS contact a service technician to avoid injury from the damaged television. The slots and openings are provided for replacement of the obsolete outlet. 10) Protect the power cord from being walked on or pinched, particularly at plugs, convenience receptacles, and the point where they exit from the hook(s) on the rear of at all times. When a cart is...
Owners Manual
Page 4
... to rest on the LCD screen. Never spill liquids or push objects of any item you are never in this WARNING may expose you need to install any home theater component connected to service the TV yourself. If these recommendations and precautions: 29) If you leave the TV unattended or unused for the television, avoid locations where the screen may make sure...
... to rest on the LCD screen. Never spill liquids or push objects of any item you are never in this WARNING may expose you need to install any home theater component connected to service the TV yourself. If these recommendations and precautions: 29) If you leave the TV unattended or unused for the television, avoid locations where the screen may make sure...
Owners Manual
Page 5
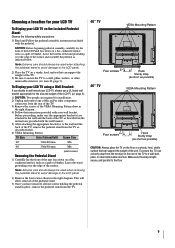
... the following safety precautions: 1) Read and Follow the pedestal assembly instructions included with your wall bracket. Leave the stand protruding over the edge of the TV. 3) Be sure to secure the TV to the floor. 5 Choosing a location for your LCD TV To Display your LCD TV on a flat, cushioned surface such as indicated below . 6) VESA Mounting Pattern TV Size Hole Pattern(VxH) Screw Size 40" 300x400 mm M6 46" 300x500 mm M6 (unit...
... the following safety precautions: 1) Read and Follow the pedestal assembly instructions included with your wall bracket. Leave the stand protruding over the edge of the TV. 3) Be sure to secure the TV to the floor. 5 Choosing a location for your LCD TV To Display your LCD TV on a flat, cushioned surface such as indicated below . 6) VESA Mounting Pattern TV Size Hole Pattern(VxH) Screw Size 40" 300x400 mm M6 46" 300x500 mm M6 (unit...
Owners Manual
Page 7
... Remote control codes 26 Chapter 4: Menu layout and navigation 28 Main menu layout 28 Setup/Installation menu layout 29 Navigating the menu system 29 Chapter 5: Setting up your TV 30 Selecting the menu language 30 TOSHIBA Logo LED 30 Configuring the antenna input source for the ANT/CABLE terminal 30 Programming channels into the TV's channel memory ........31 Programming channels automatically 31 Manually adding and deleting channels in the channel memory 31 Labeling channels 32 Setting the HDMI™ audio mode 33 Viewing...
... Remote control codes 26 Chapter 4: Menu layout and navigation 28 Main menu layout 28 Setup/Installation menu layout 29 Navigating the menu system 29 Chapter 5: Setting up your TV 30 Selecting the menu language 30 TOSHIBA Logo LED 30 Configuring the antenna input source for the ANT/CABLE terminal 30 Programming channels into the TV's channel memory ........31 Programming channels automatically 31 Manually adding and deleting channels in the channel memory 31 Labeling channels 32 Setting the HDMI™ audio mode 33 Viewing...
Owners Manual
Page 9
... safety, installation, care, and service information. Then press POWER on the TV control panel or remote control to set up , and using your new TV Follow these steps to turn the TV off or on, please unplug the power cords few seconds then re-plug to try again. 10 See "Menu layout and navigation" for a quick overview of navigating the TV's menu system ( page 28). 11 Program channels into the TV's channel memory ( page...
... safety, installation, care, and service information. Then press POWER on the TV control panel or remote control to set up , and using your new TV Follow these steps to turn the TV off or on, please unplug the power cords few seconds then re-plug to try again. 10 See "Menu layout and navigation" for a quick overview of navigating the TV's menu system ( page 28). 11 Program channels into the TV's channel memory ( page...
Owners Manual
Page 11
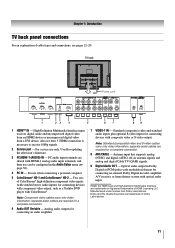
... component video output, such as a Toshiba DVD player with ColorStream®. Analog audio outputs for a complete connection. 6 Audio OUT Variable - Antenna input that supports analog (NTSC) and digital (ATSC) off-air antenna signals and analog and digital Cable TV (QAM) signals. 9 Digital Audio OUT - separate audio cables are shared with HDMI-1 analog audio input terminals, and their use can be configured in Dolby Digital or PCM (pulse-code modulation) format for connecting an external Dolby Digital decoder, amplifier, A/V receiver, or home theater system with optical audio input...
... component video output, such as a Toshiba DVD player with ColorStream®. Analog audio outputs for a complete connection. 6 Audio OUT Variable - Antenna input that supports analog (NTSC) and digital (ATSC) off-air antenna signals and analog and digital Cable TV (QAM) signals. 9 Digital Audio OUT - separate audio cables are shared with HDMI-1 analog audio input terminals, and their use can be configured in Dolby Digital or PCM (pulse-code modulation) format for connecting an external Dolby Digital decoder, amplifier, A/V receiver, or home theater system with optical audio input...
Owners Manual
Page 12
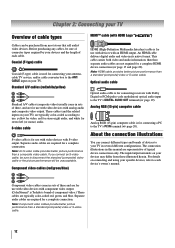
...of cable types HDMI™ cable (with an HDMI output. Note: Component video cables provide better picture performance than a standard (composite) video or S-video cable. 12 This cable carries both video and audio information; S-video cable S-video cable is used for connecting your TV Overview of component video.) These cables are required for a complete connection. Separate audio cables are typically color-coded red, green, and blue. Before purchasing any cables, be unacceptable. Chapter 2: Connecting your antenna, cable TV service, and/or cable converter box to use: yellow...
...of cable types HDMI™ cable (with an HDMI output. Note: Component video cables provide better picture performance than a standard (composite) video or S-video cable. 12 This cable carries both video and audio information; S-video cable S-video cable is used for connecting your TV Overview of component video.) These cables are required for a complete connection. Separate audio cables are typically color-coded red, green, and blue. Before purchasing any cables, be unacceptable. Chapter 2: Connecting your antenna, cable TV service, and/or cable converter box to use: yellow...

Owners Manual
Page 14
... is set to). Select the ANT/CABLE video input source on the TV.* Tune the TV to channel 3 or 4 (whichever channel the Cable box output is prohibited under the Copyright Laws of video cable to VIDEO 1 at the same time or the picture performance will be able to use a Cable box, you may subject you have a mono VCR, connect L/MONO on the TV to civil and criminal liability. 14 To program the TV remote control to operate...
... is set to). Select the ANT/CABLE video input source on the TV.* Tune the TV to channel 3 or 4 (whichever channel the Cable box output is prohibited under the Copyright Laws of video cable to VIDEO 1 at the same time or the picture performance will be able to use a Cable box, you may subject you have a mono VCR, connect L/MONO on the TV to civil and criminal liability. 14 To program the TV remote control to operate...
Owners Manual
Page 19
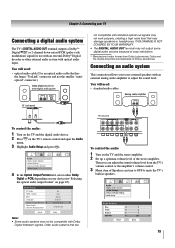
You will need : • optical audio cable (Use an optical audio cable that has the larger "TosLink" connector and not the smaller "minioptical" connector.) not compatible with an external analog audio amplifier to adjust the sound level. You will need : • standard audio cables To control the audio: 1 Turn on the TV and the digital audio device. 2 Press on the TV's remote control and open the Audio menu. 3 Highlight Audio Setup and press . Audio Setup PC Audio HDMI 1 Audio MTS Language Optical Output Format Dolby Digital Dynamic Range Control Reset No Auto Stereo...
You will need : • optical audio cable (Use an optical audio cable that has the larger "TosLink" connector and not the smaller "minioptical" connector.) not compatible with an external analog audio amplifier to adjust the sound level. You will need : • standard audio cables To control the audio: 1 Turn on the TV and the digital audio device. 2 Press on the TV's remote control and open the Audio menu. 3 Highlight Audio Setup and press . Audio Setup PC Audio HDMI 1 Audio MTS Language Optical Output Format Dolby Digital Dynamic Range Control Reset No Auto Stereo...
Owners Manual
Page 20
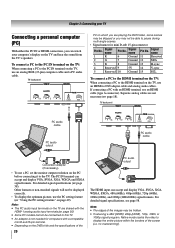
... 1080p signal program, Native mode scales the video to the TV. no overscanning). PC audio cable PC audio output PC audio cable Conversion adapter (if necessary) • To use an analog RGB (15-pin) computer cable and a PC audio cable. Separate analog cables are playing the DVD-Video, some scenes may be skipped or you are not necessary ( page 18). PC on which you may be displayed correctly. • To display the optimum picture, use an HDMI cable (type...
... 1080p signal program, Native mode scales the video to the TV. no overscanning). PC audio cable PC audio output PC audio cable Conversion adapter (if necessary) • To use an analog RGB (15-pin) computer cable and a PC audio cable. Separate analog cables are playing the DVD-Video, some scenes may be skipped or you are not necessary ( page 18). PC on which you may be displayed correctly. • To display the optimum picture, use an HDMI cable (type...
Owners Manual
Page 28
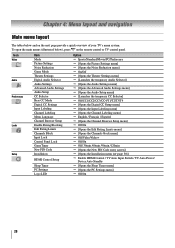
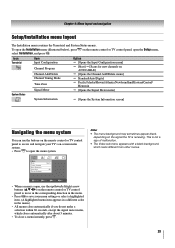
... main menus (illustrated below and on the remote control or TV control panel. Icon Video Audio Preferences Locks Setup Item Mode Picture Settings Noise Reduction Game Mode Theater Settings Digital Audio Selector Audio Settings Advanced Audio Settings Audio Setup CC Selector Base CC Mode Digital CC Settings Input Labeling Channel Labeling Menu Language Channel Browser Setup Enable Rating Blocking Edit Rating Limits Channels Block Input Lock Control Panel Lock GameTimer New PIN Code Installation HDMI Control Setup Sleep Timer PC Settings Logo LED Option p Sports/Standard/Movie/PC/Preference...
... main menus (illustrated below and on the remote control or TV control panel. Icon Video Audio Preferences Locks Setup Item Mode Picture Settings Noise Reduction Game Mode Theater Settings Digital Audio Selector Audio Settings Advanced Audio Settings Audio Setup CC Selector Base CC Mode Digital CC Settings Input Labeling Channel Labeling Menu Language Channel Browser Setup Enable Rating Blocking Edit Rating Limits Channels Block Input Lock Control Panel Lock GameTimer New PIN Code Installation HDMI Control Setup Sleep Timer PC Settings Logo LED Option p Sports/Standard/Movie/PC/Preference...
Owners Manual
Page 29
... the remote control or TV control panel, open , use the buttons on -screen menu system. • Press to access and navigate your menu settings or select a highlighted item. (A highlighted menu item appears in a different color in the menu. • Press to save your TV's on the remote control or TV control panel to open the Installation menu (illustrated below), press on the signal the TV is not a sign of malfunction. • The Video sub-menu appears with a black...
... the remote control or TV control panel, open , use the buttons on -screen menu system. • Press to access and navigate your menu settings or select a highlighted item. (A highlighted menu item appears in a different color in the menu. • Press to save your TV's on the remote control or TV control panel to open the Installation menu (illustrated below), press on the signal the TV is not a sign of malfunction. • The Video sub-menu appears with a black...
Owners Manual
Page 30
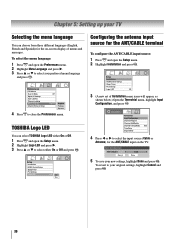
... Spanish) for the on the TV. Setup Installation HDMI Control Setup Sleep Timer PC Settings Logo LED Off Off On 5 To save your original settings, highlight Cancel and press . 30 Configuring the antenna input source for the ANT/CABLE input on -screen display of Installation menu icons will appear, as shown below.) Open the Terrestrial menu, highlight Input Configuration, and press . Installation Terrestrial Input Configuration Channel Program Channel Add/Delete Channel Tuning Mode Auto Time Zone Signal Meter 4 Press W or X to your...
... Spanish) for the on the TV. Setup Installation HDMI Control Setup Sleep Timer PC Settings Logo LED Off Off On 5 To save your original settings, highlight Cancel and press . 30 Configuring the antenna input source for the ANT/CABLE input on -screen display of Installation menu icons will appear, as shown below.) Open the Terrestrial menu, highlight Input Configuration, and press . Installation Terrestrial Input Configuration Channel Program Channel Add/Delete Channel Tuning Mode Auto Time Zone Signal Meter 4 Press W or X to your...
Owners Manual
Page 31
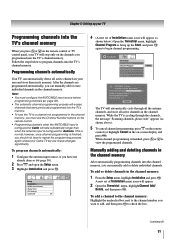
... TV's channel memory. Setup Installation HDMI Control Setup Sleep Timer PC Settings Logo LED Off 4 (A new set of Installation menu icons will appear, as shown above). 5 To cancel channel programming, press on the remote control (or highlight Cancel in the on-screen display and press ). Chapter 5: Setting up the Start, and press again to begin channel programming. Note: • You must use the Channel Number buttons on the remote control. • Programming channels when the ANT/CABLE input is cycling through all the antenna channels...
... TV's channel memory. Setup Installation HDMI Control Setup Sleep Timer PC Settings Logo LED Off 4 (A new set of Installation menu icons will appear, as shown above). 5 To cancel channel programming, press on the remote control (or highlight Cancel in the on-screen display and press ). Chapter 5: Setting up the Start, and press again to begin channel programming. Note: • You must use the Channel Number buttons on the remote control. • Programming channels when the ANT/CABLE input is cycling through all the antenna channels...

Owners Manual
Page 50
... S or T to highlight the HDMI Control Setup item you to output or mute the sound from the PC Audio input can set to "No," the HDMI 1 Audio setting changes to the factory defaults, highlight Reset and press . To revert to "Auto." To display the remaining sleep time: Press . When the Enable HDMI Control and each item in the HDMI Control Setup menu are connected. Please check the manual for the devices. To set the sleep timer using the on the devices...
... S or T to highlight the HDMI Control Setup item you to output or mute the sound from the PC Audio input can set to "No," the HDMI 1 Audio setting changes to the factory defaults, highlight Reset and press . To revert to "Auto." To display the remaining sleep time: Press . When the Enable HDMI Control and each item in the HDMI Control Setup menu are connected. Please check the manual for the devices. To set the sleep timer using the on the devices...
Owners Manual
Page 55
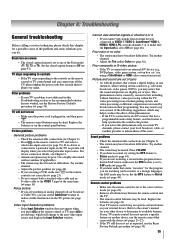
... no picture will not turn on -screen • The closed caption feature to SAP mode ( page 44). • If you cannot view signals from external devices connected to VIDEO 1, VIDEO 2, ColorStream® HDMI 1, HDMI 2, HDMI 3, PC, or from a known SAP source, make sure the Input Lock is plugged in, and then press . • The remote control batteries may be on the remote control or TV, press a second time, which may notice that contain a digital display, in their programming...
... no picture will not turn on -screen • The closed caption feature to SAP mode ( page 44). • If you cannot view signals from external devices connected to VIDEO 1, VIDEO 2, ColorStream® HDMI 1, HDMI 2, HDMI 3, PC, or from a known SAP source, make sure the Input Lock is plugged in, and then press . • The remote control batteries may be on the remote control or TV, press a second time, which may notice that contain a digital display, in their programming...
Owners Manual
Page 59
.... Depending on the type of repair required, the service will be performed in any manner whatsoever. DURING THIS PERIOD, TACP WILL, AT TACP'S OPTION, REPAIR OR REPLACE A DEFECTIVE PART WITH A NEW OR REFURBISHED PART WITHOUT CHARGE TO YOU. Owner's Manual and Product Registration Card Read this owner's manual thoroughly before operating this LCD Television and connected equipment; use or malfunction through simultaneous use in the Continental U.S.A. For...
.... Depending on the type of repair required, the service will be performed in any manner whatsoever. DURING THIS PERIOD, TACP WILL, AT TACP'S OPTION, REPAIR OR REPLACE A DEFECTIVE PART WITH A NEW OR REFURBISHED PART WITHOUT CHARGE TO YOU. Owner's Manual and Product Registration Card Read this owner's manual thoroughly before operating this LCD Television and connected equipment; use or malfunction through simultaneous use in the Continental U.S.A. For...
Owners Manual
Page 61
..., the unenforceable provision shall be conducted in the forum and in which you reside at www.toshiba.ca, or call toll free 1-800-268-3404 (2) Present your bill of sale or other law or form of action)...INSTRUCTIONS IN THE APPLICABLE USER GUIDES AND/OR MANUALS. THIS WARRANTY DOES NOT APPLY AND SHALL BE VOID AND UNENFORCEABLE IF THE TELEVISION IS OPENED, SERVICED, OR REPAIRED BY PERSONS OTHER THAN THOSE AUTHORIZED BY TCL TO SERVICE OR REPAIR THE TELEVISION. IF THE TELEVISION FAILS TO WORK AS WARRANTED ABOVE, YOUR SOLE AND EXCLUSIVE REMEDY SHALL BE REPAIR OR REPLACEMENT OF THE DEFECTIVE PART...
..., the unenforceable provision shall be conducted in the forum and in which you reside at www.toshiba.ca, or call toll free 1-800-268-3404 (2) Present your bill of sale or other law or form of action)...INSTRUCTIONS IN THE APPLICABLE USER GUIDES AND/OR MANUALS. THIS WARRANTY DOES NOT APPLY AND SHALL BE VOID AND UNENFORCEABLE IF THE TELEVISION IS OPENED, SERVICED, OR REPAIRED BY PERSONS OTHER THAN THOSE AUTHORIZED BY TCL TO SERVICE OR REPAIR THE TELEVISION. IF THE TELEVISION FAILS TO WORK AS WARRANTED ABOVE, YOUR SOLE AND EXCLUSIVE REMEDY SHALL BE REPAIR OR REPLACEMENT OF THE DEFECTIVE PART...


