User Manual
Page 8
...menu layout 23 Navigating the menu system 23 Chapter 5: Setting up your TV 24 Initial Setup 24 Selecting the menu language 24 TOSHIBA Logo LED 24 Configuring the antenna input source for the ANT/CABLE terminal 24 Programming channels into the TV's channel memory............25 ...captions 37 Digital CC Settings 38 CC Selector 38 8 Adjusting the audio 38 Muting the sound 38 Using the digital audio selector 38 Selecting stereo/SAP broadcasts 39 Adjusting the audio quality 39 Selecting the optical audio output format 39 Using the Dolby® Digital Dynamic Range Control feature...40...
...menu layout 23 Navigating the menu system 23 Chapter 5: Setting up your TV 24 Initial Setup 24 Selecting the menu language 24 TOSHIBA Logo LED 24 Configuring the antenna input source for the ANT/CABLE terminal 24 Programming channels into the TV's channel memory............25 ...captions 37 Digital CC Settings 38 CC Selector 38 8 Adjusting the audio 38 Muting the sound 38 Using the digital audio selector 38 Selecting stereo/SAP broadcasts 39 Adjusting the audio quality 39 Selecting the optical audio output format 39 Using the Dolby® Digital Dynamic Range Control feature...40...
User Manual
Page 9
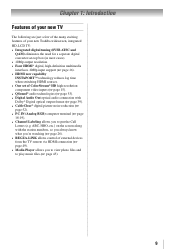
...ColorStream® HD high-resolution component video inputs ( page 15). • QSound® audio technologies ( page 53). • Digital Audio Out optical audio connection with Dolby® Digital optical output format ( page 39). • CableClear® digital picture noise reduction ( page ... (e.g. Chapter 1: Introduction Features of your new TV The following are just a few of the many exciting features of your new Toshiba widescreen, integrated HD, LCD TV: • Integrated digital tuning (8VSB ATSC and QAM) eliminates the need for a separate digital...
...ColorStream® HD high-resolution component video inputs ( page 15). • QSound® audio technologies ( page 53). • Digital Audio Out optical audio connection with Dolby® Digital optical output format ( page 39). • CableClear® digital picture noise reduction ( page ... (e.g. Chapter 1: Introduction Features of your new TV The following are just a few of the many exciting features of your new Toshiba widescreen, integrated HD, LCD TV: • Integrated digital tuning (8VSB ATSC and QAM) eliminates the need for a separate digital...
User Manual
Page 12
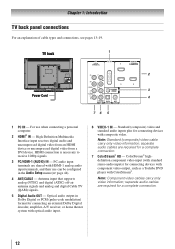
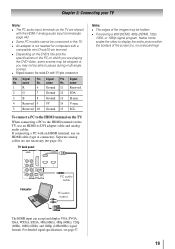
...audio output in the Audio Setup menu ( page 44). 4無 ANT/CABLE - Note: Standard (composite) video cable carry only video information; ColorStream® highdefinition component video input (with ColorStream®. TV back 1 2 3 Power Cord 4 76 5 1無 PC IN - PC audio input terminals are required for connecting devices with component video output, such as a Toshiba... DVD player with standard stereo audio inputs) for a complete ...
...audio output in the Audio Setup menu ( page 44). 4無 ANT/CABLE - Note: Standard (composite) video cable carry only video information; ColorStream® highdefinition component video input (with ColorStream®. TV back 1 2 3 Power Cord 4 76 5 1無 PC IN - PC audio input terminals are required for connecting devices with component video output, such as a Toshiba... DVD player with standard stereo audio inputs) for a complete ...
User Manual
Page 13
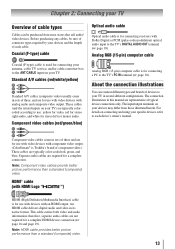
...; Chapter 2: Connecting your devices may differ from most stores that sell audio/ video devices. Component video cables (red/green/blue) Optical audio cable Optical audio cable is for use with video devices with analog audio and composite video output. Analog RGB (15-pin) computer cable Analog RGB (15-pin) computer... for connecting your antenna, cable TV service, and/or cable converter box to use: yellow for video, red for stereo right audio, and white for use with video devices with component video output. (ColorStream® is Toshiba's brand of typical device connections only.
...; Chapter 2: Connecting your devices may differ from most stores that sell audio/ video devices. Component video cables (red/green/blue) Optical audio cable Optical audio cable is for use with video devices with analog audio and composite video output. Analog RGB (15-pin) computer cable Analog RGB (15-pin) computer... for connecting your antenna, cable TV service, and/or cable converter box to use: yellow for video, red for stereo right audio, and white for use with video devices with component video output. (ColorStream® is Toshiba's brand of typical device connections only.
User Manual
Page 14
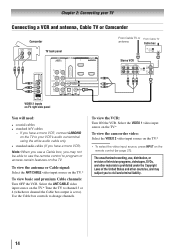
...; coaxial cables • standard A/V cables −− If you have a mono VCR, connect L/MONO on the TV to your VCR's audio out terminal using the white audio cable only. • standard audio cables (If you have a mono VCR) Note: When you to civil and criminal liability. 14 Use the Cable box controls to... on the TV.* ** To select the video input source, press INPUT on the TV.* Tune the TV to channel 3 or 4 (whichever channel the Cable box output is prohibited under the Copyright Laws of the United States and other countries, and may not be able to use a Cable box, you may subject...
...; coaxial cables • standard A/V cables −− If you have a mono VCR, connect L/MONO on the TV to your VCR's audio out terminal using the white audio cable only. • standard audio cables (If you have a mono VCR) Note: When you to civil and criminal liability. 14 Use the Cable box controls to... on the TV.* ** To select the video input source, press INPUT on the TV.* Tune the TV to channel 3 or 4 (whichever channel the Cable box output is prohibited under the Copyright Laws of the United States and other countries, and may not be able to use a Cable box, you may subject...
User Manual
Page 16
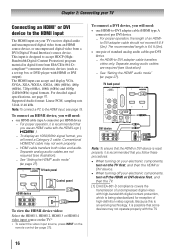
... kHz Note: To connect a PC to the HDMI input, see illustration). −− See "Setting the HDMI® audio mode" ( page 27). Conventional HDMI/DVI cable may not operate properly with HDMI or DVI output). To connect a DVI device, you will need: • one pair of standard analog... audio cables per DVI device −− An HDMI-to-DVI adapter cable transfers video only. Separate analog audio cables are required (see page 57. Because ...
... kHz Note: To connect a PC to the HDMI input, see illustration). −− See "Setting the HDMI® audio mode" ( page 27). Conventional HDMI/DVI cable may not operate properly with HDMI or DVI output). To connect a DVI device, you will need: • one pair of standard analog... audio cables per DVI device −− An HDMI-to-DVI adapter cable transfers video only. Separate analog audio cables are required (see page 57. Because ...
User Manual
Page 18
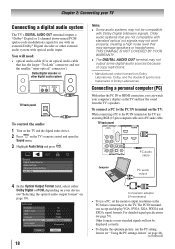
.... 2無 Press on the TV's remote control and open the Sound menu. 3無 Highlight Audio Setup and press . TV back panel PC audio cable Computer PC audio output 4無 In the Optical Output Format field, select either the PC IN or HDMI connection, you can accept and display VGA, SVGA, XGA,... SXGA signal formats. The PC IN terminal can watch your device ("Selecting the optical audio output format" on page 39). 18 Conversion adapter (if necessary) • To use a PC, set the monitor output resolution on the PC before connecting it to the PC IN terminal on page 44). (...
.... 2無 Press on the TV's remote control and open the Sound menu. 3無 Highlight Audio Setup and press . TV back panel PC audio cable Computer PC audio output 4無 In the Optical Output Format field, select either the PC IN or HDMI connection, you can accept and display VGA, SVGA, XGA,... SXGA signal formats. The PC IN terminal can watch your device ("Selecting the optical audio output format" on page 39). 18 Conversion adapter (if necessary) • To use a PC, set the monitor output resolution on the PC before connecting it to the PC IN terminal on page 44). (...
User Manual
Page 19
Separate analog cables are playing the DVD-Video, some scenes may be skipped or you are not necessary ( page 16). Computer PC audio cable PC audio output The HDMI input can accept and display VGA, SVGA, XGA, WXGA, SXGA, 480i (60Hz), 480p (60Hz), 720p (60Hz), 1080i (60Hz), and 1080p (24Hz/60Hz) signal ...
Separate analog cables are playing the DVD-Video, some scenes may be skipped or you are not necessary ( page 16). Computer PC audio cable PC audio output The HDMI input can accept and display VGA, SVGA, XGA, WXGA, SXGA, 480i (60Hz), 480p (60Hz), 720p (60Hz), 1080i (60Hz), and 1080p (24Hz/60Hz) signal ...
User Manual
Page 27
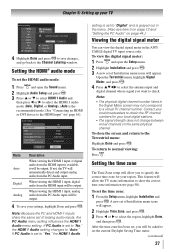
... set the time zone: 1無 From the Setup menu, highlight Installation and press . When viewing the HDMI 1 input, analog audio from the HDMI input is available, it will be output. To set the HDMI audio mode: 1無 Press and open the Setup menu. 2無 Highlight Installation and press . 3無 A new set to "No...
... set the time zone: 1無 From the Setup menu, highlight Installation and press . When viewing the HDMI 1 input, analog audio from the HDMI input is available, it will be output. To set the HDMI audio mode: 1無 Press and open the Setup menu. 2無 Highlight Installation and press . 3無 A new set to "No...
User Manual
Page 39
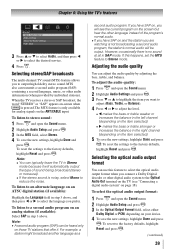
... SAP on the item selected). 5無 To save the new settings, highlight Done and press . To select the optical audio output format: 1無 Press and open the Sound menu. 2無 Highlight Audio Settings and press . 3無 Press or to highlight the item you want to adjust (Bass, ...highlight Reset and press . To reset the settings to select the desired service. 4無 Press . If this feature to select the optical audio output format when you to the Optical Audio Out terminal on the TV (see the current program on the screen but hear the other digital...
... SAP on the item selected). 5無 To save the new settings, highlight Done and press . To select the optical audio output format: 1無 Press and open the Sound menu. 2無 Highlight Audio Settings and press . 3無 Press or to highlight the item you want to adjust (Bass, ...highlight Reset and press . To reset the settings to select the desired service. 4無 Press . If this feature to select the optical audio output format when you to the Optical Audio Out terminal on the TV (see the current program on the screen but hear the other digital...
User Manual
Page 40
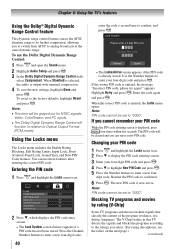
...programs according to "0000". Changing your PIN code 1無 Press and highlight the Locks menu icon. 2無 Press to Optical Output Format (PCM mode). Reenter the PIN code to enter your four-digit code and press . To use these features after entering the correct...TV programs and movies include signals that classify the content of the program (violence, sex, dialog, language). When Standard is selected, the audio is now active. Chapter 6: Using the TV's features Using the Dolby® Digital Dynamic Range Control feature This dynamic range control feature ...
...programs according to "0000". Changing your PIN code 1無 Press and highlight the Locks menu icon. 2無 Press to Optical Output Format (PCM mode). Reenter the PIN code to enter your four-digit code and press . To use these features after entering the correct...TV programs and movies include signals that classify the content of the program (violence, sex, dialog, language). When Standard is selected, the audio is now active. Chapter 6: Using the TV's features Using the Dolby® Digital Dynamic Range Control feature This dynamic range control feature ...

User Manual
Page 44
...** The default settings may vary depending on the input signal format. When a PC is within ±10 from center.* Sampling Clock Helps to output or mute the sound from your PC when connecting using the PC IN terminal and an analog RGB cable. ( page 18) To set of...readjust the Clock Phase and Sampling Clock. If the edges of malfunction. Mode Description Horizontal Position Moves the picture left/right. Setting the PC Audio This function allows you can view an image from center.* Vertical Position Moves the picture up/down. Note: Because the PC and HDMI-1 inputs...
...** The default settings may vary depending on the input signal format. When a PC is within ±10 from center.* Sampling Clock Helps to output or mute the sound from your PC when connecting using the PC IN terminal and an analog RGB cable. ( page 18) To set of...readjust the Clock Phase and Sampling Clock. If the edges of malfunction. Mode Description Horizontal Position Moves the picture left/right. Setting the PC Audio This function allows you can view an image from center.* Vertical Position Moves the picture up/down. Note: Because the PC and HDMI-1 inputs...
User Manual
Page 49
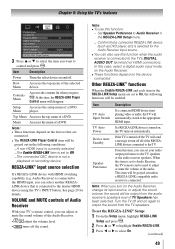
... HDMI input. Turn the TV off . Item Description Power Turns the select device on and off and on again to output the sound from the audio receiver's speakers even if TV Speakers has been selected. Contents Menu Accesses the contents list when you turn off all of...® input source selection If a REGZA-LINK device with HDMI switching capability (e.g. VOLUME and MUTE controls of Audio Receiver With your audio output preference to the TV speakers or the audio receiver speakers. This item will disappear. When this item, you can select another REGZALINK device that are set to...
... HDMI input. Turn the TV off . Item Description Power Turns the select device on and off and on again to output the sound from the audio receiver's speakers even if TV Speakers has been selected. Contents Menu Accesses the contents list when you turn off all of...® input source selection If a REGZA-LINK device with HDMI switching capability (e.g. VOLUME and MUTE controls of Audio Receiver With your audio output preference to the TV speakers or the audio receiver speakers. This item will disappear. When this item, you can select another REGZALINK device that are set to...
User Manual
Page 53
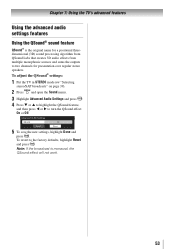
... not work. 53 To revert to two channels for a positional threedimensional (3D) sound processing algorithm from QSound Labs that creates 3D audio effects from multiple monophonic sources and sums the outputs to the factory defaults, highlight Reset and press . To adjust the QSound® settings: 1無 Put the TV in STEREO mode...
... not work. 53 To revert to two channels for a positional threedimensional (3D) sound processing algorithm from QSound Labs that creates 3D audio effects from multiple monophonic sources and sums the outputs to the factory defaults, highlight Reset and press . To adjust the QSound® settings: 1無 Put the TV in STEREO mode...
User Manual
Page 56
... AUDIO OUTPUT: Optical type PC INPUT: 15-Pin D-sub Analog RGB Dimensions 32E200U/32E20U: Width: 2'7-1/2 inches (801.68mm) Height: 1'10-3/4 inches (577.05mm) Depth: 9-5/8 inches (245mm) 37E200U/37E20U: Width: 3'-3/8 inches (924.5mm) Height: 2'2 inches (660.3mm) Depth: 11-5/8 inches (295mm) 40E200U/...60 Hz Power Maximum Current 32E200U/32E20U: 1.55 A 37E200U/37E20U: 1.75 A 40E200U/40E20U: 2.20 A Power Consumption 32E200U/32E20U: 0.6 W in standby mode 37E200U/37E20U: 0.6 W in standby mode 40E200U/40E20U: 0.6 W in the future. AUDIO: 150 mV(rms) (30% modulation equivalent, 22 k ohm or greater) ...
... AUDIO OUTPUT: Optical type PC INPUT: 15-Pin D-sub Analog RGB Dimensions 32E200U/32E20U: Width: 2'7-1/2 inches (801.68mm) Height: 1'10-3/4 inches (577.05mm) Depth: 9-5/8 inches (245mm) 37E200U/37E20U: Width: 3'-3/8 inches (924.5mm) Height: 2'2 inches (660.3mm) Depth: 11-5/8 inches (295mm) 40E200U/...60 Hz Power Maximum Current 32E200U/32E20U: 1.55 A 37E200U/37E20U: 1.75 A 40E200U/40E20U: 2.20 A Power Consumption 32E200U/32E20U: 0.6 W in standby mode 37E200U/37E20U: 0.6 W in standby mode 40E200U/40E20U: 0.6 W in the future. AUDIO: 150 mV(rms) (30% modulation equivalent, 22 k ohm or greater) ...

Brochure
Page 2
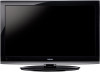
...Audio/Video Inputs USB Port High Res PC Input (S-XGA, 15 Pin, D-sub) Dolby® Digital Optical Output PRODUCT & PACKAGING VESA® Mounting Pattern3 Unit Dimensions (WHD) in. (with other countries. Dolby and the double-D symbol are trademarks of Video Electronics Standards Association. http://www.tacp.toshiba... (WHD) in picture resolution. 40E200U Enjoy a stunning picture bursting with color and clarity with InstaPort™ and REGZA-LINK®, and a Hi-Res PC Input, perfect for the size and weight of Toshiba Corporation. ColorStream and Theaterwide are trademarks...
...Audio/Video Inputs USB Port High Res PC Input (S-XGA, 15 Pin, D-sub) Dolby® Digital Optical Output PRODUCT & PACKAGING VESA® Mounting Pattern3 Unit Dimensions (WHD) in. (with other countries. Dolby and the double-D symbol are trademarks of Video Electronics Standards Association. http://www.tacp.toshiba... (WHD) in picture resolution. 40E200U Enjoy a stunning picture bursting with color and clarity with InstaPort™ and REGZA-LINK®, and a Hi-Res PC Input, perfect for the size and weight of Toshiba Corporation. ColorStream and Theaterwide are trademarks...


