User Manual
Page 2
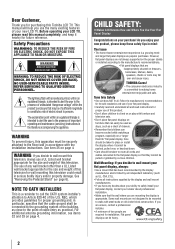
... wall mount this television, always use of this Toshiba LCD TV. The use of your LCD TV, please read and understand all cords and cables connected to the flat panel display so that they cannot be pulled or grabbed by curious children. TOSHIBA Cares! • The consumer electronics industry is a reminder to call the CATV system installer's attention to Article 820-40 of important operating and maintenance (servicing) instructions...
... wall mount this television, always use of this Toshiba LCD TV. The use of your LCD TV, please read and understand all cords and cables connected to the flat panel display so that they cannot be pulled or grabbed by curious children. TOSHIBA Cares! • The consumer electronics industry is a reminder to call the CATV system installer's attention to Article 820-40 of important operating and maintenance (servicing) instructions...
User Manual
Page 4
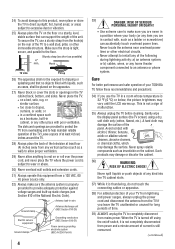
... as a wall) to allow proper ventilation. 29) Never allow anything to rest on the cabinet. or • in a confined space such as insecticide on or roll over the power cord, and never place the TV where the power cord is still consumed. (continued) A hard cloth may damage the surface. Gently wipe the display panel surface (the TV screen) using the...
... as a wall) to allow proper ventilation. 29) Never allow anything to rest on the cabinet. or • in a confined space such as insecticide on or roll over the power cord, and never place the TV where the power cord is still consumed. (continued) A hard cloth may damage the surface. Gently wipe the display panel surface (the TV screen) using the...
User Manual
Page 5
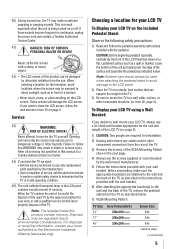
... the TV is being turned on or off. Refer all servicing not specified in the LCD panel contains a small amount of mercury. If these sounds become frequent or continuous, unplug the power cord and contact a Toshiba Authorized Service Center. 41) DANGER: RISK OF SERIOUS PERSONAL INJURY OR DEATH! If you to wall mount your LCD TV, always use a UL listed wall bracket appropriate for your local...
... the TV is being turned on or off. Refer all servicing not specified in the LCD panel contains a small amount of mercury. If these sounds become frequent or continuous, unplug the power cord and contact a Toshiba Authorized Service Center. 41) DANGER: RISK OF SERIOUS PERSONAL INJURY OR DEATH! If you to wall mount your LCD TV, always use a UL listed wall bracket appropriate for your local...
User Manual
Page 8
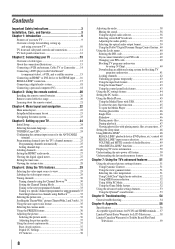
... Initial Setup 24 Selecting the menu language 24 TOSHIBA Logo LED 24 Configuring the antenna input source for the ANT/CABLE terminal 24 Programming channels into the TV's channel memory............25 Programming channels automatically 25 Setting channel skip 25 Labeling channels 26 Setting the HDMI® audio mode 27 Viewing the digital signal meter 27 Setting the time zone 27 Viewing the system status 28 Chapter 6: Using the TV's features 29 Selecting the video input source to view 29 Labeling the video input sources...
... Initial Setup 24 Selecting the menu language 24 TOSHIBA Logo LED 24 Configuring the antenna input source for the ANT/CABLE terminal 24 Programming channels into the TV's channel memory............25 Programming channels automatically 25 Setting channel skip 25 Labeling channels 26 Setting the HDMI® audio mode 27 Viewing the digital signal meter 27 Setting the time zone 27 Viewing the system status 28 Chapter 6: Using the TV's features 29 Selecting the video input source to view 29 Labeling the video input sources...
User Manual
Page 12
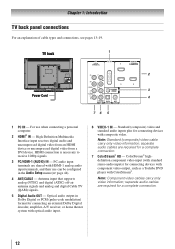
... audio cables are required for a complete connection. 7無 ColorStream® HD - Optical audio output in the Audio Setup menu ( page 44). 4無 ANT/CABLE - Chapter 1: Introduction TV back panel connections For an explanation of cable types and connections, see pages 13-19. TV back 1 2 3 Power Cord 4 76 5 1無 PC IN - For use can be configured in Dolby Digital or PCM (pulse-code modulation) format for connecting devices with component video output, such as a Toshiba DVD player with HDMI-1 analog audio input...
... audio cables are required for a complete connection. 7無 ColorStream® HD - Optical audio output in the Audio Setup menu ( page 44). 4無 ANT/CABLE - Chapter 1: Introduction TV back panel connections For an explanation of cable types and connections, see pages 13-19. TV back 1 2 3 Power Cord 4 76 5 1無 PC IN - For use can be configured in Dolby Digital or PCM (pulse-code modulation) format for connecting devices with component video output, such as a Toshiba DVD player with HDMI-1 analog audio input...
User Manual
Page 13
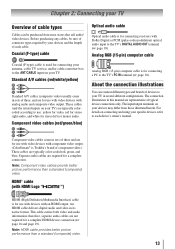
... Note: Component video cables provide better picture performance than a standard (composite) video. 13 An HDMI cable delivers digital audio and video in sets of typical device connections only. therefore, separate audio cables are typically color-coded red, green, and blue. Before purchasing any cables, be purchased from those illustrated herein. Component video cables (red/green/blue) Optical audio cable Optical audio cable is Toshiba's brand of devices to use with devices with analog audio and composite video output. The connection illustrations in this manual are...
... Note: Component video cables provide better picture performance than a standard (composite) video. 13 An HDMI cable delivers digital audio and video in sets of typical device connections only. therefore, separate audio cables are typically color-coded red, green, and blue. Before purchasing any cables, be purchased from those illustrated herein. Component video cables (red/green/blue) Optical audio cable Optical audio cable is Toshiba's brand of devices to use with devices with analog audio and composite video output. The connection illustrations in this manual are...
User Manual
Page 18
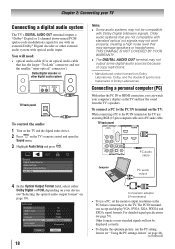
... formats or non-standard signals will need: • optical audio cable (Use an optical audio cable that has the larger "TosLink" connector and not the smaller "mini-optical" connector.) Dolby Digital decoder or other external audio system with optical audio input. Connecting a personal computer (PC) With either Dolby Digital or PCM, depending on your device ("Selecting the optical audio output format" on page 39). 18 Conversion adapter (if necessary) • To use a PC, set the monitor output resolution...
... formats or non-standard signals will need: • optical audio cable (Use an optical audio cable that has the larger "TosLink" connector and not the smaller "mini-optical" connector.) Dolby Digital decoder or other external audio system with optical audio input. Connecting a personal computer (PC) With either Dolby Digital or PCM, depending on your device ("Selecting the optical audio output format" on page 39). 18 Conversion adapter (if necessary) • To use a PC, set the monitor output resolution...
User Manual
Page 22
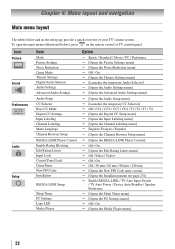
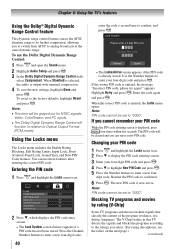
Icon Picture Sound Preferences Locks Setup Item Mode Picture Settings Noise Reduction Game Mode Theater Settings Digital Audio Selector Audio Settings Advanced Audio Settings Audio Setup CC Selector Base CC Mode Digital CC Settings Input Labeling Channel Labeling Menu Language Channel Browser Setup REGZA-LINK Player Control Enable Rating Blocking Edit Rating Limits Input Lock Control Panel Lock GameTimer New PIN Code Installation REGZA-LINK Setup Sleep Timer PC Settings Logo LED Media Player Option Sports / Standard / Movie / PC / Preference [Opens the Picture Settings menu...
Icon Picture Sound Preferences Locks Setup Item Mode Picture Settings Noise Reduction Game Mode Theater Settings Digital Audio Selector Audio Settings Advanced Audio Settings Audio Setup CC Selector Base CC Mode Digital CC Settings Input Labeling Channel Labeling Menu Language Channel Browser Setup REGZA-LINK Player Control Enable Rating Blocking Edit Rating Limits Input Lock Control Panel Lock GameTimer New PIN Code Installation REGZA-LINK Setup Sleep Timer PC Settings Logo LED Media Player Option Sports / Standard / Movie / PC / Preference [Opens the Picture Settings menu...
User Manual
Page 25
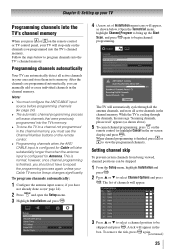
... skipped and press . Setting channel skip To prevent certain channels from being viewed, channel positions can manually add or erase individual channels in the channel memory. Note: •• You must use the Channel Number buttons on -screen display and press ). When channel programming is normal; After the channels are programmed automatically, you must configure the ANT/CABLE input source before programming channels ( page 24). •• The automatic channel programming process will take...
... skipped and press . Setting channel skip To prevent certain channels from being viewed, channel positions can manually add or erase individual channels in the channel memory. Note: •• You must use the Channel Number buttons on -screen display and press ). When channel programming is normal; After the channels are programmed automatically, you must configure the ANT/CABLE input source before programming channels ( page 24). •• The automatic channel programming process will take...
User Manual
Page 27
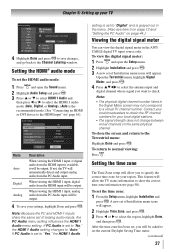
... the Channel Labeling window. Mode Auto Digital Analog Description When viewing the HDMI 1 input, if digital audio from the HDMI input will be output. If PC Audio is set to check. Open the Terrestrial menu, highlight Signal Meter, and press . 4無 Press pqtu to select the antenna input and digital channel whose signal you want to "Digital" and is set to "Yes," the HDMI 1 Audio setting is grayed out in the ANT/ CABLE digital TV input source only. To close the screen and...
... the Channel Labeling window. Mode Auto Digital Analog Description When viewing the HDMI 1 input, if digital audio from the HDMI input will be output. If PC Audio is set to check. Open the Terrestrial menu, highlight Signal Meter, and press . 4無 Press pqtu to select the antenna input and digital channel whose signal you want to "Digital" and is set to "Yes," the HDMI 1 Audio setting is grayed out in the ANT/ CABLE digital TV input source only. To close the screen and...
User Manual
Page 38
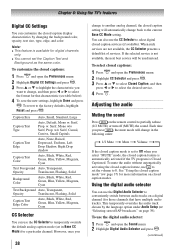
... Color Auto, Black, White, Red, Green, Blue, Yellow, Magenta, Cyan Text Background Auto, Transparent, Opacity Translucent, Flashing, Solid Caption Text Edge Color Auto, Black, White, Red, Green, Blue, Yellow, Magenta, Cyan CC Selector You can use the Digital Audio Selector to conveniently switch between audio tracks on page 39). When such services are not available, the CC Selector presents a default list of services. Using the digital audio selector You can use the CC Selector to temporarily override the default analog caption mode (set...
... Color Auto, Black, White, Red, Green, Blue, Yellow, Magenta, Cyan Text Background Auto, Transparent, Opacity Translucent, Flashing, Solid Caption Text Edge Color Auto, Black, White, Red, Green, Blue, Yellow, Magenta, Cyan CC Selector You can use the Digital Audio Selector to conveniently switch between audio tracks on page 39). When such services are not available, the CC Selector presents a default list of services. Using the digital audio selector You can use the CC Selector to temporarily override the default analog caption mode (set...
User Manual
Page 40
... the Channel Number buttons to enter a new four-digit code, 40 enter the code a second time to enter your four-digit code and press . Use the Number buttons to confirm, and press . • The Locks/Active screen appears if the PIN code is displayed, press four times within five seconds. Enter the code again and press . The PIN code will be grayed out for NTSC signals, Video, ColorStream, and PC inputs. •...
... the Channel Number buttons to enter a new four-digit code, 40 enter the code a second time to enter your four-digit code and press . Use the Number buttons to confirm, and press . • The Locks/Active screen appears if the PIN code is displayed, press four times within five seconds. Enter the code again and press . The PIN code will be grayed out for NTSC signals, Video, ColorStream, and PC inputs. •...

User Manual
Page 44
... analog RGB cable. ( page 18) To set of analog audio inputs, the PC Audio menu setting influences the HDMI 1 Audio menu setting. Note: If a PC is not connected or there is pressed, the message "NOT AVAILABLE" appears. button on the control panel (except POWER) is no audio. To adjust the PC settings: 1無 Repeatedly press to select PC input mode ( "Selecting the video input source to select On. To unlock the control panel: Select Off in the Setup menu...
... analog RGB cable. ( page 18) To set of analog audio inputs, the PC Audio menu setting influences the HDMI 1 Audio menu setting. Note: If a PC is not connected or there is pressed, the message "NOT AVAILABLE" appears. button on the control panel (except POWER) is no audio. To adjust the PC settings: 1無 Repeatedly press to select PC input mode ( "Selecting the video input source to select On. To unlock the control panel: Select Off in the Setup menu...
User Manual
Page 49
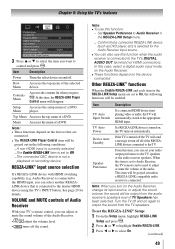
... Menu Accesses the contents list when you can be enabled. Setup Menu Accesses the setup menu of a DVD. In this case, select a digital audio input mode on the Audio Receiver. ••These functions depend on the Audio Receiver, change its input source, or adjust the sound volume, the sound will send a message to the master HDMI device using the TV's INPUT button. This item will be used to the HDMI input, you can adjust or mute the sound volume of the audio. Item Description Power Turns...
... Menu Accesses the contents list when you can be enabled. Setup Menu Accesses the setup menu of a DVD. In this case, select a digital audio input mode on the Audio Receiver. ••These functions depend on the Audio Receiver, change its input source, or adjust the sound volume, the sound will send a message to the master HDMI device using the TV's INPUT button. This item will be used to the HDMI input, you can adjust or mute the sound volume of the audio. Item Description Power Turns...
User Manual
Page 50
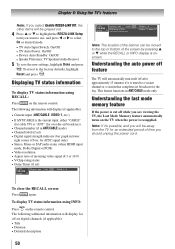
... q to the factory defaults, highlight Reset and press . The following additional information will be away from the TV for ATSC signal only) • Stereo, Mono or SAP audio status (when HDMI input mode, Dolby Digital or PCM) • Video resolution • Aspect ratio of incoming video signal (4:3 or 16:9) • V-Chip rating status • Game Timer (if set ) • Digital signal strength indicator (bar graph in ANT/CABLE mode only.
... q to the factory defaults, highlight Reset and press . The following additional information will be away from the TV for ATSC signal only) • Stereo, Mono or SAP audio status (when HDMI input mode, Dolby Digital or PCM) • Video resolution • Aspect ratio of incoming video signal (4:3 or 16:9) • V-Chip rating status • Game Timer (if set ) • Digital signal strength indicator (bar graph in ANT/CABLE mode only.

User Manual
Page 54
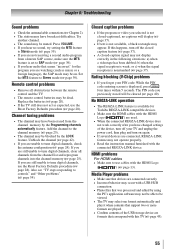
... cannot view signals from external devices connected to VIDEO 1, VIDEO 2, ColorStream® HDMI 1, HDMI 2, HDMI 3, HDMI 4, PC or from channels 3 or 4, make sure the Input Lock is connected to an external A/V device (e.g., DVD player, video game system, set to a particular input on the remote control or TV and select a valid video input source ( page 29). Black box on the remote control or TV, press a second time, which may help synchronize the sound to inform them of the problem and some solutions you cannot turn...
... cannot view signals from external devices connected to VIDEO 1, VIDEO 2, ColorStream® HDMI 1, HDMI 2, HDMI 3, HDMI 4, PC or from channels 3 or 4, make sure the Input Lock is connected to an external A/V device (e.g., DVD player, video game system, set to a particular input on the remote control or TV and select a valid video input source ( page 29). Black box on the remote control or TV, press a second time, which may help synchronize the sound to inform them of the problem and some solutions you cannot turn...
User Manual
Page 55
... tune digital channels, use the Reset Factory Defaults procedure ( page 28). Set the MTS feature to controls" and "Other problems" ( page 54). Remote control problems •• Remove all channels from a known SAP source, make sure the MTS feature is not closed -caption signal may be muted. Channel tuning problems •• The channel may be cleared ( page 40). If this TV ( page 45). 55 HDMI problems For HDMI cables •...
... tune digital channels, use the Reset Factory Defaults procedure ( page 28). Set the MTS feature to controls" and "Other problems" ( page 54). Remote control problems •• Remove all channels from a known SAP source, make sure the MTS feature is not closed -caption signal may be muted. Channel tuning problems •• The channel may be cleared ( page 40). If this TV ( page 45). 55 HDMI problems For HDMI cables •...
User Manual
Page 58
... limited warranty. (7) Product that are sold and used for commercial purposes for Warranty service. (2) All warranty servicing of purchase including the serial number for LCD Televisions Toshiba America Consumer Products, L.L.C. ("TACP") makes the following all of shipment to impede normal service is not covered under this LCD Television is exposed to excessive temperature (heat/cold), moisture as outlined in the product's specification listed in the Owner's manual as...
... limited warranty. (7) Product that are sold and used for commercial purposes for Warranty service. (2) All warranty servicing of purchase including the serial number for LCD Televisions Toshiba America Consumer Products, L.L.C. ("TACP") makes the following all of shipment to impede normal service is not covered under this LCD Television is exposed to excessive temperature (heat/cold), moisture as outlined in the product's specification listed in the Owner's manual as...
User Manual
Page 59
... product registration does not diminish your responsibility. (5) Warranties extend only to service the Television; This includes wall mounts, custom cabinets and other than those authorized by persons other installation methods that result in materials or workmanship as wear and tear, scratches and dents; Service, repairs or replacement made necessary by the use or installation of antenna systems are effective only if the...
... product registration does not diminish your responsibility. (5) Warranties extend only to service the Television; This includes wall mounts, custom cabinets and other than those authorized by persons other installation methods that result in materials or workmanship as wear and tear, scratches and dents; Service, repairs or replacement made necessary by the use or installation of antenna systems are effective only if the...

Brochure
Page 2
... 3 3 3 3 AUDIO Speaker System Mute/Half Mute Invisible 3 CONVENIENCE Built-in TV Tuning Auto Aspect Control Photo Frame Capability Input Labeling Channel Labeling Channel BrowserTM/Favorites Sleep Timer Remote Control JACK PACK HDMI® v1.3 Digital Inputs InstaPortTM Fast HDMI® Switching HDMI®-CEC2 ColorStream® Component Video Input Rear Audio/Video Inputs Side Audio/Video Inputs USB Port High Res PC Input (S-XGA, 15 Pin, D-sub) Dolby® Digital Optical Output PRODUCT & PACKAGING VESA® Mounting Pattern3 Unit Dimensions (WHD) in picture resolution.
... 3 3 3 3 AUDIO Speaker System Mute/Half Mute Invisible 3 CONVENIENCE Built-in TV Tuning Auto Aspect Control Photo Frame Capability Input Labeling Channel Labeling Channel BrowserTM/Favorites Sleep Timer Remote Control JACK PACK HDMI® v1.3 Digital Inputs InstaPortTM Fast HDMI® Switching HDMI®-CEC2 ColorStream® Component Video Input Rear Audio/Video Inputs Side Audio/Video Inputs USB Port High Res PC Input (S-XGA, 15 Pin, D-sub) Dolby® Digital Optical Output PRODUCT & PACKAGING VESA® Mounting Pattern3 Unit Dimensions (WHD) in picture resolution.


