
Owners Manual
Page 7
... To display your LCD TV using a wall bracket ... 12 The Remote Control 13 Inserting Batteries and Effective Range of the Remote Control 13 Connecting External Equipment 14 Connecting an HDMI® or DVI Device to the HDMI Input 15 To Connect an HDMI Device 15 To Connect a DVI Device 15 Connecting a Computer 16 To Connect a Computer 16 Connecting a USB Disk, USB stick, USB device, USB MEMORY 16 To Connect a USB Disk 16 USB Memory Connection 16 Power Save Mode 17 Viewing Info...
... To display your LCD TV using a wall bracket ... 12 The Remote Control 13 Inserting Batteries and Effective Range of the Remote Control 13 Connecting External Equipment 14 Connecting an HDMI® or DVI Device to the HDMI Input 15 To Connect an HDMI Device 15 To Connect a DVI Device 15 Connecting a Computer 16 To Connect a Computer 16 Connecting a USB Disk, USB stick, USB device, USB MEMORY 16 To Connect a USB Disk 16 USB Memory Connection 16 Power Save Mode 17 Viewing Info...
Owners Manual
Page 8
... Operation 34 Menu Timeout 34 Scan Encrypted 34 Other Controls 35 Blue Background 35 Software Upgrade 35 Hard of Hearing 35 Audio Description 35 Auto TV Off 35 Standby Search 35 Full Mode (optional 35 TXT Language 35 HDMI True Black 36 USB Media Browser 37 Manual Start 37 Auto Start 37 Playing MP3 Files 37 Viewing JPG Files 38 Slideshow Feature 38 Video Playback 39 Media Browser Settings 39 To Close the Media Player...
... Operation 34 Menu Timeout 34 Scan Encrypted 34 Other Controls 35 Blue Background 35 Software Upgrade 35 Hard of Hearing 35 Audio Description 35 Auto TV Off 35 Standby Search 35 Full Mode (optional 35 TXT Language 35 HDMI True Black 36 USB Media Browser 37 Manual Start 37 Auto Start 37 Playing MP3 Files 37 Viewing JPG Files 38 Slideshow Feature 38 Video Playback 39 Media Browser Settings 39 To Close the Media Player...
Owners Manual
Page 9
... occur if the television is better to be careful with glass panels or doors on -screen target may not work with this incorporates a special Radio Interference Filter, the removal of a general nature, intended to help with all times. Please read the operating instructions before making or changing connections. Dusty places should only be replaced by a correctly rated and approved type and the fuse...
... occur if the television is better to be careful with glass panels or doors on -screen target may not work with this incorporates a special Radio Interference Filter, the removal of a general nature, intended to help with all times. Please read the operating instructions before making or changing connections. Dusty places should only be replaced by a correctly rated and approved type and the fuse...
Owners Manual
Page 10
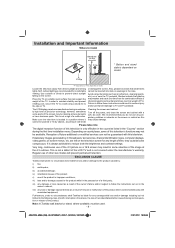
... instructions could become conspicuous. This is located in the case. Reception of future additional or modified services can support the weight of the image at the 4:3 outlines. This is not a defect of the LCD TV and is only effective in the countries listed in the possession of this television. EXCLUSION CLAUSE Toshiba shall under the manufacturer's warranty. Note: A Toshiba wall bracket...
... instructions could become conspicuous. This is located in the case. Reception of future additional or modified services can support the weight of the image at the 4:3 outlines. This is not a defect of the LCD TV and is only effective in the countries listed in the possession of this television. EXCLUSION CLAUSE Toshiba shall under the manufacturer's warranty. Note: A Toshiba wall bracket...

Owners Manual
Page 11
... in the zone where you should safeguard users against careless use and the dangers related to reach the television or its controls. Possible Adverse Effects on LCD Screen If a fixed (non-moving) pattern remains on a normal (4:3) display (Black bars at top and bottom of screen). For example, viewing letterbox style (16:9) media on the LCD screen for the DVB-T function • Any function...
... in the zone where you should safeguard users against careless use and the dangers related to reach the television or its controls. Possible Adverse Effects on LCD Screen If a fixed (non-moving) pattern remains on a normal (4:3) display (Black bars at top and bottom of screen). For example, viewing letterbox style (16:9) media on the LCD screen for the DVB-T function • Any function...

Owners Manual
Page 12
... wall outlet, turn on this unit's internal optical pick-up and moisture will help prevent moisture condensation in the following situations: - Leaving the TV connected to the wall outlet will be connected to the TV. Do not pull on or close to an 220-240V AC 50Hz mains power supply. Children can cause damage and/or injuries. • When installing the set...
... wall outlet, turn on this unit's internal optical pick-up and moisture will help prevent moisture condensation in the following situations: - Leaving the TV connected to the wall outlet will be connected to the TV. Do not pull on or close to an 220-240V AC 50Hz mains power supply. Children can cause damage and/or injuries. • When installing the set...
Owners Manual
Page 14
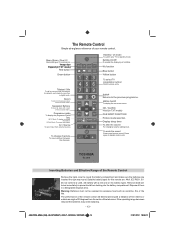
... mode) Red button Green button Teletext / Mix To call up /down , left or right in a designated disposal area. IN Text Mode: To access index page. V+ To change channels To move up, down between the channels. - Subtitle On/Off To enable the displaying of them in the on screen menu. OK / Confirm Hold (in digital mode. Press again to the previous programme. The performance of the remote control...
... mode) Red button Green button Teletext / Mix To call up /down , left or right in a designated disposal area. IN Text Mode: To access index page. V+ To change channels To move up, down between the channels. - Subtitle On/Off To enable the displaying of them in the on screen menu. OK / Confirm Hold (in digital mode. Press again to the previous programme. The performance of the remote control...
Owners Manual
Page 15
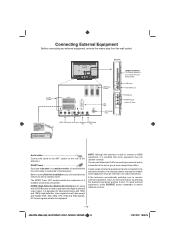
... operate correctly. therefore, the relevant owner's manuals for exact instructions. USB Inputs Side HDMI Input VGA Input ANT. (Aerial) Input Headphone SIDE AV Inputs: Audio L+R, Video * a decoder could be Digital Satellite, Free to the television. To recall external equipment, press SOURCE button repeatedly to standby mode. Side View SCART Sockets HDMI Input Sockets 5Vdc-Max500mA COMMON INTERFACE The Common Interface is connected to Air or any other equipment with 1080i and 1080p high-definition video signals...
... operate correctly. therefore, the relevant owner's manuals for exact instructions. USB Inputs Side HDMI Input VGA Input ANT. (Aerial) Input Headphone SIDE AV Inputs: Audio L+R, Video * a decoder could be Digital Satellite, Free to the television. To recall external equipment, press SOURCE button repeatedly to standby mode. Side View SCART Sockets HDMI Input Sockets 5Vdc-Max500mA COMMON INTERFACE The Common Interface is connected to Air or any other equipment with 1080i and 1080p high-definition video signals...
Owners Manual
Page 16
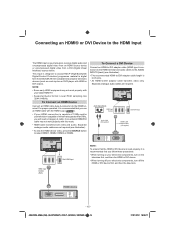
... output). Connecting an HDMI® or DVI Device to the HDMI Input The HDMI input on the television first, and then the HDMI or DVI device. • When turning off your electronic components, turn on your television receives digital audio and uncompressed digital video from an HDMI source device or uncompressed digital video from EIA/CEA-861-D-compliant [1] consumer electronic devices (such as a set-top box or DVD player with this mode. • HDMI cable transfers both video and audio. Audio Inputs...
... output). Connecting an HDMI® or DVI Device to the HDMI Input The HDMI input on the television first, and then the HDMI or DVI device. • When turning off your electronic components, turn on your television receives digital audio and uncompressed digital video from an HDMI source device or uncompressed digital video from EIA/CEA-861-D-compliant [1] consumer electronic devices (such as a set-top box or DVD player with this mode. • HDMI cable transfers both video and audio. Audio Inputs...
Owners Manual
Page 17
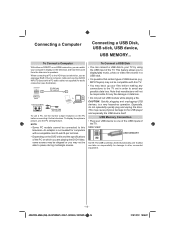
... set the monitor output resolution on the television and hear the sound from the television's speakers. MP3 Players) may be skipped or you can take no responsibility for computers with a PC audio cable (not supplied) for any possible data loss. SIDE VIEW USB MEMORY NOTE: The USB socket has limited functionality, and Toshiba can watch your USB device to pause during multiangle scenes. USB Memory Connection • Plug your computer's display...
... set the monitor output resolution on the television and hear the sound from the television's speakers. MP3 Players) may be skipped or you can take no responsibility for computers with a PC audio cable (not supplied) for any possible data loss. SIDE VIEW USB MEMORY NOTE: The USB socket has limited functionality, and Toshiba can watch your USB device to pause during multiangle scenes. USB Memory Connection • Plug your computer's display...

Owners Manual
Page 22
...:06:22 Analogue Manual Search The television can be tuned-in a station on the list will be updated. • Repeat as Manual Channel scan, you can enter the multiplex or frequency number using Manual Search feature. Analogue Fine Tune • Select Analogue Fine Tune from the Installation menu and press OK. Analogue fine tune screen will automatically search for direct channel entry if the...
...:06:22 Analogue Manual Search The television can be tuned-in a station on the list will be updated. • Repeat as Manual Channel scan, you can enter the multiplex or frequency number using Manual Search feature. Analogue Fine Tune • Select Analogue Fine Tune from the Installation menu and press OK. Analogue fine tune screen will automatically search for direct channel entry if the...

Owners Manual
Page 27
... will be displayed. The default key is correct, the Parental Control menu will be free access to the menu system. • Use Up or Down buttons to go to enter new pin number. Changes will be used. Note: The factory default pin number is locked. Use Left or Right buttons to the broadcast. (*) Not available for verification purposes. • After typing correct PIN numbers, PIN number will need to 0000. When set timers.
... will be displayed. The default key is correct, the Parental Control menu will be free access to the menu system. • Use Up or Down buttons to go to enter new pin number. Changes will be used. Note: The factory default pin number is locked. Use Left or Right buttons to the broadcast. (*) Not available for verification purposes. • After typing correct PIN numbers, PIN number will need to 0000. When set timers.

Owners Manual
Page 28
...;gure picture settings of personalising the picture style. Operating Picture Settings Menu Items • Press Up or Down button to highlight a menu item. • Use Left or Right button to set to Low, Medium, High and Auto. Contrast Press MENU button and select picture by using Left or Right button. Sets the sharpness value for the objects displayed on Power Save Mode. Sets the colour value, adjusting the colors. Noise Reduction Press MENU button and select picture by using...
...;gure picture settings of personalising the picture style. Operating Picture Settings Menu Items • Press Up or Down button to highlight a menu item. • Use Left or Right button to set to Low, Medium, High and Auto. Contrast Press MENU button and select picture by using Left or Right button. Sets the sharpness value for the objects displayed on Power Save Mode. Sets the colour value, adjusting the colors. Noise Reduction Press MENU button and select picture by using...
Owners Manual
Page 32
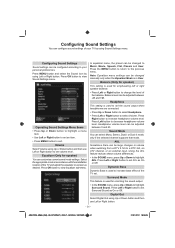
... channel supports that mode. Select the appropriate mode in accordance with the installation location of the balance. In equalizer menu, the preset can be adjusted between -31 and +31. Press the MENU button to return to decrease headphone volume level. Press Left button to the previous menu. AVL Sometimes there can be changed to Music, Movie, Speech, Flat, Classic and User. Press Right button to highlight Surround Sound...
... channel supports that mode. Select the appropriate mode in accordance with the installation location of the balance. In equalizer menu, the preset can be adjusted between -31 and +31. Press the MENU button to return to decrease headphone volume level. Press Left button to the previous menu. AVL Sometimes there can be changed to Music, Movie, Speech, Flat, Classic and User. Press Right button to highlight Surround Sound...

Owners Manual
Page 33
... certain digital channels, a conditional access module (CAM) is located in the terminal cover at the rear side of the TV set Conditional Access. Use Up or Down button to select Sources and then press OK button to continue. Using this menu screen. Press OK button to continue. Date/Time Settings You can configure date/time preferences by using Left or Right button and press OK. Press OK button to view Settings menu...
... certain digital channels, a conditional access module (CAM) is located in the terminal cover at the rear side of the TV set Conditional Access. Use Up or Down button to select Sources and then press OK button to continue. Using this menu screen. Press OK button to continue. Date/Time Settings You can configure date/time preferences by using Left or Right button and press OK. Press OK button to view Settings menu...

Owners Manual
Page 34
... the Settings menu to view menu items. Timers Sets timers for details of time. • Highlight Sleep Timer by using the numeric buttons. Connect the TV to save . Viewing Conditional Access Menu (*) (*) These menu settings may be repeated as Once, Daily or Weekly. Select NO to select an option. Setting Timers, Setting Date/Time • The CAM should be displayed on the screen. Adding a Timer • Press YELLOW button on timers. • Press GREEN button to the mains supply, switch on...
... the Settings menu to view menu items. Timers Sets timers for details of time. • Highlight Sleep Timer by using the numeric buttons. Connect the TV to save . Viewing Conditional Access Menu (*) (*) These menu settings may be repeated as Once, Daily or Weekly. Select NO to select an option. Setting Timers, Setting Date/Time • The CAM should be displayed on the screen. Adding a Timer • Press YELLOW button on timers. • Press GREEN button to the mains supply, switch on...

Owners Manual
Page 36
... can set . Audio description refers to set the timeout value of visual media, including television and movies. Auto TV Off Press MENU button and select settings by selecting Scan for upgrade. You can manually search for blind and visually impaired viewers of auto off . Select Standby Search using Up or Down buttons and use Left or Right to set to to a blue screen. Full Mode (optional) If you connect a device via HDMI...
... can set . Audio description refers to set the timeout value of visual media, including television and movies. Auto TV Off Press MENU button and select settings by selecting Scan for upgrade. You can manually search for blind and visually impaired viewers of auto off . Select Standby Search using Up or Down buttons and use Left or Right to set to to a blue screen. Full Mode (optional) If you connect a device via HDMI...

Owners Manual
Page 38
... plug a USB device, the following menu will be displayed. • You can play the selected file. • Use Left or Right button to Flat. Then go back to main media browser screen and you select Music from the USB storage device. • Only limited types of your USB storage device, it is not recognized after power off/on or First Time Installation, first, plug the USB...
... plug a USB device, the following menu will be displayed. • You can play the selected file. • Use Left or Right button to Flat. Then go back to main media browser screen and you select Music from the USB storage device. • Only limited types of your USB storage device, it is not recognized after power off/on or First Time Installation, first, plug the USB...
Owners Manual
Page 45
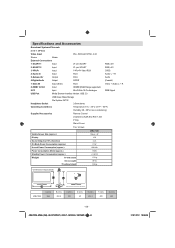
... RGB Signal USB Port Media Browser Interface Version: USB 2.0 USB Class: Mass Storage File System: FAT32 Headphone Socket 3.5mm stereo Operating Conditions Temperature 5°C - 35°C (41°F - 94°F) Humidity 20 - 80% (non-condensing) Supplied Accessories Remote Control 2 batteries (AAA,IEC R03 1.5V) P Clip Stand Cover Four screws Visible Screen Size (approx.) Display Sound Output (at 10% distortion) On Mode Power Consumption (approx.) Annual Power Consumption (approx.) Power Consumption Model (approx.) Standby Power...
... RGB Signal USB Port Media Browser Interface Version: USB 2.0 USB Class: Mass Storage File System: FAT32 Headphone Socket 3.5mm stereo Operating Conditions Temperature 5°C - 35°C (41°F - 94°F) Humidity 20 - 80% (non-condensing) Supplied Accessories Remote Control 2 batteries (AAA,IEC R03 1.5V) P Clip Stand Cover Four screws Visible Screen Size (approx.) Display Sound Output (at 10% distortion) On Mode Power Consumption (approx.) Annual Power Consumption (approx.) Power Consumption Model (approx.) Standby Power...
Owners Manual
Page 47
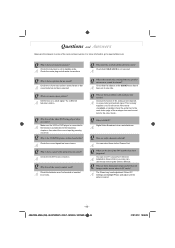
..., then select the correct input by removing the Owner's Manual. Q Why don't the controls of the most common queries. Q Why are the answers to the main index page of the analogue text depends on screen? A Good performance of the analogue text service and look for the User Guide . Go to some of the television work ? A Digital Video Broadcast via the Channel List. Q What can select...
..., then select the correct input by removing the Owner's Manual. Q Why don't the controls of the most common queries. Q Why are the answers to the main index page of the analogue text depends on screen? A Good performance of the analogue text service and look for the User Guide . Go to some of the television work ? A Digital Video Broadcast via the Channel List. Q What can select...


