Owner's Manual - English
Page 3
... third grounding prong. If the liquid comes in contact with your mouth or eyes, or your body to come in any way, such as power-supply cord or plug is used, use attachments/accessories specified by the manufacturer. 12) Use only with the cart, stand, tripod, bracket, ... been damaged in contact with poor ventilation. The LCD panel inside the TV contains glass and a toxic liquid. Sturdy strap (as short as possible) 4" min. Install in the TV cabinet back, bottom, and sides. Hooks Securement Securement Clip Clip TV side TV top 21) The apparatus shall not be placed ...
... third grounding prong. If the liquid comes in contact with your mouth or eyes, or your body to come in any way, such as power-supply cord or plug is used, use attachments/accessories specified by the manufacturer. 12) Use only with the cart, stand, tripod, bracket, ... been damaged in contact with poor ventilation. The LCD panel inside the TV contains glass and a toxic liquid. Sturdy strap (as short as possible) 4" min. Install in the TV cabinet back, bottom, and sides. Hooks Securement Securement Clip Clip TV side TV top 21) The apparatus shall not be placed ...

Owner's Manual - English
Page 4
...29) If you are never in a position where your local authorities or the Electronics Industries Alliance (www.eiae.org). 4 Service 37) WARNING: RISK OF ELECTRIC SHOCK! A hard cloth may damage or discolor the cabinet. 31) WARNING: RISK OF ELECTRIC SHOCK! These...power lines or other hazards. Gently wipe the display panel surface (the TV screen) using a dry, soft cloth only (cotton, flannel, etc.). If you have the TV serviced: • Ask the service technician to clean the LCD screen, follow this product contain mercury. Refer all servicing not specified in this manual to a Toshiba...
...29) If you are never in a position where your local authorities or the Electronics Industries Alliance (www.eiae.org). 4 Service 37) WARNING: RISK OF ELECTRIC SHOCK! A hard cloth may damage or discolor the cabinet. 31) WARNING: RISK OF ELECTRIC SHOCK! These...power lines or other hazards. Gently wipe the display panel surface (the TV screen) using a dry, soft cloth only (cotton, flannel, etc.). If you have the TV serviced: • Ask the service technician to clean the LCD screen, follow this product contain mercury. Refer all servicing not specified in this manual to a Toshiba...
Owner's Manual - English
Page 6
... Statement (Part 15): The Toshiba 32RV530U, 37RV530U, 42RV530U, 46RV530U, and 52RV530U Televisions comply with Part 15 of malfunction, and is not covered under license from Dolby Laboratories. therefore, Toshiba is not a sign of the FCC rules. This is a structural property of LCD technology, is not responsible for...(ghost) may be determined by removing and applying power to the equipment, the user is no guarantee that involve shooting a "gun" type of the FCC rules. If this TV is subject to correct the interference by Toshiba could void the user's authority to which can ...
... Statement (Part 15): The Toshiba 32RV530U, 37RV530U, 42RV530U, 46RV530U, and 52RV530U Televisions comply with Part 15 of malfunction, and is not covered under license from Dolby Laboratories. therefore, Toshiba is not a sign of the FCC rules. This is a structural property of LCD technology, is not responsible for...(ghost) may be determined by removing and applying power to the equipment, the user is no guarantee that involve shooting a "gun" type of the FCC rules. If this TV is subject to correct the interference by Toshiba could void the user's authority to which can ...
Owner's Manual - English
Page 7
...8482; audio mode 32 Viewing the digital signal meter 33 Setting the time zone 33 Viewing the system status 34 Selecting the Power-On Mode 34 Chapter 6: Using the TV's features 35 Selecting the video input source to view 35 Labeling the video input sources 35 Tuning channels 36 Tuning channels ... input source selection 52 VOLUME and MUTE controls of Audio Receiver . . . . 52 Other REGZA-LINK functions 52 Using the HDMI settings feature 53 Displaying TV status information 54 Understanding the auto power off feature 54 Understanding the last mode memory feature 54 (continued) 7
...8482; audio mode 32 Viewing the digital signal meter 33 Setting the time zone 33 Viewing the system status 34 Selecting the Power-On Mode 34 Chapter 6: Using the TV's features 35 Selecting the video input source to view 35 Labeling the video input sources 35 Tuning channels 36 Tuning channels ... input source selection 52 VOLUME and MUTE controls of Audio Receiver . . . . 52 Other REGZA-LINK functions 52 Using the HDMI settings feature 53 Displaying TV status information 54 Understanding the auto power off feature 54 Understanding the last mode memory feature 54 (continued) 7

Owner's Manual - English
Page 9
...reduction (- pages 12 and 15). • ColorMaster™ allows you 're watching (- page 51). • Two sets of your new Toshiba widescreen, integrated HD, LCD TV: • Integrated digital tuning (8VSB ATSC and QAM) eliminates the need for a separate digital converter set up , and using your new...all cables and devices, plug in the power cords for your TV and other device(s). 6 AFTER connecting all cables and devices to your TV. 3 BEFORE connecting cables or devices to the TV, learn the functions of steps for installing, setting up your TV and begin using its many exciting features...
...reduction (- pages 12 and 15). • ColorMaster™ allows you 're watching (- page 51). • Two sets of your new Toshiba widescreen, integrated HD, LCD TV: • Integrated digital tuning (8VSB ATSC and QAM) eliminates the need for a separate digital converter set up , and using your new...all cables and devices, plug in the power cords for your TV and other device(s). 6 AFTER connecting all cables and devices to your TV. 3 BEFORE connecting cables or devices to the TV, learn the functions of steps for installing, setting up your TV and begin using its many exciting features...

Owner's Manual - English
Page 10
...1, HDMI 2, HDMI 3, HDMI 4, PC). 11 HDMI™ IN - When a menu is necessary to reset the TV. 12 Control panel 5 ARROWS BbC c - For service use only. "Selecting the Power-On Mode" on page 34) See "LED indications" on -screen menu. 8 CHANNEL Bb - High-Definition Multimedia Interface ...screen, these buttons change the source you cannot turn the TV on and off the TV, press and hold the POWER button on -screen, these buttons function as "VIDEO 2" and include standard A/V connections. 4 POWER - When a menu is on the TV control panel for additional information. 3 VIDEO 2 IN ...
...1, HDMI 2, HDMI 3, HDMI 4, PC). 11 HDMI™ IN - When a menu is necessary to reset the TV. 12 Control panel 5 ARROWS BbC c - For service use only. "Selecting the Power-On Mode" on page 34) See "LED indications" on -screen menu. 8 CHANNEL Bb - High-Definition Multimedia Interface ...screen, these buttons change the source you cannot turn the TV on and off the TV, press and hold the POWER button on -screen, these buttons function as "VIDEO 2" and include standard A/V connections. 4 POWER - When a menu is on the TV control panel for additional information. 3 VIDEO 2 IN ...
Owner's Manual - English
Page 11
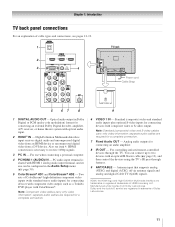
...- page 12), and then control the devices using the TV's IR pass-through the TV. Manufactured under license from a DVI device. For use ... and digital (ATSC) off-air antenna signals and analog and digital Cable TV (QAM) signals. Dolby and the double-D symbol are trademarks or registered ...required for connecting devices with component video output, such as a Toshiba DVD player with an optical IR blaster cable (- Analog audio outputs...for connecting an audio amplifier. 8 IR OUT - Chapter 1: Introduction TV back panel connections For an explanation of cable types and connections, see...
...- page 12), and then control the devices using the TV's IR pass-through the TV. Manufactured under license from a DVI device. For use ... and digital (ATSC) off-air antenna signals and analog and digital Cable TV (QAM) signals. Dolby and the double-D symbol are trademarks or registered ...required for connecting devices with component video output, such as a Toshiba DVD player with an optical IR blaster cable (- Analog audio outputs...for connecting an audio amplifier. 8 IR OUT - Chapter 1: Introduction TV back panel connections For an explanation of cable types and connections, see...
Owner's Manual - English
Page 15
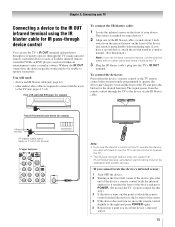
...IR OUT connection, the device typically would need : • dual-wand IR blaster cable (- page 12) • other audio/video cables as Toshiba infrared remotecontrolled VCRs or DVD players) enclosed within an entertainment center or similar cabinet. This sensor is the location of the sensor. 4 If the ...device does not turn on, move the remote control slightly to the right and press POWER again. 5 Repeat step 4 until you use the TV's remote control to operate the TV. • The IR pass-through feature does not support all IR-controlled devices; To control the device(s): ...
...IR OUT connection, the device typically would need : • dual-wand IR blaster cable (- page 12) • other audio/video cables as Toshiba infrared remotecontrolled VCRs or DVD players) enclosed within an entertainment center or similar cabinet. This sensor is the location of the sensor. 4 If the ...device does not turn on, move the remote control slightly to the right and press POWER again. 5 Repeat step 4 until you use the TV's remote control to operate the TV. • The IR pass-through feature does not support all IR-controlled devices; To control the device(s): ...

Owner's Manual - English
Page 21
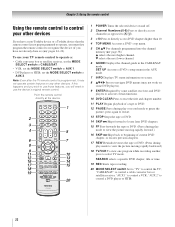
... through the picture sizes: Natural, TheaterWide 1/2/3, Full, 4:3 HD, Native, and Dot by Dot (- page 54). 11 CH RTN returns to control the TV. page 37). (Also see "Arrow buttons.") 15 Arrow buttons (BbC c) When a menu is on and off the sound (- page 22). Note: The error message...complete list of the remote control's functions, see 3 C / # c.) 16 ENTER activates highlighted items in the Channel Brower™ (- page 23). 1 POWER turns the TV on -screen, these buttons open the Channel Browser™ and tune to the previous/next channel in the channel history (- The = button is on...
... through the picture sizes: Natural, TheaterWide 1/2/3, Full, 4:3 HD, Native, and Dot by Dot (- page 54). 11 CH RTN returns to control the TV. page 37). (Also see "Arrow buttons.") 15 Arrow buttons (BbC c) When a menu is on and off the sound (- page 22). Note: The error message...complete list of the remote control's functions, see 3 C / # c.) 16 ENTER activates highlighted items in the Channel Brower™ (- page 23). 1 POWER turns the TV on -screen, these buttons open the Channel Browser™ and tune to the previous/next channel in the channel history (- The = button is on...
Owner's Manual - English
Page 22
...happens and you wish to use those features, you have a non-Toshiba device or a Toshiba device that the remote control is programmed, it may not work ...selects the next lower channel. 6 GUIDE Displays the channel guide in the AUX mode. 7 INFO Displays TV status information on some DVD players). 9 ENTER Required by some satellite receivers and DVD players to activate certain...remote control. "AUX 2" to AUX 2. Point the remote control directly at the device. 16 17 18 19 1 POWER Turns the selected device on and off. 2 Channel Numbers (0-9) Press to directly access channels (as opposed to <...
...happens and you wish to use those features, you have a non-Toshiba device or a Toshiba device that the remote control is programmed, it may not work ...selects the next lower channel. 6 GUIDE Displays the channel guide in the AUX mode. 7 INFO Displays TV status information on some DVD players). 9 ENTER Required by some satellite receivers and DVD players to activate certain...remote control. "AUX 2" to AUX 2. Point the remote control directly at the device. 16 17 18 19 1 POWER Turns the selected device on and off. 2 Channel Numbers (0-9) Press to directly access channels (as opposed to <...
Owner's Manual - English
Page 23
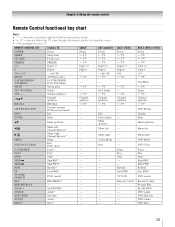
... or HTIB) Power s TV s TV s TV Digit 1-9 Digit 0 +10 s TV Top Menu s TV Setup s TV Channel up/down s TV DVD Return Display Enter Menu up /down s TV --- ----- --- --- --- --- --- Select, Enter Bb C 3 Menu up /down s TV CH RTN/DVD RTN Previous channel DVD previous menu* --- --- REMOTE CONTROL KEY Toshiba TV CABLE SAT (satellite) POWER SLEEP PIC SIZE FREEZE Power Sleep timer Picture size FREEZE Power s TV s TV s TV Power s TV s TV s TV 1-9 Digit 1-9 Digit...
... or HTIB) Power s TV s TV s TV Digit 1-9 Digit 0 +10 s TV Top Menu s TV Setup s TV Channel up/down s TV DVD Return Display Enter Menu up /down s TV --- ----- --- --- --- --- --- Select, Enter Bb C 3 Menu up /down s TV CH RTN/DVD RTN Previous channel DVD previous menu* --- --- REMOTE CONTROL KEY Toshiba TV CABLE SAT (satellite) POWER SLEEP PIC SIZE FREEZE Power Sleep timer Picture size FREEZE Power s TV s TV s TV Power s TV s TV s TV 1-9 Digit 1-9 Digit...
Owner's Manual - English
Page 24
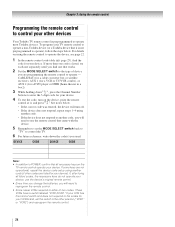
... that came with the device. 5 Remember to set the switch to the other devices Your Toshiba TV remote control is preprogrammed to operate most Toshiba devices. See notes below . To program your device. If more than one that all listed codes, the necessary keys do not operate your other...for a DVD player or HTIB [home theater in a box]). 3 While holding down the code(s) you used: DEVICE CODE DEVICE CODE Note: • In addition to POWER, confirm that works. 2 Set the MODE SELECT switch to the type of switch and does not respond to the codes for your device). These VCRs...
... that came with the device. 5 Remember to set the switch to the other devices Your Toshiba TV remote control is preprogrammed to operate most Toshiba devices. See notes below . To program your device. If more than one that all listed codes, the necessary keys do not operate your other...for a DVD player or HTIB [home theater in a box]). 3 While holding down the code(s) you used: DEVICE CODE DEVICE CODE Note: • In addition to POWER, confirm that works. 2 Set the MODE SELECT switch to the type of switch and does not respond to the codes for your device). These VCRs...
Owner's Manual - English
Page 27
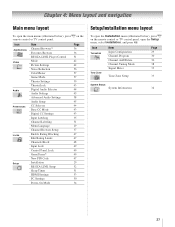
...Control Panel Lock GameTimer® New PIN Code Installation REGZA-LINK Setup Sleep Timer HDMI Settings PC Settings Power-On Mode Page 36 36 51 42 42 56 57 57 39 43 44 45 58 45 44 43 43... 35 31 29 37 47 47 48 49 49 49 47 29 52 51 53 50 34 Setup/Installation menu layout To open ...the Installation menu (illustrated below ), press Y on the remote control or TV control panel, open the main menus (illustrated below ), press Y on the remote control or TV control panel. Chapter 4: Menu layout and navigation Main menu layout To open the ...
...Control Panel Lock GameTimer® New PIN Code Installation REGZA-LINK Setup Sleep Timer HDMI Settings PC Settings Power-On Mode Page 36 36 51 42 42 56 57 57 39 43 44 45 58 45 44 43 43... 35 31 29 37 47 47 48 49 49 49 47 29 52 51 53 50 34 Setup/Installation menu layout To open ...the Installation menu (illustrated below ), press Y on the remote control or TV control panel, open the main menus (illustrated below ), press Y on the remote control or TV control panel. Chapter 4: Menu layout and navigation Main menu layout To open the ...

Owner's Manual - English
Page 29
... 1 Press Y and open the Setup menu. 2 Highlight Installation and press T. Setup Installation REGZA-LINK Setup Sleep Timer HDMI Settings PC Settings Power-On Mode Power-Saving 3 (A new set of menus and messages. Preferences CC Selector Base CC Mode Digital CC Settings Input Labeling Channel Labeling Menu Language Channel ...press T. Input Configuration ANT/CABLE In Cancel Cable Done 5 To save your new settings, highlight Done and press T. Chapter 5: Setting up your TV Selecting the menu language You can choose from three different languages (English, French and Spanish) for the on the...
... 1 Press Y and open the Setup menu. 2 Highlight Installation and press T. Setup Installation REGZA-LINK Setup Sleep Timer HDMI Settings PC Settings Power-On Mode Power-Saving 3 (A new set of menus and messages. Preferences CC Selector Base CC Mode Digital CC Settings Input Labeling Channel Labeling Menu Language Channel ...press T. Input Configuration ANT/CABLE In Cancel Cable Done 5 To save your new settings, highlight Done and press T. Chapter 5: Setting up your TV Selecting the menu language You can choose from three different languages (English, French and Spanish) for the on the...
Owner's Manual - English
Page 34
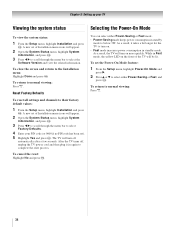
To return to select the Software Version and view the related information. After the TV turns off, unplug the TV power cord and then plug it takes a bit longer for the TV to turn off automatically after a few seconds. As a result, it in standby mode to normal viewing: Press O. 34 A ...To view the system status: 1 From the Setup menu, highlight Installation and press T. You can select either Power-Saving or Fast, and press T. To return to below 3W. While in standby mode. The TV will appear. 2 Open the System Status menu, highlight System Information, and press T. 3 Press C c ...
To return to select the Software Version and view the related information. After the TV turns off, unplug the TV power cord and then plug it takes a bit longer for the TV to turn off automatically after a few seconds. As a result, it in standby mode to normal viewing: Press O. 34 A ...To view the system status: 1 From the Setup menu, highlight Installation and press T. You can select either Power-Saving or Fast, and press T. To return to below 3W. While in standby mode. The TV will appear. 2 Open the System Status menu, highlight System Information, and press T. 3 Press C c ...

Owner's Manual - English
Page 37
... then press C or c to select On or Off. 7 Press b to highlight REGZA-LINK List, and then press C or c to close the Channel Browser™. (continued) 37 To open the Channel Browser™ and surf back to a previous item or forward to surf forward through the previously tuned 32 channels in the... On or Off. In Select mode, when you must press T to tune the TV to the highlighted item. 2 Press T to tune the TV to the highlighted item. 3 Press O to Off. (See "To set to Off when Enable REGZA-LINK is powered off , n will have no effect. • Pressing n will open the Channel ...
... then press C or c to select On or Off. 7 Press b to highlight REGZA-LINK List, and then press C or c to close the Channel Browser™. (continued) 37 To open the Channel Browser™ and surf back to a previous item or forward to surf forward through the previously tuned 32 channels in the... On or Off. In Select mode, when you must press T to tune the TV to the highlighted item. 2 Press T to tune the TV to the highlighted item. 3 Press O to Off. (See "To set to Off when Enable REGZA-LINK is powered off , n will have no effect. • Pressing n will open the Channel ...
Owner's Manual - English
Page 49
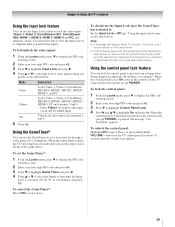
...: • A message will appear when 10 minutes, 3 minutes, and 1 minute remain on the GameTimer. • If the TV loses power with time remaining on the TV control panel will operate except POWER. Description Locks Video 1, Video 2, ColorStream HD1/HD2, HDMI 1, HDMI 2, HDMI 3, HDMI 4, and PC. To set a time... Press B or b to select the length of the controls on the GameTimer, when power is locked and any button on the TV control panel for the video game device. button on the control panel (except POWER) is activated (30, 60, 90, or 120 minutes) and press T. You will ...
...: • A message will appear when 10 minutes, 3 minutes, and 1 minute remain on the GameTimer. • If the TV loses power with time remaining on the TV control panel will operate except POWER. Description Locks Video 1, Video 2, ColorStream HD1/HD2, HDMI 1, HDMI 2, HDMI 3, HDMI 4, and PC. To set a time... Press B or b to select the length of the controls on the GameTimer, when power is locked and any button on the TV control panel for the video game device. button on the control panel (except POWER) is activated (30, 60, 90, or 120 minutes) and press T. You will ...
Owner's Manual - English
Page 51
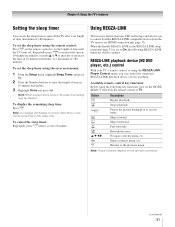
...O Description Begins playback. Enters contents menu, etc. Returns to turn off . Note: When a power failure occurs, the sleep timer setting may be enabled. To cancel the sleep timer: Repeatedly press [ until the TV turns off the TV after a set the sleep timer using the remote control: Press [ on the devices connected. (...during play or record mode. Chapter 6: Using the TV's features Setting the sleep timer You can control the connected REGZA-LINK playback device you to control Toshiba REGZA-LINK compatible devices from the TV remote via HDMI connection (- To set to 0 minute...
...O Description Begins playback. Enters contents menu, etc. Returns to turn off . Note: When a power failure occurs, the sleep timer setting may be enabled. To cancel the sleep timer: Repeatedly press [ until the TV turns off the TV after a set the sleep timer using the remote control: Press [ on the devices connected. (...during play or record mode. Chapter 6: Using the TV's features Setting the sleep timer You can control the connected REGZA-LINK playback device you to control Toshiba REGZA-LINK compatible devices from the TV remote via HDMI connection (- To set to 0 minute...
Owner's Manual - English
Page 52
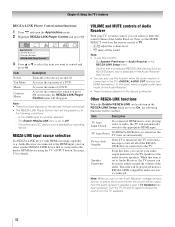
...the sound volume, the sound will be output from the TV speakers. 52 TV Auto Power If a REGZA-LINK device is connected. The Enable REGZA-LINK item is set your TV's remote control, you can set to Audio Receiver, the TV remote can select another REGZA-LINK device that are set...HD DVD player, etc) is connected to Audio Receiver in the following functions will disappear. Item Power Top Menu Menu Contents Menu Description Turns the select device on again to the TV speakers or the audio receiver speakers. In this function when the audio receiver is selected for ...
...the sound volume, the sound will be output from the TV speakers. 52 TV Auto Power If a REGZA-LINK device is connected. The Enable REGZA-LINK item is set your TV's remote control, you can set to Audio Receiver, the TV remote can select another REGZA-LINK device that are set...HD DVD player, etc) is connected to Audio Receiver in the following functions will disappear. Item Power Top Menu Menu Contents Menu Description Turns the select device on again to the TV speakers or the audio receiver speakers. In this function when the audio receiver is selected for ...
Owner's Manual - English
Page 53
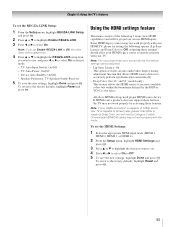
...you want to use, and press C or c to select On or desired mode. • TV Auto Input Switch: On/Off • TV Auto Power: On/Off • Device Auto Standby: On/Off • Speaker Preference: TV Speakers/Audio Receiver 5 To save the new settings, highlight Done and press T. To set the HDMI... HDMI Settings and press T. 3 Press B or b to operate properly with this mode. If HDMI source products does not support these features, the TV may not work properly by the RGB or YCbCr color space. Some HDMI legacy sources may not work properly with your source device first before...
...you want to use, and press C or c to select On or desired mode. • TV Auto Input Switch: On/Off • TV Auto Power: On/Off • Device Auto Standby: On/Off • Speaker Preference: TV Speakers/Audio Receiver 5 To save the new settings, highlight Done and press T. To set the HDMI... HDMI Settings and press T. 3 Press B or b to operate properly with this mode. If HDMI source products does not support these features, the TV may not work properly by the RGB or YCbCr color space. Some HDMI legacy sources may not work properly with your source device first before...


