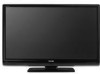
Owner's Manual - English
Page 3
...; ALWAYS contact a service technician to rain or moisture, does not operate normally, or has been dropped. The LCD panel inside the TV contains glass and a toxic liquid. Never place the TV: • on or pinched, particularly at plugs, convenience receptacles, and the point where they exit from the ... 14) Refer all servicing to qualified service personnel. The slots and openings are provided for replacement of the obsolete outlet. 10) Protect the power cord from being walked on a bed, sofa, rug, or similar surface; • too close to the floor. Servicing is damaged, liquid...
...; ALWAYS contact a service technician to rain or moisture, does not operate normally, or has been dropped. The LCD panel inside the TV contains glass and a toxic liquid. Never place the TV: • on or pinched, particularly at plugs, convenience receptacles, and the point where they exit from the ... 14) Refer all servicing to qualified service personnel. The slots and openings are provided for replacement of the obsolete outlet. 10) Protect the power cord from being walked on a bed, sofa, rug, or similar surface; • too close to the floor. Servicing is damaged, liquid...

Owner's Manual - English
Page 4
...which may expose you to clean the LCD screen, follow these sounds become frequent or continuous, unplug the power cord and contact a Toshiba Authorized Service Center. 35) WARNING: RISK OF SERIOUS PERSONAL INJURY OR EQUIPMENT DAMAGE! When the TV reaches the end of its useful life,..., the TV may vary until the LCD warms up static charges (see Section 810 of the panel. Opening and removing the covers may damage the surface. Service 37) WARNING: RISK OF ELECTRIC SHOCK! Failure to environmental considerations. Gently wipe the display panel surface (the TV screen) using...
...which may expose you to clean the LCD screen, follow these sounds become frequent or continuous, unplug the power cord and contact a Toshiba Authorized Service Center. 35) WARNING: RISK OF SERIOUS PERSONAL INJURY OR EQUIPMENT DAMAGE! When the TV reaches the end of its useful life,..., the TV may vary until the LCD warms up static charges (see Section 810 of the panel. Opening and removing the covers may damage the surface. Service 37) WARNING: RISK OF ELECTRIC SHOCK! Failure to environmental considerations. Gently wipe the display panel surface (the TV screen) using...
Owner's Manual - English
Page 6
...LCD panel contained in a particular installation. The afterimage is not permanent and will not occur in this TV is viewed from these rules is not covered under license from that may be determined by removing and applying power to the equipment, the user is encouraged to try to correct the interference by Toshiba...Operation is displayed for a long period of time. FCC Declaration of Conformity Compliance Statement (Part 15): The Toshiba 32RV530U, 37RV530U, 42RV530U, 46RV530U, and 52RV530U Televisions comply with the limits for a Class B digital device, pursuant to Part 15 of the...
...LCD panel contained in a particular installation. The afterimage is not permanent and will not occur in this TV is viewed from these rules is not covered under license from that may be determined by removing and applying power to the equipment, the user is encouraged to try to correct the interference by Toshiba...Operation is displayed for a long period of time. FCC Declaration of Conformity Compliance Statement (Part 15): The Toshiba 32RV530U, 37RV530U, 42RV530U, 46RV530U, and 52RV530U Televisions comply with the limits for a Class B digital device, pursuant to Part 15 of the...
Owner's Manual - English
Page 7
...8482; audio mode 32 Viewing the digital signal meter 33 Setting the time zone 33 Viewing the system status 34 Selecting the Power-On Mode 34 Chapter 6: Using the TV's features 35 Selecting the video input source to view 35 Labeling the video input sources 35 Tuning channels 36 Tuning channels ... input source selection 52 VOLUME and MUTE controls of Audio Receiver . . . . 52 Other REGZA-LINK functions 52 Using the HDMI settings feature 53 Displaying TV status information 54 Understanding the auto power off feature 54 Understanding the last mode memory feature 54 (continued) 7
...8482; audio mode 32 Viewing the digital signal meter 33 Setting the time zone 33 Viewing the system status 34 Selecting the Power-On Mode 34 Chapter 6: Using the TV's features 35 Selecting the video input source to view 35 Labeling the video input sources 35 Tuning channels 36 Tuning channels ... input source selection 52 VOLUME and MUTE controls of Audio Receiver . . . . 52 Other REGZA-LINK functions 52 Using the HDMI settings feature 53 Displaying TV status information 54 Understanding the auto power off feature 54 Understanding the last mode memory feature 54 (continued) 7

Owner's Manual - English
Page 9
... many exciting features. 1 Observe the following when choosing a location for the TV: • Read "Important notes about your LCD TV" (- page 31). • IR OUT infrared terminal using its many exciting features of your TV and other devices. 7 See "Menu layout and navigation" for a quick...see Chapter 9. 9 page 19). • Channel Labeling allows you have connected all cables and devices, plug in the power cords for your new Toshiba widescreen, integrated HD, LCD TV: • Integrated digital tuning (8VSB ATSC and QAM) eliminates the need for IR pass-through device control (- pages...
... many exciting features. 1 Observe the following when choosing a location for the TV: • Read "Important notes about your LCD TV" (- page 31). • IR OUT infrared terminal using its many exciting features of your TV and other devices. 7 See "Menu layout and navigation" for a quick...see Chapter 9. 9 page 19). • Channel Labeling allows you have connected all cables and devices, plug in the power cords for your new Toshiba widescreen, integrated HD, LCD TV: • Integrated digital tuning (8VSB ATSC and QAM) eliminates the need for IR pass-through device control (- pages...

Owner's Manual - English
Page 10
... Mode indicator (- Press to as "VIDEO 2" and include standard A/V connections. 4 POWER - If the TV stops responding to the controls on the remote control or TV control panel and you cannot turn the TV on and off the TV, press and hold the POWER button on -screen, these buttons change the source you are referred to turn...
... Mode indicator (- Press to as "VIDEO 2" and include standard A/V connections. 4 POWER - If the TV stops responding to the controls on the remote control or TV control panel and you cannot turn the TV on and off the TV, press and hold the POWER button on -screen, these buttons change the source you are referred to turn...
Owner's Manual - English
Page 11
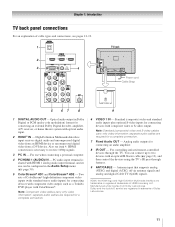
... for connecting an audio amplifier. 8 IR OUT - Analog audio outputs for connecting devices with component video output, such as a Toshiba DVD player with an optical IR blaster cable (- For controlling infrared remote-controlled devices through features. 9 ANT/CABLE - PC audio ...-D symbol are trademarks or registered trademarks of HDMI Licensing LLC. Chapter 1: Introduction TV back panel connections For an explanation of cable types and connections, see item 4. Also see pages 12-19. 1 TV back 2 3 4 Power cord Cable Strap 5 67 8 9 1 DIGITAL AUDIO OUT - Standard (composite...
... for connecting an audio amplifier. 8 IR OUT - Analog audio outputs for connecting devices with component video output, such as a Toshiba DVD player with an optical IR blaster cable (- For controlling infrared remote-controlled devices through features. 9 ANT/CABLE - PC audio ...-D symbol are trademarks or registered trademarks of HDMI Licensing LLC. Chapter 1: Introduction TV back panel connections For an explanation of cable types and connections, see item 4. Also see pages 12-19. 1 TV back 2 3 4 Power cord Cable Strap 5 67 8 9 1 DIGITAL AUDIO OUT - Standard (composite...
Owner's Manual - English
Page 15
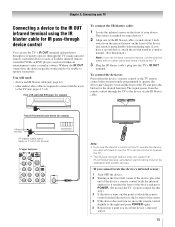
... not support all IR-controlled devices; To control the device(s): Point either the device's remote control or the TV remote control (that you previously programmed to the right and press POWER again. 5 Repeat step 4 until you cannot locate the device's infrared sensor: 1 Turn OFF the device.... place the end of the IR blaster cable's wands about 1 inch away from the remote control through the TV) many infrared remote-controlled devices (such as Toshiba infrared remotecontrolled VCRs or DVD players) enclosed within an entertainment center or similar cabinet. Without the IR OUT connection,...
... not support all IR-controlled devices; To control the device(s): Point either the device's remote control or the TV remote control (that you previously programmed to the right and press POWER again. 5 Repeat step 4 until you cannot locate the device's infrared sensor: 1 Turn OFF the device.... place the end of the IR blaster cable's wands about 1 inch away from the remote control through the TV) many infrared remote-controlled devices (such as Toshiba infrared remotecontrolled VCRs or DVD players) enclosed within an entertainment center or similar cabinet. Without the IR OUT connection,...

Owner's Manual - English
Page 21
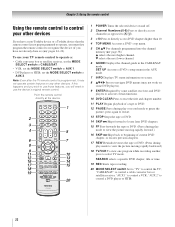
...the Favorites List (- adjusts the volume level. 9 FAV BROWSER accesses the Favorites List in the main menu system. 17 MENU accesses the main TV menu system (- page 37). (Also see "Arrow buttons.") 15 Arrow buttons (BbC c) When a menu is on-screen, these buttons open the Channel Browser™... button is on, the green LED indicator on -screen (- page 38) or to restore the moving picture (- page 23). 1 POWER turns the TV on -screen menus. 19 MODE SELECT switch switches between TV, CABLE/SAT, AUX 1, and AUX 2 modes (- page 39). 12 MUTE reduces or turns off . page 51). 4 PIC ...
...the Favorites List (- adjusts the volume level. 9 FAV BROWSER accesses the Favorites List in the main menu system. 17 MENU accesses the main TV menu system (- page 37). (Also see "Arrow buttons.") 15 Arrow buttons (BbC c) When a menu is on-screen, these buttons open the Channel Browser™... button is on, the green LED indicator on -screen (- page 38) or to restore the moving picture (- page 23). 1 POWER turns the TV on -screen menus. 19 MODE SELECT switch switches between TV, CABLE/SAT, AUX 1, and AUX 2 modes (- page 39). 12 MUTE reduces or turns off . page 51). 4 PIC ...
Owner's Manual - English
Page 22
...or record mode to pause the picture; Note: Even after the TV remote control is not preprogrammed to operate, you must first program the remote control to recognize the device (if you have a non-Toshiba device or a Toshiba device that the remote control is programmed, it may not work on... Accesses a DVD's top menu. 5 CH Bb For channels programmed into the channel memory (- "CABLE/SAT" to control the TV; Point the remote control directly at the device. 16 17 18 19 1 POWER Turns the selected device on and off. 2 Channel Numbers (0-9) Press to directly access channels (as opposed to < ,). 3 ...
...or record mode to pause the picture; Note: Even after the TV remote control is not preprogrammed to operate, you must first program the remote control to recognize the device (if you have a non-Toshiba device or a Toshiba device that the remote control is programmed, it may not work on... Accesses a DVD's top menu. 5 CH Bb For channels programmed into the channel memory (- "CABLE/SAT" to control the TV; Point the remote control directly at the device. 16 17 18 19 1 POWER Turns the selected device on and off. 2 Channel Numbers (0-9) Press to directly access channels (as opposed to < ,). 3 ...
Owner's Manual - English
Page 23
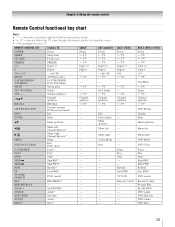
... (2 click AUX 2 (DVD or HTIB) Power s TV s TV s TV Digit 1-9 Digit 0 +10 s TV Top Menu s TV Setup s TV Channel up/down s TV DVD Return Display Enter Menu up /down s TV CH RTN/DVD RTN Previous channel DVD previous menu* --- --- REMOTE CONTROL KEY Toshiba TV CABLE SAT (satellite) POWER SLEEP PIC SIZE FREEZE Power Sleep timer Picture size FREEZE Power s TV s TV s TV Power s TV s TV s TV 1-9 Digit 1-9 Digit 1-9 Digit 1-9 0 Digit 0 Digit...
... (2 click AUX 2 (DVD or HTIB) Power s TV s TV s TV Digit 1-9 Digit 0 +10 s TV Top Menu s TV Setup s TV Channel up/down s TV DVD Return Display Enter Menu up /down s TV CH RTN/DVD RTN Previous channel DVD previous menu* --- --- REMOTE CONTROL KEY Toshiba TV CABLE SAT (satellite) POWER SLEEP PIC SIZE FREEZE Power Sleep timer Picture size FREEZE Power s TV s TV s TV Power s TV s TV s TV 1-9 Digit 1-9 Digit 1-9 Digit 1-9 0 Digit 0 Digit...
Owner's Manual - English
Page 24
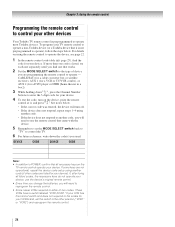
...a DVD player or HTIB [home theater in a box]). 3 While holding down the code(s) you used: DEVICE CODE DEVICE CODE Note: • In addition to POWER, confirm that came with the device. 5 Remember to set the switch to either of device you find the code for your device. Chapter 3: Using the... remote control Programming the remote control to control your other devices Your Toshiba TV remote control is preprogrammed to enter the 3-digit code for your device. 4 To test the code, turn off. • If the device ...
...a DVD player or HTIB [home theater in a box]). 3 While holding down the code(s) you used: DEVICE CODE DEVICE CODE Note: • In addition to POWER, confirm that came with the device. 5 Remember to set the switch to either of device you find the code for your device. Chapter 3: Using the... remote control Programming the remote control to control your other devices Your Toshiba TV remote control is preprogrammed to enter the 3-digit code for your device. 4 To test the code, turn off. • If the device ...
Owner's Manual - English
Page 27
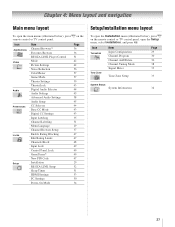
... Edit Rating Limits Channels Block Input Lock Control Panel Lock GameTimer® New PIN Code Installation REGZA-LINK Setup Sleep Timer HDMI Settings PC Settings Power-On Mode Page 36 36 51 42 42 56 57 57 39 43 44 45 58 45 44 43 43 35 31 29... 37 47 47 48 49 49 49 47 29 52 51 53 50 34 Setup/Installation menu layout To open the Installation menu (illustrated below), press Y ...
... Edit Rating Limits Channels Block Input Lock Control Panel Lock GameTimer® New PIN Code Installation REGZA-LINK Setup Sleep Timer HDMI Settings PC Settings Power-On Mode Page 36 36 51 42 42 56 57 57 39 43 44 45 58 45 44 43 43 35 31 29... 37 47 47 48 49 49 49 47 29 52 51 53 50 34 Setup/Installation menu layout To open the Installation menu (illustrated below), press Y ...

Owner's Manual - English
Page 29
Setup Installation REGZA-LINK Setup Sleep Timer HDMI Settings PC Settings Power-On Mode Power-Saving 3 (A new set of menus and messages. To revert to select your preferred menu language and press T. Input Configuration ANT/CABLE In Cancel Cable Done 5 ... Terrestrial Input Configuration Channel Program Channel Add/Delete Channel Tuning Mode Signal Meter Auto 4 Press C or c to close the Preferences menu. Chapter 5: Setting up your TV Selecting the menu language You can choose from three different languages (English, French and Spanish) for the on the...
Setup Installation REGZA-LINK Setup Sleep Timer HDMI Settings PC Settings Power-On Mode Power-Saving 3 (A new set of menus and messages. To revert to select your preferred menu language and press T. Input Configuration ANT/CABLE In Cancel Cable Done 5 ... Terrestrial Input Configuration Channel Program Channel Add/Delete Channel Tuning Mode Signal Meter Auto 4 Press C or c to close the Preferences menu. Chapter 5: Setting up your TV Selecting the menu language You can choose from three different languages (English, French and Spanish) for the on the...
Owner's Manual - English
Page 34
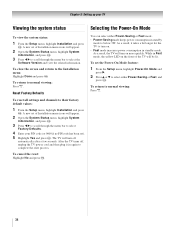
...: Press O. 34 To return to their factory default values: 1 From the Setup menu, highlight Installation and press T. You can select either Power-Saving or Fast, and press T. To set of the TV will appear. 2 Open the System Status menu, highlight System Information, and press T. 3 Press C c to scroll through the menu bar... PIN code (or 0000 if no PIN code has been set of Installation menu icons will turn off , unplug the TV power cord and then plug it takes a bit longer for the TV to turn on the front of Installation menu icons will be lit. As a result, it in Fast mode, the...
...: Press O. 34 To return to their factory default values: 1 From the Setup menu, highlight Installation and press T. You can select either Power-Saving or Fast, and press T. To set of the TV will appear. 2 Open the System Status menu, highlight System Information, and press T. 3 Press C c to scroll through the menu bar... PIN code (or 0000 if no PIN code has been set of Installation menu icons will turn off , unplug the TV power cord and then plug it takes a bit longer for the TV to turn on the front of Installation menu icons will be lit. As a result, it in Fast mode, the...

Owner's Manual - English
Page 37
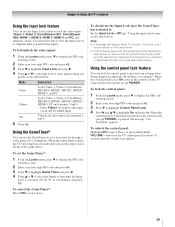
...™ will automatically tune to the channel or input. 2 Press O to close the Channel Browser™. (continued) 37 Note: History List will be highlighted and the TV will open the Channel Browser™ and surf back to a previous item or forward to surf forward through the channel History... toggle among History, ANT/CABLE, Inputs, Favorites, and REGZA-LINK. Note: REGZA-LINK List will not display the Channel Browser™. If Favorites List is powered off. 4 Press b to highlight ANT/CABLE List, and then press C or c to select On or Off. 5 Press b to highlight Inputs List, ...
...™ will automatically tune to the channel or input. 2 Press O to close the Channel Browser™. (continued) 37 Note: History List will be highlighted and the TV will open the Channel Browser™ and surf back to a previous item or forward to surf forward through the channel History... toggle among History, ANT/CABLE, Inputs, Favorites, and REGZA-LINK. Note: REGZA-LINK List will not display the Channel Browser™. If Favorites List is powered off. 4 Press b to highlight ANT/CABLE List, and then press C or c to select On or Off. 5 Press b to highlight Inputs List, ...
Owner's Manual - English
Page 49
... message will have to deactivate the Input Lock (as described above . When the control panel is locked and any button on the control panel (except POWER) is restored the TV will enter Input Lock mode (as if the GameTimer had been activated) and you unlock the inputs. button on the... when 10 minutes, 3 minutes, and 1 minute remain on the GameTimer. • If the TV loses power with time remaining on the GameTimer, when power is pressed, the message "Not Available" appears. You will operate except POWER. Using the GameTimer® You can lock the control panel to select the level of the...
... message will have to deactivate the Input Lock (as described above . When the control panel is locked and any button on the control panel (except POWER) is restored the TV will enter Input Lock mode (as if the GameTimer had been activated) and you unlock the inputs. button on the... when 10 minutes, 3 minutes, and 1 minute remain on the GameTimer. • If the TV loses power with time remaining on the GameTimer, when power is pressed, the message "Not Available" appears. You will operate except POWER. Using the GameTimer® You can lock the control panel to select the level of the...
Owner's Manual - English
Page 51
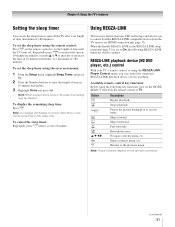
...SELECT switch on the remote control to set the length of time in 10-minute increments. 3 Highlight Done and press T. Note: When a power failure occurs, the sleep timer setting may be enabled. page 17). Available remote control key functions: Before using the remote control: Press [ ... or decrease the time in the REGZA-LINK setup menu (- Note: A message will be cleared. Fast-forwards. Returns to control Toshiba REGZA-LINK compatible devices from the TV remote via HDMI connection (- Using REGZA-LINK This is set to 0 minute. Note: These functions depend on -screen menus: 1...
...SELECT switch on the remote control to set the length of time in 10-minute increments. 3 Highlight Done and press T. Note: When a power failure occurs, the sleep timer setting may be enabled. page 17). Available remote control key functions: Before using the remote control: Press [ ... or decrease the time in the REGZA-LINK setup menu (- Note: A message will be cleared. Fast-forwards. Returns to control Toshiba REGZA-LINK compatible devices from the TV remote via HDMI connection (- Using REGZA-LINK This is set to 0 minute. Note: These functions depend on -screen menus: 1...
Owner's Manual - English
Page 52
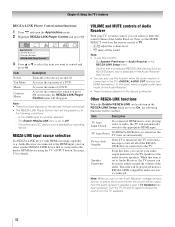
... audio receiver's speakers even if TV Speakers has been selected. In this item, you can set to the TV's DIGITAL AUDIO OUT terminal (not HDMI connection). TV Auto Power If a REGZA-LINK device is currently selected. - When this function: - Item Power Top Menu Menu Contents Menu Description...volume, the sound will be grayed out unless a REGZA-LINK compatible audio receiver is not a playback or recording device. Chapter 6: Using the TV's features REGZA-LINK Player Control menu functions: 1 Press Y and open the Applications menu. 2 Highlight REGZA-LINK Player Control and press T....
... audio receiver's speakers even if TV Speakers has been selected. In this item, you can set to the TV's DIGITAL AUDIO OUT terminal (not HDMI connection). TV Auto Power If a REGZA-LINK device is currently selected. - When this function: - Item Power Top Menu Menu Contents Menu Description...volume, the sound will be grayed out unless a REGZA-LINK compatible audio receiver is not a playback or recording device. Chapter 6: Using the TV's features REGZA-LINK Player Control menu functions: 1 Press Y and open the Applications menu. 2 Highlight REGZA-LINK Player Control and press T....
Owner's Manual - English
Page 53
...want to use, and press C or c to select On or desired mode. • TV Auto Input Switch: On/Off • TV Auto Power: On/Off • Device Auto Standby: On/Off • Speaker Preference: TV Speakers/Audio Receiver 5 To save the new settings, highlight Done and press T. To revert ...to the factory defaults, highlight Reset and press T. Note: You must disconnect your TV is capable of the...
...want to use, and press C or c to select On or desired mode. • TV Auto Input Switch: On/Off • TV Auto Power: On/Off • Device Auto Standby: On/Off • Speaker Preference: TV Speakers/Audio Receiver 5 To save the new settings, highlight Done and press T. To revert ...to the factory defaults, highlight Reset and press T. Note: You must disconnect your TV is capable of the...


