
User Guide
Page 10
... mode 50 Setting the HDMI® audio mode 50 Viewing the digital signal meter 51 Setting the time zone 52 Viewing the system status 52 Resetting Factory Defaults 53
... mode 50 Setting the HDMI® audio mode 50 Viewing the digital signal meter 51 Setting the time zone 52 Viewing the system status 52 Resetting Factory Defaults 53
User Guide
Page 18
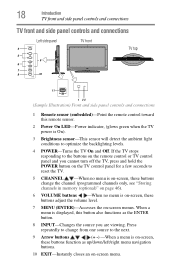
.... 8 INPUT-Changes the source you cannot turn off the TV, press and hold the POWER button on the TV control panel for a few seconds to reset the TV. 5 CHANNEL -When no menu is on-screen, these buttons adjust the volume level. 7 MENU (ENTER)-Accesses the on -screen menu. 18 Introduction TV...
.... 8 INPUT-Changes the source you cannot turn off the TV, press and hold the POWER button on the TV control panel for a few seconds to reset the TV. 5 CHANNEL -When no menu is on-screen, these buttons adjust the volume level. 7 MENU (ENTER)-Accesses the on -screen menu. 18 Introduction TV...
User Guide
Page 28
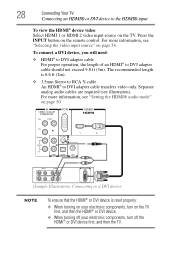
The recommended length is reset properly: ❖ When turning on your electronic components, turn on the TV first, and then the HDMI® or DVI device. ❖ When turning off ...
The recommended length is reset properly: ❖ When turning on your electronic components, turn on the TV first, and then the HDMI® or DVI device. ❖ When turning off ...

User Guide
Page 31
... ENTER button. (Sample Image) Audio Setup screen 4 Press the ( / arrow) buttons to select Optical Output Format. 5 Press the ( / arrow) buttons to the factory defaults, highlight Reset, and then press the ENTER button. To revert to select either Dolby Digital or PCM, depending on your device, see "Selecting the optical audio output...
... ENTER button. (Sample Image) Audio Setup screen 4 Press the ( / arrow) buttons to select Optical Output Format. 5 Press the ( / arrow) buttons to the factory defaults, highlight Reset, and then press the ENTER button. To revert to select either Dolby Digital or PCM, depending on your device, see "Selecting the optical audio output...

User Guide
Page 44
... Setup process and press the POWER button before completing all the steps, the Initial Setup window will appear every time you first turn on or reset the TV, the Initial Setup window will appear. 1 In the Menu Language field, press the ( / arrow) buttons to select your preferred language. 2 Press the ( / arrow...
... Setup process and press the POWER button before completing all the steps, the Initial Setup window will appear every time you first turn on or reset the TV, the Initial Setup window will appear. 1 In the Menu Language field, press the ( / arrow) buttons to select your preferred language. 2 Press the ( / arrow...
User Guide
Page 53
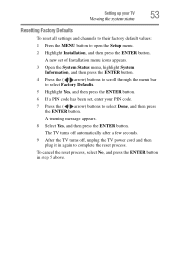
To cancel the reset process, select No, and press the ENTER button in again to open the Setup menu. 2 Highlight Installation, and then press the ENTER button. Setting up ... select Factory Defaults. 5 Highlight Yes, and then press the ENTER button. 6 If a PIN code has been set, enter your TV 53 Viewing the system status Resetting Factory Defaults To reset all settings and channels to their factory default values: 1 Press the MENU button to complete the...
To cancel the reset process, select No, and press the ENTER button in again to open the Setup menu. 2 Highlight Installation, and then press the ENTER button. Setting up ... select Factory Defaults. 5 Highlight Yes, and then press the ENTER button. 6 If a PIN code has been set, enter your TV 53 Viewing the system status Resetting Factory Defaults To reset all settings and channels to their factory default values: 1 Press the MENU button to complete the...
User Guide
Page 57
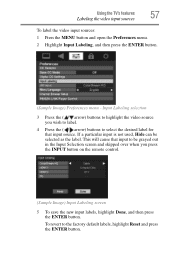
... grayed out in the Input Selection screen and skipped over when you wish to label. 4 Press the ( / arrow) buttons to the factory default labels, highlight Reset and press the ENTER button. Using the TV's features 57 Labeling the video input sources To label the video input sources: 1 Press the MENU button...
... grayed out in the Input Selection screen and skipped over when you wish to label. 4 Press the ( / arrow) buttons to the factory default labels, highlight Reset and press the ENTER button. Using the TV's features 57 Labeling the video input sources To label the video input sources: 1 Press the MENU button...
User Guide
Page 58
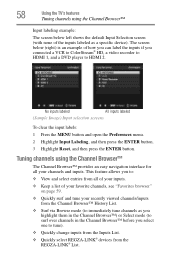
... screens To clear the input labels: 1 Press the MENU button and open the Preferences menu. 2 Highlight Input Labeling, and then press the ENTER button. 3 Highlight Reset, and then press the ENTER button. 58 Using the TV's features Tuning channels using the Channel Browser™ The Channel Browser™ provides an easy...
... screens To clear the input labels: 1 Press the MENU button and open the Preferences menu. 2 Highlight Input Labeling, and then press the ENTER button. 3 Highlight Reset, and then press the ENTER button. 58 Using the TV's features Tuning channels using the Channel Browser™ The Channel Browser™ provides an easy...

User Guide
Page 60
...) buttons to select On or Off. 7 Press the ( arrow) button to highlight REGZA-LINK List, and then press the ( / arrow) buttons to factory defaults, highlight Reset, and then press the ENTER button. See "Using REGZA-LINK®" on the remote control. ❖ Press the BACK CB arrow button to surf backward...
...) buttons to select On or Off. 7 Press the ( arrow) button to highlight REGZA-LINK List, and then press the ( / arrow) buttons to factory defaults, highlight Reset, and then press the ENTER button. See "Using REGZA-LINK®" on the remote control. ❖ Press the BACK CB arrow button to surf backward...

User Guide
Page 69
Aspect Ratio of the following input sources is from the HDMI 1 or HDMI 2 input. To revert to the factory defaults, highlight Reset and then press the ENTER button. NOTE The auto aspect ratio feature is On) 4:3 Normal 4:3 4:3 Letter Box TheaterWide 2 16:9 Full Full Not defined (no ID-1 ... Using the Auto Aspect feature 6 To save the new settings, highlight Done, and then press the ENTER button. To revert to the factory defaults, highlight Reset and then press the ENTER button.
Aspect Ratio of the following input sources is from the HDMI 1 or HDMI 2 input. To revert to the factory defaults, highlight Reset and then press the ENTER button. NOTE The auto aspect ratio feature is On) 4:3 Normal 4:3 4:3 Letter Box TheaterWide 2 16:9 Full Full Not defined (no ID-1 ... Using the Auto Aspect feature 6 To save the new settings, highlight Done, and then press the ENTER button. To revert to the factory defaults, highlight Reset and then press the ENTER button.
User Guide
Page 70
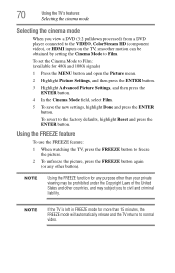
... purpose other button). Using the FREEZE feature To use the FREEZE feature: 1 When watching the TV, press the FREEZE button to the factory defaults, highlight Reset and press the ENTER button. NOTE Using the FREEZE function for 480i and 1080i signals) 1 Press the MENU button and open the Picture menu. 2 Highlight...
... purpose other button). Using the FREEZE feature To use the FREEZE feature: 1 When watching the TV, press the FREEZE button to the factory defaults, highlight Reset and press the ENTER button. NOTE Using the FREEZE function for 480i and 1080i signals) 1 Press the MENU button and open the Picture menu. 2 Highlight...
User Guide
Page 73
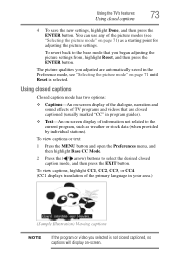
...see "Selecting the picture mode" on -screen. You can use any of TV programs and videos that you began adjusting the picture settings from, highlight Reset, and then press the ENTER button. To view captions, highlight CC1, CC2, CC3, or CC4. (CC1 displays translation of information not related to...your area.) (Sample Illustration) Viewing captions NOTE If the program or video you adjusted are closed captioned, no captions will display on page 71 until Reset is not closed captioned (usually marked "CC" in program guides). ❖ Text-An on page 71) as weather or stock data (when ...
...see "Selecting the picture mode" on -screen. You can use any of TV programs and videos that you began adjusting the picture settings from, highlight Reset, and then press the ENTER button. To view captions, highlight CC1, CC2, CC3, or CC4. (CC1 displays translation of information not related to...your area.) (Sample Illustration) Viewing captions NOTE If the program or video you adjusted are closed captioned, no captions will display on page 71 until Reset is not closed captioned (usually marked "CC" in program guides). ❖ Text-An on page 71) as weather or stock data (when ...
User Guide
Page 75
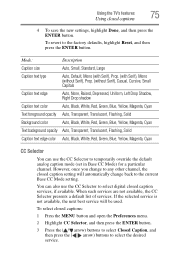
..., and then press the ENTER button. 3 Press the ( / arrow) buttons to select Closed Caption, and then press the ( / arrow) buttons to the factory defaults, highlight Reset, and then press the ENTER button. To revert to select the desired service. Mode: Description Caption size Auto, Small, Standard, Large Caption text type Auto...
..., and then press the ENTER button. 3 Press the ( / arrow) buttons to select Closed Caption, and then press the ( / arrow) buttons to the factory defaults, highlight Reset, and then press the ENTER button. To revert to select the desired service. Mode: Description Caption size Auto, Small, Standard, Large Caption text type Auto...

User Guide
Page 77
...SAP broadcast, the "Stereo" mark and/or word "SAP" appears when the INFO button is noisy, select Mono to output high-fidelity stereo sound. To reset the settings to select the desired service. 4 Press the EXIT button. NOTE ❖ You can transmit a second audio program (SAP) containing a second... Digital Audio Selector selection 3 Press the ( / arrow) buttons to select Audio, and then press the ( / arrow) buttons to the factory defaults, highlight Reset, and then press the ENTER button. MTS also can typically leave the TV in stereo sound: 1 Press the MENU button and open the Sound menu...
...SAP broadcast, the "Stereo" mark and/or word "SAP" appears when the INFO button is noisy, select Mono to output high-fidelity stereo sound. To reset the settings to select the desired service. 4 Press the EXIT button. NOTE ❖ You can transmit a second audio program (SAP) containing a second... Digital Audio Selector selection 3 Press the ( / arrow) buttons to select Audio, and then press the ( / arrow) buttons to the factory defaults, highlight Reset, and then press the ENTER button. MTS also can typically leave the TV in stereo sound: 1 Press the MENU button and open the Sound menu...

User Guide
Page 78
... and the station you prefer. NOTE ❖ A second audio program (SAP) can adjust the audio quality by adjusting the bass, treble and balance. To reset the settings to a second audio program on an analog station, if available, select SAP in step 3 above , and then press the ( / arrow) ...quality You can be output. For example, a station might broadcast another language as a second audio program. To listen to the factory defaults, highlight Reset, and then press the ENTER button. If this happens, set the MTS feature to adjust the level. ❖ makes the bass or treble ...
... and the station you prefer. NOTE ❖ A second audio program (SAP) can adjust the audio quality by adjusting the bass, treble and balance. To reset the settings to a second audio program on an analog station, if available, select SAP in step 3 above , and then press the ( / arrow) ...quality You can be output. For example, a station might broadcast another language as a second audio program. To listen to the factory defaults, highlight Reset, and then press the ENTER button. If this happens, set the MTS feature to adjust the level. ❖ makes the bass or treble ...
User Guide
Page 79
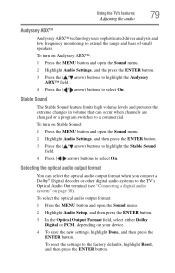
To reset the settings to extend the range and bass of small speakers. To turn on page 30). To select the optical audio output format: 1 Press the ...'s features 79 Adjusting the audio Audyssey ABX™ Audyssey ABX™ technology uses sophisticated driver analysis and low frequency monitoring to the factory defaults, highlight Reset, and then press the ENTER button.
To reset the settings to extend the range and bass of small speakers. To turn on page 30). To select the optical audio output format: 1 Press the ...'s features 79 Adjusting the audio Audyssey ABX™ Audyssey ABX™ technology uses sophisticated driver analysis and low frequency monitoring to the factory defaults, highlight Reset, and then press the ENTER button.
User Guide
Page 80
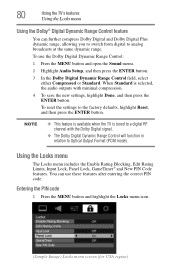
... further compress Dolby Digital and Dolby Digital Plus dynamic range, allowing you to switch from digital to the factory defaults, highlight Reset, and then press the ENTER button. To reset the settings to analog broadcasts at the same dynamic range. Using the Locks menu The Locks menu includes the Enable Rating Blocking...
... further compress Dolby Digital and Dolby Digital Plus dynamic range, allowing you to switch from digital to the factory defaults, highlight Reset, and then press the ENTER button. To reset the settings to analog broadcasts at the same dynamic range. Using the Locks menu The Locks menu includes the Enable Rating Blocking...
User Guide
Page 91
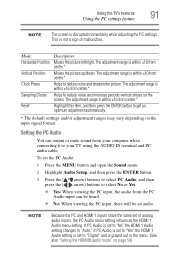
... optimum adjustment automatically. * The default settings and/or adjustment ranges may vary depending on page 50) Mode: Horizontal Position Vertical Position Clock Phase Sampling Clocks Reset Description: Moves the picture left/right. The adjustment range is set of malfunction. The adjustment range is disrupted momentarily while adjusting the PC settings.
... optimum adjustment automatically. * The default settings and/or adjustment ranges may vary depending on page 50) Mode: Horizontal Position Vertical Position Clock Phase Sampling Clocks Reset Description: Moves the picture left/right. The adjustment range is set of malfunction. The adjustment range is disrupted momentarily while adjusting the PC settings.

User Guide
Page 104
...-LINK Setup and press the ENTER button. 2 Press the ( / arrow) buttons to highlight Enable REGZA-LINK. 3 Press the ( / arrow) buttons to the factory defaults, highlight Reset and press the ENTER button. The following information will be grayed out. 4 Press the ( / arrow) buttons to highlight the REGZA-LINK Setup item you want...
...-LINK Setup and press the ENTER button. 2 Press the ( / arrow) buttons to highlight Enable REGZA-LINK. 3 Press the ( / arrow) buttons to the factory defaults, highlight Reset and press the ENTER button. The following information will be grayed out. 4 Press the ( / arrow) buttons to highlight the REGZA-LINK Setup item you want...
User Guide
Page 108
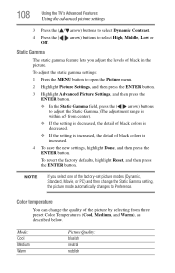
To revert the factory defaults, highlight Reset, and then press the ENTER button. Color temperature You can change the Static Gamma setting, the picture mode automatically changes to Preference. Static Gamma The ...
To revert the factory defaults, highlight Reset, and then press the ENTER button. Color temperature You can change the Static Gamma setting, the picture mode automatically changes to Preference. Static Gamma The ...


