
User Guide
Page 10
... mode 50 Setting the HDMI® audio mode 50 Viewing the digital signal meter 51 Setting the time zone 52 Viewing the system status 52 Resetting Factory Defaults 53
... mode 50 Setting the HDMI® audio mode 50 Viewing the digital signal meter 51 Setting the time zone 52 Viewing the system status 52 Resetting Factory Defaults 53
User Guide
Page 18
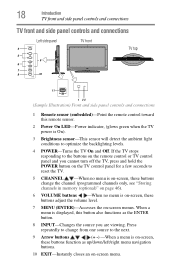
.... 8 INPUT-Changes the source you cannot turn off the TV, press and hold the POWER button on the TV control panel for a few seconds to reset the TV. 5 CHANNEL -When no menu is on-screen, these buttons adjust the volume level. 7 MENU (ENTER)-Accesses the on -screen, these buttons change from...
.... 8 INPUT-Changes the source you cannot turn off the TV, press and hold the POWER button on the TV control panel for a few seconds to reset the TV. 5 CHANNEL -When no menu is on-screen, these buttons adjust the volume level. 7 MENU (ENTER)-Accesses the on -screen, these buttons change from...
User Guide
Page 28
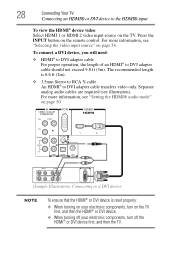
... video only. For more information, see "Selecting the video input source" on page 54. Press the INPUT button on the TV. The recommended length is reset properly: ❖ When turning on your electronic components, turn on the TV first, and then the HDMI® or DVI device. ❖ When turning off...
... video only. For more information, see "Selecting the video input source" on page 54. Press the INPUT button on the TV. The recommended length is reset properly: ❖ When turning on your electronic components, turn on the TV first, and then the HDMI® or DVI device. ❖ When turning off...

User Guide
Page 31
... ENTER button. (Sample Image) Audio Setup screen 4 Press the ( / arrow) buttons to select Optical Output Format. 5 Press the ( / arrow) buttons to the factory defaults, highlight Reset, and then press the ENTER button.
... ENTER button. (Sample Image) Audio Setup screen 4 Press the ( / arrow) buttons to select Optical Output Format. 5 Press the ( / arrow) buttons to the factory defaults, highlight Reset, and then press the ENTER button.

User Guide
Page 44
... Start Scan and continue with the Auto Tuning. You can stop the Initial Setup by pressing the EXIT button. However if you turn on or reset the TV, the Initial Setup window will appear every time you do not finish the entire Initial Setup process and press the POWER button before...
... Start Scan and continue with the Auto Tuning. You can stop the Initial Setup by pressing the EXIT button. However if you turn on or reset the TV, the Initial Setup window will appear every time you do not finish the entire Initial Setup process and press the POWER button before...
User Guide
Page 53
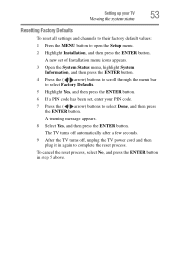
... it in step 5 above. Setting up your PIN code. 7 Press the ( / arrow) buttons to select Done, and then press the ENTER button. To cancel the reset process, select No, and press the ENTER button in again to open the Setup menu. 2 Highlight Installation, and then press the ENTER button. A warning message... select Factory Defaults. 5 Highlight Yes, and then press the ENTER button. 6 If a PIN code has been set, enter your TV 53 Viewing the system status Resetting Factory Defaults To reset all settings and channels to their factory default values: 1 Press the MENU button to complete the...
... it in step 5 above. Setting up your PIN code. 7 Press the ( / arrow) buttons to select Done, and then press the ENTER button. To cancel the reset process, select No, and press the ENTER button in again to open the Setup menu. 2 Highlight Installation, and then press the ENTER button. A warning message... select Factory Defaults. 5 Highlight Yes, and then press the ENTER button. 6 If a PIN code has been set, enter your TV 53 Viewing the system status Resetting Factory Defaults To reset all settings and channels to their factory default values: 1 Press the MENU button to complete the...
User Guide
Page 57
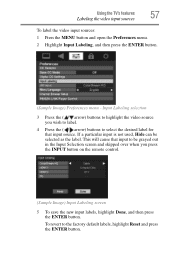
... skipped over when you wish to label. 4 Press the ( / arrow) buttons to select the desired label for that input to the factory default labels, highlight Reset and press the ENTER button. This will cause that input source. Using the TV's features 57 Labeling the video input sources To label the video...
... skipped over when you wish to label. 4 Press the ( / arrow) buttons to select the desired label for that input to the factory default labels, highlight Reset and press the ENTER button. This will cause that input source. Using the TV's features 57 Labeling the video input sources To label the video...
User Guide
Page 58
... screens To clear the input labels: 1 Press the MENU button and open the Preferences menu. 2 Highlight Input Labeling, and then press the ENTER button. 3 Highlight Reset, and then press the ENTER button. The screen below left shows the default Input Selection screen (with none of how you can label the inputs...
... screens To clear the input labels: 1 Press the MENU button and open the Preferences menu. 2 Highlight Input Labeling, and then press the ENTER button. 3 Highlight Reset, and then press the ENTER button. The screen below left shows the default Input Selection screen (with none of how you can label the inputs...

User Guide
Page 60
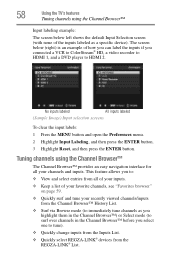
... Favorites list, or the REGZA-LINK® devices in the REGZA-LINK® List. ❖ Press the NEXT CB arrow button to factory defaults, highlight Reset, and then press the ENTER button. To open the Channel Browser™: ❖ Press the BACK CB or NEXT CB arrow buttons on page 101...
... Favorites list, or the REGZA-LINK® devices in the REGZA-LINK® List. ❖ Press the NEXT CB arrow button to factory defaults, highlight Reset, and then press the ENTER button. To open the Channel Browser™: ❖ Press the BACK CB or NEXT CB arrow buttons on page 101...

User Guide
Page 69
...; A 480i signal from the ColorStream HD or Video input ❖ 480i, 480p, 720p, 1080i, 1080p, or VGA (60Hz) signal from -5 to the factory defaults, highlight Reset and then press the ENTER button. To revert to the factory defaults, highlight...
...; A 480i signal from the ColorStream HD or Video input ❖ 480i, 480p, 720p, 1080i, 1080p, or VGA (60Hz) signal from -5 to the factory defaults, highlight Reset and then press the ENTER button. To revert to the factory defaults, highlight...
User Guide
Page 70
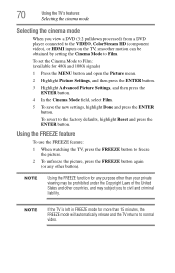
... than 15 minutes, the FREEZE mode will automatically release and the TV returns to Film. To set the Cinema Mode to the factory defaults, highlight Reset and press the ENTER button.
... than 15 minutes, the FREEZE mode will automatically release and the TV returns to Film. To set the Cinema Mode to the factory defaults, highlight Reset and press the ENTER button.
User Guide
Page 73
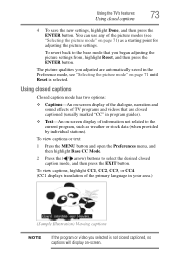
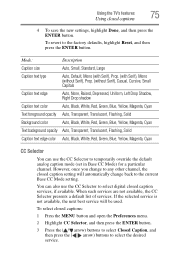
..., highlight CC1, CC2, CC3, or CC4. (CC1 displays translation of TV programs and videos that you began adjusting the picture settings from, highlight Reset, and then press the ENTER button. To revert back to the base mode that are automatically saved in program guides). ❖ Text-An on...picture qualities you selected is not closed captioned (usually marked "CC" in the Preference mode, see "Selecting the picture mode" on page 71 until Reset is selected. You can use any of information not related to select the desired closed captions 4 To save the new settings, highlight Done, and...
..., highlight CC1, CC2, CC3, or CC4. (CC1 displays translation of TV programs and videos that you began adjusting the picture settings from, highlight Reset, and then press the ENTER button. To revert back to the base mode that are automatically saved in program guides). ❖ Text-An on...picture qualities you selected is not closed captioned (usually marked "CC" in the Preference mode, see "Selecting the picture mode" on page 71 until Reset is selected. You can use any of information not related to select the desired closed captions 4 To save the new settings, highlight Done, and...
User Guide
Page 75
If the selected service is not available, the next best service will automatically change to the factory defaults, highlight Reset, and then press the ENTER button. Using the TV's features 75 Using closed captions: 1 Press the MENU button and open the Preferences menu. 2 Highlight CC ...
If the selected service is not available, the next best service will automatically change to the factory defaults, highlight Reset, and then press the ENTER button. Using the TV's features 75 Using closed captions: 1 Press the MENU button and open the Preferences menu. 2 Highlight CC ...

User Guide
Page 77
..." appears when the INFO button is only available for analog signals on the ANT/CABLE input. The MTS feature is pressed. To reset the settings to output high-fidelity stereo sound. Selecting stereo/SAP broadcasts The multi-channel TV sound (MTS) feature allows you to the... factory defaults, highlight Reset, and then press the ENTER button. NOTE ❖ You can transmit a second audio program (SAP) containing a second language, music or other...
..." appears when the INFO button is only available for analog signals on the ANT/CABLE input. The MTS feature is pressed. To reset the settings to output high-fidelity stereo sound. Selecting stereo/SAP broadcasts The multi-channel TV sound (MTS) feature allows you to the... factory defaults, highlight Reset, and then press the ENTER button. NOTE ❖ You can transmit a second audio program (SAP) containing a second language, music or other...

User Guide
Page 78
... settings to Stereo mode. If you have SAP on , you prefer. If this happens, set the MTS feature to the factory defaults, highlight Reset, and then press the ENTER button. To adjust the audio quality: 1 Press the MENU button and open the Sound menu. 2 Highlight Audio Settings, and then ...
... settings to Stereo mode. If you have SAP on , you prefer. If this happens, set the MTS feature to the factory defaults, highlight Reset, and then press the ENTER button. To adjust the audio quality: 1 Press the MENU button and open the Sound menu. 2 Highlight Audio Settings, and then ...
User Guide
Page 79
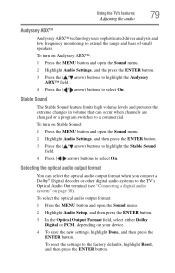
... the audio Audyssey ABX™ Audyssey ABX™ technology uses sophisticated driver analysis and low frequency monitoring to the factory defaults, highlight Reset, and then press the ENTER button. To reset the settings to extend the range and bass of small speakers. To select the optical audio output format: 1 Press the MENU...
... the audio Audyssey ABX™ Audyssey ABX™ technology uses sophisticated driver analysis and low frequency monitoring to the factory defaults, highlight Reset, and then press the ENTER button. To reset the settings to extend the range and bass of small speakers. To select the optical audio output format: 1 Press the MENU...
User Guide
Page 80
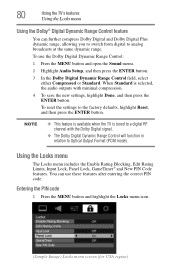
To reset the settings to analog broadcasts at the same dynamic range. Entering the PIN code 1 Press the MENU button and highlight the Locks menu icon. (Sample ... Code features. You can further compress Dolby Digital and Dolby Digital Plus dynamic range, allowing you to switch from digital to the factory defaults, highlight Reset, and then press the ENTER button. When Standard is tuned to a digital RF channel with minimal compression. 4 To save the new settings, highlight Done, and...
To reset the settings to analog broadcasts at the same dynamic range. Entering the PIN code 1 Press the MENU button and highlight the Locks menu icon. (Sample ... Code features. You can further compress Dolby Digital and Dolby Digital Plus dynamic range, allowing you to switch from digital to the factory defaults, highlight Reset, and then press the ENTER button. When Standard is tuned to a digital RF channel with minimal compression. 4 To save the new settings, highlight Done, and...
User Guide
Page 91
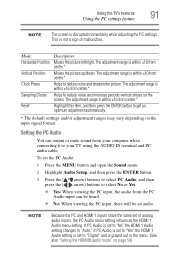
... disrupted momentarily while adjusting the PC settings. To set to reduce noise and sharpen the picture. Mode: Horizontal Position Vertical Position Clock Phase Sampling Clocks Reset Description: Moves the picture left/right. The adjustment range is within ±10 from center.* Highlight this item, and then press the ENTER button to...
... disrupted momentarily while adjusting the PC settings. To set to reduce noise and sharpen the picture. Mode: Horizontal Position Vertical Position Clock Phase Sampling Clocks Reset Description: Moves the picture left/right. The adjustment range is within ±10 from center.* Highlight this item, and then press the ENTER button to...

User Guide
Page 104
...-LINK Setup and press the ENTER button. 2 Press the ( / arrow) buttons to highlight Enable REGZA-LINK. 3 Press the ( / arrow) buttons to the factory defaults, highlight Reset and press the ENTER button. To revert to select On. NOTE If you turn on the Audio Receiver, change its input source or adjust the...
...-LINK Setup and press the ENTER button. 2 Press the ( / arrow) buttons to highlight Enable REGZA-LINK. 3 Press the ( / arrow) buttons to the factory defaults, highlight Reset and press the ENTER button. To revert to select On. NOTE If you turn on the Audio Receiver, change its input source or adjust the...
User Guide
Page 108
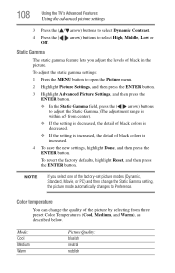
... factory-set picture modes (Dynamic, Standard, Movie, or PC) and then change the quality of black in the picture. To revert the factory defaults, highlight Reset, and then press the ENTER button. Static Gamma The static gamma feature lets you select one of black colors is increased. 4 To save the new...
... factory-set picture modes (Dynamic, Standard, Movie, or PC) and then change the quality of black in the picture. To revert the factory defaults, highlight Reset, and then press the ENTER button. Static Gamma The static gamma feature lets you select one of black colors is increased. 4 To save the new...


