
Brochure
Page 1
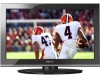
...C120U LCD HDTV, built with 720p HD resolution Dynamic Backlight Control for the big screen experience. Say goodbye to standard-def with Toshiba quality and reliability, and designed to light up any room of the house. Outstanding price. Easily connect to monitor brightness and ... the right amount of connections, this feature. Easily connect your PC to other devices and broaden your TV for deeper blacks and more colors, finer details, less visual noise and brighter, realistic pictures. For clear, well-balanced sound. Easily connect to your favorite tunes and...
...C120U LCD HDTV, built with 720p HD resolution Dynamic Backlight Control for the big screen experience. Say goodbye to standard-def with Toshiba quality and reliability, and designed to light up any room of the house. Outstanding price. Easily connect to monitor brightness and ... the right amount of connections, this feature. Easily connect your PC to other devices and broaden your TV for deeper blacks and more colors, finer details, less visual noise and brighter, realistic pictures. For clear, well-balanced sound. Easily connect to your favorite tunes and...
User Guide
Page 13
... the last mode memory feature ......106 Chapter 7: Using the TV's Advanced Features 107 Using the advanced picture settings 107 Dynamic Contrast 107 Static Gamma 108 Color temperature 108 CableClear® digital Noise Reduction 109 MPEG Noise Reduction 110 Game Mode 110 Chapter 8: Troubleshooting 112 General troubleshooting 112 Picture problems 113 Sound...
... the last mode memory feature ......106 Chapter 7: Using the TV's Advanced Features 107 Using the advanced picture settings 107 Dynamic Contrast 107 Static Gamma 108 Color temperature 108 CableClear® digital Noise Reduction 109 MPEG Noise Reduction 110 Game Mode 110 Chapter 8: Troubleshooting 112 General troubleshooting 112 Picture problems 113 Sound...
User Guide
Page 22
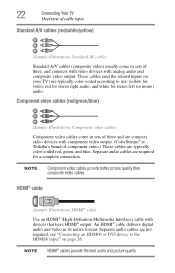
... Use an HDMI® (High-Definition Multimedia Interface) cable with component video output. (ColorStream® is Toshiba's brand of component video.) These cables are typically color-coded red, green, and blue. Separate audio cables are typically color-coded according to the HDMI® input" on your TV) are required for stereo left (or...
... Use an HDMI® (High-Definition Multimedia Interface) cable with component video output. (ColorStream® is Toshiba's brand of component video.) These cables are typically color-coded red, green, and blue. Separate audio cables are typically color-coded according to the HDMI® input" on your TV) are required for stereo left (or...
User Guide
Page 25
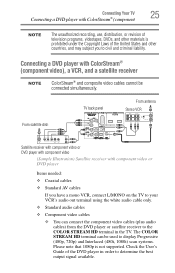
... cables ❖ Component video cables ❖ You can connect the component video cables (plus audio cables) from the DVD player or satellite receiver to the COLOR STREAM HD terminal in order to civil and criminal liability. Check the User's Guide of the DVD player in the TV. Connecting Your TV 25... with component video or DVD player Items needed: ❖ Coaxial cables ❖ Standard AV cables If you to determine the best output signal available. The COLOR STREAM HD terminal can be connected simultaneously.
... cables ❖ Component video cables ❖ You can connect the component video cables (plus audio cables) from the DVD player or satellite receiver to the COLOR STREAM HD terminal in order to civil and criminal liability. Check the User's Guide of the DVD player in the TV. Connecting Your TV 25... with component video or DVD player Items needed: ❖ Coaxial cables ❖ Standard AV cables If you to determine the best output signal available. The COLOR STREAM HD terminal can be connected simultaneously.

User Guide
Page 43
Menu Layout and Navigation 43 Navigating the menu system 3 Press the ENTER button to save your menu settings or select a highlighted item. A highlighted menu item appears in a different color in the menu. 4 All menus close automatically if you do not make a selection within approximately 60 seconds, except the signal meter menu, which closes automatically after a few minutes. 5 To close a menu instantly, press the EXIT button. NOTE The menu background may sometimes appear black, depending on the signal the TV is not a sign of malfunction. This is receiving.
Menu Layout and Navigation 43 Navigating the menu system 3 Press the ENTER button to save your menu settings or select a highlighted item. A highlighted menu item appears in a different color in the menu. 4 All menus close automatically if you do not make a selection within approximately 60 seconds, except the signal meter menu, which closes automatically after a few minutes. 5 To close a menu instantly, press the EXIT button. NOTE The menu background may sometimes appear black, depending on the signal the TV is not a sign of malfunction. This is receiving.
User Guide
Page 72
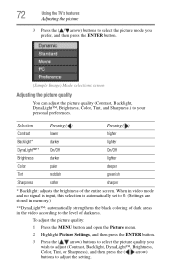
...and no signal is input, this selection is automatically set to 0. (Settings are stored in memory.) **DynaLight™: automatically strengthens the black coloring of dark areas in the video according to your personal preferences. 72 Using the TV's features Adjusting the picture 3 Press the ( / ...arrow) buttons to select the picture mode you wish to adjust (Contrast, Backlight, DynaLight™, Brightness, Color, Tint, or Sharpness), and then press the ( / arrow) buttons to adjust the setting. To adjust the picture quality: 1 Press the MENU ...
...and no signal is input, this selection is automatically set to 0. (Settings are stored in memory.) **DynaLight™: automatically strengthens the black coloring of dark areas in the video according to your personal preferences. 72 Using the TV's features Adjusting the picture 3 Press the ( / ...arrow) buttons to select the picture mode you wish to adjust (Contrast, Backlight, DynaLight™, Brightness, Color, Tint, or Sharpness), and then press the ( / arrow) buttons to adjust the setting. To adjust the picture quality: 1 Press the MENU ...
User Guide
Page 74
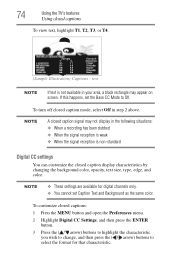
...; When the signal reception is non-standard Digital CC settings You can customize the closed caption display characteristics by changing the background color, opacity, text size, type, edge, and color. NOTE A closed captions To view text, highlight T1, T2, T3, or T4. (Sample Illustration) Captions - NOTE ❖ These ...wish to change, and then press the ( / arrow) buttons to Off. If this happens, set Caption Text and Background as the same color. 74 Using the TV's features Using closed caption signal may not display in your area, a black rectangle may appear on screen.
...; When the signal reception is non-standard Digital CC settings You can customize the closed caption display characteristics by changing the background color, opacity, text size, type, edge, and color. NOTE A closed captions To view text, highlight T1, T2, T3, or T4. (Sample Illustration) Captions - NOTE ❖ These ...wish to change, and then press the ( / arrow) buttons to Off. If this happens, set Caption Text and Background as the same color. 74 Using the TV's features Using closed caption signal may not display in your area, a black rectangle may appear on screen.
User Guide
Page 75
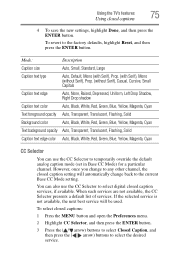
... Auto, None, Raised, Depressed, Uniform, Left Drop Shadow, Right Drop shadow Caption text color Auto, Black, White, Red, Green, Blue, Yellow, Magenta, Cyan Text foreground opacity Auto, Transparent, Translucent, Flashing, Solid Background color Auto, Black, White, Red, Green, Blue, Yellow, Magenta, Cyan Text background opacity ...Auto, Transparent, Translucent, Flashing, Solid Caption text edge color Auto, Black, White, Red, Green, Blue, Yellow, Magenta, Cyan CC Selector You can also use the CC Selector to the...
... Auto, None, Raised, Depressed, Uniform, Left Drop Shadow, Right Drop shadow Caption text color Auto, Black, White, Red, Green, Blue, Yellow, Magenta, Cyan Text foreground opacity Auto, Transparent, Translucent, Flashing, Solid Background color Auto, Black, White, Red, Green, Blue, Yellow, Magenta, Cyan Text background opacity ...Auto, Transparent, Translucent, Flashing, Solid Caption text edge color Auto, Black, White, Red, Green, Blue, Yellow, Magenta, Cyan CC Selector You can also use the CC Selector to the...
User Guide
Page 108
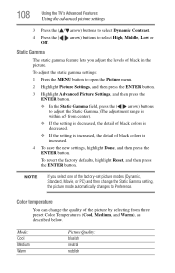
... factory defaults, highlight Reset, and then press the ENTER button. NOTE If you adjust the levels of black colors is increased. 4 To save the new settings, highlight Done, and then press the ENTER button. Color temperature You can change the Static Gamma setting, the picture mode automatically changes to Preference. Mode: Cool..., Movie, or PC) and then change the quality of the picture by selecting from center). ❖ If the setting is decreased, the detail of black colors is decreased. ❖ If the setting is within ±5 from three preset...
... factory defaults, highlight Reset, and then press the ENTER button. NOTE If you adjust the levels of black colors is increased. 4 To save the new settings, highlight Done, and then press the ENTER button. Color temperature You can change the Static Gamma setting, the picture mode automatically changes to Preference. Mode: Cool..., Movie, or PC) and then change the quality of the picture by selecting from center). ❖ If the setting is decreased, the detail of black colors is decreased. ❖ If the setting is within ±5 from three preset...
User Guide
Page 109
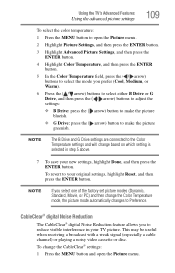
...settings, highlight Reset, and then press the ENTER button. Using the TV's Advanced Features Using the advanced picture settings 109 To select the color temperature: 1 Press the MENU button to open the Picture menu. NOTE If you select one of the factory set picture modes (Dynamic..., and then press the ENTER button. 3 Highlight Advanced Picture Settings, and then press the ENTER button. 4 Highlight Color Temperature, and then press the ENTER button. 5 In the Color Temperature field, press the ( / arrow) buttons to select the mode you to Preference. CableClear® digital Noise Reduction...
...settings, highlight Reset, and then press the ENTER button. Using the TV's Advanced Features Using the advanced picture settings 109 To select the color temperature: 1 Press the MENU button to open the Picture menu. NOTE If you select one of the factory set picture modes (Dynamic..., and then press the ENTER button. 3 Highlight Advanced Picture Settings, and then press the ENTER button. 4 Highlight Color Temperature, and then press the ENTER button. 5 In the Color Temperature field, press the ( / arrow) buttons to select the mode you to Preference. CableClear® digital Noise Reduction...

User Guide
Page 114
..., use this may not be having broadcast difficulties. The cause may be correct. Cannot view external signals or channel 3 or 4. Poor display color or no color. Adjust the Tint and/or Color, see "Using the input lock feature" on page 108. Poor composite picture. This will cause a change to an external A/V device (e.g. Picture... you cannot view signals from external devices connected to an A/V receiver that contain a digital display, this feature to help synchronize the sound to Off, see "Color temperature" on page 87.
..., use this may not be having broadcast difficulties. The cause may be correct. Cannot view external signals or channel 3 or 4. Poor display color or no color. Adjust the Tint and/or Color, see "Using the input lock feature" on page 108. Poor composite picture. This will cause a change to an external A/V device (e.g. Picture... you cannot view signals from external devices connected to an A/V receiver that contain a digital display, this feature to help synchronize the sound to Off, see "Color temperature" on page 87.
User Guide
Page 127
Index A advanced picture settings CableClear® digital Noise Reduction 109 Color temperature 108 Dynamic Contrast 107 MPEG Noise Reduction 110 Static Gamma 108 using 107 audio adjusting quality 78 Audyssey ABX™ 79 Dolby® Digital ...
Index A advanced picture settings CableClear® digital Noise Reduction 109 Color temperature 108 Dynamic Contrast 107 MPEG Noise Reduction 110 Static Gamma 108 using 107 audio adjusting quality 78 Audyssey ABX™ 79 Dolby® Digital ...


