User Manual
Page 7
... try to which can radiate radio frequency energy and, if not installed and used in the United States and other countries. • MPEG Layer-3 audio coding technology licensed from a normal viewing distance. Dolby and the double-D symbol are trademarks of Dolby Laboratories. • HDMI, the HDMI logo, ...symptoms are technical limitations of LCD Display technology and are designed to radio communications. FCC Declaration of Conformity Compliance Statement (Part 15): Toshiba 32C110U, 40E210U, and 55G310U Television models comply with the instructions, may cause undesired operation.
... try to which can radiate radio frequency energy and, if not installed and used in the United States and other countries. • MPEG Layer-3 audio coding technology licensed from a normal viewing distance. Dolby and the double-D symbol are trademarks of Dolby Laboratories. • HDMI, the HDMI logo, ...symptoms are technical limitations of LCD Display technology and are designed to radio communications. FCC Declaration of Conformity Compliance Statement (Part 15): Toshiba 32C110U, 40E210U, and 55G310U Television models comply with the instructions, may cause undesired operation.
User Manual
Page 8
...Connecting an HDMI® or DVI device to the HDMI input 16 REGZA-LINK® connection 17 Connecting a digital audio system 18 Connecting a personal computer (PC 18 Chapter 3: Using the remote control 20 Installing the remote control batteries ...device (DVD player, etc.) control 47 REGZA-LINK® input source selection 47 VOLUME and MUTE controls of Audio Receiver........ 48 Other REGZA-LINK® functions 48 Displaying TV status information 48 Understanding the last mode memory ... Warranty for LCD Televisions 57 Limited Canadian Warranty for Toshiba Brand Flat Panel Televisions 58
...Connecting an HDMI® or DVI device to the HDMI input 16 REGZA-LINK® connection 17 Connecting a digital audio system 18 Connecting a personal computer (PC 18 Chapter 3: Using the remote control 20 Installing the remote control batteries ...device (DVD player, etc.) control 47 REGZA-LINK® input source selection 47 VOLUME and MUTE controls of Audio Receiver........ 48 Other REGZA-LINK® functions 48 Displaying TV status information 48 Understanding the last mode memory ... Warranty for LCD Televisions 57 Limited Canadian Warranty for Toshiba Brand Flat Panel Televisions 58
User Manual
Page 9
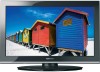
Chapter 1: Introduction Features of your new TV The following are just a few of the many exciting features of your new Toshiba widescreen, integrated HD, LCD TV: • Integrated digital tuning (8VSB ATSC and QAM) eliminates the need for a separate digital converter ... support ( page 16). • One set of ColorStream® HD high-resolution component video inputs ( page 15). • Digital Audio Out optical audio connection with Dolby® Digital optical output format ( page 38). • CableClear® digital picture noise reduction ( page 51). •...
Chapter 1: Introduction Features of your new TV The following are just a few of the many exciting features of your new Toshiba widescreen, integrated HD, LCD TV: • Integrated digital tuning (8VSB ATSC and QAM) eliminates the need for a separate digital converter ... support ( page 16). • One set of ColorStream® HD high-resolution component video inputs ( page 15). • Digital Audio Out optical audio connection with Dolby® Digital optical output format ( page 38). • CableClear® digital picture noise reduction ( page 51). •...
User Manual
Page 11
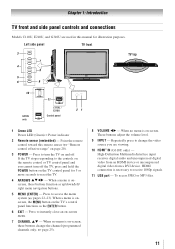
... up/down/left/ right menu navigation buttons. 5無 MENU (ENTER) - These buttons adjust the volume level. 9無 INPUT - High-Definition Multimedia Interface input receives digital audio and uncompressed digital video from an HDMI device or uncompressed digital video from a DVI device. When no menu is on-screen, these buttons function as...
... up/down/left/ right menu navigation buttons. 5無 MENU (ENTER) - These buttons adjust the volume level. 9無 INPUT - High-Definition Multimedia Interface input receives digital audio and uncompressed digital video from an HDMI device or uncompressed digital video from a DVI device. When no menu is on-screen, these buttons function as...
User Manual
Page 12
... input (with standard stereo audio inputs) for connecting devices with optical audio input. 6無 VIDEO IN - Optical audio output in the Audio Setup menu ( page 43). 4無 ANT/CABLE - Standard (composite) video and standard audio inputs for connecting devices with component video output, such as a Toshiba DVD player with HDMI 1 analog audio input terminals, and its...
... input (with standard stereo audio inputs) for connecting devices with optical audio input. 6無 VIDEO IN - Optical audio output in the Audio Setup menu ( page 43). 4無 ANT/CABLE - Standard (composite) video and standard audio inputs for connecting devices with component video output, such as a Toshiba DVD player with HDMI 1 analog audio input terminals, and its...
User Manual
Page 13
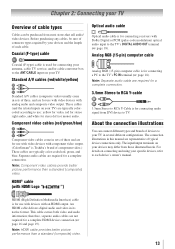
Coaxial (F-type) cable Coaxial (F-type) cable is Toshiba's brand of component video.) These cables are required for a complete connection. 3.5mm Stereo to RCA Y-cable 3.5mm Stereo to RCA Y-Cable is for stereo left (or mono) audio. Note: Component video cables provide better picture performance ...a complete connection. These cables (and the related inputs on connecting and using your specific devices, refer to each cable. Note: Separate audio cable are typically color-coded red, green, and blue. Note: HDMI cable provides better picture performance than a standard (composite) video....
Coaxial (F-type) cable Coaxial (F-type) cable is Toshiba's brand of component video.) These cables are required for a complete connection. 3.5mm Stereo to RCA Y-cable 3.5mm Stereo to RCA Y-Cable is for stereo left (or mono) audio. Note: Component video cables provide better picture performance ...a complete connection. These cables (and the related inputs on connecting and using your specific devices, refer to each cable. Note: Separate audio cable are typically color-coded red, green, and blue. Note: HDMI cable provides better picture performance than a standard (composite) video....
User Manual
Page 14
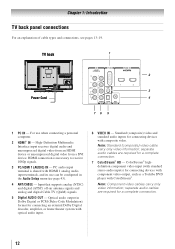
... to program or access certain features on the TV. on the TV to your TV Connecting a VCR and antenna, Cable TV or Camcorder Camcorder AUDIO OUT L R VIDEO TV back panel 1 From Cable TV or From Cable TV antenna Cable box IN CH 3 CH 4 OUT Stereo VCR VIDEO... remote control ( page 21). Use the Cable box controls to civil and criminal liability. 14 Chapter 2: Connecting your VCR's audio out terminal using the white audio cable only. • Standard audio cables. Select the ANT/CABLE video input source on the TV.* Tune the TV to channel 3 or 4 (whichever channel the ...
... to program or access certain features on the TV. on the TV to your TV Connecting a VCR and antenna, Cable TV or Camcorder Camcorder AUDIO OUT L R VIDEO TV back panel 1 From Cable TV or From Cable TV antenna Cable box IN CH 3 CH 4 OUT Stereo VCR VIDEO... remote control ( page 21). Use the Cable box controls to civil and criminal liability. 14 Chapter 2: Connecting your VCR's audio out terminal using the white audio cable only. • Standard audio cables. Select the ANT/CABLE video input source on the TV.* Tune the TV to channel 3 or 4 (whichever channel the ...
User Manual
Page 15
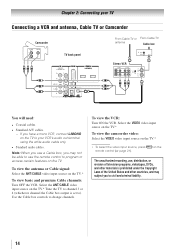
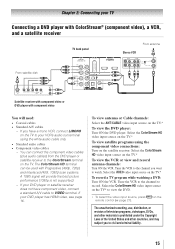
... a DVD player with ColorStream® (component video), a VCR, and a satellite receiver From satellite dish TV back panel 1 From antenna Stereo VCR VIDEO AUDIO L R IN CH 3 CH 4 OUT L R IN from the DVD player or satellite receiver to the ColorStream terminal on the TV. Tune the VCR...: Turn ON the VCR. Select the ColorStream HD video input source on the TV.* To view satellite programs using the white audio cable only. • Standard audio cables • Component video cables −− You can be used with component video You will provide the best picture performance...
... a DVD player with ColorStream® (component video), a VCR, and a satellite receiver From satellite dish TV back panel 1 From antenna Stereo VCR VIDEO AUDIO L R IN CH 3 CH 4 OUT L R IN from the DVD player or satellite receiver to the ColorStream terminal on the TV. Tune the VCR...: Turn ON the VCR. Select the ColorStream HD video input source on the TV.* To view satellite programs using the white audio cable only. • Standard audio cables • Component video cables −− You can be used with component video You will provide the best picture performance...
User Manual
Page 16
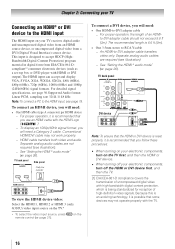
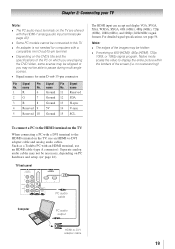
... rate 32/44.1/ 48 kHz Note: To connect a PC to the HDMI input, see illustration). −− See "Setting the HDMI ® audio mode" ( page 26). Conventional HDMI/DVI cable may not operate properly with the HDMI Logo ( ). −− To display an 1080p/60Hz... signal format, you follow these procedures: •• When turning on your electronic components, turn on your TV receives digital audio and uncompressed digital video from an HDMI source device, or uncompressed digital video from EIA/CEA-861-Dcompliant[1] consumer electronic devices (such as ...
... rate 32/44.1/ 48 kHz Note: To connect a PC to the HDMI input, see illustration). −− See "Setting the HDMI ® audio mode" ( page 26). Conventional HDMI/DVI cable may not operate properly with the HDMI Logo ( ). −− To display an 1080p/60Hz... signal format, you follow these procedures: •• When turning on your electronic components, turn on your TV receives digital audio and uncompressed digital video from an HDMI source device, or uncompressed digital video from EIA/CEA-861-Dcompliant[1] consumer electronic devices (such as ...
User Manual
Page 17
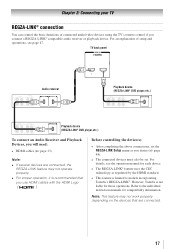
... not liable for compatibility information. Refer to models incorporating Toshiba's REGZA-LINK®. Note: This feature may not work properly depending on the devices that you desire ( page 48). • The connected ... proper operation, it is limited to the individual instruction manuals for those operations. For an explanation of connected audio/video devices using the TV's remote control if you connect a REGZA-LINK® compatible audio receiver or playback device. Before controlling the device(s): • After completing the above connections, set . TV ...
... not liable for compatibility information. Refer to models incorporating Toshiba's REGZA-LINK®. Note: This feature may not work properly depending on the devices that you desire ( page 48). • The connected ... proper operation, it is limited to the individual instruction manuals for those operations. For an explanation of connected audio/video devices using the TV's remote control if you connect a REGZA-LINK® compatible audio receiver or playback device. Before controlling the device(s): • After completing the above connections, set . TV ...
User Manual
Page 18
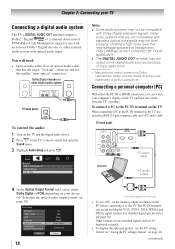
... PCM, depending on your computer's display on page 42). (continued) The PC IN terminal can watch your device ("Selecting the optical audio output format" on page 38). 18 Conversion adapter (if necessary) • To use the PC setting feature ( "Using the PC...SVGA, XGA, WXGA and SXGA signal formats. For detailed signal specifications ( page 56). Chapter 2: Connecting your TV Connecting a digital audio system The TV's DIGITAL AUDIO OUT terminal outputs a Dolby® * Digital or 2-channel down-mixed PCM (Pulse-Code Modulation) signal for use an analog RGB ...
... PCM, depending on your computer's display on page 42). (continued) The PC IN terminal can watch your device ("Selecting the optical audio output format" on page 38). 18 Conversion adapter (if necessary) • To use the PC setting feature ( "Using the PC...SVGA, XGA, WXGA and SXGA signal formats. For detailed signal specifications ( page 56). Chapter 2: Connecting your TV Connecting a digital audio system The TV's DIGITAL AUDIO OUT terminal outputs a Dolby® * Digital or 2-channel down-mixed PCM (Pulse-Code Modulation) signal for use an analog RGB ...
User Manual
Page 19
... mode scales the video to -DVI adapter cable and analog audio cables. For detailed signal specifications, see page 56. Separate analog audio cables may not be necessary, depending on PC hardware and setup. ( page 16). Such as a Toshiba PC with an HDMI terminal, use an HDMI-to display the... to the HDMI terminal on the TV, use an HDMI cable (type A connector). name Pin Signal No. TV back panel 1 Computer PC audio cable PC audio output HDMI-to pause during multi-angle scenes. • Signal names for mini D-sub 15-pin connector Pin Signal No. Chapter 2: Connecting your...
... mode scales the video to -DVI adapter cable and analog audio cables. For detailed signal specifications, see page 56. Separate analog audio cables may not be necessary, depending on PC hardware and setup. ( page 16). Such as a Toshiba PC with an HDMI terminal, use an HDMI-to display the... to the HDMI terminal on the TV, use an HDMI cable (type A connector). name Pin Signal No. TV back panel 1 Computer PC audio cable PC audio output HDMI-to pause during multi-angle scenes. • Signal names for mini D-sub 15-pin connector Pin Signal No. Chapter 2: Connecting your...
User Manual
Page 22
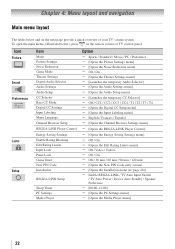
...panel. Icon Picture Sound Preferences Locks Setup Item Mode Picture Settings Noise Reduction Game Mode Theater Settings Digital Audio Selector Audio Settings Audio Setup CC Selector Base CC Mode Digital CC Settings Input Labeling Menu Language Channel Browser Setup REGZA-LINK Player...; [Opens the Noise Reduction menu] Off / On [Opens the Theater Settings menu] [Launches the temporary Audio Selector] [Opens the Audio Settings menu] [Opens the Audio Setup menu] [Launches the temporary CC Selector] Off / CC1 / CC2 / CC3 / CC4 / T1 / T2...
...panel. Icon Picture Sound Preferences Locks Setup Item Mode Picture Settings Noise Reduction Game Mode Theater Settings Digital Audio Selector Audio Settings Audio Setup CC Selector Base CC Mode Digital CC Settings Input Labeling Menu Language Channel Browser Setup REGZA-LINK Player...; [Opens the Noise Reduction menu] Off / On [Opens the Theater Settings menu] [Launches the temporary Audio Selector] [Opens the Audio Settings menu] [Opens the Audio Setup menu] [Launches the temporary CC Selector] Off / CC1 / CC2 / CC3 / CC4 / T1 / T2...
User Manual
Page 26
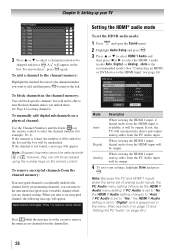
... 41 Locking channels) To manually add digital subchannels on a physical channel: Use the Channel Numbers and the Dash ( ) on page 43.) 26 If PC Audio is found , a message will be output. If the channel is set to "Digital" and is accidentally added to "Auto." however, they can still be...channel, the following message will be output. 4無 To save your TV 3無 Press p or q to select a channel position to select the HDMI 1 audio mode (Auto, Digital, or Analog). (Auto is available, it will appear. Note: Because the PC and HDMI-1 inputs share the same set the HDMI...
... 41 Locking channels) To manually add digital subchannels on a physical channel: Use the Channel Numbers and the Dash ( ) on page 43.) 26 If PC Audio is found , a message will be output. If the channel is set to "Digital" and is accidentally added to "Auto." however, they can still be...channel, the following message will be output. 4無 To save your TV 3無 Press p or q to select a channel position to select the HDMI 1 audio mode (Auto, Digital, or Analog). (Auto is available, it will appear. Note: Because the PC and HDMI-1 inputs share the same set the HDMI...
User Manual
Page 28
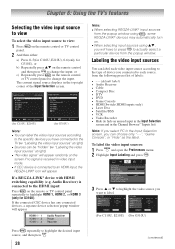
... label the video input sources according to the specific devices you select PC in the top right corner of labels: • - - (default label) • Audio Receiver • Cable • Compact Disc • DTV • DVD • Game Console • HDMI Switch (HDMI inputs only) • Laser Disc...Selection screen and in the Channel Browser™ Inputs list) Note: If you have to press to change the input. Video Audio Receiver Cable Compact Disc DTV Video Audio Receiver Cable Compact Disc DTV (For C110U, E210U) (For G310U) Press repeatedly to label. or c) Repeatedly press on ...
... label the video input sources according to the specific devices you select PC in the top right corner of labels: • - - (default label) • Audio Receiver • Cable • Compact Disc • DTV • DVD • Game Console • HDMI Switch (HDMI inputs only) • Laser Disc...Selection screen and in the Channel Browser™ Inputs list) Note: If you have to press to change the input. Video Audio Receiver Cable Compact Disc DTV Video Audio Receiver Cable Compact Disc DTV (For C110U, E210U) (For G310U) Press repeatedly to label. or c) Repeatedly press on ...
User Manual
Page 37
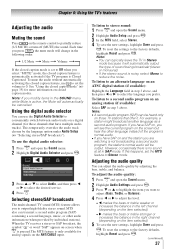
...feature allows you select "MUTE" mode, the closed caption mode is active, the Mute will automatically output the type of the program's normal audio. ••If you are watching is noisy, select Mono to select the language you prefer. When the TV receives a stereo or ... is no sound at all in Stereo mode because it . See "Using the closed caption modes. Note: ••A second audio program (SAP) can transmit a second audio program (SAP) containing a second language, music, or other language instead of sound being broadcast (stereo or monaural). ••...
...feature allows you select "MUTE" mode, the closed caption mode is active, the Mute will automatically output the type of the program's normal audio. ••If you are watching is noisy, select Mono to select the language you prefer. When the TV receives a stereo or ... is no sound at all in Stereo mode because it . See "Using the closed caption modes. Note: ••A second audio program (SAP) can transmit a second audio program (SAP) containing a second language, music, or other language instead of sound being broadcast (stereo or monaural). ••...
User Manual
Page 38
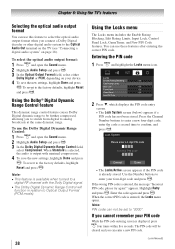
... screen is already stored. To use the Dolby Digital Dynamic Range Control: 1無 Press and open the Sound menu. 2無 Highlight Audio Setup and press . 3無 In the Optical Output Format field, select either Dolby Digital or PCM, depending on page 18). Press ...PIN code. (continued) When the correct PIN code is entered, the message "Incorrect PIN code, please try again!" When Standard is selected, the audio is available when turned to a digital RF channel with minimal compression. 4無 To save the new settings, highlight Done and press . appears. ...
... screen is already stored. To use the Dolby Digital Dynamic Range Control: 1無 Press and open the Sound menu. 2無 Highlight Audio Setup and press . 3無 In the Optical Output Format field, select either Dolby Digital or PCM, depending on page 18). Press ...PIN code. (continued) When the correct PIN code is entered, the message "Incorrect PIN code, please try again!" When Standard is selected, the audio is available when turned to a digital RF channel with minimal compression. 4無 To save the new settings, highlight Done and press . appears. ...
User Manual
Page 43
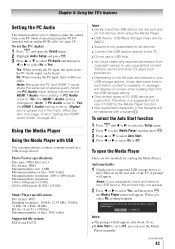
...load before content is grayed out in the menu. (Also see item 3 on page 12 and "Setting the HDMI® Audio mode" on a USB storage device. Toshiba cannot and does not grant such permission. ••Depending on the file size and amount in the filename will appear. Note...Player, and then press . 3無 Press or to select Auto Start. 4無 Press or to "Yes" the HDMI 1 Audio setting is not guaranteed for the Media Player function. ••Non-supported characters in your PC when connecting using the Media Player. ••...
...load before content is grayed out in the menu. (Also see item 3 on page 12 and "Setting the HDMI® Audio mode" on a USB storage device. Toshiba cannot and does not grant such permission. ••Depending on the file size and amount in the filename will appear. Note...Player, and then press . 3無 Press or to select Auto Start. 4無 Press or to "Yes" the HDMI 1 Audio setting is not guaranteed for the Media Player function. ••Non-supported characters in your PC when connecting using the Media Player. ••...
User Manual
Page 46
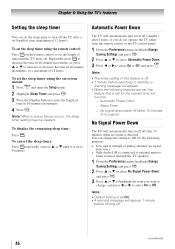
... minutes of no signal) No Signal Power Down The TV will automatically turn itself off (standby) after 15 minutes when no signal detection.) • Only Audio L/R is set the length of time until it is connected to external input to listen to music through the TV speakers. 1無 From the Preferences...
... minutes of no signal) No Signal Power Down The TV will automatically turn itself off (standby) after 15 minutes when no signal detection.) • Only Audio L/R is set the length of time until it is connected to external input to listen to music through the TV speakers. 1無 From the Preferences...
User Manual
Page 47
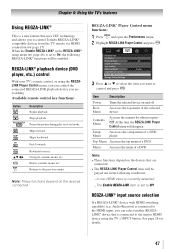
...: 1無 Press and open the Preferences menu. 2無 Highlight REGZA-LINK Player Control and press . Audio Receiver) is connected to the HDMI input, you can control the connected REGZA-LINK playback device you to control Toshiba REGZA-LINK® compatible devices from the TV remote via HDMI connection ( page 17). Available...
...: 1無 Press and open the Preferences menu. 2無 Highlight REGZA-LINK Player Control and press . Audio Receiver) is connected to the HDMI input, you can control the connected REGZA-LINK playback device you to control Toshiba REGZA-LINK® compatible devices from the TV remote via HDMI connection ( page 17). Available...


