
User Manual
Page 2
... your flat panel display, always: • Use a mount that has been recommended by the display manufacturer and/or listed by the display and wall mount manufacturers. • If you have any wall bracket other than life" flat panel display. Some wall mounts are not always supported on the proper stands or installed according to walls with furniture and television sets. • Don't place flat panel displays on your new LCD TV. See "Removing the Pedestal Stand" ( page 6). However, flat panel displays...
... your flat panel display, always: • Use a mount that has been recommended by the display manufacturer and/or listed by the display and wall mount manufacturers. • If you have any wall bracket other than life" flat panel display. Some wall mounts are not always supported on the proper stands or installed according to walls with furniture and television sets. • Don't place flat panel displays on your new LCD TV. See "Removing the Pedestal Stand" ( page 6). However, flat panel displays...
User Manual
Page 4
... the hook(s) on the rear of the television at least four (4) inches away from any item you use a sturdy strap from mains power. Make sure the strap is subject to wear or abuse. 30) Never overload wall outlets and extension cords. 31) Always operate this product, never place or store the TV in cabinet, or any home theater component connected to...
... the hook(s) on the rear of the television at least four (4) inches away from any item you use a sturdy strap from mains power. Make sure the strap is subject to wear or abuse. 30) Never overload wall outlets and extension cords. 31) Always operate this product, never place or store the TV in cabinet, or any home theater component connected to...
User Manual
Page 5
... pedestal stand to avoid damage to wall mount your local authorities or the Electronics Industries Alliance (www.eiae.org). Disposal may expose you need to clean the LCD screen, follow this manual to a Toshiba Authorized Service Provider. 44) If you decide to the LCD panel. 2) Place the TV on a flat, cushioned surface such as described upper right position. 7) VESA Mounting Pattern TV Size Hole Pattern(HxV) Screw Size 32...
... pedestal stand to avoid damage to wall mount your local authorities or the Electronics Industries Alliance (www.eiae.org). Disposal may expose you need to clean the LCD screen, follow this manual to a Toshiba Authorized Service Provider. 44) If you decide to the LCD panel. 2) Place the TV on a flat, cushioned surface such as described upper right position. 7) VESA Mounting Pattern TV Size Hole Pattern(HxV) Screw Size 32...
User Manual
Page 8
... back panel connections 12 Chapter 2: Connecting your TV 13 Overview of cable types 13 About the connection illustrations 13 Connecting a VCR and antenna, Cable TV or Camcorder 14 Connecting a DVD player with ColorStream® (component video), a VCR, and a satellite receiver 15 Connecting an HDMI® or DVI device to the HDMI input 16 REGZA-LINK® connection 17 Connecting a digital audio system 18 Connecting a personal computer (PC 18 Chapter 3: Using the remote control 20 Installing the remote control batteries 20 Remote control...
... back panel connections 12 Chapter 2: Connecting your TV 13 Overview of cable types 13 About the connection illustrations 13 Connecting a VCR and antenna, Cable TV or Camcorder 14 Connecting a DVD player with ColorStream® (component video), a VCR, and a satellite receiver 15 Connecting an HDMI® or DVI device to the HDMI input 16 REGZA-LINK® connection 17 Connecting a digital audio system 18 Connecting a personal computer (PC 18 Chapter 3: Using the remote control 20 Installing the remote control batteries 20 Remote control...
User Manual
Page 12
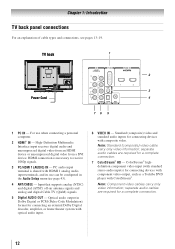
...separate audio cables are required for connecting devices with component video output, such as a Toshiba DVD player with composite video. High-Definition Multimedia Interface input receives digital audio and uncompressed digital video from an HDMI device or uncompressed digital video from a DVI device. Optical audio output in the Audio Setup menu ( page 43). 4無 ANT/CABLE - Chapter 1: Introduction TV back panel connections For an explanation of cable types and connections, see pages 13-19. separate audio cables are required for connecting an external Dolby Digital...
...separate audio cables are required for connecting devices with component video output, such as a Toshiba DVD player with composite video. High-Definition Multimedia Interface input receives digital audio and uncompressed digital video from an HDMI device or uncompressed digital video from a DVI device. Optical audio output in the Audio Setup menu ( page 43). 4無 ANT/CABLE - Chapter 1: Introduction TV back panel connections For an explanation of cable types and connections, see pages 13-19. separate audio cables are required for connecting an external Dolby Digital...
User Manual
Page 13
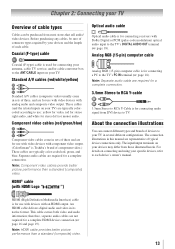
.... Component video cables (red/green/blue) Component video cables come in this manual are typically color-coded red, green, and blue. The input/output terminals on your TV. The connection illustrations in sets of three, and are for connecting receivers with an HDMI output. HDMI® cable (with HDMI Logo " ") Optical audio cable Optical audio cable is for a complete connection. Chapter 2: Connecting your TV Overview of cable types Cables can connect different types and brands of devices to your TV in its native format. Analog RGB (15-pin) computer cable Analog...
.... Component video cables (red/green/blue) Component video cables come in this manual are typically color-coded red, green, and blue. The input/output terminals on your TV. The connection illustrations in sets of three, and are for connecting receivers with an HDMI output. HDMI® cable (with HDMI Logo " ") Optical audio cable Optical audio cable is for a complete connection. Chapter 2: Connecting your TV Overview of cable types Cables can connect different types and brands of devices to your TV in its native format. Analog RGB (15-pin) computer cable Analog...
User Manual
Page 16
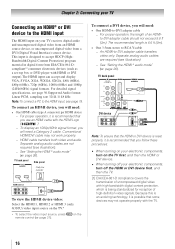
... HDMI 1, HDMI 2 or HDMI 3 (only G310U) video input source on your electronic components, turn off your TV receives digital audio and uncompressed digital video from an HDMI source device, or uncompressed digital video from EIA/CEA-861-Dcompliant[1] consumer electronic devices (such as a set-top box or DVD player with the HDMI Logo ( ). −− To display an 1080p/60Hz signal format, you will need: • One HDMI-to the HDMI input, see illustration). −− See "Setting the HDMI ® audio mode...
... HDMI 1, HDMI 2 or HDMI 3 (only G310U) video input source on your electronic components, turn off your TV receives digital audio and uncompressed digital video from an HDMI source device, or uncompressed digital video from EIA/CEA-861-Dcompliant[1] consumer electronic devices (such as a set-top box or DVD player with the HDMI Logo ( ). −− To display an 1080p/60Hz signal format, you will need: • One HDMI-to the HDMI input, see illustration). −− See "Setting the HDMI ® audio mode...
User Manual
Page 18
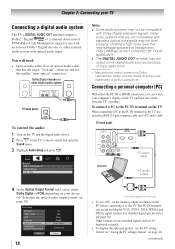
... on the TV's remote control and open the Sound menu. 3無 Highlight Audio Setup and press . Connecting a personal computer (PC) With either Dolby Digital or PCM, depending on your device ("Selecting the optical audio output format" on page 38). 18 Conversion adapter (if necessary) • To use a PC, set the monitor output resolution on the TV, use an analog RGB (15-pin) computer cable and a PC audio cable. For detailed signal specifications ( page...
... on the TV's remote control and open the Sound menu. 3無 Highlight Audio Setup and press . Connecting a personal computer (PC) With either Dolby Digital or PCM, depending on your device ("Selecting the optical audio output format" on page 38). 18 Conversion adapter (if necessary) • To use a PC, set the monitor output resolution on the TV, use an analog RGB (15-pin) computer cable and a PC audio cable. For detailed signal specifications ( page...
User Manual
Page 21
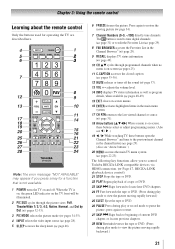
... by Dot. ( pages 32-33). 3無 PIC MODE selects the picture mode ( pages 34-35). 4無 INPUT selects the video input source ( page 28). 5無 SLEEP accesses the sleep timer ( page 46). 6無 FREEZE freezes the picture. Note: The error message "NOT AVAILABLE" may appear if you to control Toshiba REGZA-LINK compatible devices via HDMI connection. ( Page 47, REGZA-LINK playback device...
... by Dot. ( pages 32-33). 3無 PIC MODE selects the picture mode ( pages 34-35). 4無 INPUT selects the video input source ( page 28). 5無 SLEEP accesses the sleep timer ( page 46). 6無 FREEZE freezes the picture. Note: The error message "NOT AVAILABLE" may appear if you to control Toshiba REGZA-LINK compatible devices via HDMI connection. ( Page 47, REGZA-LINK playback device...
User Manual
Page 22
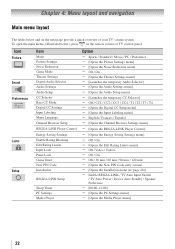
... Main menu layout The tables below ), press on the next page provide a quick overview of your TV's menu system. Icon Picture Sound Preferences Locks Setup Item Mode Picture Settings Noise Reduction Game Mode Theater Settings Digital Audio Selector Audio Settings Audio Setup CC Selector Base CC Mode Digital CC Settings Input Labeling Menu Language Channel Browser Setup REGZA-LINK Player Control Energy Saving Settings Enable Rating Blocking Edit Rating Limits Input Lock Panel Lock GameTimer New PIN Code Installation REGZA-LINK Setup Sleep Timer PC Settings Media Player Option ...
... Main menu layout The tables below ), press on the next page provide a quick overview of your TV's menu system. Icon Picture Sound Preferences Locks Setup Item Mode Picture Settings Noise Reduction Game Mode Theater Settings Digital Audio Selector Audio Settings Audio Setup CC Selector Base CC Mode Digital CC Settings Input Labeling Menu Language Channel Browser Setup REGZA-LINK Player Control Energy Saving Settings Enable Rating Blocking Edit Rating Limits Input Lock Panel Lock GameTimer New PIN Code Installation REGZA-LINK Setup Sleep Timer PC Settings Media Player Option ...
User Manual
Page 26
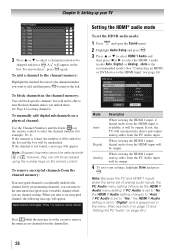
...: Because the PC and HDMI-1 inputs share the same set to "No," the HDMI 1 Audio setting changes to the channel list by programming channels, you unlock them. ( Page 41 Locking channels) To manually add digital subchannels on a physical channel: Use the Channel Numbers and the Dash ( ) on the remote control. Mode Description Auto When viewing the HDMI 1 input, if digital audio from the PC Audio input will be output. If PC Audio is set to "Yes," the HDMI 1 Audio setting is set to remove channel Press while the message...
...: Because the PC and HDMI-1 inputs share the same set to "No," the HDMI 1 Audio setting changes to the channel list by programming channels, you unlock them. ( Page 41 Locking channels) To manually add digital subchannels on a physical channel: Use the Channel Numbers and the Dash ( ) on the remote control. Mode Description Auto When viewing the HDMI 1 input, if digital audio from the PC Audio input will be output. If PC Audio is set to "Yes," the HDMI 1 Audio setting is set to remove channel Press while the message...
User Manual
Page 34
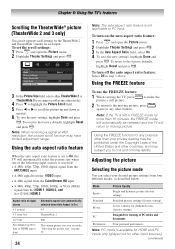
... HDMI aspect data) Automatic aspect size (automatically selected when Auto Aspect is received: • A 480i, 480p, 720p, 1080i digital signal from the ANT/CABLE input • A 480i signal from the VIDEO input • A 480i signal from the ColorStream HD input • A 480i, 480p, 720p, 1080i, 1080p, or VGA (60Hz) signal from four different modes, as needed. 6無 To save the new settings, highlight Done and press . Using the auto...
... HDMI aspect data) Automatic aspect size (automatically selected when Auto Aspect is received: • A 480i, 480p, 720p, 1080i digital signal from the ANT/CABLE input • A 480i signal from the VIDEO input • A 480i signal from the ColorStream HD input • A 480i, 480p, 720p, 1080i, 1080p, or VGA (60Hz) signal from four different modes, as needed. 6無 To save the new settings, highlight Done and press . Using the auto...
User Manual
Page 38
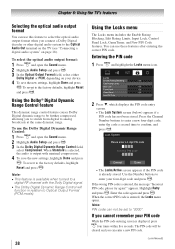
... optical audio output format: 1無 Press and open the Sound menu. 2無 Highlight Audio Setup and press . 3無 In the Dolby Digital Dynamic Range Control field, select Compressed. To revert to the factory defaults, highlight Reset and press . To revert to the factory defaults, highlight Reset and press . Press the Channel Number buttons to enter a new four-digit code, enter the code a second time to enter your device. 4無 To save the new settings...
... optical audio output format: 1無 Press and open the Sound menu. 2無 Highlight Audio Setup and press . 3無 In the Dolby Digital Dynamic Range Control field, select Compressed. To revert to the factory defaults, highlight Reset and press . To revert to the factory defaults, highlight Reset and press . Press the Channel Number buttons to enter a new four-digit code, enter the code a second time to enter your device. 4無 To save the new settings...
User Manual
Page 43
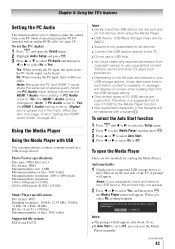
... Setting the PC Audio This function allows you to output or mute the sound from your USB storage device, it is suggested not to use copyrighted content. When you select No, nothing happens. No: When viewing the PC input, there will display on the rear side of U3 USB device are two methods for starting the Media Player. To open the Sound menu. 2無 Highlight Audio Setup...
... Setting the PC Audio This function allows you to output or mute the sound from your USB storage device, it is suggested not to use copyrighted content. When you select No, nothing happens. No: When viewing the PC input, there will display on the rear side of U3 USB device are two methods for starting the Media Player. To open the Sound menu. 2無 Highlight Audio Setup...
User Manual
Page 48
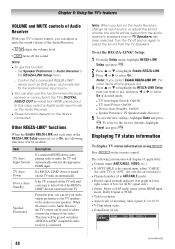
...; Channel number (if in ANT/CABLE mode) • Digital signal strength indicator (bar graph in the REGZA-LINK Setup menu. −− Confirm that a connected REGZA-LINK® device (such as DVD player, etc) is turned off the TV will send a message to turn on automatically. To set to Audio Receiver, the TV remote can be used to adjust or mute the volume of the audio. Item TV Auto Input Switch TV Auto Power Device Auto Standby Speaker Preference...
...; Channel number (if in ANT/CABLE mode) • Digital signal strength indicator (bar graph in the REGZA-LINK Setup menu. −− Confirm that a connected REGZA-LINK® device (such as DVD player, etc) is turned off the TV will send a message to turn on automatically. To set to Audio Receiver, the TV remote can be used to adjust or mute the volume of the audio. Item TV Auto Input Switch TV Auto Power Device Auto Standby Speaker Preference...
User Manual
Page 53
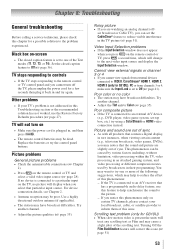
... be dead. Poor color or no picture will change to the next video input source and display the Input Selection window. air broadcast or Cable TV), you press on -screen •• The closed caption feature to Off ( page 41). Black box on the remote control or TV, press a second time, which may cause a slight jitter of this issue.( page 51) 53 Cannot view external signals or channel 3 or 4 •...
... be dead. Poor color or no picture will change to the next video input source and display the Input Selection window. air broadcast or Cable TV), you press on -screen •• The closed caption feature to Off ( page 41). Black box on the remote control or TV, press a second time, which may cause a slight jitter of this issue.( page 51) 53 Cannot view external signals or channel 3 or 4 •...
User Manual
Page 54
... HDMI cables •• Make sure to use cables with the latest HDMI TV products, due to tune digital channels, use the Reset Factory Defaults procedure ( page 27). Try another channel. •• The sound may appear. Remote control problems •• Remove all channels from the channel list and reprogram channels into the channel memory ( page 24). If you forget your TV and unplug the power cord, then plug and turn off the closed caption...
... HDMI cables •• Make sure to use cables with the latest HDMI TV products, due to tune digital channels, use the Reset Factory Defaults procedure ( page 27). Try another channel. •• The sound may appear. Remote control problems •• Remove all channels from the channel list and reprogram channels into the channel memory ( page 24). If you forget your TV and unplug the power cord, then plug and turn off the closed caption...
User Manual
Page 57
... electric power), improper installation, improper maintenance, or use of the operating instructions in the United States. or Puerto Rico. (5) Removal and reinstallation of this LCD Television. use or malfunction through simultaneous use in violation of purchase including the serial number for set installation, setup, adjustment of customer controls, and installation or repair of antenna, satellite or cable systems are not covered by this limited warranty. (6) Reception or other problems caused by inadequate antenna systems...
... electric power), improper installation, improper maintenance, or use of the operating instructions in the United States. or Puerto Rico. (5) Removal and reinstallation of this LCD Television. use or malfunction through simultaneous use in violation of purchase including the serial number for set installation, setup, adjustment of customer controls, and installation or repair of antenna, satellite or cable systems are not covered by this limited warranty. (6) Reception or other problems caused by inadequate antenna systems...
User Manual
Page 58
... Television and its parts against material defects in materials or workmanship that is mounted in the unlikely event of original retail purchase. Registration of your LCD Television will enable TCL to complete the product registration does not diminish your LCD Television online at http://support.toshiba.ca/warranty/. This includes wall mounts, custom cabinets and other proof of purchase. (2) All warranty servicing of this LCD Television. Service, repairs or replacement...
... Television and its parts against material defects in materials or workmanship that is mounted in the unlikely event of original retail purchase. Registration of your LCD Television will enable TCL to complete the product registration does not diminish your LCD Television online at http://support.toshiba.ca/warranty/. This includes wall mounts, custom cabinets and other proof of purchase. (2) All warranty servicing of this LCD Television. Service, repairs or replacement...
Brochure
Page 2
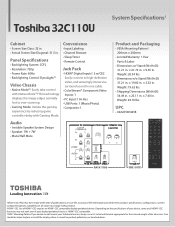
... • Input Labeling • Channel Browser • Sleep Timer • Remote Control Jack Pack • HDMI® Digital Inputs2: 2 w/CEC Easily connect to high-definition video, and amazingly immersive surround sound in one cable. • ColorStream® Component Video Inputs: 1 • PC Input: 1 Hi-Res • USB Ports: 1 (Music/Photo) • Composite: 1 Audio • Invisible Speaker System Design • Speaker: 7W + 7W • Mute/Half Mute Product and Packaging • VESA Mounting Pattern3...
... • Input Labeling • Channel Browser • Sleep Timer • Remote Control Jack Pack • HDMI® Digital Inputs2: 2 w/CEC Easily connect to high-definition video, and amazingly immersive surround sound in one cable. • ColorStream® Component Video Inputs: 1 • PC Input: 1 Hi-Res • USB Ports: 1 (Music/Photo) • Composite: 1 Audio • Invisible Speaker System Design • Speaker: 7W + 7W • Mute/Half Mute Product and Packaging • VESA Mounting Pattern3...


