

Owner's Manual - English
Page 2
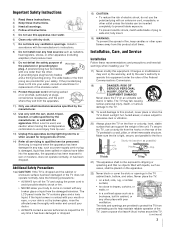
... EXPOSE THIS APPLIANCE TO RAIN OR MOISTURE. The use a UL Listed wall bracket appropriate for the size and weight of the home with the installation instructions. As a result, TVs may reach for wall mounting this hidden hazard of this Toshiba LCD TV. Use appropriate furniture large enough to constitute a risk of this television for . Before operating your TV (and other enclosed instructions for proper grounding and, in accordance with...
... EXPOSE THIS APPLIANCE TO RAIN OR MOISTURE. The use a UL Listed wall bracket appropriate for the size and weight of the home with the installation instructions. As a result, TVs may reach for wall mounting this hidden hazard of this Toshiba LCD TV. Use appropriate furniture large enough to constitute a risk of this television for . Before operating your TV (and other enclosed instructions for proper grounding and, in accordance with...
Owner's Manual - English
Page 3
... hooks on or pinched, particularly at plugs, convenience receptacles, and the point where they exit from overheating and to help maintain reliable operation of plug to inspect the TV any way, such as power-supply cord or plug is dropped and the cabinet or enclosure surface has been damaged or the TV does not operate normally, take the following precautions: • ALWAYS turn...
... hooks on or pinched, particularly at plugs, convenience receptacles, and the point where they exit from overheating and to help maintain reliable operation of plug to inspect the TV any way, such as power-supply cord or plug is dropped and the cabinet or enclosure surface has been damaged or the TV does not operate normally, take the following precautions: • ALWAYS turn...
Owner's Manual - English
Page 4
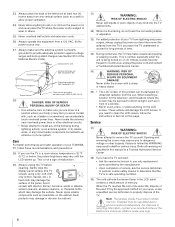
.... 25) Never overload wall outlets and extension cords. 26) Always operate this equipment from a 120 VAC, 60 Hz power source only. 27) Always make sure the antenna system is properly grounded to service the TV yourself. A hard cloth may damage or discolor the cabinet. 31) WARNING: RISK OF ELECTRIC SHOCK! When selecting a location for the television, avoid locations where the screen may be exposed...
.... 25) Never overload wall outlets and extension cords. 26) Always operate this equipment from a 120 VAC, 60 Hz power source only. 27) Always make sure the antenna system is properly grounded to service the TV yourself. A hard cloth may damage or discolor the cabinet. 31) WARNING: RISK OF ELECTRIC SHOCK! When selecting a location for the television, avoid locations where the screen may be exposed...
Owner's Manual - English
Page 7
... 24 Remote control codes 25 Chapter 4: Menu layout and navigation 27 Main menu layout 27 Setup/Installation menu layout 28 Navigating the menu system 28 Chapter 5: Setting up your TV 29 Selecting the menu language 29 Configuring the antenna input source for the ANT terminal 29 Programming channels into the TV's channel memory . . . . 30 Programming channels automatically 30 Manually adding and deleting channels in the channel memory 30 Labeling channels 31 Setting the HDMI™ audio mode 32 Viewing the digital signal...
... 24 Remote control codes 25 Chapter 4: Menu layout and navigation 27 Main menu layout 27 Setup/Installation menu layout 28 Navigating the menu system 28 Chapter 5: Setting up your TV 29 Selecting the menu language 29 Configuring the antenna input source for the ANT terminal 29 Programming channels into the TV's channel memory . . . . 30 Programming channels automatically 30 Manually adding and deleting channels in the channel memory 30 Labeling channels 31 Setting the HDMI™ audio mode 32 Viewing the digital signal...
Owner's Manual - English
Page 8
...-enhanced television services may require the use of ColorStream® HD high-resolution component video inputs (- page 15). • SRS WOW™ audio technologies (- For more information call your cable operator is capable of the most cases). • Three HDMI™ digital, high-definition multimedia interfaces 1080p input support (- page 17). • Two sets of a set -top box (in most innovative LCD TVs on the screen along with Dolby® Digital optical output format...
...-enhanced television services may require the use of ColorStream® HD high-resolution component video inputs (- page 15). • SRS WOW™ audio technologies (- For more information call your cable operator is capable of the most cases). • Three HDMI™ digital, high-definition multimedia interfaces 1080p input support (- page 17). • Two sets of a set -top box (in most innovative LCD TVs on the screen along with Dolby® Digital optical output format...
Owner's Manual - English
Page 9
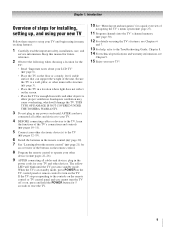
... UNDER THE TOSHIBA WARRANTY. 3 Do not plug in the power cords for your new TV! 9 Secure the TV to a wall, pillar, or other objects to allow proper ventilation. pages 22-26). 9 AFTER connecting all cables and devices, plug in any power cords until the TV goes into the TV's channel memory (- page 27). 11 Program channels into standby mode. Chapter 1: Introduction Overview of steps for installing, setting up, and using your new TV Follow these...
... UNDER THE TOSHIBA WARRANTY. 3 Do not plug in the power cords for your new TV! 9 Secure the TV to a wall, pillar, or other objects to allow proper ventilation. pages 22-26). 9 AFTER connecting all cables and devices, plug in any power cords until the TV goes into the TV's channel memory (- page 27). 11 Program channels into standby mode. Chapter 1: Introduction Overview of steps for installing, setting up, and using your new TV Follow these...
Owner's Manual - English
Page 11
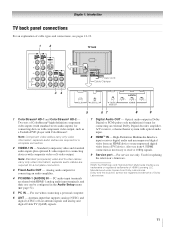
... input receives digital audio and uncompressed digital video from an HDMI device or uncompressed digital video from Dolby Laboratories. Standard (composite) video and standard audio inputs plus optional S-video inputs for connecting devices with optical audio input. 8 HDMI™ IN - Chapter 1: Introduction TV back panel connections For an explanation of ColorStream® high-definition component video inputs (with standard stereo audio inputs) for connecting devices with component video output, such as a Toshiba DVD player with ColorStream®. Two sets of cable types...
... input receives digital audio and uncompressed digital video from an HDMI device or uncompressed digital video from Dolby Laboratories. Standard (composite) video and standard audio inputs plus optional S-video inputs for connecting devices with optical audio input. 8 HDMI™ IN - Chapter 1: Introduction TV back panel connections For an explanation of ColorStream® high-definition component video inputs (with standard stereo audio inputs) for connecting devices with component video output, such as a Toshiba DVD player with ColorStream®. Two sets of cable types...
Owner's Manual - English
Page 12
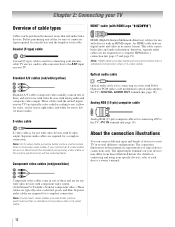
... color-coded red, green, and blue. Separate audio cables are typically color-coded according to the ANT input on your TV Overview of cable types Cables can connect different types and brands of each device's owner's manual. The connection illustrations in several different configurations. The input/output terminals on your devices and the length of devices to your specific devices, refer to the TV's DIGITAL AUDIO OUT terminal (- Note: Component video cables provide better picture performance than a composite video cable. HDMI...
... color-coded red, green, and blue. Separate audio cables are typically color-coded according to the ANT input on your TV Overview of cable types Cables can connect different types and brands of each device's owner's manual. The connection illustrations in several different configurations. The input/output terminals on your devices and the length of devices to your specific devices, refer to the TV's DIGITAL AUDIO OUT terminal (- Note: Component video cables provide better picture performance than a composite video cable. HDMI...

Owner's Manual - English
Page 14
... S-video and a cable box An S-video connection will need: • coaxial cables • S-video cable - Note: When you have a mono VCR, connect L/MONO on the TV to program or access certain features on the TV. To view basic and premium Cable channels: Turn OFF the VCR. TV upper back panel TV lower back panel From Cable TV Cable box IN CH 3 CH 4 OUT stereo VCR VIDEO AUDIO L R IN CH 3 CH 4 OUT L R IN from ANT OUT to change channels. Select the VIDEO 1 video input source...
... S-video and a cable box An S-video connection will need: • coaxial cables • S-video cable - Note: When you have a mono VCR, connect L/MONO on the TV to program or access certain features on the TV. To view basic and premium Cable channels: Turn OFF the VCR. TV upper back panel TV lower back panel From Cable TV Cable box IN CH 3 CH 4 OUT stereo VCR VIDEO AUDIO L R IN CH 3 CH 4 OUT L R IN from ANT OUT to change channels. Select the VIDEO 1 video input source...
Owner's Manual - English
Page 19
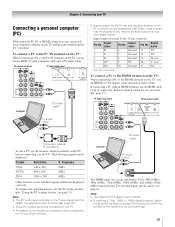
... audio cable PC audio output The HDMI input can be hidden. • If receiving a 720p, 1080i, or 1080p signal program, Native mode scales the video to the HDMI terminal on the TV, use the PC setting feature (- Signal name 6 Ground 7 Ground 8 Ground 9 NC 10 Ground Pin No. "Using the PC settings feature" on the TV and hear the sound from the TV's speakers. page 52). • Some PC models cannot be connected to this TV...
... audio cable PC audio output The HDMI input can be hidden. • If receiving a 720p, 1080i, or 1080p signal program, Native mode scales the video to the HDMI terminal on the TV, use the PC setting feature (- Signal name 6 Ground 7 Ground 8 Ground 9 NC 10 Ground Pin No. "Using the PC settings feature" on the TV and hear the sound from the TV's speakers. page 52). • Some PC models cannot be connected to this TV...
Owner's Manual - English
Page 27
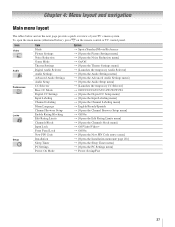
...below and on the remote control or TV control panel. Icon Video Audio Preferences Locks Setup Item Mode Picture Settings Noise Reduction Game Mode Theater Settings Digital Audio Selector Audio Settings Advanced Audio Settings Audio Setup CC Selector Base CC Mode Digital CC Settings Input Labeling Channel Labeling Menu Language Channel Browser Setup Enable Rating Blocking Edit Rating Limits Channels Block Input Lock Front Panel Lock New PIN Code Installation Sleep Timer PC Settings Power-On Mode Option S Sports/Standard/Movie/Preference S [Opens the Picture Settings menu] S [Opens the Noise...
...below and on the remote control or TV control panel. Icon Video Audio Preferences Locks Setup Item Mode Picture Settings Noise Reduction Game Mode Theater Settings Digital Audio Selector Audio Settings Advanced Audio Settings Audio Setup CC Selector Base CC Mode Digital CC Settings Input Labeling Channel Labeling Menu Language Channel Browser Setup Enable Rating Blocking Edit Rating Limits Channels Block Input Lock Front Panel Lock New PIN Code Installation Sleep Timer PC Settings Power-On Mode Option S Sports/Standard/Movie/Preference S [Opens the Picture Settings menu] S [Opens the Noise...
Owner's Manual - English
Page 28
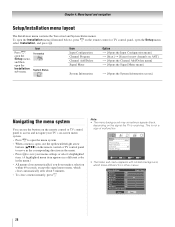
... menus. Picture Settings Contrast 100 Back Light 100 DynaLight Brightness 50 Color 50 Tint 0 Sharpness 50 Advanced Picture Settings Reset Mode: Sports On Done 28 Press Y, open the Setup menu, and then open , use the buttons on the remote control or TV control panel to access and navigate your TV's on-screen menu system. • Press Y to open the menu system. • When a menu is not a sign of malfunction. Video Mode Picture Settings Noise Reduction Game Mode Theater Settings Sports...
... menus. Picture Settings Contrast 100 Back Light 100 DynaLight Brightness 50 Color 50 Tint 0 Sharpness 50 Advanced Picture Settings Reset Mode: Sports On Done 28 Press Y, open the Setup menu, and then open , use the buttons on the remote control or TV control panel to access and navigate your TV's on-screen menu system. • Press Y to open the menu system. • When a menu is not a sign of malfunction. Video Mode Picture Settings Noise Reduction Game Mode Theater Settings Sports...

Owner's Manual - English
Page 30
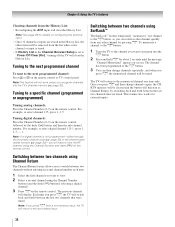
.... Installation Terrestrial Input Configuration Channel Program Channel Add/Delete Signal Meter Start ANT Cable Scanning channels, please wait ... 52% Number of Installation menu icons will appear, as shown below to view the programmed channels. This is configured for Antenna. Setup Installation Sleep Timer PC Settings Power-On Mode Power-Saving 4 (A new set of Installation menu icons will appear, as shown above). 5 To cancel channel programming, press O on the remote control (or highlight Abort in the channel memory. Note: • You must use the Channel Number buttons...
.... Installation Terrestrial Input Configuration Channel Program Channel Add/Delete Signal Meter Start ANT Cable Scanning channels, please wait ... 52% Number of Installation menu icons will appear, as shown below to view the programmed channels. This is configured for Antenna. Setup Installation Sleep Timer PC Settings Power-On Mode Power-Saving 4 (A new set of Installation menu icons will appear, as shown above). 5 To cancel channel programming, press O on the remote control (or highlight Abort in the channel memory. Note: • You must use the Channel Number buttons...

Owner's Manual - English
Page 32
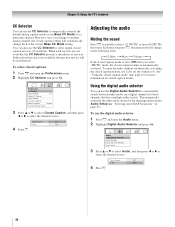
... T to "Auto." Assigned channel labels will be deleted and press =. 3 Highlight Yes from the list of analog audio inputs, the PC Audio menu setting influences the HDMI 1 Audio menu setting. Audio Setup PC Audio HDMI 1 Audio MTS Language Optical Output Format Dolby Digital Dynamic Range Control Reset No Auto Stereo English Dolby Digital Compressed Done Note: Because the PC and HDMI-1 inputs share the same set the HDMI audio mode: 1 Press Y and open the Audio menu. 2 Highlight Audio Setup and press T. 3 Press B or b to select HDMI 1 Audio and...
... T to "Auto." Assigned channel labels will be deleted and press =. 3 Highlight Yes from the list of analog audio inputs, the PC Audio menu setting influences the HDMI 1 Audio menu setting. Audio Setup PC Audio HDMI 1 Audio MTS Language Optical Output Format Dolby Digital Dynamic Range Control Reset No Auto Stereo English Dolby Digital Compressed Done Note: Because the PC and HDMI-1 inputs share the same set the HDMI audio mode: 1 Press Y and open the Audio menu. 2 Highlight Audio Setup and press T. 3 Press B or b to select HDMI 1 Audio and...
Owner's Manual - English
Page 38
... channels or inputs are tuned. Note: If you program channels into the R button. 2 Press and hold R for external inputs. 38 The TV will return to "Power Off Clear (On)," turning off the TV will clear the History List. page 30). Note: If a digital channel is set to the last-viewed input. Switching between two channels using SurfLock™ The SurfLock™ feature temporarily "memorizes" one time only. Once you can then change channels...
... channels or inputs are tuned. Note: If you program channels into the R button. 2 Press and hold R for external inputs. 38 The TV will return to "Power Off Clear (On)," turning off the TV will clear the History List. page 30). Note: If a digital channel is set to the last-viewed input. Switching between two channels using SurfLock™ The SurfLock™ feature temporarily "memorizes" one time only. Once you can then change channels...
Owner's Manual - English
Page 44
... be used instead. See "Using the closed caption modes. Audio Digital Audio Selector Audio Settings Advanced Audio Settings Audio Setup 3 Press B or b to select Audio, and then press C or c to conveniently switch between audio tracks on a digital channel (for more information on page 45). Closed Caption Audio CC 1 None 44 To use the Digital Audio Selector to select the desired service. 4 Press O. You can use the CC Selector to temporarily override the default analog caption mode (set the volume to the current Base CC Mode setting...
... be used instead. See "Using the closed caption modes. Audio Digital Audio Selector Audio Settings Advanced Audio Settings Audio Setup 3 Press B or b to select Audio, and then press C or c to conveniently switch between audio tracks on a digital channel (for more information on page 45). Closed Caption Audio CC 1 None 44 To use the Digital Audio Selector to select the desired service. 4 Press O. You can use the CC Selector to temporarily override the default analog caption mode (set the volume to the current Base CC Mode setting...
Owner's Manual - English
Page 58
... set to an external A/V device (e.g., DVD player, video game system, set to SAP mode (- LED indications while in but not powered on the TV control panel for 5 or more of the following suggestions, which will change to the next video input source and display the Input Selection window. 58 Cannot view external signals or channel 3 or 4 • If you cannot view signals from external devices connected to a particular input on -screen • The closed caption feature to Stereo mode (- Sound problems • Check the antenna/cable connections...
... set to an external A/V device (e.g., DVD player, video game system, set to SAP mode (- LED indications while in but not powered on the TV control panel for 5 or more of the following suggestions, which will change to the next video input source and display the Input Selection window. 58 Cannot view external signals or channel 3 or 4 • If you cannot view signals from external devices connected to a particular input on -screen • The closed caption feature to Stereo mode (- Sound problems • Check the antenna/cable connections...

Owner's Manual - English
Page 62
... of antenna systems are your LCD Television online at 1-800-575-5469. (2) You must be commenced to change, modify, or extend the terms of original retail purchase. Reception problems caused by inadequate antenna systems, misaligned satellite dishes, cable 62 television distribution, VCRs, DVD players/recorders, personal computer level IEEE-1394 devices, and any state of this manual and reviewing the section entitled "Troubleshooting," you...
... of antenna systems are your LCD Television online at 1-800-575-5469. (2) You must be commenced to change, modify, or extend the terms of original retail purchase. Reception problems caused by inadequate antenna systems, misaligned satellite dishes, cable 62 television distribution, VCRs, DVD players/recorders, personal computer level IEEE-1394 devices, and any state of this manual and reviewing the section entitled "Troubleshooting," you...
Owner's Manual - English
Page 63
... will come on the type of repair required, the service will either be performed by one (1) year after the date of original retail purchase. ON-SITE SERVICE ONLY APPLIES WITHIN 100 KILOMETERS OF AN ASP. d. i. Damage to the Television caused by failure to follow the specifications, User manuals or guides as set installation, setup, adjustment of customer controls, and installation or repair of antenna systems are not...
... will come on the type of repair required, the service will either be performed by one (1) year after the date of original retail purchase. ON-SITE SERVICE ONLY APPLIES WITHIN 100 KILOMETERS OF AN ASP. d. i. Damage to the Television caused by failure to follow the specifications, User manuals or guides as set installation, setup, adjustment of customer controls, and installation or repair of antenna systems are not...

Owner's Manual - English
Page 65
... audio output format 46 P PC Audio 52 PC connection 19 PC settings 51 Picture adjustment 42 Picture mode 42 Picture quality 42 Picture scroll 40 Picture size selection 39 POWER button 10, 21 Power-On Mode 34 R RECALL button 53 Remote control Battery installation 20 Device code table 25 Effective range 20 Functional key chart 23 Learning about the buttons .......21 Programming 24 Reset Factory Defaults 33 S Safety 2 SAP sound 45 Satellite receiver connection 15 Scroll settings 40 Selecting Menu Language 29 Service 4 Side panel control 10 Sleep timer 52 Specifications...
... audio output format 46 P PC Audio 52 PC connection 19 PC settings 51 Picture adjustment 42 Picture mode 42 Picture quality 42 Picture scroll 40 Picture size selection 39 POWER button 10, 21 Power-On Mode 34 R RECALL button 53 Remote control Battery installation 20 Device code table 25 Effective range 20 Functional key chart 23 Learning about the buttons .......21 Programming 24 Reset Factory Defaults 33 S Safety 2 SAP sound 45 Satellite receiver connection 15 Scroll settings 40 Selecting Menu Language 29 Service 4 Side panel control 10 Sleep timer 52 Specifications...


