User Manual
Page 2
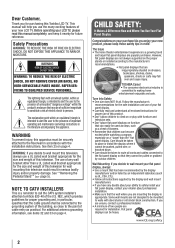
... situated on a "larger than a UL Listed wall bracket appropriate for the size and weight of this television for future reference. Tune Into Safety • One size does NOT fit all instructions supplied by an independent laboratory (such as practical. Wall Mounting: If you decide to wall mount your purchase! Some wall mounts are not always supported on your flat panel display, always: • Use a mount that the cable ground shall be heavy. 2
... situated on a "larger than a UL Listed wall bracket appropriate for the size and weight of this television for future reference. Tune Into Safety • One size does NOT fit all instructions supplied by an independent laboratory (such as practical. Wall Mounting: If you decide to wall mount your purchase! Some wall mounts are not always supported on your flat panel display, always: • Use a mount that the cable ground shall be heavy. 2
User Manual
Page 5
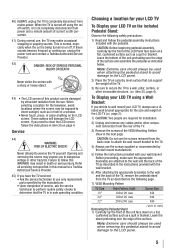
... the wall mount bracket to the TV. 4) Always use only replacement parts specified by ultraviolet radiation from the rear of the TV. 3) Remove the screws of the VESA Mounting Pattern show in safe operating condition. If you have the TV serviced: • Ask the service technician to use the screws supplied or recommended by the wall mount manufacturer. 5) Follow the instructions provided with a sharp or heavy object. 43) • The LCD screen of...
... the wall mount bracket to the TV. 4) Always use only replacement parts specified by ultraviolet radiation from the rear of the TV. 3) Remove the screws of the VESA Mounting Pattern show in safe operating condition. If you have the TV serviced: • Ask the service technician to use the screws supplied or recommended by the wall mount manufacturer. 5) Follow the instructions provided with a sharp or heavy object. 43) • The LCD screen of...
User Manual
Page 6
..." TV VESA Mounting Pattern Four screws 6 Hook Sturdy strap (as short as possible) FCC Declaration of Conformity Compliance Statement (Part 15): The Toshiba 19SL410U, 24SL410U, and 32SL410U Televisions comply with Part 15 of the pedestal stand. 3) Once you have removed the four screws that to which can radiate radio frequency energy and, if not installed and used in accordance with the limits for help. These limits...
..." TV VESA Mounting Pattern Four screws 6 Hook Sturdy strap (as short as possible) FCC Declaration of Conformity Compliance Statement (Part 15): The Toshiba 19SL410U, 24SL410U, and 32SL410U Televisions comply with Part 15 of the pedestal stand. 3) Once you have removed the four screws that to which can radiate radio frequency energy and, if not installed and used in accordance with the limits for help. These limits...
User Manual
Page 8
... (V-Chip 40 Downloading an additional rating system for blocking TV programs and movies 41 Locking channels 42 Unlocking programs temporarily 42 Using the input lock feature 42 Using the Game Timer 43 Using the control panel lock feature 43 Using the PC settings feature 43 Setting the PC Audio 44 Using the Media Player 44 Using the Media Player with USB 44 To select the Auto Start function 45 To open the Media Player 45 Viewing photo files 45 Playing music files...
... (V-Chip 40 Downloading an additional rating system for blocking TV programs and movies 41 Locking channels 42 Unlocking programs temporarily 42 Using the input lock feature 42 Using the Game Timer 43 Using the control panel lock feature 43 Using the PC settings feature 43 Setting the PC Audio 44 Using the Media Player 44 Using the Media Player with USB 44 To select the Auto Start function 45 To open the Media Player 45 Viewing photo files 45 Playing music files...
User Manual
Page 12
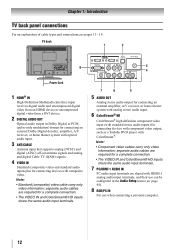
TV back Power Cord 1 HDMI® IN High-Definition Multimedia Interface input receives digital audio and uncompressed digital video from an HDMI device or uncompressed digital video from a DVI device. 2 DIGITAL AUDIO OUT Optical audio output in the Audio Setup menu ( page 44). 8 RGB/PC IN For use can be configured in Dolby Digital or PCM (pulse-code modulation) format for connecting an external Dolby Digital decoder, amplifier, A/V receiver, or home theater system with optical audio input. 3 ANT/CABLE Antenna input that supports analog (NTSC) and digital (ATSC...
TV back Power Cord 1 HDMI® IN High-Definition Multimedia Interface input receives digital audio and uncompressed digital video from an HDMI device or uncompressed digital video from a DVI device. 2 DIGITAL AUDIO OUT Optical audio output in the Audio Setup menu ( page 44). 8 RGB/PC IN For use can be configured in Dolby Digital or PCM (pulse-code modulation) format for connecting an external Dolby Digital decoder, amplifier, A/V receiver, or home theater system with optical audio input. 3 ANT/CABLE Antenna input that supports analog (NTSC) and digital (ATSC...
User Manual
Page 13
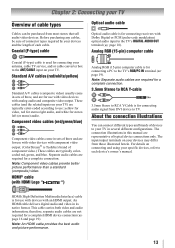
... audio cables are typically color-coded according to the TV's RGB/PC IN terminal ( page 19). Chapter 2: Connecting your devices and the length of each device's owner's manual. The input/output terminals on your TV. This cable carries both video and audio information; Coaxial (F-type) cable Optical audio cable Optical audio cable is for a complete HDMI device connection ( page 16 and page 19). Note: Component video cables provide better picture performance than a standard (composite) video. An HDMI cable delivers digital audio...
... audio cables are typically color-coded according to the TV's RGB/PC IN terminal ( page 19). Chapter 2: Connecting your devices and the length of each device's owner's manual. The input/output terminals on your TV. This cable carries both video and audio information; Coaxial (F-type) cable Optical audio cable Optical audio cable is for a complete HDMI device connection ( page 16 and page 19). Note: Component video cables provide better picture performance than a standard (composite) video. An HDMI cable delivers digital audio...
User Manual
Page 19
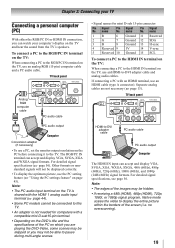
... Separate analog cables are playing the DVD-Video, some scenes may be skipped or you can watch your computer's display on the TV and hear the sound from the TV's speakers. Other formats or nonstandard signals will not be displayed correctly. • To display the optimum picture, use an HDMI cable (type A connector). If connecting a PC with a compatible mini D-sub15-pin terminal. • Depending on the DVD's title and the specifications...
... Separate analog cables are playing the DVD-Video, some scenes may be skipped or you can watch your computer's display on the TV and hear the sound from the TV's speakers. Other formats or nonstandard signals will not be displayed correctly. • To display the optimum picture, use an HDMI cable (type A connector). If connecting a PC with a compatible mini D-sub15-pin terminal. • Depending on the DVD's title and the specifications...
User Manual
Page 21
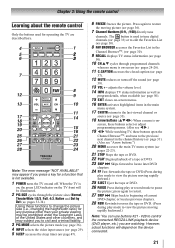
... green LED indicator on -screen ( pages 24-26). 11 C.CAPTION accesses the closed caption ( page 37). 12 MUTE reduces or turns off . press again to restart. 27 SKIP Skips back to beginning of current DVD chapter, or locates previous chapters. 28 REW Rewinds/reverses the tape or DVD. (Press during play mode to view the picture moving rapidly backward.) Note: You can use buttons #21 - #28 to control...
... green LED indicator on -screen ( pages 24-26). 11 C.CAPTION accesses the closed caption ( page 37). 12 MUTE reduces or turns off . press again to restart. 27 SKIP Skips back to beginning of current DVD chapter, or locates previous chapters. 28 REW Rewinds/reverses the tape or DVD. (Press during play mode to view the picture moving rapidly backward.) Note: You can use buttons #21 - #28 to control...
User Manual
Page 22
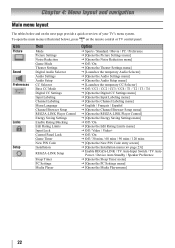
... The tables below ), press on the next page provide a quick overview of your TV's menu system. Icon Picture Sound Preferences Locks Setup Item Mode Picture Settings Noise Reduction Game Mode Theater Settings Digital Audio Selector Audio Settings Audio Setup CC Selector Base CC Mode Digital CC Settings Input Labeling Channel Labeling Menu Language Channel Browser Setup REGZA-LINK Player Control Energy Saving Settings Enable Rating Blocking Edit Rating Limits Input Lock Control Panel Lock Game Timer New PIN Code Installation REGZA-LINK Setup Sleep Timer PC Settings Media Player Option...
... The tables below ), press on the next page provide a quick overview of your TV's menu system. Icon Picture Sound Preferences Locks Setup Item Mode Picture Settings Noise Reduction Game Mode Theater Settings Digital Audio Selector Audio Settings Audio Setup CC Selector Base CC Mode Digital CC Settings Input Labeling Channel Labeling Menu Language Channel Browser Setup REGZA-LINK Player Control Energy Saving Settings Enable Rating Blocking Edit Rating Limits Input Lock Control Panel Lock Game Timer New PIN Code Installation REGZA-LINK Setup Sleep Timer PC Settings Media Player Option...
User Manual
Page 23
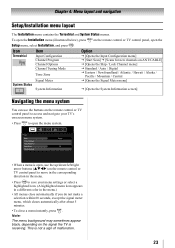
... black, depending on the remote control or TV control panel, open the menu system. Icon Terrestrial Item Input Configuration Channel Program Channel Options Channel Tuning Mode Time Zone Signal Meter System Status System Information Option J [Opens the Input Configuration menu] J [Start Scan] J [Scans for new channels on ANT/CABLE] J [Opens the Skip / Lock Channel menu] J Standard / Auto / Digital J Eastern / Newfoundland / Atlantic / Hawaii / Alaska / Pacific / Mountain / Central J [Opens the Signal Meter menu] J [Opens the System Information screen] Navigating the menu...
... black, depending on the remote control or TV control panel, open the menu system. Icon Terrestrial Item Input Configuration Channel Program Channel Options Channel Tuning Mode Time Zone Signal Meter System Status System Information Option J [Opens the Input Configuration menu] J [Start Scan] J [Scans for new channels on ANT/CABLE] J [Opens the Skip / Lock Channel menu] J Standard / Auto / Digital J Eastern / Newfoundland / Atlantic / Hawaii / Alaska / Pacific / Mountain / Central J [Opens the Signal Meter menu] J [Opens the System Information screen] Navigating the menu...
User Manual
Page 24
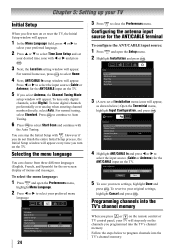
... TV control panel, your TV will appear. Preferences CC Selector Base CC Mode Digital CC Settings Input Labeling Channel Labeling Menu Language Channel Browser Setup REGZA-LINK Player Control 24 Off Auto English 3 Press to your original settings, highlight Cancel and press . Configuring the antenna input source for the ANT/CABLE input on the TV. Setup Installation REGZA-LINK Setup Sleep Timer PC Settings Media Player 3 (A new set your desired time zone with the Auto Tuning. For normal home use, press to program channels...
... TV control panel, your TV will appear. Preferences CC Selector Base CC Mode Digital CC Settings Input Labeling Channel Labeling Menu Language Channel Browser Setup REGZA-LINK Player Control 24 Off Auto English 3 Press to your original settings, highlight Cancel and press . Configuring the antenna input source for the ANT/CABLE input on the TV. Setup Installation REGZA-LINK Setup Sleep Timer PC Settings Media Player 3 (A new set your desired time zone with the Auto Tuning. For normal home use, press to program channels...

User Manual
Page 25
... Channel Number buttons on the remote control (or highlight Cancel in the channel memory, you should not have not already done so ( page 24). 2 Press and open the Setup menu. 3 Highlight Installation and press . Installation Terrestrial Input Configuration Channel Program Channel Options Channel Tuning Mode Time Zone Signal Meter again to a channel not programmed in the onscreen display and press ). This is finished, press or to bring 25 Setup Installation REGZA-LINK Setup Sleep Timer PC Settings Media Player...
... Channel Number buttons on the remote control (or highlight Cancel in the channel memory, you should not have not already done so ( page 24). 2 Press and open the Setup menu. 3 Highlight Installation and press . Installation Terrestrial Input Configuration Channel Program Channel Options Channel Tuning Mode Time Zone Signal Meter again to a channel not programmed in the onscreen display and press ). This is finished, press or to bring 25 Setup Installation REGZA-LINK Setup Sleep Timer PC Settings Media Player...
User Manual
Page 27
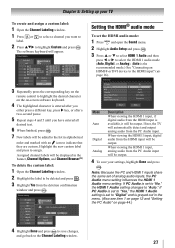
... select the HDMI 1 audio mode (Auto, Digital, or Analog). (Auto is set to "No," the HDMI 1 Audio setting changes to indicate that they are custom. If PC Audio is the recommended mode.) See "Connecting an HDMI® or DVI device to highlight Custom and press . Audio Setup PC Audio HDMI 1 Audio MTS Language Optical Output Format Dolby Digital Dynamic Range Control No Auto Stereo English Dolby Digital Compressed Reset Done Mode Auto Digital Analog Description When viewing the HDMI 1 input, if digital audio from the HDMI input is entered after...
... select the HDMI 1 audio mode (Auto, Digital, or Analog). (Auto is set to "No," the HDMI 1 Audio setting changes to indicate that they are custom. If PC Audio is the recommended mode.) See "Connecting an HDMI® or DVI device to highlight Custom and press . Audio Setup PC Audio HDMI 1 Audio MTS Language Optical Output Format Dolby Digital Dynamic Range Control No Auto Stereo English Dolby Digital Compressed Reset Done Mode Auto Digital Analog Description When viewing the HDMI 1 input, if digital audio from the HDMI input is entered after...
User Manual
Page 44
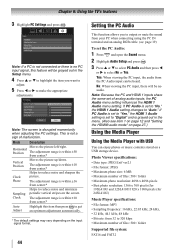
... stripes on the screen. PC Settings Horizontal Position 0 Vertical Position 0 Clock Phase 0 Sampling Clock 0 Auto Adjust 0 Reset Done Note: The screen is within 16 from 32 to select No or Yes. If PC Audio is no audio. Setup Installation REGZA-LINK Setup Sleep Timer PC Settings Media Player Note: If a PC is not connected or there is set the PC Audio: 1 Press and open the Sound menu. 2 Highlight Audio Setup and press . 3 Press...
... stripes on the screen. PC Settings Horizontal Position 0 Vertical Position 0 Clock Phase 0 Sampling Clock 0 Auto Adjust 0 Reset Done Note: The screen is within 16 from 32 to select No or Yes. If PC Audio is no audio. Setup Installation REGZA-LINK Setup Sleep Timer PC Settings Media Player Note: If a PC is not connected or there is set the PC Audio: 1 Press and open the Sound menu. 2 Highlight Audio Setup and press . 3 Press...
User Manual
Page 48
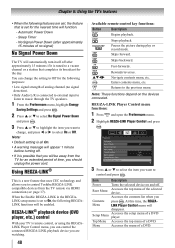
... CC Selector Base CC Mode Digital CC Settings Input Labeling Channel Labeling Menu Language Channel Browser Setup REGZA-LINK Player Control Off Auto English 3 Press S or T to Off for the following REGZALINK functions will disappear. Menu Accesses the menu of a DVD player. Menu LINK Player Control menu will be away from the TV remote via HDMI connection ( page 17). Automatic Power Down - Sleep Timer - Skips forward. When the Enable REGZA-LINK in the REGZALINK setup menu is connected to external input to...
... CC Selector Base CC Mode Digital CC Settings Input Labeling Channel Labeling Menu Language Channel Browser Setup REGZA-LINK Player Control Off Auto English 3 Press S or T to Off for the following REGZALINK functions will disappear. Menu Accesses the menu of a DVD player. Menu LINK Player Control menu will be away from the TV remote via HDMI connection ( page 17). Automatic Power Down - Sleep Timer - Skips forward. When the Enable REGZA-LINK in the REGZALINK setup menu is connected to external input to...
User Manual
Page 53
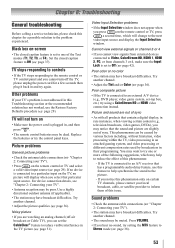
...: - Picture problems General picture problems • Check the antenna/cable connections ( "Chapter 2: Connecting your TV's problem is set the CableClear® feature to the picture. - Cannot view external signals or channel 3 or 4 • If you notice this issue. Poor color or no device is connected to a particular input on the remote control or TV, press a second time, which may have broadcast difficulties. This phenomenon can set to Video, ColorStream HD, HDMI 1, HDMI 2, PC, or from external devices connected...
...: - Picture problems General picture problems • Check the antenna/cable connections ( "Chapter 2: Connecting your TV's problem is set the CableClear® feature to the picture. - Cannot view external signals or channel 3 or 4 • If you notice this issue. Poor color or no device is connected to a particular input on the remote control or TV, press a second time, which may have broadcast difficulties. This phenomenon can set to Video, ColorStream HD, HDMI 1, HDMI 2, PC, or from external devices connected...
User Manual
Page 57
... Service Provider. (4) The warranties from TAIS are effective only if this LCD Television is not covered under this limited warranty. (11) Product that is mounted in such a manner as lightning or fluctuations in electric power), improper installation, improper maintenance, or use in violation of instructions furnished by this LCD Television must present upon request your LCD Television online at http://register.toshiba.com. ANY PART OR PRODUCT REPLACED...
... Service Provider. (4) The warranties from TAIS are effective only if this LCD Television is not covered under this limited warranty. (11) Product that is mounted in such a manner as lightning or fluctuations in electric power), improper installation, improper maintenance, or use in violation of instructions furnished by this LCD Television must present upon request your LCD Television online at http://register.toshiba.com. ANY PART OR PRODUCT REPLACED...
User Manual
Page 58
... COVERED BY THESE WARRANTIES. This includes wall mounts, custom cabinets and other installation methods that is authorized to the Television not approved in the Television failing for set installation, setup, adjustment of customer controls, and installation or repair of antenna systems are posted to the Toshiba Support website and can be commenced to service the Television; Service made necessary by the end user via a USB stick or SD card type media. f. DURING THIS...
... COVERED BY THESE WARRANTIES. This includes wall mounts, custom cabinets and other installation methods that is authorized to the Television not approved in the Television failing for set installation, setup, adjustment of customer controls, and installation or repair of antenna systems are posted to the Toshiba Support website and can be commenced to service the Television; Service made necessary by the end user via a USB stick or SD card type media. f. DURING THIS...
Brochure
Page 1
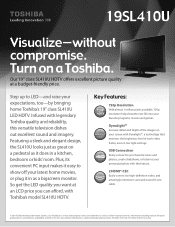
... CLEAR SCAN 480Hz QUANTUM BLACK Camera Angle Select Digital Tuning Closed Captioning Sleep Timer 10 Apps IR Pass-Through Native Mode™ PixelPure 5G Resolution +™ Active Shutter Glasses © 2011 Toshiba America Information Systems, Inc. 19SL410U Visualize-without limitation product prices, specifications, availability, content of their respective owners. So get the LED quality you can afford, with Toshiba's model SL410U HDTV. ing Toshiba quality and reliability, Closed Captioning Sleep Timer 1080P...
... CLEAR SCAN 480Hz QUANTUM BLACK Camera Angle Select Digital Tuning Closed Captioning Sleep Timer 10 Apps IR Pass-Through Native Mode™ PixelPure 5G Resolution +™ Active Shutter Glasses © 2011 Toshiba America Information Systems, Inc. 19SL410U Visualize-without limitation product prices, specifications, availability, content of their respective owners. So get the LED quality you can afford, with Toshiba's model SL410U HDTV. ing Toshiba quality and reliability, Closed Captioning Sleep Timer 1080P...
Brochure
Page 2
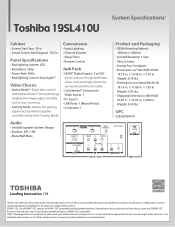
... in. × 4.80 in . Convenience • Input Labeling • Channel Browser • Sleep Timer • Remote Control Jack Pack • HDMI® Digital Inputs2: 2 w/CEC Easily connect to wall mount your Toshiba television, always use a UL Listed wall bracket appropriate for the size and weight of the information provided herein, product specifications, configurations, system/ component/options availability are all HDMI®-CEC functions may not work even if your device, some or all...
... in. × 4.80 in . Convenience • Input Labeling • Channel Browser • Sleep Timer • Remote Control Jack Pack • HDMI® Digital Inputs2: 2 w/CEC Easily connect to wall mount your Toshiba television, always use a UL Listed wall bracket appropriate for the size and weight of the information provided herein, product specifications, configurations, system/ component/options availability are all HDMI®-CEC functions may not work even if your device, some or all...


