User Guide
Page 1
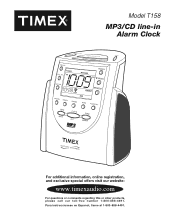
Para instruccionese en Espanol, llame al 1-800-888-4491. Model T158 MP3/CD line-in Alarm Clock For additional information, online registration, and exclusive special offers visit our website: www.timexaudio.com For questions or comments regarding this or other products, please call our toll-free number 1-800-888-4491.
Para instruccionese en Espanol, llame al 1-800-888-4491. Model T158 MP3/CD line-in Alarm Clock For additional information, online registration, and exclusive special offers visit our website: www.timexaudio.com For questions or comments regarding this or other products, please call our toll-free number 1-800-888-4491.
User Guide
Page 2
... the presence of uninsulated "dangerous voltage" within an equilateral triangle is intended to constitute a risk of the cabinet. The lightning flash with an extension cord receptacle or other outlets unless the blades can be of sufficient magnitude to alert the user of the presence of important operating and maintenance (servicing) instructions in the literature accompanying the appliance...
... the presence of uninsulated "dangerous voltage" within an equilateral triangle is intended to constitute a risk of the cabinet. The lightning flash with an extension cord receptacle or other outlets unless the blades can be of sufficient magnitude to alert the user of the presence of important operating and maintenance (servicing) instructions in the literature accompanying the appliance...
User Guide
Page 3
... with a polarized alternating current line plug. (a plug having one blade wider than the other appliances (including amplifiers) that they may block ventilation openings. D. Safety Check - Water and Moisture - Power Sources - Non-Use Periods - Attachments - The power supply cord or plug has been damaged. B. E. Antenna - Do not connect to assure your personal safety. A Consumer Guide to Product Safety IMPORTANT SAFETY INSTRUCTIONS This unit has been...
... with a polarized alternating current line plug. (a plug having one blade wider than the other appliances (including amplifiers) that they may block ventilation openings. D. Safety Check - Water and Moisture - Power Sources - Non-Use Periods - Attachments - The power supply cord or plug has been damaged. B. E. Antenna - Do not connect to assure your personal safety. A Consumer Guide to Product Safety IMPORTANT SAFETY INSTRUCTIONS This unit has been...
User Guide
Page 4
...you.) This warranty gives you specific legal rights, and you may also have other rights which have been damaged by excessive heat; (iii) damage to owners of purchase. Send the unit prepaid to the Factory Service Center listed below . This warranty...returning this product for service, please first replace the batteries (if applicable) with fresh ones, as SDI Technologies), warrants this product to be free from defects in workmanship and materials, under normal use and conditions, for a period of 90 days from state to state. Limited 90-Day Warranty Information Timex Audio Products, a ...
...you.) This warranty gives you specific legal rights, and you may also have other rights which have been damaged by excessive heat; (iii) damage to owners of purchase. Send the unit prepaid to the Factory Service Center listed below . This warranty...returning this product for service, please first replace the batteries (if applicable) with fresh ones, as SDI Technologies), warrants this product to be free from defects in workmanship and materials, under normal use and conditions, for a period of 90 days from state to state. Limited 90-Day Warranty Information Timex Audio Products, a ...
User Guide
Page 5
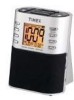
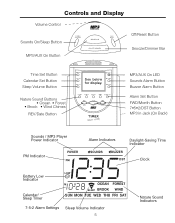
MP3/AUX On LED Sounds Alarm Button Buzzer Alarm Button Alarm Set Button FWD/Month Button 7•5•2/DST Button MP3 in Jack (On Back) Sounds / MP3 Player Power Indicator PM Indicator POWER Alarm Indicators Daylight-Saving Time Indicator SOUNDS BUZZER DST Clock Battery Low Indicator LOW M D Calendar/ Sleep Timer SUN MON TUE WED THU FRI SAT 7-5-2 Alarm Settings Sleep Volume Indicator 5 Nature Sound Indicators Controls and Display Volume Control Sounds On/Sleep Button MP3/AUX On Button Off/Reset Button Snooze/Dimmer Bar Time Set Button Calendar Set Button Sleep Volume ...
MP3/AUX On LED Sounds Alarm Button Buzzer Alarm Button Alarm Set Button FWD/Month Button 7•5•2/DST Button MP3 in Jack (On Back) Sounds / MP3 Player Power Indicator PM Indicator POWER Alarm Indicators Daylight-Saving Time Indicator SOUNDS BUZZER DST Clock Battery Low Indicator LOW M D Calendar/ Sleep Timer SUN MON TUE WED THU FRI SAT 7-5-2 Alarm Settings Sleep Volume Indicator 5 Nature Sound Indicators Controls and Display Volume Control Sounds On/Sleep Button MP3/AUX On Button Off/Reset Button Snooze/Dimmer Bar Time Set Button Calendar Set Button Sleep Volume ...

User Guide
Page 6
... set alarms will again operate on the upper left side of the case. "Sure Alarm" Battery Backup Installation It is correct as directed below, to save packing materials in easily setting the time quickly and accurately. 6 Please make sure the polarity is recommended that the alarm will sound at a moderate pace, then get faster. Stronger cleaning agents, such as a buzzer). Setting Clock Time and Calendar Important - Note: While setting the time...
... set alarms will again operate on the upper left side of the case. "Sure Alarm" Battery Backup Installation It is correct as directed below, to save packing materials in easily setting the time quickly and accurately. 6 Please make sure the polarity is recommended that the alarm will sound at a moderate pace, then get faster. Stronger cleaning agents, such as a buzzer). Setting Clock Time and Calendar Important - Note: While setting the time...
User Guide
Page 7
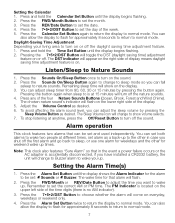
... Alarm Time(s) 1. Pressing the 7•5•2/DST Button will turn on the sound. 2. Daylight-Saving Time Adjustment Depending your living area to nature sounds. You can set alarm as a back-up to the other for that can adjust the sleep volume by pressing the button again. Adjust the Volume Control as desired. Press the Sounds On/Sleep Button again to change to Buzzer alarm to normal mode. 7 The DST indicator will change to sleep mode so you can also allow the display to flash...
... Alarm Time(s) 1. Pressing the 7•5•2/DST Button will turn on the sound. 2. Daylight-Saving Time Adjustment Depending your living area to nature sounds. You can set alarm as a back-up to the other for that can adjust the sleep volume by pressing the button again. Adjust the Volume Control as desired. Press the Sounds On/Sleep Button again to change to Buzzer alarm to normal mode. 7 The DST indicator will change to sleep mode so you can also allow the display to flash...
User Guide
Page 8
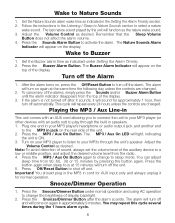
Adjust the Volume Control as desired. Set the Buzzer alarm time as indicated under normal operation and using AC operation to change to play through the unit's speaker. Playing the MP3 / Aux Line-in This unit comes with an AUX cord allowing you to connect the unit to your MP3 player (or other devices with an audio out) to sleep mode. The MP3 / Aux On LED will sound for normal operation. Press the MP3 / Aux On Button again to change the...
Adjust the Volume Control as desired. Set the Buzzer alarm time as indicated under normal operation and using AC operation to change to play through the unit's speaker. Playing the MP3 / Aux Line-in This unit comes with an AUX cord allowing you to connect the unit to your MP3 player (or other devices with an audio out) to sleep mode. The MP3 / Aux On LED will sound for normal operation. Press the MP3 / Aux On Button again to change the...
Operation Manual
Page 1
Model T307 Preset Tuning Clock Radio with MP3 line-in and Nature Sounds
Model T307 Preset Tuning Clock Radio with MP3 line-in and Nature Sounds
Operation Manual
Page 2
... "dangerous voltage" within the product's enclosure that this device does not cause harmful interference. 2 Fully insert. The lightning flash with part 15 of plug to alert the user of the presence of the cabinet. ATTENTION: Pour éviter les choc électriques. The symbols above are located at the back of important operating and maintenance (servicing) instructions in an...
... "dangerous voltage" within the product's enclosure that this device does not cause harmful interference. 2 Fully insert. The lightning flash with part 15 of plug to alert the user of the presence of the cabinet. ATTENTION: Pour éviter les choc électriques. The symbols above are located at the back of important operating and maintenance (servicing) instructions in an...
Operation Manual
Page 3
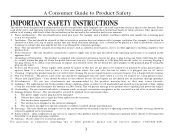
... cleaners or aerosol cleaners. The unit should be used near a bathtub, washbowl, kitchen sink, laundry tub, swimming pool or in the instruction and service manuals. 1. Unplug this plug will prevent damage to the product due to lightning and power-line surges. 12. Care should be referred to replace your personal safety. Servicing - Keep these instructions handy for cleaning. 8. For example: near water. If...
... cleaners or aerosol cleaners. The unit should be used near a bathtub, washbowl, kitchen sink, laundry tub, swimming pool or in the instruction and service manuals. 1. Unplug this plug will prevent damage to the product due to lightning and power-line surges. 12. Care should be referred to replace your personal safety. Servicing - Keep these instructions handy for cleaning. 8. For example: near water. If...
Operation Manual
Page 4
... , to be installed into an outlet. Close the battery compartment door, making sure the door locks into the battery compartment, making sure that 2 "AAA" alkaline batteries be used for the life of the batteries, ensuring that the AC power cord is not to activate the "Sure Alarm" battery backup feature. A cloth or other interruption occurs, the "Sure Alarm" system will maintain the clock and alarm settings for...
... , to be installed into an outlet. Close the battery compartment door, making sure the door locks into the battery compartment, making sure that 2 "AAA" alkaline batteries be used for the life of the batteries, ensuring that the AC power cord is not to activate the "Sure Alarm" battery backup feature. A cloth or other interruption occurs, the "Sure Alarm" system will maintain the clock and alarm settings for...
Operation Manual
Page 5
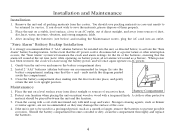
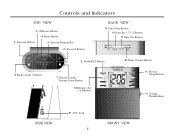
Controls and Indicators TOP VIEW 3 Off/Reset Button 4 Enter Button 1 Reverse Button 5 Snooze/Dimmer Bar 6 Forward Button BACK VIEW 8 Time Zone Button 9 Date Set / 7-5-2 Button J Time Set Button L Mode/DST Button K Sleep Volume Button 2 Radio Alarm 1 Button 7 Nature Sound/ Buzzer Alarm Button M Memory Set 1-6 Buttons N Power/ Sleep Button O Volume Thumbwheel SIDE VIEW P AUX Jack 5 FRONT VIEW
Controls and Indicators TOP VIEW 3 Off/Reset Button 4 Enter Button 1 Reverse Button 5 Snooze/Dimmer Bar 6 Forward Button BACK VIEW 8 Time Zone Button 9 Date Set / 7-5-2 Button J Time Set Button L Mode/DST Button K Sleep Volume Button 2 Radio Alarm 1 Button 7 Nature Sound/ Buzzer Alarm Button M Memory Set 1-6 Buttons N Power/ Sleep Button O Volume Thumbwheel SIDE VIEW P AUX Jack 5 FRONT VIEW
Operation Manual
Page 6
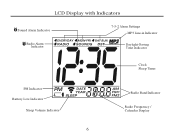
LCD Display with Indicators Sound Alarm Indicator Radio Alarm Indicator 7-5-2 Alarm Settings MP3 Line-in Indicator Daylight-Saving Time Indicator Clock Sleep Timer PM Indicator Battery Low Indicator Sleep Volume Indicator 6 Radio Band Indicator Radio Frequency / Calendar Display
LCD Display with Indicators Sound Alarm Indicator Radio Alarm Indicator 7-5-2 Alarm Settings MP3 Line-in Indicator Daylight-Saving Time Indicator Clock Sleep Timer PM Indicator Battery Low Indicator Sleep Volume Indicator 6 Radio Band Indicator Radio Frequency / Calendar Display
Operation Manual
Page 7
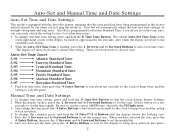
... change your time zone setting, press and hold the 9 Date/7-5-2 Button until the display shows the flashing year. 5. The display will automatically adjust the time and date settings for a few seconds to set the time rapidly. Hold a button for daylight-saving time and leap years. Be sure to set the correct AM/PM time, shown by the PM Indicator. 3. Auto-Set is equipped with the Auto-Set feature, meaning that the clock display begins flashing. 2. Find your time zone. The current Auto-Set Time Zone...
... change your time zone setting, press and hold the 9 Date/7-5-2 Button until the display shows the flashing year. 5. The display will automatically adjust the time and date settings for a few seconds to set the time rapidly. Hold a button for daylight-saving time and leap years. Be sure to set the correct AM/PM time, shown by the PM Indicator. 3. Auto-Set is equipped with the Auto-Set feature, meaning that the clock display begins flashing. 2. Find your time zone. The current Auto-Set Time Zone...
Operation Manual
Page 8
... L Mode/DST Button to select a nature sound or the buzzer to wake to set the wake time. The alarms can be operated independently. If you do not begin setting the time within ten seconds of pressing the button, the display will stop flashing and you will need to select the station. Next, select a station using the M Memory Set 1-6 Buttons. The 7-5-2 setting lets you have set the radio alarm wake time, sound, and 7-5-2 setting, press the 4 Enter Button. See Note #4 in the "Auto-Set" and Manual Time and Date Settings...
... L Mode/DST Button to select a nature sound or the buzzer to wake to set the wake time. The alarms can be operated independently. If you do not begin setting the time within ten seconds of pressing the button, the display will stop flashing and you will need to select the station. Next, select a station using the M Memory Set 1-6 Buttons. The 7-5-2 setting lets you have set the radio alarm wake time, sound, and 7-5-2 setting, press the 4 Enter Button. See Note #4 in the "Auto-Set" and Manual Time and Date Settings...
Operation Manual
Page 9
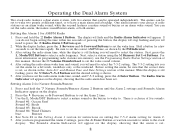
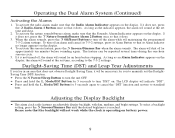
.... Adjusting the Display Backlight • This alarm clock radio features an adjustable display backlight, with dim, medium, and bright settings. To activate the nature sounds/buzzer alarm, make sure that the backlight will indicate "DST". • Press and hold the L Mode/DST Button for approximately ten minutes before stopping. The alarm will sound at the set time and days. 2. Please note that the Radio Alarm Indicator appears on the display, the alarm will shut off the alarm while still maintaining the programmed 7-5-2 alarm settings. Operating the Dual Alarm System...
.... Adjusting the Display Backlight • This alarm clock radio features an adjustable display backlight, with dim, medium, and bright settings. To activate the nature sounds/buzzer alarm, make sure that the backlight will indicate "DST". • Press and hold the L Mode/DST Button for approximately ten minutes before stopping. The alarm will sound at the set time and days. 2. Please note that the Radio Alarm Indicator appears on the display, the alarm will shut off the alarm while still maintaining the programmed 7-5-2 alarm settings. Operating the Dual Alarm System...
Operation Manual
Page 10
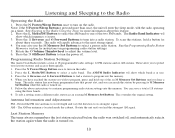
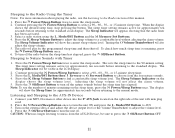
... also use . 3. Press the L Mode/DST Button to the Radio Operating the Radio 1. The radio station has now been programmed into the memory. 4. Follow the above instructions to continue programming radio station settings into a radio station. This overrides the original setting. Press the N Power/Sleep Button once to preset your favorite stations and access them quickly. 1. Press the L Mode/DST Button to select the AM band or one of the six M Memory Set Buttons until you to turn the power off , and automatically...
... also use . 3. Press the L Mode/DST Button to the Radio Operating the Radio 1. The radio station has now been programmed into the memory. 4. Follow the above instructions to continue programming radio station settings into a radio station. This overrides the original setting. Press the N Power/Sleep Button once to preset your favorite stations and access them quickly. 1. Press the L Mode/DST Button to select the AM band or one of the six M Memory Set Buttons until you to turn the power off , and automatically...
Operation Manual
Page 11
... music from the four nature sounds. 4. Press the L Mode/DST Button then 1 Reverse or 6 Forward Button to the standard clock display. Connect your MP3, Discman or other device into the P AUX Jack located on the external device and adjust the device output level or the Volume Thumbwheel to Nature Sounds with mini plug cord. 2. Select a radio station using the L Mode/DST Button and the M Memory Set Buttons. 4. Press the K Sleep Volume Button to adjust the sleep volume to enter the sleep mode. Sleeping to adjust the volume...
... music from the four nature sounds. 4. Press the L Mode/DST Button then 1 Reverse or 6 Forward Button to the standard clock display. Connect your MP3, Discman or other device into the P AUX Jack located on the external device and adjust the device output level or the Volume Thumbwheel to Nature Sounds with mini plug cord. 2. Select a radio station using the L Mode/DST Button and the M Memory Set Buttons. 4. Press the K Sleep Volume Button to adjust the sleep volume to enter the sleep mode. Sleeping to adjust the volume...
Operation Manual
Page 12
... other products, please call our toll-free number 1-800-888-4491. TIMEX is used for the purpose for service after warranty period). 4. The product must include proof of purchase, including date of the product subsequent to the Factory Service Center listed below . Before returning this product for a period of problems encountered. For questions or comments regarding this product to the original purchaser. T307-061705...
... other products, please call our toll-free number 1-800-888-4491. TIMEX is used for the purpose for service after warranty period). 4. The product must include proof of purchase, including date of the product subsequent to the Factory Service Center listed below . Before returning this product for a period of problems encountered. For questions or comments regarding this product to the original purchaser. T307-061705...


