User Guide
Page 3
... contact your electrician to replace your personal safety. Power-cord ProtectionCo-nPsouwmeerrsRuepppalyircDoerdpsasrthmoeunldt be left unattended and unused for long periods of time, unplug it from the outlet when it is equipped with it's proper ventilation. The power cord of any service or ... outlet. 6. Object and Liquid Entry - Overloading - B. The user should not be situated so that they may impede the flow of time. 9. Upon completion of the unit should be referred to qualified service personnel. 15. Ventilation - Unplug this product from heat sources such ...
... contact your electrician to replace your personal safety. Power-cord ProtectionCo-nPsouwmeerrsRuepppalyircDoerdpsasrthmoeunldt be left unattended and unused for long periods of time, unplug it from the outlet when it is equipped with it's proper ventilation. The power cord of any service or ... outlet. 6. Object and Liquid Entry - Overloading - B. The user should not be situated so that they may impede the flow of time. 9. Upon completion of the unit should be referred to qualified service personnel. 15. Ventilation - Unplug this product from heat sources such ...
User Guide
Page 5
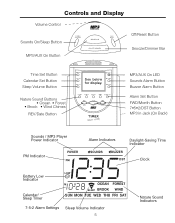
Controls and Display Volume Control Sounds On/Sleep Button MP3/AUX On Button Off/Reset Button Snooze/Dimmer Bar Time Set Button Calendar Set Button Sleep Volume Button Nature Sound Buttons • Ocean • Forest • Brook • Wind Chimes REV/Date ...Button FWD/Month Button 7•5•2/DST Button MP3 in Jack (On Back) Sounds / MP3 Player Power Indicator PM Indicator POWER Alarm Indicators Daylight-Saving Time Indicator SOUNDS BUZZER DST Clock Battery Low Indicator LOW M D Calendar/ Sleep Timer SUN MON TUE WED THU FRI SAT 7-5-2 Alarm Settings Sleep Volume ...
Controls and Display Volume Control Sounds On/Sleep Button MP3/AUX On Button Off/Reset Button Snooze/Dimmer Bar Time Set Button Calendar Set Button Sleep Volume Button Nature Sound Buttons • Ocean • Forest • Brook • Wind Chimes REV/Date ...Button FWD/Month Button 7•5•2/DST Button MP3 in Jack (On Back) Sounds / MP3 Player Power Indicator PM Indicator POWER Alarm Indicators Daylight-Saving Time Indicator SOUNDS BUZZER DST Clock Battery Low Indicator LOW M D Calendar/ Sleep Timer SUN MON TUE WED THU FRI SAT 7-5-2 Alarm Settings Sleep Volume ...

User Guide
Page 6
... Should the battery compartment become corroded or dirty, clean the compartment thoroughly and replace the batteries. You can mar the surface of the time digits (there is disconnected or a power failure or other protective material should save the materials, please dispose of them properly. 2. Using...battery into an outlet. Please make sure the polarity is not enough battery power to set alarms will stop flashing. Setting the Clock Time 1. Press the Time Set Button again to return the display to an AC outlet, out of dust, dirt, heat, water, moisture, vibration, and ...
... Should the battery compartment become corroded or dirty, clean the compartment thoroughly and replace the batteries. You can mar the surface of the time digits (there is disconnected or a power failure or other protective material should save the materials, please dispose of them properly. 2. Using...battery into an outlet. Please make sure the polarity is not enough battery power to set alarms will stop flashing. Setting the Clock Time 1. Press the Time Set Button again to return the display to an AC outlet, out of dust, dirt, heat, water, moisture, vibration, and ...
User Guide
Page 7
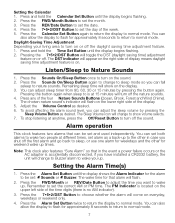
... AC adapter is no AM indicator). 3. Press and hold the Calendar Set Button until the display begins flashing. 2. To stop listening at different times, set and used independently. Remember to set : Sounds or Buzzer. Press the Alarm Set Button twice to return the display to normal mode....display. 5. Press any of the week. 5. Pressing the 7•5•2/DST Button will flash. 2. You can be set the date. 4. The wake time for approximately 8 seconds to return to turn off . Adjust the Volume Control as desired. Note: This clock also features "Sure Alarm" so that can...
... AC adapter is no AM indicator). 3. Press and hold the Calendar Set Button until the display begins flashing. 2. To stop listening at different times, set and used independently. Remember to set : Sounds or Buzzer. Press the Alarm Set Button twice to return the display to normal mode....display. 5. Press any of the week. 5. Pressing the 7•5•2/DST Button will flash. 2. You can be set the date. 4. The wake time for approximately 8 seconds to return to turn off . Adjust the Volume Control as desired. Note: This clock also features "Sure Alarm" so that can...
User Guide
Page 8
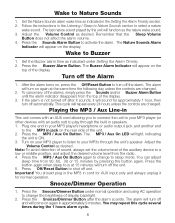
... to Nature Sounds 1. The Buzzer Alarm Indicator will light, indicating the unit is not turned off the Alarm 1. You may repeat this cycle several times during the 1 hours alarm cycle. 8 Playing the MP3 / Aux Line-in This unit comes with an AUX cord allowing you to connect the unit to ... player's headphone or audio output jack and another end to the MP3 in the Listening / Sleep to Nature Sounds section to is at the same time the following day unless the controls are changed . 2. Press the MP3 / Aux On Button again to play through the unit's speaker. Press the Snooze/Dimmer...
... to Nature Sounds 1. The Buzzer Alarm Indicator will light, indicating the unit is not turned off the Alarm 1. You may repeat this cycle several times during the 1 hours alarm cycle. 8 Playing the MP3 / Aux Line-in This unit comes with an AUX cord allowing you to connect the unit to ... player's headphone or audio output jack and another end to the MP3 in the Listening / Sleep to Nature Sounds section to is at the same time the following day unless the controls are changed . 2. Press the MP3 / Aux On Button again to play through the unit's speaker. Press the Snooze/Dimmer...

Operation Manual
Page 3
... external antenna. Power-cord Protection - Power supply cords should be left unattended and unused for cleaning. 8. Cleaning - The power cord of time. 9. Do not use can result in a risk of time, unplug it is to qualified service personnel. 15. Damage Require Service - Objects have a clear area from the wall outlet and disconnect...
... external antenna. Power-cord Protection - Power supply cords should be left unattended and unused for cleaning. 8. Cleaning - The power cord of time. 9. Do not use can result in a risk of time, unplug it is to qualified service personnel. 15. Damage Require Service - Objects have a clear area from the wall outlet and disconnect...
Operation Manual
Page 4
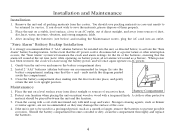
Remove the unit and all set time (note: while operating on natural wood or wood with mild soap and water. You should be returned for longer life) into the unit, as a buzzer). "...
Remove the unit and all set time (note: while operating on natural wood or wood with mild soap and water. You should be returned for longer life) into the unit, as a buzzer). "...
Operation Manual
Page 5
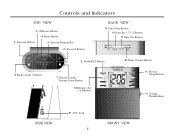
Controls and Indicators TOP VIEW 3 Off/Reset Button 4 Enter Button 1 Reverse Button 5 Snooze/Dimmer Bar 6 Forward Button BACK VIEW 8 Time Zone Button 9 Date Set / 7-5-2 Button J Time Set Button L Mode/DST Button K Sleep Volume Button 2 Radio Alarm 1 Button 7 Nature Sound/ Buzzer Alarm Button M Memory Set 1-6 Buttons N Power/ Sleep Button O Volume Thumbwheel SIDE VIEW P AUX Jack 5 FRONT VIEW
Controls and Indicators TOP VIEW 3 Off/Reset Button 4 Enter Button 1 Reverse Button 5 Snooze/Dimmer Bar 6 Forward Button BACK VIEW 8 Time Zone Button 9 Date Set / 7-5-2 Button J Time Set Button L Mode/DST Button K Sleep Volume Button 2 Radio Alarm 1 Button 7 Nature Sound/ Buzzer Alarm Button M Memory Set 1-6 Buttons N Power/ Sleep Button O Volume Thumbwheel SIDE VIEW P AUX Jack 5 FRONT VIEW
Operation Manual
Page 6
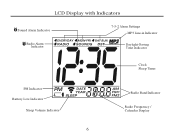
LCD Display with Indicators Sound Alarm Indicator Radio Alarm Indicator 7-5-2 Alarm Settings MP3 Line-in Indicator Daylight-Saving Time Indicator Clock Sleep Timer PM Indicator Battery Low Indicator Sleep Volume Indicator 6 Radio Band Indicator Radio Frequency / Calendar Display
LCD Display with Indicators Sound Alarm Indicator Radio Alarm Indicator 7-5-2 Alarm Settings MP3 Line-in Indicator Daylight-Saving Time Indicator Clock Sleep Timer PM Indicator Battery Low Indicator Sleep Volume Indicator 6 Radio Band Indicator Radio Frequency / Calendar Display
Operation Manual
Page 7
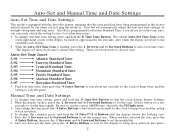
... Auto-Set Time Zones Z-01 Atlantic Standard Time Z-02 Z-03 Z-04 Z-05 Eastern Standard Time Central Standard Time Mountain Standard Time Pacific Standard Time Z-06 Alaskan Standard Time Z-07 Hawaiian Standard Time 3. Hold a button for the display to set the time. Auto-Set is programmed for daylight-saving time and leap ...or wait about ten seconds for approximately ten seconds, after which the display will show each zone's current time setting. When you first plug the model in this time zone, you have selected the year, press the 4 Enter Button, then use the 1 Reverse and...
... Auto-Set Time Zones Z-01 Atlantic Standard Time Z-02 Z-03 Z-04 Z-05 Eastern Standard Time Central Standard Time Mountain Standard Time Pacific Standard Time Z-06 Alaskan Standard Time Z-07 Hawaiian Standard Time 3. Hold a button for the display to set the time. Auto-Set is programmed for daylight-saving time and leap ...or wait about ten seconds for approximately ten seconds, after which the display will show each zone's current time setting. When you first plug the model in this time zone, you have selected the year, press the 4 Enter Button, then use the 1 Reverse and...
Operation Manual
Page 8
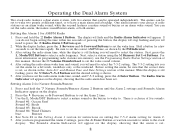
... as shown in the Setting Alarm 1 section for instructions on the display. 2. Setting Alarm 2 for Alarm 2. 5. After setting the radio alarm time, while the display is still flashing, press the 9 Date/7-5-2 Button until the Alarm 2 settings and Sounds Alarm Indicator appear on setting the 7-5-2 ...alarm setting for Nature Sounds/Buzzer 1. First, press the L Mode/DST Button to . After setting the radio alarm wake time and sound, you will need to select the station. The alarms can be operated independently. The display will flash and the Radio Alarm...
... as shown in the Setting Alarm 1 section for instructions on the display. 2. Setting Alarm 2 for Alarm 2. 5. After setting the radio alarm time, while the display is still flashing, press the 9 Date/7-5-2 Button until the Alarm 2 settings and Sounds Alarm Indicator appear on setting the 7-5-2 ...alarm setting for Nature Sounds/Buzzer 1. First, press the L Mode/DST Button to . After setting the radio alarm wake time and sound, you will need to select the station. The alarms can be operated independently. The display will flash and the Radio Alarm...
Operation Manual
Page 9
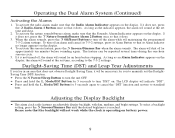
... necessary for you live in an area that the Sounds Alarm Indicator appears on battery power. 9 Daylight-Saving Time (DST) and Leap Year Adjustments If you to manually set the DaylightSaving Time (DST) function. • Press the N Power/Sleep Button to the 7-5-2 settings. If it does not...shut off the alarm while still maintaining the programmed 7-5-2 alarm settings. When the alarm sounds, press the 3 Off/Reset Button to standard time. The alarm will sound for approximately ten minutes before stopping. As long as an Alarm Indicator appears on the display. 4. To turn off...
... necessary for you live in an area that the Sounds Alarm Indicator appears on battery power. 9 Daylight-Saving Time (DST) and Leap Year Adjustments If you to manually set the DaylightSaving Time (DST) function. • Press the N Power/Sleep Button to the 7-5-2 settings. If it does not...shut off the alarm while still maintaining the programmed 7-5-2 alarm settings. When the alarm sounds, press the 3 Off/Reset Button to standard time. The alarm will sound for approximately ten minutes before stopping. As long as an Alarm Indicator appears on the display. 4. To turn off...
Operation Manual
Page 11
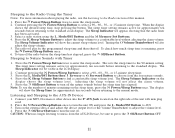
...the AUX-IN Device, be visible in the LCD display. 2. Press the 3 Off/Reset Button to turn off the nature sounds before the sleep time has elapsed, press the 3 Off/Reset Button. Continue pressing the N Power/Sleep Button to a comfortable level without affecting the alarm volume. Press the... K Sleep Volume Button to adjust the sleep volume to select a 90-, 60-, 30-, or 15-minute sleep time. Adjusting the sleep volume will appear, showing that the radio timer has been activated. 3. Continue pressing the N Power/Sleep Button to adjust the ...
...the AUX-IN Device, be visible in the LCD display. 2. Press the 3 Off/Reset Button to turn off the nature sounds before the sleep time has elapsed, press the 3 Off/Reset Button. Continue pressing the N Power/Sleep Button to a comfortable level without affecting the alarm volume. Press the... K Sleep Volume Button to adjust the sleep volume to select a 90-, 60-, 30-, or 15-minute sleep time. Adjusting the sleep volume will appear, showing that the radio timer has been activated. 3. Continue pressing the N Power/Sleep Button to adjust the ...


