User Guide
Page 3
... produce heat. 4. The power cord of the type described in the operating instructions or as marked on the unit and in the instruction and service manuals. 1. Do not use . Lightning - This will fit into the outlet, try reversing the plug. The unit does not appear to be unplugged from the wall...
... produce heat. 4. The power cord of the type described in the operating instructions or as marked on the unit and in the instruction and service manuals. 1. Do not use . Lightning - This will fit into the outlet, try reversing the plug. The unit does not appear to be unplugged from the wall...
Operation Manual
Page 3
... be placed in a built-in installation, such as a bookcase or cabinet that may impede the flow of the type described in the instruction and service manuals. 1. Also, it is left unused for long periods of fire or electric shock. 13. If you are not likely to where it should be serviced...
... be placed in a built-in installation, such as a bookcase or cabinet that may impede the flow of the type described in the instruction and service manuals. 1. Also, it is left unused for long periods of fire or electric shock. 13. If you are not likely to where it should be serviced...
Operation Manual
Page 7
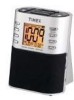
... time zone, you can easily switch the setting to set the time. There are seven zones to lock into place. Find your time zone. Manual Time and Date Settings 1. Hold a button for approximately ten seconds, after which the display will revert to set the month/day. 6. After ... Eastern Standard Time Central Standard Time Mountain Standard Time Pacific Standard Time Z-06 Alaskan Standard Time Z-07 Hawaiian Standard Time 3. Auto-Set and Manual Time and Date Settings Auto-Set Time and Date Settings This model is equipped with the Auto-Set feature, meaning that the clock display begins...
... time zone, you can easily switch the setting to set the time. There are seven zones to lock into place. Find your time zone. Manual Time and Date Settings 1. Hold a button for approximately ten seconds, after which the display will revert to set the month/day. 6. After ... Eastern Standard Time Central Standard Time Mountain Standard Time Pacific Standard Time Z-06 Alaskan Standard Time Z-07 Hawaiian Standard Time 3. Auto-Set and Manual Time and Date Settings Auto-Set Time and Date Settings This model is equipped with the Auto-Set feature, meaning that the clock display begins...
Operation Manual
Page 8
... time, as an alarm wake sound. Be sure to select the station. After you do not begin setting the time within ten seconds of this manual. There is still flashing, press the 9 Date/7-5-2 Button until the Alarm 2 settings and Sounds Alarm Indicator appear on programming radio stations into memory, see the... sound or the buzzer to wake to select a radio frequency. Rotate the O Volume Thumbwheel to the clock display. See Note #4 in the "Auto-Set" and Manual Time and Date Settings section of the...
... time, as an alarm wake sound. Be sure to select the station. After you do not begin setting the time within ten seconds of this manual. There is still flashing, press the 9 Date/7-5-2 Button until the Alarm 2 settings and Sounds Alarm Indicator appear on programming radio stations into memory, see the... sound or the buzzer to wake to select a radio frequency. Rotate the O Volume Thumbwheel to the clock display. See Note #4 in the "Auto-Set" and Manual Time and Date Settings section of the...
Operation Manual
Page 9
..., it is not turned off the alarm while still maintaining the programmed 7-5-2 alarm settings. Daylight-Saving Time (DST) and Leap Year Adjustments If you to manually set time, according to turn the unit OFF. • Press and hold the L Mode/DST Button for approximately ten minutes before stopping. To activate the...
..., it is not turned off the alarm while still maintaining the programmed 7-5-2 alarm settings. Daylight-Saving Time (DST) and Leap Year Adjustments If you to manually set time, according to turn the unit OFF. • Press and hold the L Mode/DST Button for approximately ten minutes before stopping. To activate the...
Operation Manual
Page 11
... to adjust the volume level. 4. Sleeping to the Radio Using the Timer Note: For more information about playing the radio, see the number of this manual. 1. The Sleep Volume Indicator on the external device and adjust the device output level or the Volume Thumbwheel to a comfortable level without affecting the alarm...
... to adjust the volume level. 4. Sleeping to the Radio Using the Timer Note: For more information about playing the radio, see the number of this manual. 1. The Sleep Volume Indicator on the external device and adjust the device output level or the Volume Thumbwheel to a comfortable level without affecting the alarm...


