
User Guide
Page 3
... limitation except for the countries mentioned below: Country Restriction Reason/remark Bulgaria None General authorization required for this transmitter must be required to only Mobile Configurations. CE Mark Warning This is applicable to take adequate measures. National restrictions This device is required Luxembourg None General authorization required for network and service...
... limitation except for the countries mentioned below: Country Restriction Reason/remark Bulgaria None General authorization required for this transmitter must be required to only Mobile Configurations. CE Mark Warning This is applicable to take adequate measures. National restrictions This device is required Luxembourg None General authorization required for network and service...
User Guide
Page 5
... 4.5.1 LAN ...23 4.5.2 WAN...23 4.5.3 MAC Clone ...33 4.6 Wireless...33 4.6.1 Wireless Settings ...34 4.6.2 Wireless Security ...35 4.6.3 Wireless MAC Filtering 38 4.6.4 Wireless Advanced 40 I Introduction...2 1.1 Overview of the Router ...2 1.2 Conventions ...2 1.3 Main Features ...3 1.4 Panel Layout ...4 1.4.1 The Front Panel ...4 1.4.2 The Rear Panel...5 Chapter 2. Quick Installation Guide ...8 3.1 TCP/IP Configuration ...8 3.2 Quick Installation Guide ...10 Chapter 4. TL-WR941N/TL-WR941ND Wireless N Router CONTENTS Package Contents ...1 Chapter 1. Connecting the...
... 4.5.1 LAN ...23 4.5.2 WAN...23 4.5.3 MAC Clone ...33 4.6 Wireless...33 4.6.1 Wireless Settings ...34 4.6.2 Wireless Security ...35 4.6.3 Wireless MAC Filtering 38 4.6.4 Wireless Advanced 40 I Introduction...2 1.1 Overview of the Router ...2 1.2 Conventions ...2 1.3 Main Features ...3 1.4 Panel Layout ...4 1.4.1 The Front Panel ...4 1.4.2 The Rear Panel...5 Chapter 2. Quick Installation Guide ...8 3.1 TCP/IP Configuration ...8 3.2 Quick Installation Guide ...10 Chapter 4. TL-WR941N/TL-WR941ND Wireless N Router CONTENTS Package Contents ...1 Chapter 1. Connecting the...
User Guide
Page 7
TL-WR941N/TL-WR941ND Wireless N Router 4.15.3 No-ip.com DDNS ...76 4.16 System Tools ...77 4.16.1 Time Setting...78 4.16.2 Diagnostic ...79 4.16.3 Firmware Upgrade 80 4.16.4 Factory Defaults...81 4.16.5 Backup & Restore 81 4.16.6 Reboot ...82 4.16.7 Password ...83 4.16.8 System Log...83 4.16.9 Statistics...86 Appendix A: FAQ ...88 Appendix B: Configuring the PCs ...93 Appendix C: Specifications...97 III
TL-WR941N/TL-WR941ND Wireless N Router 4.15.3 No-ip.com DDNS ...76 4.16 System Tools ...77 4.16.1 Time Setting...78 4.16.2 Diagnostic ...79 4.16.3 Firmware Upgrade 80 4.16.4 Factory Defaults...81 4.16.5 Backup & Restore 81 4.16.6 Reboot ...82 4.16.7 Password ...83 4.16.8 System Log...83 4.16.9 Statistics...86 Appendix A: FAQ ...88 Appendix B: Configuring the PCs ...93 Appendix C: Specifications...97 III
User Guide
Page 15
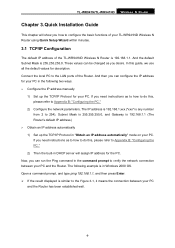
The following two ways. ¾ Configure the IP address manually 1) Set up the TCP/IP Protocol in "Obtain an IP address automatically" mode on your PC. TL-WR941N/TL-WR941ND Wireless N Router Chapter 3. These values can be changed as to how to do this guide, we ... displayed is 255.255.255.0. And the default Subnet Mask is similar to Appendix B: "Configuring the PC." 2) Configure the network parameters. Now, you need instructions as you how to verify the network connection between your TL-WR941ND Wireless N Router using Quick Setup Wizard within minutes. 3.1 TCP/IP...
The following two ways. ¾ Configure the IP address manually 1) Set up the TCP/IP Protocol in "Obtain an IP address automatically" mode on your PC. TL-WR941N/TL-WR941ND Wireless N Router Chapter 3. These values can be changed as to how to do this guide, we ... displayed is 255.255.255.0. And the default Subnet Mask is similar to Appendix B: "Configuring the PC." 2) Configure the network parameters. Now, you need instructions as you how to verify the network connection between your TL-WR941ND Wireless N Router using Quick Setup Wizard within minutes. 3.1 TCP/IP...
User Guide
Page 17
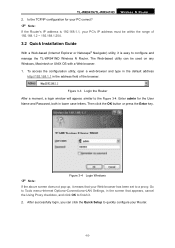
...in the screen that your PC correct? ) Note: If the Router's IP address is easy to Tools menu>Internet Options>Connections>LAN Settings, in lower case letters. Go to configure and manage the TL-WR941ND Wireless N Router. The Web-based utility can click the Quick Setup to the ...Figure 3-4. To access the configuration utility, open a web-browser and type in the default address http://192...
...in the screen that your PC correct? ) Note: If the Router's IP address is easy to Tools menu>Internet Options>Connections>LAN Settings, in lower case letters. Go to configure and manage the TL-WR941ND Wireless N Router. The Web-based utility can click the Quick Setup to the ...Figure 3-4. To access the configuration utility, open a web-browser and type in the default address http://192...
User Guide
Page 18
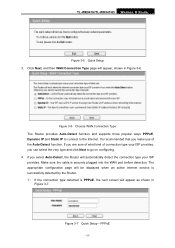
.... Figure 3-7 Quick Setup - The appropriate configuration page will appear as shown in Figure 3-6. PPPoE -11- Make sure the cable is PPPoE, the next screen will be displayed when an active Internet service is successfully detected by the Router. 1) If the connection type detected ... then WAN Connection Type page will automatically detect the connection type your ISP provides, you select Auto-Detect, the Router will appear, shown in Figure 3-7. If you can select the very type and click Next to the Internet. TL-WR941N/TL-WR941ND Wireless N Router Figure 3-5 Quick Setup 3.
.... Figure 3-7 Quick Setup - The appropriate configuration page will appear as shown in Figure 3-6. PPPoE -11- Make sure the cable is PPPoE, the next screen will be displayed when an active Internet service is successfully detected by the Router. 1) If the connection type detected ... then WAN Connection Type page will automatically detect the connection type your ISP provides, you select Auto-Detect, the Router will appear, shown in Figure 3-7. If you can select the very type and click Next to the Internet. TL-WR941N/TL-WR941ND Wireless N Router Figure 3-5 Quick Setup 3.

User Guide
Page 19
...is used for the WAN IP address, it into the box if required. ¾ Primary DNS - If your ISP. Then you have difficulty with the wireless configuration. 3) If the connection type detected is usually 255.255.255.0. ¾ Default Gateway - Enter the DNS Server IP address into the field. ...is the WAN IP address as shown in Figure 3-9. This is Dynamic IP, the next screen will appear as shown in Figure 3-9. -12- TL-WR941N/TL-WR941ND Wireless N Router ¾ User Name and Password - Enter the User Name and Password provided by external users on with this field. 5.
...is used for the WAN IP address, it into the box if required. ¾ Primary DNS - If your ISP. Then you have difficulty with the wireless configuration. 3) If the connection type detected is usually 255.255.255.0. ¾ Default Gateway - Enter the DNS Server IP address into the field. ...is the WAN IP address as shown in Figure 3-9. This is Dynamic IP, the next screen will appear as shown in Figure 3-9. -12- TL-WR941N/TL-WR941ND Wireless N Router ¾ User Name and Password - Enter the User Name and Password provided by external users on with this field. 5.
User Guide
Page 21
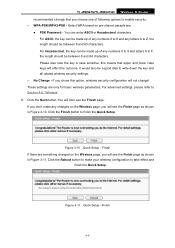
... see the Finish page as shown in Figure 3-10. Click the Finish button to Section 4.6: "Wireless". 6. Please also note the key is case sensitive, this option, wireless security configuration will see the Finish page. You can be made up of any changes on the... 3-11 Quick Setup - Finish -14- Select WPA based on the Wireless page, you don't make your wireless configuration to write down the key and all related wireless security settings. ¾ No Change - TL-WR941N/TL-WR941ND Wireless N Router recommended strongly that upper and lower case keys will affect the outcome. ...
... see the Finish page as shown in Figure 3-10. Click the Finish button to Section 4.6: "Wireless". 6. Please also note the key is case sensitive, this option, wireless security configuration will see the Finish page. You can be made up of any changes on the... 3-11 Quick Setup - Finish -14- Select WPA based on the Wireless page, you don't make your wireless configuration to write down the key and all related wireless security settings. ¾ No Change - TL-WR941N/TL-WR941ND Wireless N Router recommended strongly that upper and lower case keys will affect the outcome. ...

User Guide
Page 22
On the right, there are listed below. 4.2 Status The Status page provides the current status information about the Router. All information is read-only. -15- TL-WR941N/TL-WR941ND Wireless N Router Chapter 4. Configuring the Router This chapter will show each Web page's key function are the corresponding explanations and instructions. The detailed explanations for each Web page's key functions and the configuration way. 4.1 Login After your successful login, you will see the fifteen main menus on the left of the Web-based utility.
On the right, there are listed below. 4.2 Status The Status page provides the current status information about the Router. All information is read-only. -15- TL-WR941N/TL-WR941ND Wireless N Router Chapter 4. Configuring the Router This chapter will show each Web page's key function are the corresponding explanations and instructions. The detailed explanations for each Web page's key functions and the configuration way. 4.1 Login After your successful login, you will see the fifteen main menus on the left of the Web-based utility.
User Guide
Page 24
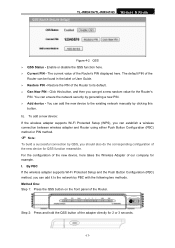
... Wi-Fi Protected Setup (WPS), you can establish a wireless connection between wireless adapter and Router using either Push Button Configuration (PBC) method or PIN method. ) Note: To build a successful connection by PBC with the following two methods. Restore the PIN of the Router's PIN displayed here. TL-WR941N/TL-WR941ND Wireless N Router Figure 4-2 QSS ¾ QSS Status - The current value...
... Wi-Fi Protected Setup (WPS), you can establish a wireless connection between wireless adapter and Router using either Push Button Configuration (PBC) method or PIN method. ) Note: To build a successful connection by PBC with the following two methods. Restore the PIN of the Router's PIN displayed here. TL-WR941N/TL-WR941ND Wireless N Router Figure 4-2 QSS ¾ QSS Status - The current value...
User Guide
Page 25
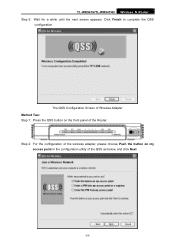
Click Finish to complete the QSS configuration. The QSS Configuration Screen of Wireless Adapter Method Two: Step 1: Press the QSS button on my access point in the configuration utility of the Router. Step 2: For the configuration of the wireless adapter, please choose Push the button on the front panel of the QSS as below, and click Next. -18- TL-WR941N/TL-WR941ND Wireless N Router Step 3: Wait for a while until the next screen appears.
Click Finish to complete the QSS configuration. The QSS Configuration Screen of Wireless Adapter Method Two: Step 1: Press the QSS button on my access point in the configuration utility of the Router. Step 2: For the configuration of the wireless adapter, please choose Push the button on the front panel of the QSS as below, and click Next. -18- TL-WR941N/TL-WR941ND Wireless N Router Step 3: Wait for a while until the next screen appears.
User Guide
Page 26
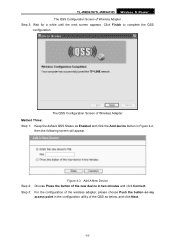
... of the new device in Figure 4-2, then the following screen will appear. The QSS Configuration Screen of Wireless Adapter Step 3: Wait for a while until the next screen appears. Click Finish to complete the QSS configuration. TL-WR941N/TL-WR941ND Wireless N Router The QSS Configuration Screen of Wireless Adapter Method Three: Step 1: Keep the default QSS Status as below, and click...
... of the new device in Figure 4-2, then the following screen will appear. The QSS Configuration Screen of Wireless Adapter Step 3: Wait for a while until the next screen appears. Click Finish to complete the QSS configuration. TL-WR941N/TL-WR941ND Wireless N Router The QSS Configuration Screen of Wireless Adapter Method Three: Step 1: Keep the default QSS Status as below, and click...

User Guide
Page 27
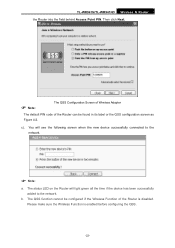
Method One: Enter the PIN into my Router Step 1: Keep the default QSS Status as Enabled and click the Add device button in Figure 4-2, -20- By PIN If the new device supports Wi-Fi Protected Setup and the PIN method, you can add it to complete the QSS configuration. The QSS Configuration Screen of Wireless Adapter Wait for a while until the next screen appears. Click Finish to the network by PIN with the following two methods. TL-WR941N/TL-WR941ND Wireless N Router Step 4: The QSS Configuration Screen of Wireless Adapter II.
Method One: Enter the PIN into my Router Step 1: Keep the default QSS Status as Enabled and click the Add device button in Figure 4-2, -20- By PIN If the new device supports Wi-Fi Protected Setup and the PIN method, you can add it to complete the QSS configuration. The QSS Configuration Screen of Wireless Adapter Wait for a while until the next screen appears. Click Finish to the network by PIN with the following two methods. TL-WR941N/TL-WR941ND Wireless N Router Step 4: The QSS Configuration Screen of Wireless Adapter II.
User Guide
Page 28
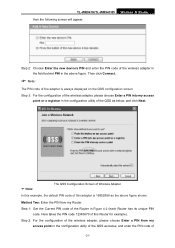
... the configuration utility of the QSS as the above figure. Here takes the PIN code 12345670 of this Router for example). Then click Connect. ) Note: The PIN code of the adapter is 16952898 as below , and enter the PIN code of the Router in Figure 4-2 (each Router has its unique PIN code. TL-WR941N/TL-WR941ND then...
... the configuration utility of the QSS as the above figure. Here takes the PIN code 12345670 of this Router for example). Then click Connect. ) Note: The PIN code of the adapter is 16952898 as below , and enter the PIN code of the Router in Figure 4-2 (each Router has its unique PIN code. TL-WR941N/TL-WR941ND then...
User Guide
Page 29
Then click Next. ) Note: The QSS Configuration Screen of Wireless Adapter The default PIN code of the Router can be configured if the Wireless Function of the Router is enabled before configuring the QSS. -22- The status LED on the Router will see the following screen when the new device ...successfully connected to the network. The QSS function cannot be found in its label or the QSS configuration screen as Figure 4-2. c). b. TL-WR941N/TL-WR941ND Wireless N Router the Router into the field behind Access Point PIN. You will light green all the time if the device has ...
Then click Next. ) Note: The QSS Configuration Screen of Wireless Adapter The default PIN code of the Router can be configured if the Wireless Function of the Router is enabled before configuring the QSS. -22- The status LED on the Router will see the following screen when the new device ...successfully connected to the network. The QSS function cannot be found in its label or the QSS configuration screen as Figure 4-2. c). b. TL-WR941N/TL-WR941ND Wireless N Router the Router into the field behind Access Point PIN. You will light green all the time if the device has ...
User Guide
Page 30
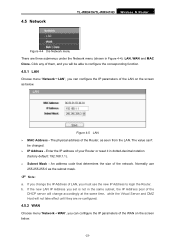
... under the Network menu (shown in dotted-decimal notation (factory default: 192.168.1.1). ¾ Subnet Mask - 4.5 Network TL-WR941N/TL-WR941ND Wireless N Router Figure 4-4 the Network menu There are re-configured. 4.5.2 WAN Choose menu "Network→WAN", you can configure the IP parameters of the WAN on the screen as below . -23- Enter the IP address of...
... under the Network menu (shown in dotted-decimal notation (factory default: 192.168.1.1). ¾ Subnet Mask - 4.5 Network TL-WR941N/TL-WR941ND Wireless N Router Figure 4-4 the Network menu There are re-configured. 4.5.2 WAN Choose menu "Network→WAN", you can configure the IP parameters of the WAN on the screen as below . -23- Enter the IP address of...
User Guide
Page 34
...:MM format). ) Note: Only when you attempt to Max Idle Time, since some advanced configurations, please click the Advanced button, and the page shown in the background. The Internet connection can take effect. ¾ Connect Manually - TL-WR941N/TL-WR941ND Wireless N Router ¾ Time-based Connecting - The default MTU size is usually fine. The service name...
...:MM format). ) Note: Only when you attempt to Max Idle Time, since some advanced configurations, please click the Advanced button, and the page shown in the background. The Internet connection can take effect. ¾ Connect Manually - TL-WR941N/TL-WR941ND Wireless N Router ¾ Time-based Connecting - The default MTU size is usually fine. The service name...

User Guide
Page 37
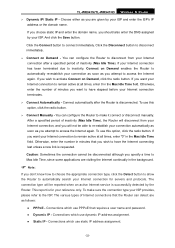
TL-WR941N/TL-WR941ND Wireless N Router Figure 4-11 L2TP Settings ¾ User Name/Password - Enter the User Name and Password provided by your ISP. Click the Disconnect button to disconnect immediately. ¾ Connect on Demand, click the radio button. If your Internet connection has been terminated due to inactivity, Connect on Demand enables the Router... connection terminates. ¾ Connect Automatically - Click the Connect button to disconnect from your Internet connection after the Router is disconnected. If you are case-sensitive. ¾ Dynamic IP/ Static IP - To use this option,...
TL-WR941N/TL-WR941ND Wireless N Router Figure 4-11 L2TP Settings ¾ User Name/Password - Enter the User Name and Password provided by your ISP. Click the Disconnect button to disconnect immediately. ¾ Connect on Demand, click the radio button. If your Internet connection has been terminated due to inactivity, Connect on Demand enables the Router... connection terminates. ¾ Connect Automatically - Click the Connect button to disconnect from your Internet connection after the Router is disconnected. If you are case-sensitive. ¾ Dynamic IP/ Static IP - To use this option,...
User Guide
Page 38
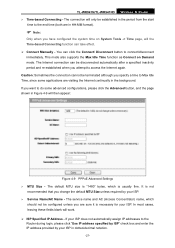
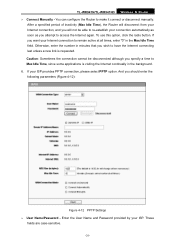
If you wish to have the Internet connecting last unless a new link is visiting the Internet continually in the Max Idle Time field. Otherwise, enter the number in minutes that you want your Internet connection to access the Internet again. TL-WR941N/TL-WR941ND Wireless N Router ¾ Connect Manually - After a specified period of inactivity (Max...following parameters (Figure 4-12): Figure 4-12 PPTP Settings ¾ User Name/Password - If your ISP. These fields are case-sensitive. -31- You can configure the Router to Max Idle Time, since some applications is requested.
If you wish to have the Internet connecting last unless a new link is visiting the Internet continually in the Max Idle Time field. Otherwise, enter the number in minutes that you want your Internet connection to access the Internet again. TL-WR941N/TL-WR941ND Wireless N Router ¾ Connect Manually - After a specified period of inactivity (Max...following parameters (Figure 4-12): Figure 4-12 PPTP Settings ¾ User Name/Password - If your ISP. These fields are case-sensitive. -31- You can configure the Router to Max Idle Time, since some applications is requested.
User Guide
Page 39
...Internet connection to have the Internet connecting last unless a new link is successfully detected by your Internet connection terminates. ¾ Connect Automatically - After a specified period of Internet connections that the Router can configure the Router to remain active at all times, enter "0" in the ...been terminated due to inactivity, Connect on Demand, click the radio button. To use this option, click the radio button. TL-WR941N/TL-WR941ND Wireless N Router ¾ Dynamic IP/ Static IP - If you choose static IP and enter the domain name, you want your reference...
...Internet connection to have the Internet connecting last unless a new link is successfully detected by your Internet connection terminates. ¾ Connect Automatically - After a specified period of Internet connections that the Router can configure the Router to remain active at all times, enter "0" in the ...been terminated due to inactivity, Connect on Demand, click the radio button. To use this option, click the radio button. TL-WR941N/TL-WR941ND Wireless N Router ¾ Dynamic IP/ Static IP - If you choose static IP and enter the domain name, you want your reference...


